
Related Manuals for Dog trace d-control professional 1000 ONE


Summary of Contents for Dog trace d-control professional 1000 ONE
- Page 1 d-control professional 1000 2000 Elektronisches Erziehungshalsband Electronic training collar Collare elettronico di addestramento Collier électronique de dressage Elektronische trainingshalsband...
- Page 2 Before using your product, please read the instructions in this user guide carefully and keep it for future reference. VNT electronics s.r.o., hereby declares that the Dogtrace electronic training collar d-control professional 1000 ONE and professional 2000 ONE complies with the basic requirements and further relevant regulations of directive 2014/53/EC.
-
Page 3: Table Of Contents
CONTENTS 2 Important notice . . . . . . . . . . . . . . . . . . . . . . . . . . . . . . . . . . . . . . . . . . . . . . . . . . . . . . 23 3 ECMA . -
Page 4: Important Notice
IMPORTANT NOTICE The electronic training collars d-control are intended only to train animals. They are not intended to harm, injure or to cause fear. Do not use the electronic training collars for dogs with health problems (e.g. heart disease, epilepsy, etc.) or for dogs with behavioral disorders (aggressive dogs etc). The collar should never be worn for more than 12 hours a day. -
Page 5: Introduction
However, making corrections to your dog’s unwanted behaviour is only a small part of what you can do with the d-control. Features of d-control professional 1000 ONE / 2000 ONE The electronic training collar d-control professional is variable and impact resistant device. -
Page 6: Optional Accessories
4.2 Optional accessories Dummy receiver (with the strap) Spare batteries and accumulator Spare screws Spare rubber seal for the transmitter and the receiver Spare contact points (7 and 10 mm) Woven and plastic collars – various colours PRODUCT DESCRIPTION 5.1 Transmitter 1. -
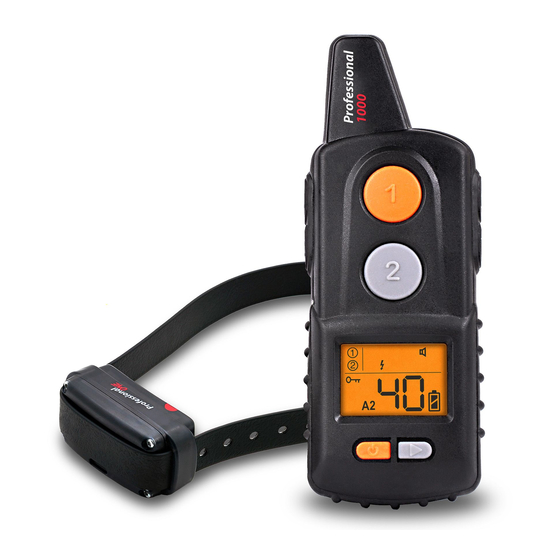
Page 7: Receiver
Display 1. Command indicator of function buttons A1 or B1 2. Command indicator of function buttons A2 or B2 3. Transmission indicator 4. Current button setup indication 5. Battery power indicator 6. Indicator of mode or stimulation level 7. Locking of selected function and command 5.2 Receiver 1. -
Page 8: Transmitter Preparation
TRANSMITTER PREPARATION 6.1 Battery insertion and replacement 1. Screw out 4 screws from the battery cover using a cross-head screwdriver and remove the lid. 2. Insert two alkaline AAA batteries into the battery compartment with a correct polarity (according to the polarity indicated with the “+” symbol in the battery compartment). -
Page 9: Receiver Preparation
RECEIVER PREPARATION 7.1 Battery charging d-control professional receiver contains the Li-Pol accumulator. The accumulator of the unit must be charged before using the unit for the first time. 1. Connect the supply cable and the clip to the receiver (see picture) 2. -
Page 10: Pairing The Receiver With The Transmitter
2. When the green LED lighted up, move your transmitter away from the receiver. The receiver LED indicator will flash green to indicate the receiver is ON. Switching OFF When switching OFF, follow the same steps as when switching ON. 1. -
Page 11: Choice Of The Contact Points
Pairing (programming) function buttons A1/A2 with the first receiver 1. Turn ON your transmitter. 2. The receiver must be turned OFF. 3. Move the red target of the transmitter towards the receiver so it comes into the contact with the red target of the receiver and hold for 5 seconds. The red LED indicator of the receiver will lit up, afterwards the green LED indicator will lit up. -
Page 12: Fitting The Training Collar
the picture 5.2 Receiver in the chapter 5 Product description, page 26. Tighten them manually carefully (do not use a pliers – this could damage the product). TIP: When your dog has a dry skin in the area where the contact points are, it is good to lubricate the dog‘s skin with a vaseline, hand cream, or baby oil - which enables a correct transfer of stimulation impulses. -
Page 13: The Basics Of Training Collar Usage
THE BASICS OF TRAINING COLLAR USAGE The trainer’s elementary knowledge of the dog training is the prerequisite for using the training collar. If you don´t have this knowledge, we recommend you to contact a training center, a cynology club, or a school for dogs where you will learn the basic communication with your dog. - Page 14 − Momentary / continuous stimulation: This function enables you to activate a safe stimulation warning impulses in the receiver transmitted by two contact points. The purpose of stimulation impulses is not to hurt the dog, but this impulse is very unpleasant for your dog. Your dog will soon create a connection between your command, an audible beep tone and the unpleasant feeling on the neck.
- Page 15 Lichtfunktion: For an easy localization of your dog in the dark, this function provides several modes of LED light. The LED - diodes are placed in the transparent receiver housing of the collar. The transmitter also allows you to set a different interval of flashing when using two collars at the same time - you can easily spot your dogs according to the flashing interval (example: a dog A - flashes once in a second and a dog B - flashes once in two seconds).
-
Page 16: For The Best Results
FOR THE BEST RESULTS 9.1 Maximum transmitter range The training collar d-control professional 1000 ONE / 2000 ONE can be used up to 1000 m or 2000 m working range. The maximum range depends on many factors - weather, terrain, vegetation and so on. -
Page 17: Troubleshooting
TROUBLESHOOTING 1. Read again this user guide and make sure the problem is not caused by a flat battery or incorrect use. 2. Make sure the batteries in transmitter are inserted with the correct polarity. 3. The accumulator is weak if the light function does not work - charge the accumulator. -
Page 18: Maintenance
MAINTENANCE It is important to keep the device clean. Never use volatile substances eg.: thinner, gasoline or other cleaners. To clean your Dogtrace d-control use a soft, damp cloth and, if necessary, neutral detergent. The transmitter and the receiver (collar) Dogtrace d-control professional is waterproof only on condition of the good state of the seal. -
Page 19: Warranty Terms And Conditions
WARRANTY TERMS AND CONDITIONS VNT electronics s .r .o . provides a 2 year warranty on the Dogtrace products with respect to defects in material and workmanship under normal use and service from the date of the original purchase. The limited warranty does not cover the following: accumulators straps direct or indirect risks during transportation of the product to the retailer...
Need help?
Do you have a question about the d-control professional 1000 ONE and is the answer not in the manual?
Questions and answers
Здравствуйте.На экране рессивера горит символ ключ.Как разблокровать рессивер
To unlock the Dog Trace Professional 1000 ONE receiver when the key symbol is displayed on the screen, press and hold the button you used to lock it for a long time.
This answer is automatically generated