
Related Manuals for Huawei ETP48400-C9A2


Summary of Contents for Huawei ETP48400-C9A2
- Page 1 ETP48400-C9A2 Embedded Power User Manual Issue Date 2020-04-07 HUAWEI TECHNOLOGIES CO., LTD.
- Page 2 Notice The purchased products, services and features are stipulated by the contract made between Huawei and the customer. All or part of the products, services and features described in this document may not be within the purchase scope or the usage scope. Unless otherwise specified in the contract, all statements, information, and recommendations in this document are provided "AS IS"...
-
Page 3: About This Document
NOTICE is used to address practices not related to personal injury. Supplements the important information in the main text. NOTE is used to address information not related to personal Issue 05 (2020-04-07) Copyright © Huawei Technologies Co., Ltd. - Page 4 Chapter 4 Installation Modified 4.1.4 Rules for Removing a Protective Panel. Chapter 6 Commissioning Modified 6.7.1 (Optional) Setting Parameters Before Using WebUI. Issue 01 (2015-01-26) This issue is the first official release. Issue 05 (2020-04-07) Copyright © Huawei Technologies Co., Ltd.
-
Page 5: Table Of Contents
2.1 Introduction ................................15 2.2 Model Number Description...........................15 2.3 System Features ..............................15 2.4 System Configurations............................16 3 Components ..........................17 3.1 Power Subrack ETP48400-C9A2 ..........................17 3.2 Rectifier ................................19 3.3 SMU02B ................................20 3.4 UIM02C ................................23 4 Installation ..........................27 4.1 Installation Preparations ............................27 4.1.1 Tools .................................27... - Page 6 7.2.10 High Amb. Temp.............................62 7.2.11 Low Amb. Temp..............................62 7.2.12 High Amb. Humi.............................62 7.2.13 Low Ambient Humidity ...........................63 7.2.14 Batt. High Temp...............................63 7.2.15 Batt. Low Temp...............................64 7.2.16 Door Alarm ..............................64 Issue 05 (2020-04-07) Copyright © Huawei Technologies Co., Ltd.
- Page 7 7.4.5 Replacing a Circuit Breaker ..........................73 A Technical Specifications ....................... 75 B Electrical Schematic Diagram ....................78 C Associations Between Alarms and Dry Contacts on the UIM ......... 79 D Acronyms and Abbreviations....................80 Issue 05 (2020-04-07) Copyright © Huawei Technologies Co., Ltd.
-
Page 8: Safety Precautions
The "NOTICE", "CAUTION", "WARNING", and "DANGER" statements in this document do not cover all the safety instructions. They are only supplements to the safety instructions. Huawei will not be liable for any consequence caused by the violation of general safety requirements or design, production, and usage safety standards. - Page 9 Before installing, operating, or maintaining a cabinet, clean up any water, ice, snow, or other sundries on the top of the cabinet to prevent sundries from falling into the cabinet when you open the cabinet door. Issue 05 (2020-04-07) Copyright © Huawei Technologies Co., Ltd.
- Page 10 To avoid electric shock, do not connect safety extra-low voltage (SELV) circuits to telecommunication network voltage (TNV) circuits. Do not power on the equipment before it is installed or confirmed by professionals. Issue 05 (2020-04-07) Copyright © Huawei Technologies Co., Ltd.
- Page 11 2. If there are multiple output ports, use the symbol near the output ports. Connect cables according to the rated power output and configuration parameter information in the instruction. 3. If there are multiple slots, use the symbol near the slot Issue 05 (2020-04-07) Copyright © Huawei Technologies Co., Ltd.
-
Page 12: Personnel Requirements
1.2 Personnel Requirements Personnel who plan to install or maintain Huawei equipment must receive thorough training, understand all necessary safety precautions, and be able to correctly perform all operations. ... - Page 13 When holding a board, hold its edge without touching any components. Do not touch the components with your bare hands. Package boards with ESD packaging materials before storing or transporting them. Issue 05 (2020-04-07) Copyright © Huawei Technologies Co., Ltd.
-
Page 14: Installation Environment Requirements
Do not mount it on an insecure moveable object or metal object with sharp edges. Make sure that the hooks will not slide off. Issue 05 (2020-04-07) Copyright © Huawei Technologies Co., Ltd. -
Page 15: Mechanical Safety
Before hoisting objects, ensure that hoisting tools are firmly secured onto a load-bearing object or wall. Ensure that the angle formed by two hoisting cables is no more than 90 degrees, as shown in the following figure. Issue 05 (2020-04-07) Copyright © Huawei Technologies Co., Ltd. - Page 16 75 degrees, as shown in the following figure. An angle rule can be used to measure the angle. When climbing a ladder, take the following precautions to reduce risks and ensure safety: Issue 05 (2020-04-07) Copyright © Huawei Technologies Co., Ltd.
- Page 17 Moving Heavy Objects Be cautious to avoid injury when moving heavy objects. When moving the equipment by hand, wear protective gloves to prevent injuries. Issue 05 (2020-04-07) Copyright © Huawei Technologies Co., Ltd.
-
Page 18: Battery Safety
Dispose of waste batteries in accordance with local laws and regulations. Do not dispose of batteries as household waste. If a battery is disposed of improperly, it may explode. Issue 05 (2020-04-07) Copyright © Huawei Technologies Co., Ltd. - Page 19 If permitted, disconnect the batteries in use before performing any other operations. To avoid battery short-circuit, do not maintain batteries with power on. Flammable Gas Issue 05 (2020-04-07) Copyright © Huawei Technologies Co., Ltd.
- Page 20 When the ambient temperature is lower than the lower limit of the operating temperature (charge is forbidden at 0° C), do not charge the battery. Otherwise, a short circuit would occur inside the battery. Do not throw a lithium battery in fire. Issue 05 (2020-04-07) Copyright © Huawei Technologies Co., Ltd.
- Page 21 ETP48400-C9A2 Embedded Power User Manual 1 Safety Precautions When maintenance is complete, return the waste lithium battery to the maintenance office. Issue 05 (2020-04-07) Copyright © Huawei Technologies Co., Ltd.
-
Page 22: Overview
User Manual 2 Overview Overview 2.1 Introduction ETP48400-C9A2 is embedded telecom power system that supplies power to -48 V DC communications equipment with a maximum current of 400 A. 2.2 Model Number Description Figure 2-1 shows the model number description for the ETP48400-C9A2. -
Page 23: System Configurations
A maximum of six lead-acid battery strings are supported in lead-acid battery scenario. A maximum of nine lithium battery strings are supported in lithium battery scenario. 2.4 System Configurations Table 2-1 describes configurations of the ETP48400-C9A2. Table 2-1 ETP48400-C9A2 configurations Item Configurations ... -
Page 24: Components
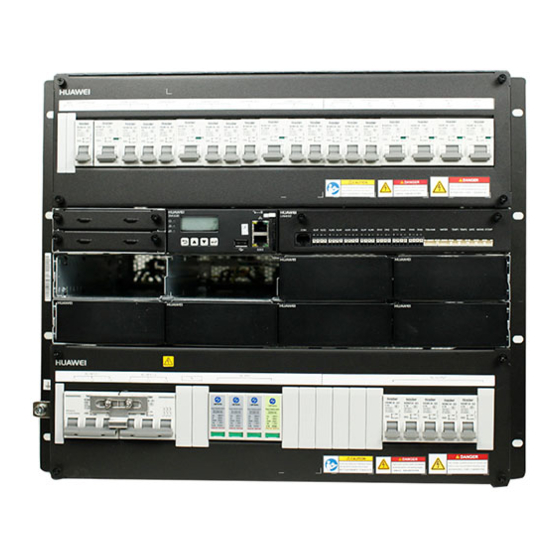
(1) DC PDU (2) SMU02B (3) Space for rectifiers (4) AC PDU (5) Ground screw (6) UIM02C Before delivery, the RTN+ busbar is short-circuited with the subrack PE terminal by default. Issue 05 (2020-04-07) Copyright © Huawei Technologies Co., Ltd. - Page 25 BLVD route: two 1-pole 63 A, two 1-pole 32 A, and two 1-pole distribution 16 A circuit breakers LLVD route: two 1-pole 80 A, two 1-pole 63 A, and six 1-pole Issue 05 (2020-04-07) Copyright © Huawei Technologies Co., Ltd.
-
Page 26: Rectifier
The rectifier is loading an application program. Alarm Yellow No alarm has been generated. indicator Steady on The rectifier has generated an alarm due to ambient overtemperature. The rectifier has generated an alarm for Issue 05 (2020-04-07) Copyright © Huawei Technologies Co., Ltd. -
Page 27: Smu02B
(2) Minor alarm indicator (3) Major alarm indicator (4) Buttons (5) USB port (protected by a security (6) RS485/RS232 port mechanism) (7) Handle (8) Locking latch (9) Fast Ethernet (FE) port (10) LCD Issue 05 (2020-04-07) Copyright © Huawei Technologies Co., Ltd. - Page 28 To increase or decrease a parameter value quickly, hold down To restart the SMU, hold down for 10 seconds. To increase (or decrease) the LCD contrast ratio, hold down ) for 2 seconds. Issue 05 (2020-04-07) Copyright © Huawei Technologies Co., Ltd.
- Page 29 After installing the specific WiFi module using the USB port, you can access the WebUI locally, which facilitates operations. Using WiFi modules provided by another vendor may cause data loss or function exception. Consequences arising from this will not be borne by Huawei. Communications Ports Table 3-5 Communication port description...
-
Page 30: Uim02C
(including one ambient temperature and humidity input, one water sensor input, two ambient temperature inputs, one door status sensor input, one smoke sensor input, and one battery temperature input). Figure 3-7 UIM02C panel Issue 05 (2020-04-07) Copyright © Huawei Technologies Co., Ltd. - Page 31 ALM8 Communications port RS485 port Communication Port Table 3-9 COM communication port description Communication Communications Communications Function Port Parameter Protocol COM port Baud rate: 9600 bit/s, M/S and Modbus Connects to Issue 05 (2020-04-07) Copyright © Huawei Technologies Co., Ltd.
- Page 32 Receives data over RS485. Sends data over RS485. PGND Connects to the ground. 3, 7, 8 None Pins Figure 3-9 shows the pin numbers of the sensor ports. Table 3-11 defines the pins. Issue 05 (2020-04-07) Copyright © Huawei Technologies Co., Ltd.
- Page 33 Table 3-11 UIM02C pin definitions Silkscreen Pin Definitions TEM-HUM 12 V ENV_TEMP 12 V ENV_HUM WATER 12 V WATER Not defined TEMP1 TEMP1 TEMP2 TEMP2 GATE GATE+ GATE- SMOKE SMOKE BTEMP BTEMP Issue 05 (2020-04-07) Copyright © Huawei Technologies Co., Ltd.
-
Page 34: Installation
ETP48400-C9A2 Embedded Power User Manual 4 Installation Installation 4.1 Installation Preparations 4.1.1 Tools Use tools with insulated handles. The following table is for reference only. Table 4-1 Installation tools and instruments Issue 05 (2020-04-07) Copyright © Huawei Technologies Co., Ltd. -
Page 35: Installation Dimensions
Route and bind cables so that they appear neat and tidy and their cable sheaths are intact. Route and bind ground cables and signal cables separately. Route and bind AC power cables, DC power cables, signal cables, and communications cables separately. Issue 05 (2020-04-07) Copyright © Huawei Technologies Co., Ltd. -
Page 36: Rules For Removing A Protective Panel
When installing a subrack in an open subrack, tailor the protective panel based on the cross-sectional area of the cable bundle for routing cables. Figure 4-2 Tailoring a protective panel (1) Protective panel Issue 05 (2020-04-07) Copyright © Huawei Technologies Co., Ltd. -
Page 37: Installing A Subrack
4.3 Installing a Ground Cable Figure 4-4 shows how to install a ground cable. Ensure that the ground cable is installed securely. Inappropriate grounding may cause device damage and even personal injury. Issue 05 (2020-04-07) Copyright © Huawei Technologies Co., Ltd. -
Page 38: Installing A Rectifier
The filler panel has been removed from the rectifier slot. If the rectifier is damaged, contact your local Huawei office. The rectifier slot presents a risk of electric shock. Do not touch the slot with your hands. -
Page 39: Optional) Installing Dry Contact Signal Cables
Step 3 Remove the flat-head screwdriver and check that the signal cables are connected securely. Figure 4-6 Installing a dry contact signal cable (1) Contact plate (2) Dry contact port ----End Issue 05 (2020-04-07) Copyright © Huawei Technologies Co., Ltd. -
Page 40: Optional) Installing Communications Cables
(2) FE port on the SMU ----End 4.6.2 NetEco Management Networking Mode 1: FE Port Step 1 Connect the FE port on the SMU by using a network cable, as shown in Figure 4-8. Issue 05 (2020-04-07) Copyright © Huawei Technologies Co., Ltd. - Page 41 Step 1 Connect one end of a network cable to the RS485/RS232 port on the SMU. Step 2 Connect the other end to the MON1 port on the BBU, as shown in Figure 4-9. Issue 05 (2020-04-07) Copyright © Huawei Technologies Co., Ltd.
-
Page 42: Third-Party Nms Management (Over Snmp)
(2) MON1 port on the BBU ----End 4.6.3 Third-Party NMS Management (over SNMP) Procedure Step 1 Connect the FE port on the SMU by using a network cable, as shown in Figure 4-10. Issue 05 (2020-04-07) Copyright © Huawei Technologies Co., Ltd. -
Page 43: Installing Dc Output Power Cables
Step 3 Secure the negative DC output power cable to the corresponding DC output circuit breaker based on the actual load. Step 4 Connect the positive DC output power cable to the corresponding screw on the RTN+ busbar. Issue 05 (2020-04-07) Copyright © Huawei Technologies Co., Ltd. -
Page 44: Installing Battery Cables
ETP48400-C9A2 Embedded Power User Manual 4 Installation Figure 4-11 Installing DC output power cables (1) DC load ----End 4.8 Installing Battery Cables Prerequisites Issue 05 (2020-04-07) Copyright © Huawei Technologies Co., Ltd. - Page 45 Step 3 Secure positive battery cables for battery strings 1–4 to the RTN+ busbar. Battery cables are connected in the same way. The following figure shows how to connect battery cables for one battery string. Issue 05 (2020-04-07) Copyright © Huawei Technologies Co., Ltd.
-
Page 46: Installing Ac Output Power Cables
Ensure that the upstream AC input circuit breaker is OFF, and attach labels such as "No operations allowed." Switch off all circuit breakers before installing power cables. Procedure Step 1 Remove the front panel of the AC PDU. Issue 05 (2020-04-07) Copyright © Huawei Technologies Co., Ltd. -
Page 47: Installing 220/380 V Ac Three-Phase, Four-Wire Input Power Cables
Step 1 Route 220/380 V AC three-phase, four-wire input power cables through the protective board at the bottom of the subrack. Step 2 Secure the AC input power cables to corresponding AC input circuit breakers and terminals, as shown in Figure 4-14. Issue 05 (2020-04-07) Copyright © Huawei Technologies Co., Ltd. - Page 48 ETP48400-C9A2 Embedded Power User Manual 4 Installation Figure 4-14 Installing 220/380 V AC three-phase, four-wire input power cables (1) Alternating current distribution box (ACDB) ----End Issue 05 (2020-04-07) Copyright © Huawei Technologies Co., Ltd.
-
Page 49: Verifying The Installation
Check that all cables are arranged neatly and bound properly to their nearest cable ties, and are not twisted or overly bent. Check that cable labels are properly and securely attached in the same direction. Issue 05 (2020-04-07) Copyright © Huawei Technologies Co., Ltd. -
Page 50: Commissioning
Step 3 Check that the run indicators on the rectifiers are steady on. Step 4 Measure the voltage between the –48 V busbar and the RTN+ busbar. The value should range from –42 V DC to –58 V DC. ----End Issue 05 (2020-04-07) Copyright © Huawei Technologies Co., Ltd. -
Page 51: Setting The Display Language
Set Battery1 Connected, Battery2 Connected, Battery3 Connected, Battery4 Connected, Rated Capacity, Installation Time as required. Table 6-2 Setting battery parameters Main Menu Second-Level Third-Level Fourth-Level Default Setting Menu Menu Menu Value Parameters Battery Basic Battery1 Yes/No Settings Parameters Connected Issue 05 (2020-04-07) Copyright © Huawei Technologies Co., Ltd. -
Page 52: Optional) Setting Sensor Parameters
Power System Sensor Config. Door sensor None Set to Yes or Settings Para None based Water sensor None on site requirements. Smoke sensor None Ambient Temp. None Sensor Ambient Humi. None Sensor Issue 05 (2020-04-07) Copyright © Huawei Technologies Co., Ltd. -
Page 53: Optional) Setting The Hibernation Parameter
If the SMU is connected to the Internet but your computer is connected to a LAN, do not cancel the proxy server settings. Otherwise, you cannot access the SMU. To cancel proxy server settings, perform the following steps: Issue 05 (2020-04-07) Copyright © Huawei Technologies Co., Ltd. - Page 54 Step 4 Clear Use a proxy server for your LAN, as shown in Figure 6-1. Figure 6-1 Canceling proxy server settings 1 Figure 6-2 Canceling proxy server settings 2 Step 5 Click OK. ----End Issue 05 (2020-04-07) Copyright © Huawei Technologies Co., Ltd.
- Page 55 Step 5 Specify the security settings. Enable the following: Initialize and script ActiveX controls not marked as safe for scripting Allow previously unused ActiveX controls to run without prompt Issue 05 (2020-04-07) Copyright © Huawei Technologies Co., Ltd.
- Page 56 Include local directory path when uploading files to a server Automatic prompting for file downloads Figure 6-4 Internet Explorer security setting 1 Figure 6-5 Internet Explorer security setting 2 Issue 05 (2020-04-07) Copyright © Huawei Technologies Co., Ltd.
- Page 57 Figure 6-7 Internet Explorer security setting 4 Step 6 Click OK. Step 7 Click the Advanced tab, and select all of Use TLS 1.0, Use TLS 1.1, and Use TLS 1.2. Issue 05 (2020-04-07) Copyright © Huawei Technologies Co., Ltd.
- Page 58 Subnet Mask 255.255.255.0 Set this parameter according to the subnet mask provided by the network administrator. Default Gateway 192.168.0.1 Set this parameter Issue 05 (2020-04-07) Copyright © Huawei Technologies Co., Ltd.
-
Page 59: Optional) Setting Parameters Before Using Neteco
Step 2 Set the IP address, subnet mask, and gateway on the SMU's LCD. Table 6-6 IP parameters Main Second-Level Third-Level Default Value Settings Menu Menu Menu Setting Network IP Address 192.168.0.10 Set this parameter according to the IP address assigned by the Issue 05 (2020-04-07) Copyright © Huawei Technologies Co., Ltd. - Page 60 Table 6-8 Communications parameters Main Second-Level Third-Level Fourth-Level Fifth-Level Default Settings Menu Menu Menu Menu Menu Value Parameters Comm. Serial Port Northbound Port Mode Automatic Manual Settings Parameters Protocol Type Protocol Protocol Issue 05 (2020-04-07) Copyright © Huawei Technologies Co., Ltd.
-
Page 61: Optional) Setting Parameters Before Using Snmp
Trap Target Address IP address and port number reported in the alarm trap. Trap Port Trap community If you use SNMPv1 or SNMPv2c, community name used for reporting alarm trap packets. Issue 05 (2020-04-07) Copyright © Huawei Technologies Co., Ltd. -
Page 62: Connecting The Battery Supply
You can query the power system operating status, active alarms, and the names of user-defined dry contact inputs, and configure dry contact outputs on the NMS that is connected over SNMP. 6.8 Connecting the Battery Supply Prerequisites Issue 05 (2020-04-07) Copyright © Huawei Technologies Co., Ltd. - Page 63 Open the cover and flip the battery switch to MANUAL only when you need to power on the battery forcibly. Remember to flip the battery back to AUTO after the commissioning. Figure 6-10 Battery switch (1) Battery switch (behind the cover) ----End Issue 05 (2020-04-07) Copyright © Huawei Technologies Co., Ltd.
-
Page 64: Subsequent Operations
Step 2 Check whether the paint on the subrack exterior is intact. If any paint has flaked, repaint the area to avoid corrosion. Step 3 Ensure that the site is clean before you leave the site. ----End Issue 05 (2020-04-07) Copyright © Huawei Technologies Co., Ltd. -
Page 65: Maintenance
0.1 ohm. ground cable. Issue 05 (2020-04-07) Copyright © Huawei Technologies Co., Ltd. -
Page 66: Rectifying Common Faults
Check whether the AC input voltage is below the AC undervoltage alarm threshold (180 V AC by default). If so, handle the AC input fault. 7.2.4 DC Over Volt Possible Causes The DC overvoltage alarm threshold is incorrectly set on the SMU. Issue 05 (2020-04-07) Copyright © Huawei Technologies Co., Ltd. -
Page 67: Dc Under Volt
Check whether an alarm has been generated for interrupted rectifier communication. If so, remove the rectifier, reinstall it, and check whether the alarm is cleared. If the alarm still exists, replace the rectifier. Issue 05 (2020-04-07) Copyright © Huawei Technologies Co., Ltd. -
Page 68: Llvd Disconnected
Check whether the battery circuit breaker has tripped or the battery fuse has blown. If so, rectify the battery loop fault and then switch on the circuit breaker or replace the fuse. Issue 05 (2020-04-07) Copyright © Huawei Technologies Co., Ltd. -
Page 69: High Amb. Temp
Check whether the ambient temperature sensor is faulty. If yes, replace the ambient temperature sensor. 7.2.12 High Amb. Humi. This alarm is generated only for the power system that has a humidity sensor installed. Issue 05 (2020-04-07) Copyright © Huawei Technologies Co., Ltd. -
Page 70: Low Ambient Humidity
If not, set the threshold to the correct value. Check whether the battery temperature control system is faulty. If so, rectify the fault. The alarm is cleared when the battery temperature falls within the allowed range. Issue 05 (2020-04-07) Copyright © Huawei Technologies Co., Ltd. -
Page 71: Batt. Low Temp
7.2.17 Water Alarm This alarm is generated only for the power system that has a water sensor installed. Possible Causes There is water inside the cabinet. The water sensor is faulty. Issue 05 (2020-04-07) Copyright © Huawei Technologies Co., Ltd. -
Page 72: Smoke Alarm
If so, locate and rectify the power supply fault and restore the power supply. Check whether the AC input voltage is below the lower threshold for rectifier working voltage. If so, locate and rectify the power supply fault and restore the power supply. Issue 05 (2020-04-07) Copyright © Huawei Technologies Co., Ltd. -
Page 73: Rect Comm Fault
Check whether the AC SPD indication window is red. If so, replace the SPD. Check whether the AC SPD detection cable is disconnected. If so, reconnect the cable. 7.2.24 DC SPD Fault Possible Causes The DC SPD detection cable is disconnected. Issue 05 (2020-04-07) Copyright © Huawei Technologies Co., Ltd. -
Page 74: Identifying Component Faults
The SMU fails to communicate with the connected lower-level devices even though the communications cables are correctly connected. Communication between the SMU and all rectifiers fails even though the rectifiers and the communications cables are normal. Issue 05 (2020-04-07) Copyright © Huawei Technologies Co., Ltd. -
Page 75: Replacing Components
Step 2 Push the locking latch on the right side of the panel towards the left. Step 3 Gently draw the handle outwards, and then remove the rectifier from the subrack, as shown in Figure 7-1. Issue 05 (2020-04-07) Copyright © Huawei Technologies Co., Ltd. -
Page 76: Replacing An Smu
7-2. Figure 7-2 Installing a rectifier Step 7 Remove the protective gloves. ----End Follow-up Procedure Pack the removed component and send it to the local Huawei warehouse. 7.4.2 Replacing an SMU Prerequisites The cabinet door key is available. ... -
Page 77: Replacing The Pcb Of Uim02C
Step 5 Reset the parameters on the SMU. Figure 7-4 Installing an SMU ----End Follow-up Procedure Pack the removed component and send it to the local Huawei warehouse. 7.4.3 Replacing the PCB of UIM02C Prerequisites You have obtained an ESD wrist strap, a pair of ESD gloves, an ESD box or bag, the cabinet door key, and tools. - Page 78 Step 4 Record the positions where the PCB connects to all the cables, and then disconnect the cables. Step 5 Remove the PCB. Figure 7-6 Removing the PCB of UIM02C Step 6 Take out the new PCB and install it. Issue 05 (2020-04-07) Copyright © Huawei Technologies Co., Ltd.
-
Page 79: Replacing An Ac Spd Module
Step 10 Disconnect the ground cable from the ESD wrist strap, and remove the ESD wrist strap or ESD gloves. ----End Follow-up Procedure Pack the removed component, and return it to Huawei local warehouse. 7.4.4 Replacing an AC SPD Module Prerequisites ... -
Page 80: Replacing A Circuit Breaker
Step 4 Loosen the screw that secures the upper port of the circuit breaker using a Phillips screwdriver, and remove the power cable and signal cable terminals. Wrap the cable and terminals using insulation tape. Issue 05 (2020-04-07) Copyright © Huawei Technologies Co., Ltd. - Page 81 Figure 7-9 shows the procedure for installing the new circuit breaker. Figure 7-9 Installing the new circuit breaker Step 11 Reinstall the cover of the circuit breaker and tighten the screws. ----End Issue 05 (2020-04-07) Copyright © Huawei Technologies Co., Ltd.
-
Page 82: A Technical Specifications
24000 W (supports N+1 backup; maximum total output current does not exceed 400 A; and long-term operating current output does not exceed 350 A). ≤ ±1% (The output voltage is Regulated voltage precision Issue 05 (2020-04-07) Copyright © Huawei Technologies Co., Ltd. - Page 83 AC port: EN 55022 class B interference (EMI) DC port: EN 55022 class A Radiated emission (RE) EN 55022 class B Harmonic current IEC 61000-3-12 Voltage fluctuation and IEC 61000-3-3 flick Issue 05 (2020-04-07) Copyright © Huawei Technologies Co., Ltd.
- Page 84 Installed in a 19-inch rack Cabling AC cables go in from the bottom, and DC cables go out from the top. Maintenance mode Maintained from the front Heat dissipation mode Natural heat dissipation Issue 05 (2020-04-07) Copyright © Huawei Technologies Co., Ltd.
-
Page 85: B Electrical Schematic Diagram
ETP48400-C9A2 Embedded Power User Manual B Electrical Schematic Diagram Electrical Schematic Diagram Figure B-1 Electrical schematic diagram Issue 05 (2020-04-07) Copyright © Huawei Technologies Co., Ltd. -
Page 86: C Associations Between Alarms And Dry Contacts On The Uim
Rectifier Fault/Rectifier Protection/Rectifier Communication Failure/Rectifier Fault (Redundant)/Rectifier Fault (Non-redundant)/Multi-Rectifier Fault/All Rectifiers Fail to Communicate ALM4 AC SPD Fault/DC SPD Fault ALM5 Load Fuse Break/Battery Fuse Break ALM6 Reserved ALM7 Reserved ALM8 Reserved Issue 05 (2020-04-07) Copyright © Huawei Technologies Co., Ltd. -
Page 87: D Acronyms And Abbreviations
DCDB direct current distribution box electrical fast transient electromagnetic compatibility electrostatic discharge HTTPS Hypertext Transfer Protocol Secure Internet Protocol liquid crystal display LLVD load low voltage disconnection Issue 05 (2020-04-07) Copyright © Huawei Technologies Co., Ltd. - Page 88 D Acronyms and Abbreviations MTBF mean time between failures power distribution unit radiated susceptibility site monitoring unit SNMP Simple Network Management Protocol surge protection device total harmonic distortion user interface module Issue 05 (2020-04-07) Copyright © Huawei Technologies Co., Ltd.
Need help?
Do you have a question about the ETP48400-C9A2 and is the answer not in the manual?
Questions and answers