
Related Manuals for Huawei ETP48400-C3B1


Summary of Contents for Huawei ETP48400-C3B1
- Page 1 31500GJA ETP48400-C3B1 Embedded Power (Vodacom, South Africa) Quick Guide Issue Date 2021-05-30 HUAWEI TECHNOLOGIES CO., LTD.
- Page 2 Notice The purchased products, services and features are stipulated by the contract made between Huawei and the customer. All or part of the products, services and features described in this document may not be within the purchase scope or the usage scope. Unless otherwise specified in the contract, all statements, information, and recommendations in this document are provided "AS IS"...
-
Page 3: Table Of Contents
2.3 Installation Dimensions.................................5 3 Installing Components......................7 4 Installing Cables........................9 4.1 Installing Cables for the ETP48400-C3B1........................13 4.2 Installing DC Power Cables Between the DCDB48-400-4C and a Third-Party Monitoring Device..14 4.3 Installing Batteries and Cables (Lead-Acid Battery Scenario)................14 4.4 Installing Batteries and Cables (Lithium Battery Scenario)................... -
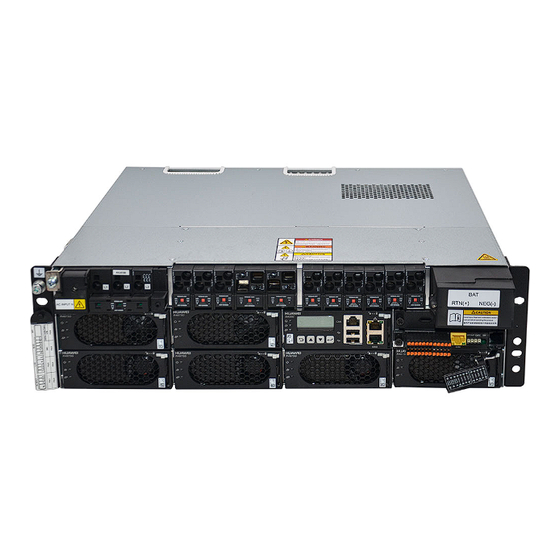
Page 4: Appearance
ETP48400-C3B1 Embedded Power (Vodacom, South Africa) Quick Guide 1 Appearance Appearance ETP48400-C3B1 appearance DCDB48-400-4C appearance Issue 01 (2021-05-30) Copyright © Huawei Technologies Co., Ltd. - Page 5 ETP48400-C3B1 Embedded Power (Vodacom, South Africa) Quick Guide 1 Appearance Component 1 SMU02C UIM05B1 Rectifier Component 2 Digital T/H Sensor Battery Temperature Sensor Cables Battery midpoint voltage Dry contact alarm cable detection cable Issue 01 (2021-05-30) Copyright © Huawei Technologies Co., Ltd.
-
Page 6: Installation Preparations
ETP48400-C3B1 Embedded Power (Vodacom, South Africa) Quick Guide 2 Installation Preparations Installation Preparations Figure 2-1 Installation process 2.1 Preparing Cables The cross-sectional area of a power cable depends on the current that will flow through the cable and the voltage drop allowed for the cable. -
Page 7: Tools
ETP48400-C3B1 Embedded Power (Vodacom, South Africa) Quick Guide 2 Installation Preparations Cable Type Maximum Minimum Maximum Current (A) Cross-Sectional Cross- Sectional Area (mm Area (mm Cable between the DCDB48-400-4C and DCDB48-400-4C (Lithium battery scenario) Battery power cable DC output power... -
Page 8: Installation Dimensions
ETP48400-C3B1 Embedded Power (Vodacom, South Africa) Quick Guide 2 Installation Preparations 2.3 Installation Dimensions Installation dimensions for the ETP48400-C3B1 NOTE ● When installing 35 mm DC output power cables, reserve at least 90 mm cabling space above the subrack. ● When installing 50 mm DC output power cables, reserve at least 180 mm cabling space above the subrack. - Page 9 ETP48400-C3B1 Embedded Power (Vodacom, South Africa) Quick Guide 2 Installation Preparations Installation dimensions for the DCDB48-400-4C Issue 01 (2021-05-30) Copyright © Huawei Technologies Co., Ltd.
-
Page 10: Installing Components
ETP48400-C3B1 Embedded Power (Vodacom, South Africa) Quick Guide 3 Installing Components Installing Components Installing the ETP48400-C3B1 1. Install the ETP48400-C3B1 in a 19-inch 2. Install the ground cable for the ETP48400- rack. C3B1. CAUTION Ensure that the ground cables are installed securely. - Page 11 ETP48400-C3B1 Embedded Power (Vodacom, South Africa) Quick Guide 3 Installing Components Installing the Rectifier 1. Install the rectifiers. Issue 01 (2021-05-30) Copyright © Huawei Technologies Co., Ltd.
-
Page 12: Installing Cables
ETP48400-C3B1 Embedded Power (Vodacom, South Africa) Quick Guide 4 Installing Cables Installing Cables D ANGER ● Ensure that the upstream AC input circuit breakers are OFF, and attach warning labels such as "Do not operate." ● Switch off all circuit breakers before installing cables. - Page 13 ETP48400-C3B1 Embedded Power (Vodacom, South Africa) Quick Guide 4 Installing Cables Figure 4-1 General wiring diagram (lead-acid battery scenario) Issue 01 (2021-05-30) Copyright © Huawei Technologies Co., Ltd.
- Page 14 ETP48400-C3B1 Embedded Power (Vodacom, South Africa) Quick Guide 4 Installing Cables Figure 4-2 General wiring diagram (lithium battery scenario with one DCDB48-400-4C) Issue 01 (2021-05-30) Copyright © Huawei Technologies Co., Ltd.
- Page 15 ETP48400-C3B1 Embedded Power (Vodacom, South Africa) Quick Guide 4 Installing Cables Figure 4-3 General wiring diagram (lithium battery scenario with two DCDB48-400-4Cs) Issue 01 (2021-05-30) Copyright © Huawei Technologies Co., Ltd.
-
Page 16: Installing Cables For The Etp48400-C3B1
ETP48400-C3B1 Embedded Power (Vodacom, South Africa) Quick Guide 4 Installing Cables 4.1 Installing Cables for the ETP48400-C3B1 1. Install cables for the ETP48400-C3B1. NOTE Bind the battery temperature sensor to the battery rack. Table 4-1 Connecting DC Output Power Cables to 200 A Circuit Breakers... -
Page 17: Installing Dc Power Cables Between The Dcdb48-400-4C And A Third-Party Monitoring Device
Do not use a combination of old and new batteries. ● To ensure discharge current equalization, the cables from the DCDB48-400-4C to the ETP48400-C3B1 and the batteries to the DCDB48-400-4C should have the same length. Issue 01 (2021-05-30) - Page 18 ETP48400-C3B1 Embedded Power (Vodacom, South Africa) Quick Guide 4 Installing Cables 1. Install power cables for the 2. Install the 3. Install copper bars DCDB48-400-4C. batteries from between batteries. bottom to top. 4. Install battery midpoint voltage detection 5. Install cables for lead-acid batteries.
-
Page 19: Installing Batteries And Cables (Lithium Battery Scenario)
One DCDB48-400-4C Two DCDB48-400-4Cs NOTICE To ensure discharge current equalization, the cables from the DCDB48-400-4Cs to the ETP48400-C3B1 should have the same length. 3. Install a lithium battery in a 19-inch 4. Install a ground cable for each lithium rack. - Page 20 ETP48400-C3B1 Embedded Power (Vodacom, South Africa) Quick Guide 4 Installing Cables 3. Install a lithium battery in a 19-inch 4. Install a ground cable for each lithium rack. battery. 5. Install lithium battery power cables. One DCDB48-400-4C Two DCDB48-400-4Cs NOTICE ●...
- Page 21 ETP48400-C3B1 Embedded Power (Vodacom, South Africa) Quick Guide 4 Installing Cables 5. Install lithium battery power cables. One DCDB48-400-4C Two DCDB48-400-4Cs Issue 01 (2021-05-30) Copyright © Huawei Technologies Co., Ltd.
-
Page 22: Verifying The Installation
ETP48400-C3B1 Embedded Power (Vodacom, South Africa) Quick Guide 5 Verifying the Installation Verifying the Installation 5.1 Checking Hardware Installation ● Check that all screws, especially those used for electrical connections, are secured. Check that flat washers and spring washers are installed properly. -
Page 23: Commissioning
ETP48400-C3B1 Embedded Power (Vodacom, South Africa) Quick Guide 6 Commissioning Commissioning 6.1 Connecting the AC Power Supply Procedure Step 1 Ensure that the AC input circuit breaker is OFF and the voltage of the upstream AC input circuit breaker is between 85 V AC to 300 V AC. - Page 24 ETP48400-C3B1 Embedded Power (Vodacom, South Africa) Quick Guide 6 Commissioning Button Name Description Enter ● Enters the main menu from the standby screen. ● Enters a submenu from the main menu. ● Saves menu settings on a submenu. NOTE ● The LCD screen becomes dark if no button is pressed within 30 seconds.
-
Page 25: Setup Wizard
ETP48400-C3B1 Embedded Power (Vodacom, South Africa) Quick Guide 6 Commissioning 6.3 Setup Wizard Table 6-2 Parameter settings Parameter settings Item Setting Value Setting the time Set this parameter to the local time zone. zone. Set the date and Set this parameter to the local date time and time. -
Page 26: Setting Battery Parameters
ETP48400-C3B1 Embedded Power (Vodacom, South Africa) Quick Guide 6 Commissioning Parameter settings Item Setting Value The SMU may restart. 6.4 Setting Battery Parameters Setting battery parameters: Parameters Settings > Acid Battery. Table 6-3 Setting battery parameters Third-Level Fourth-Level Menu Settings... - Page 27 ETP48400-C3B1 Embedded Power (Vodacom, South Africa) Quick Guide 6 Commissioning Figure 6-1 Connecting a communications cable (for WebUI management) (1) User WebUI terminal (2) FE port on the SMU Step 2 Apply for a fixed IP address to the site or equipment room network administrator.
-
Page 28: Optional) Importing A Configuration File (Webui)
ETP48400-C3B1 Embedded Power (Vodacom, South Africa) Quick Guide 6 Commissioning Figure 6-2 WebUI login page NO TE ● The preset user names include admin, engineer, and operator, and the preset password is Changeme. The user names are intended for administrators, engineers, and operators respectively. -
Page 29: Optional) Checking The Dry Contact Alarm Cable Connection
ETP48400-C3B1 Embedded Power (Vodacom, South Africa) Quick Guide 6 Commissioning 6.7 (Optional) Checking the Dry Contact Alarm Cable Connection Table 6-5 Procedure 1. Check whether an alarm is 2. Check whether the dry 3. Check whether the dry generated. contact alarm cable is contact alarm cable is removed or loose. -
Page 30: Subsequent Operations
ETP48400-C3B1 Embedded Power (Vodacom, South Africa) Quick Guide 6 Commissioning Step 4 Set all circuit breakers to the appropriate status based on site requirements. Step 5 Observe the power system for 15 minutes. If no alarm is generated on the SMU during this period, the current and voltage for batteries and loads are normal. -
Page 31: A Appendix
ETP48400-C3B1 Embedded Power (Vodacom, South Africa) Quick Guide A Appendix Appendix Electrical Conceptual Diagrams Figure A-1 Electrical conceptual diagram Preparing a Cord End Terminal Figure A-2 Preparing a cord end terminal (1) Cable (2) Cord end terminal (3) Crimping tool Issue 01 (2021-05-30) Copyright ©... - Page 32 ETP48400-C3B1 Embedded Power (Vodacom, South Africa) Quick Guide A Appendix Preparing an OT Terminal Figure A-3 Preparing an OT terminal (1) Cable (2) OT terminal (3) Heat shrink tubing (4) Hydraulic pliers (5) Heat gun Issue 01 (2021-05-30) Copyright © Huawei Technologies Co., Ltd.
Need help?
Do you have a question about the ETP48400-C3B1 and is the answer not in the manual?
Questions and answers