Table of Contents
Advertisement
Quick Links
Advertisement
Table of Contents
Troubleshooting

Related Manuals for GE TruTrak+ 3900


Summary of Contents for GE TruTrak+ 3900
- Page 1 GE Healthcare 3900/3900P Pulse Oximeter TruTrak®+ User’s Manual...
- Page 3 GE Healthcare 3900/3900P Pulse Oximeter TruTrak®+ User’s Manual 6050-0006-406 March 2005...
- Page 4 Datex-Ohmeda. Trademarks Datex®, Ohmeda®, OxyTip®, PerfTrak®, TeleOximetry®, TruTrak®, and PI ® are the property of GE Healthcare Finland Oy. All other product and company names are the property of their respective owners. 0537 GE Healthcare Finland Oy...
-
Page 5: Table Of Contents
Table of Contents 1/Overview Product description.............................1-1 Intended use............................1-1 TruTrak+ technology........................1-1 PI r pulsatile value..........................1-2 Other features.............................1-2 Functional components ........................1-3 Principles of operation........................1-4 Calibration ..........................1-5 Front panel...............................1-6 Alarm silence button........................1-7 Alarm silence ........................1-7 All mute............................1-7 Numeric display ..........................1-7 Graphic display..........................1-8 alarm limits, high and low ....................1-9 Pulse rate alarm limits, high and low ..................1-9 Display contrast adjuster......................1-9 Power/Standby button/AC power light ................1-9... - Page 6 Table of Contents 2/Setup and Operations Powering the oximeter..........................2-1 Setup..................................2-2 Factory settings ..........................2-2 Before powering on the oximeter................2-2 After powering on the oximeter .................2-2 Mode switch settings ........................2-3 Language selection......................2-3 Averaging mode........................2-4 PI r pulsatile value display .....................2-4 EMI line frequency......................2-4 Checkout procedure...........................2-5 Signal and data validity..........................2-8 Plethysmographic waveform.....................2-8...
- Page 7 Table of Contents 3/Messages and Troubleshooting Messages................................3-1 Alarm categories............................3-5 High priority............................3-5 Medium priority..........................3-5 Low priority ............................3-6 System failure.............................3-6 Troubleshooting .............................3-7 4/Printer Printer buttons..............................4-2 Print real-time data..........................4-2 Summary statistics only........................4-2 Trend print............................4-2 Stop print/advance paper......................4-3 Printed data samples..........................4-3 Printer maintenance...........................4-5 Replacing the paper roll......................4-5 Removing a paper jam........................4-6 5/TeleOximetry Using a modem: summary ........................5-1...
- Page 8 Table of Contents 6/Maintenance and Service Cleaning ................................6-1 Oximeter (with or without the printer) ................6-1 Recharging the battery..........................6-2 Replacing the battery ..........................6-2 Replacing the fuses .............................6-3 Repair policy and procedure.........................6-4 Packaging and return procedure ....................6-4 Parts list................................6-5 7/Compliance and Specifications Compliance with standards........................7-1 General safety requirements......................7-1 Electromagnetic compatibility (EMC) ..................7-2...
- Page 9 Table of Contents A/Screen Maps Screen maps ..............................A-1 B/Communications Serial device communications......................B-1 Requirements ............................B-1 RS-232 interface cable—serial pinout ..............B-2 Connection ............................B-2 Serial communication output ....................B-3 Auto-output mode......................B-4 Trend-output mode......................B-4 Analog device communications ......................B-4 RS-232 serial/analog interface cable—analog pinout ..........B-5 Index Warranty...
- Page 10 List of Figures Name Page Figure 1-1. Signal processing block diagram................1-3 Figure 1-2. Comparative light absorption...................1-4 Figure 1-3. Extinction versus wavelength graph ..............1-4 Figure 1-4. 3900P Pulse Oximeter front panel.................1-6 Figure 1-5. 3900/3900P Pulse Oximeter rear panel ............1-12 Figure 2-1. Typical adult plethysmographic waveform .............2-8 Figure 2-2.
-
Page 11: 1/Overview
1/Overview This chapter • Introduces the product, including the principles of its operation. • Describes the oximeter’s controls and features. • Lists the precautions you must take when using the oximeter. Product description The Datex-Ohmeda Model 3900 and Model 3900P pulse oximeters with TruTrak ®... -
Page 12: Pi R Pulsatile Value
3900/3900P User’s Manual one of many proprietary motion-correction algorithms, depending on the type and intensity of the motion. TruTrak+ technology employs a patented five-step process that consists of 1) high-speed data sampling; 2) motion identification, quantification, and correction; 3) calculation of the SpO value;... -
Page 13: Functional Components
1/Overview • Ability to print or transmit the data in trend memory, along with custom patient labels, alarm limit violations, and time stamps. • Viewable SpO or PI pulsatile value trend data. • Custom patient labels that appear on printer, fax, modem, and serial communication output. -
Page 14: Principles Of Operation
3900/3900P User’s Manual Principles of operation The 3900/3900P pulse oximeter uses a two-wavelength pulsatile system—red and infrared light—to distinguish between oxygenated (O Hb) and reduced (HHb) hemoglobin, each of which absorbs different amounts of light emitted from the oximeter sensor. The system then calculates the relative percentage of these two constituents and displays SpO Variable absorption (due to arterial pulse) -
Page 15: Calibration
1/Overview is “on” and the oxygenation of the arterial hemoglobin. Analog and digital signal processing then converts the light-intensity information into SpO , pulse rate, and pulsatile values for display on the monitor. Calibration A CO-oximeter typically uses four or more wavelengths of light and calculates reduced hemoglobin (HHb), oxyhemoglobin (O Hb), carboxyhemoglobin (COHb), and methemoglobin (MetHb). -
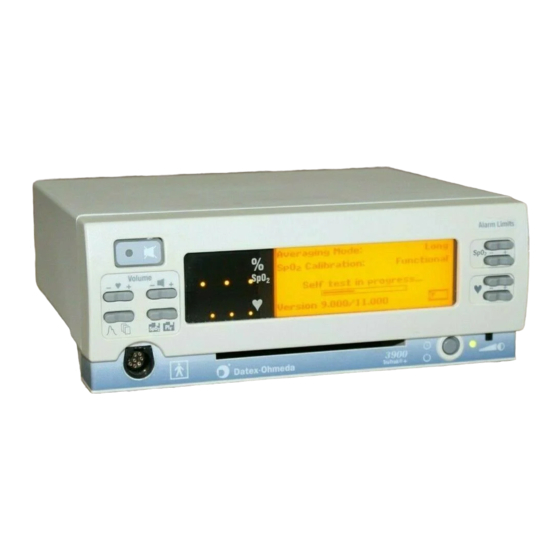
Page 16: Front Panel
3900/3900P User’s Manual Front panel NOTE: The 3900 model does not have the built-in printer (item 13). Figure 1-4. 3900P Pulse Oximeter front panel Alarm silence button Numeric display (LED) Graphic display (LCD) SpO 2 alarm limits, high/low setting buttons Pulse rate alarm limits, high/low setting buttons Display contrast adjust slide Power/Standby button... -
Page 17: Alarm Silence
1/Overview Alarm silence button This button has two functions: • 120-second alarm silence—activated by a single press. • Continuous all mute—activated by three quick presses (if the all-mute feature is enabled). Press once to deactivate. Alarm silence When an active alarm condition exists, press this button to silence the audible portion of the alarm for 120 seconds. -
Page 18: Graphic Display
3900/3900P User’s Manual 3 Graphic display 1.25 Plethysmographic waveform (also the display area for trend data, screen menus, and options) The PerfTrak waveform display appears after the monitor has detected data from the sensor. It represents the blood volume change of the hemodynamic system, assuming no other factors (e.g., motion artifact) are present. -
Page 19: Spo 2 Alarm Limits, High And Low
1/Overview 4 SpO alarm limits, high and low – While viewing the waveform screen, the top button sets the high alarm limit and the bottom button sets the low alarm limit. For either limit, press the + side of the button to raise the value or the – side to lower it. As you press one of these buttons, the values do not cycle through the available settings;... -
Page 20: Carrying Handle
3900/3900P User’s Manual When operating on battery power, an icon appears between the two pairs of alarm limit values on the right side of the LCD. (On Japanese menu screens, the icon appears at the upper right beside the first menu option.) This icon indicates the battery condition as follows: Charged/not low If the all mute condition exists, the display of this icon alternates with the... -
Page 21: Pulse Beep Volume Button
1/Overview 11 Pulse beep volume button – This button adjusts the volume level for the pulse indicator in incremental steps from OFF to level 5. The power-on default is 2 if SAVE LIMITS is set to NO (see SETTINGS in chapter 2). Press the + side of the button to increase the volume or the –... -
Page 22: Rear Panel
3900/3900P User’s Manual Rear panel Figure 1-5. 3900/3900P Pulse Oximeter rear panel WARNING: Electrical shock hazard. Because the unit is not grounded when it is operating on battery power, do not connect any equipment to the RS-232 connector on the rear panel unless the unit is connected to the AC power supply. -
Page 23: Precautions
1/Overview Precautions Two types of precautions appear in this manual: warnings and cautions. • A WARNING indicates the possibility of injury to the patient or operator. • A CAUTION indicates a condition that may lead to equipment damage or malfunction. NOTE: If you connect a modem, refer to the precautions contained in the instructions you received with your modem. -
Page 24: Electrical Shock And Flammability Hazard
3900/3900P User’s Manual Electrical shock and flammability hazard Before cleaning or servicing the oximeter, always turn it off and disconnect the power cord from the AC power supply. Patient safety The correct use of the oximeter is to measure only arterial oxygen saturation (SpO ), pulse rate, and Relative Perfusion Index pulsatile value. -
Page 25: Cautions
1/Overview service office. The 3900/3900P is referred to as an IEC/EN 60601/F device in the summary of situations table contained in IEC/EN 60601-1-1. Cautions Handle the monitor with care Improper handling can cause damage or inaccurate results. Cleaning Do not autoclave, pressure sterilize, or gas sterilize this oximeter. Use cleaning solution sparingly. - Page 26 3900/3900P User’s Manual 1-16...
-
Page 27: 2/Setup And Operations
2/Setup and Operations This chapter provides the following information and instructions: • Powering the oximeter. • Selecting the language, averaging mode, PI pulsatile value display, and EMI (electromagnetic interference) line frequency. • Checkout procedure—to determine that all functions of the 3900/3900P oximeter are working properly. -
Page 28: Setup
3900/3900P User’s Manual Setup Factory settings When you turn on the oximeter, the following settings are in effect and remain in operation until you change them. Before powering on the oximeter Use the mode switches in the oximeter’s rear panel to set the language, averaging mode, PI pulsatile value display, and EMI line frequency. -
Page 29: Mode Switch Settings
2/Setup and Operations Mode switch settings A bank of eight numbered, two-position switches is accessed through the rear panel. The up position is ON and the down position is OFF. Important: If you change the switch settings while the oximeter is on, the new settings do not take effect until you power off, then on again. -
Page 30: Averaging Mode
3900/3900P User’s Manual Averaging mode Switches 5 and 6 set the averaging mode. The averaging mode selects the time period of data used to calculate a weighted average SpO value to be displayed by the oximeter. Switches and Pulse Rate Averaging TruTrak Long (12 seconds) Yes (enabled) -
Page 31: Checkout Procedure
2/Setup and Operations Checkout procedure WARNING: Failure of operation. If the oximeter fails any part of the checkout procedures or current leakage tests, remove it from operation until qualified service personnel have corrected the situation. WARNING: Explosion hazard. Do not use the monitor in the presence of any flammable anesthetic mixture. - Page 32 3900/3900P User’s Manual To turn on the oximeter, press the power button. The first screen shows the Datex-Ohmeda logo and the model name (Model 3900 or Model 3900P). Important: If the low SpO alarm limit was saved at a limit lower than 80% (or at OFF), you will be alerted by a screen message that shows the current low SpO alarm limit and alarm volume level:...
- Page 33 2/Setup and Operations On the displays, verify • The high and low alarm limits for SpO and pulse rate. • Dashes (– – –) appear for any limit set to OFF. • The readings for SpO , pulse rate, and PI r pulsatile value. Dashes may appear on the display until the SpO , pulse rate, and PI r pulsatile value readings have stabilized (approximately 12 seconds).
-
Page 34: Signal And Data Validity
3900/3900P User’s Manual Signal and data validity Plethysmographic waveform The oximeter’s PerfTrak waveform display provides a visual indicator of the validity of the values that appear on the display. The waveform is scaled to correspond to the perfusion level or strength of the signal being received at the patient monitoring site. -
Page 35: Signal Noise
2/Setup and Operations CHECK SENSOR SITE Figure 2-3. Low perfusion waveform Signal noise The following conditions can cause noisy waveforms: • Poor sensor placement. • Motion at the sensor site. • Electrical interference. Figure 2-4. Noisy plethysmographic waveform If three easily identifiable passes of a “typical” waveform do not occur, •... -
Page 36: Numeric Display
3900/3900P User’s Manual Numeric display Stability of the SpO readings is a good indicator of signal validity. Although “stability” is a relative term, with practice you’ll get a good feeling for changes that are artifactual or physiological and the speed of each. The stability of the readings over time is affected by which averaging mode you're using. -
Page 37: Waveform Screen Button
2/Setup and Operations Waveform screen button When you are viewing some other display or screen, press this button to return to the waveform screen. You can also use this button to exit from a menu or option screen to prevent changes you have made from being confirmed. Menu button This button accesses the main menu, which has the following options: MENU... -
Page 38: Labels
3900/3900P User’s Manual LABELS This main menu option accesses the screen where you can enter custom patient labels—alphanumeric characters that help identify patients and their associated data. There are four lines available to enter labels. A label is included in data transmissions and printouts. If you use the modem or fax function, we recommend that you enter a label to identify the patient. -
Page 39: Select Field Function Keys
2/Setup and Operations LABELS — H _GONZALES _ _ _ _ _ – / + _ _ _ _ _ _ _ _ _ _ _ _ CLEAR DR_CASEY _ _ _ _ _ _ — GENERAL _ _ _ _ _ _ _ Figure 2-6. -
Page 40: Clear
3900/3900P User’s Manual NOTE: If an alarm occurs while you are entering label characters, the waveform screen appears with the alarm message. After you have attended to the alarm condition, return to the LABELS screen. The characters you had entered prior to the alarm are still there but they are not yet saved in memory as the label for the current data record. -
Page 41: Settings
2/Setup and Operations SETTINGS Select SETTINGS from the main menu to access the first of two settings screens. These settings are retained in memory and are not cleared when you clear trend data or power off the monitor (as long as the internal battery is charged). SAVE LIMITS: —... - Page 42 3900/3900P User’s Manual ALL MUTE Use this option to enable (YES) or disable (NO) the ability to mute audible alarms. • When enabled (YES), you can press the alarm silence button three times (within 3 seconds) and silence the alarms until you press the alarm silence button again (or the unit is powered off).
-
Page 43: Date And Time
2/Setup and Operations Date and time Select DATE from the main menu to set the current date and time. This information appears with data records in trend memory and on all printed or transmitted data. DATE/TIME — – / + DD / MM / YY FORMAT HH : MM... -
Page 44: Trend Options
3900/3900P User’s Manual Trend options You may choose to view SpO data or PI pulsatile value data 0.98 - 1.00 94% - 96% 2.49 CLEAR CLEAR 00:24 00:24 11:48:06 05-17-99 11:48:06 05-17-99 trend pulsatile value trend Figure 2-9. Trend screens The type of trend data being displayed appears here (SpO or PI ). -
Page 45: Trend Function Keys
2/Setup and Operations Trend function keys Trend data scroll across the screen from right to left with the most recent data record always appearing from the right. When viewing a trend screen, the alarm limit buttons assume the following functions: Scroll buttons Press the side of the button that points to the side of the screen from which you want data to appear: use... -
Page 46: Viewing Time Scale For Display
3900/3900P User’s Manual Viewing time scale for display You can select to view from 12 minutes to 24 hours of data on the screen; 24 minutes (00:24) is the default. When you change the time scale, that scale remains in effect the next time you access the trend screen. Press the left (-) or right (+) side of the function key to decrease or increase, respectively, the viewing time scale. - Page 47 2/Setup and Operations A rolling 24 hours of trend data are stored in memory in FIFO (first in/first out) order; e.g., the oldest trend data (hour 1) are stored, followed by new trend data. Patient 1 Patient 2 Patient 3 April 3 April 4 April 5...
-
Page 48: Patient Function Key Lockout
3900/3900P User’s Manual Patient function key lockout After the oximeter is set up for monitoring, you may choose to lock the monitor’s front panel buttons to prevent inadvertent changes to the settings you have specified. This procedure disables all the buttons on the oximeter (and print trend button—3900P printer) with the exception of the alarm silence button, the power on/off button, and the SpO and PI... -
Page 49: 3/Messages And Troubleshooting
3/Messages and Troubleshooting This chapter contains • Descriptions of the messages and indicators that appear on the screen. • Alarm categories and their characteristics. • A chart for troubleshooting situations that may occur while using the oximeter. Become thoroughly familiar with this information before using the oximeter to monitor a patient. - Page 50 3900/3900P User’s Manual Message Possible cause(s) Recommended action(s) The all mute feature is activated. No action required. (Press the alarm silence button once to Appears between the alarm deactivate.) limit settings (and beside the first menu option on Japanese menu screens). The alarm or pulse tone volume is No action required.
- Page 51 3/Messages and Troubleshooting Message Possible cause(s) Recommended action(s) Dirt on the sensor emitter or Clean the sensor (if reusable) or INSUFFICIENT LIGHT detector. Sensor detector failure. replace it. Test site dirty. Misaligned or Clean the test site. Reposition the poorly positioned sensor. sensor or select another test site.
- Page 52 3900/3900P User’s Manual Message Possible cause(s) Recommended action(s) Printer paper jam. Remove the jammed paper. PRINTER FAILURE See Removing a paper jam in chapter 4. Printer has failed. Printer requires service. The connected sensor is not an Replace sensor. Refer to the SENSOR FAILURE OxyTip sensor.
-
Page 53: Alarm Categories
3/Messages and Troubleshooting Alarm categories 3900/3900P oximeter tiered alarms fall into three priority categories: high, medium and low. Depending on what is occurring at the time, an alarm may fall into more than one category. NOTE: The audible alarm feature for all alarm conditions is silenced for the first two minutes after powering on. -
Page 54: Low Priority
3900/3900P User’s Manual If the following alarms occur before active monitoring, these alarms are considered to be of medium priority: • AMBIENT LIGHT • CHECK SENSOR SITE • INSUFFICIENT LIGHT • NO SENSOR • SENSOR FAILURE • SENSOR OFF Low priority Requires operator awareness. -
Page 55: Troubleshooting
3/Messages and Troubleshooting Troubleshooting The following chart list some conditions that may occur with the oximeter along with the cause(s) and recommended action(s) for correcting them. Condition Possible cause(s) Recommended action(s) Unit does not power on. The battery is fully discharged or To charge the battery and begin disconnected and/or the unit is monitoring, plug the unit into the... - Page 56 3900/3900P User’s Manual Condition Possible cause(s) Recommended action(s) No communication Incorrect cable used to connect You must use the Datex-Ohmeda through the modem. modem to monitor. modem/analog cable. Refer to Parts list in chapter 6. Modem is powered off or not Check and correct all modem properly connected.
- Page 57 4/Printer This chapter covers • Operating the 3900P printer. • Maintaining the printer. The 3900P pulse oximeter’s integrated printer is powered on with the oximeter. You can print real-time or trend data. You cannot print while data are being transmitted through the modem. The printer buttons are inactive until the transmission is completed or canceled.
-
Page 58: Printer Buttons
3900/3900P User’s Manual Printer buttons The printer’s buttons are active only when you are viewing the waveform or trend screens. Σ Figure 4-1. 3900P printer 1. Print real-time data 2. Print real-time data summary statistics 3. Print trend data 4. Stop printing/advance paper Print real-time data To begin printing current monitoring data, press this button. -
Page 59: Stop Print/Advance Paper
4/Printer (xx HRS.) ALL (XX) shows the total number of hours of data stored in memory (up to a maximum of 24 hours). To select to print all the stored data, press this function key. STATS ONLY To print only the summary statistics for the number of trend data hours selected, press this function key. -
Page 60: Figure 4-3. Printed Data Samples
3900/3900P User’s Manual mode printed data mode printed data H GONZALES H GONZALES DR CASEY DR CASEY GENERAL GENERAL BY: --------------------- BY: --------------------- COMMENTS: --------------- COMMENTS: --------------- ------------------------ ------------------------ ------------------------ ------------------------ STUDY DATE: STUDY DATE: 05/16/98 05/16/98 6-SECOND FORMAT ALARM LEGEND HIGH SpO ....↑... -
Page 61: Printer Maintenance
4/Printer Printer maintenance For information on cleaning the printer, see Cleaning in chapter 6. Replacing the paper roll CAUTIONS: To avoid damage to the printer, • Do not operate the printer without paper. Paper purchased from Datex-Ohmeda has red edges when the paper roll is nearing depletion. -
Page 62: Removing A Paper Jam
3900/3900P User’s Manual Removing a paper jam CAUTION: To avoid damaging the printhead mechanism, discharge any possible static electricity from your person before removing the paper feed cover on the printer. 1. Turn off the oximeter. Leave it plugged into the AC power supply. 2. -
Page 63: 5/Teleoximetry
5/TeleOximetry This chapter covers • Connecting a modem to the 3900/3900P. • Selecting the data to be transmitted. • Sending a fax through a fax modem. • Sending data through the modem to a remote computer. • Setting up the 3900/3900P for your modem. Sample reports are included at the end of the chapter. -
Page 64: Modem Connection
3900/3900P User’s Manual Modem connection The oximeter works with 56K modems that comply with the following: • Relevant international or national electrical safety requirements. • National requirements for connection to the telecommunications system. The oximeter contains all the software necessary for communication between the 3900/3900P and the modem to a fax machine or to another modem. -
Page 65: Modem Status
5/TeleOximetry Modem status To access the modem options: Press the Menu button to display the MENU screen. 2. Select MODEM. The MODEM STATUS screen appears. SELECT DATA — MODEM STATUS: (12 HRS.) SEND SEARCHING ... SETUP — Figure 5-1. MODEM STATUS screen 3. -
Page 66: Select Data
3900/3900P User’s Manual Select data To select the amount of data you want to send: 1. Display the MODEM STATUS screen and choose SELECT DATA. HOURS – / + SELECT HOURS — (18 HRS.) ALL 12 HOURS — Figure 5-2. SELECT HOURS screen XX HOURS (shown as 12 HOURS in Figure 5-2) indicates the number of hours of stored data that are currently selected. -
Page 67: Send
5/TeleOximetry Send After you select the amount of data you want to send, you can: • Send the data to a fax machine (Group 3 only). • Send the data to a remote computer. • Set the 3900/3900P so that a query from a remote computer will initiate transmission of the data to that computer. -
Page 68: Fax
3900/3900P User’s Manual The fax feature requires the use of a Class 1 fax modem to send a fax to a Group 3 fax machine only. To send data to a fax machine: 1. From the SEND screen, select FAX. 2. -
Page 69: Fax Transmission Messages
5/TeleOximetry Fax transmission messages After you press SEND to transmit a fax, some or all of the following messages may be displayed: DIALING REMOTE FAX—the modem is dialing the number. BUSY—the fax machine is busy. The modem redials the number until the fax machine is no longer busy or until you press CANCEL. -
Page 70: Sending Data To A Remote Computer
3900/3900P User’s Manual Sending data to a remote computer When connected to an external modem, the 3900/3900P supports the transmission of up to 24 hours of trend data over public telephone lines to a modem-equipped remote computer. The telephone connection may be initiated by the remote computer or by the 3900/3900P. -
Page 71: Remote Computer
5/TeleOximetry Remote computer To transmit data to a remote computer equipped with a modem: 1. From the SEND screen, select REMOTE COMPUTER. 2. At the PHONE NUMBER screen, enter the phone number for the remote computer modem. For details, refer to Figure 5-4 and the instructions immediately after it. -
Page 72: Canceling A Transmission (Transmission Canceled)
3900/3900P User’s Manual TRANSMISSION DONE—transmission is complete. The modem disconnects the phone line. Press to return to the SEND screen. If the transmission is interrupted, refer to Transmission failure messages later in this chapter. Canceling a transmission (TRANSMISSION CANCELED) If you select CANCEL while transmitting data, transmission stops and the modem disconnects the phone line. -
Page 73: Modem Setup
5/TeleOximetry Modem setup You may need to change the default initialization string or use a guard tone if you encounter problems when transmitting data through your modem. To check or change these settings, display the MODEM STATUS screen and select SETUP. -
Page 74: Default Initialization String
3900/3900P User’s Manual To enter a custom initialization string: 1. From the MODEM SETUP screen, select CUSTOM. INITIALIZATION — STRING – / + AT&D3&H1 ___ DEFAULT ____________ — ____________ Figure 5-8. INITIALIZATION STRING screen 2. Move to and enter the correct characters. Three lines are provided on the screen—if the string is too long to fit on the first line, continue it on the second line, then the third line. -
Page 75: Sample Reports
5/TeleOximetry Sample reports The format of the report you send depends on the option you choose from the SEND screen. Samples of the report that is sent to a remote computer and the InstaReport fax for each mode (SpO and PI ) are shown below. -
Page 76: Instareport Fax-Spo 2 Mode
3900/3900P User’s Manual InstaReport fax—SpO mode (page 1 of 2) Pulse Oximetry InstaReport H GONZALES COMMENTS DR CASEY GENERAL STUDY DURATION AND VALUES STUDY START DATE/TIME: 01/02/99 00:00:00 TIME STUDY END DATE/TIME: 01/03/99 12:00:00 LOW SpO 81 % 134 BPM 01:05:05 AVERAGE SpO 91 %... - Page 77 5/TeleOximetry InstaReport fax—SpO mode (page 2 of 2) Pulse Oximetry InstaReport H GONZALES COMMENTS DR CASEY GENERAL LEGEND: LOW SpO NO DATA 00:00:00 01:00:00 02:00:00 03:00:00 04:00:00 04:00:00 05:00:00 06:00:00 07:00:00 08:00:00 08:00:00 09:00:00 10:00:00 11:00:00 12:00:00 Pulse Oximetry InstaReport page 2 of 2 5-15...
-
Page 78: Instareport Fax-Pi R Mode
3900/3900P User’s Manual InstaReport fax—PI mode (page 1 of 2) pulsatile value InstaReport H GONZALES COMMENTS DR CASEY GENERAL STUDY DURATION AND VALUES STUDY START DATE/TIME: 01/02/99 00:00:00 TIME STUDY END DATE/TIME: 01/03/99 12:00:00 LOW SpO 81 % 134 BPM 03:04:05 AVERAGE SpO 91 %... - Page 79 5/TeleOximetry InstaReport fax—PI mode (page 2 of 2) pulsatile value InstaReport H GONZALES COMMENTS DR CASEY GENERAL LEGEND: LOW SpO NO DATA 00:00:00 01:00:00 02:00:00 03:00:00 04:00:00 04:00:00 05:00:00 06:00:00 07:00:00 08:00:00 08:00:00 09:00:00 10:00:00 11:00:00 12:00:00 pulsatile value InstaReport page 2 of 2 5-17...
- Page 80 3900/3900P User’s Manual 5-18...
-
Page 81: 6/Maintenance And Service
6/Maintenance and Service This chapter covers • Maintenance procedures: Cleaning the oximeter, as necessary. Recharging the battery, as necessary. Replacing the fuses in the power module, as necessary. • The Datex-Ohmeda repair policy. • A list of items you may order for the oximeter. To replace the paper roll in the printer, see chapter 4. -
Page 82: Recharging The Battery
3900/3900P User’s Manual To clean the outer surface of the oximeter, use a soft cloth dampened with a mild soap and water solution or one of the following solutions: 70 vol% isopropyl or ethyl alcohol quaternary ammonia 3 vol% hydrogen peroxide in water 100:1 bleach solution Cidex®... -
Page 83: Replacing The Fuses
6/Maintenance and Service Replacing the fuses Should a power problem blow one or both of the fuses in the power input module on the rear panel, you’ll need to replace them. Tool required Small flat-blade screwdriver, 5 mm (3/16 inch) WARNING: To protect against fire hazard, replace only with fuses of the same type and voltage rating. -
Page 84: Repair Policy And Procedure
3900/3900P User’s Manual Repair policy and procedure Contact Datex-Ohmeda or your authorized service office to order parts or for assistance. NOTE: Datex-Ohmeda does not warrant or service modems. Contact the manufacturer of your modem for service. Do not use malfunctioning equipment. Have the unit repaired by Datex-Ohmeda. After repair, perform the Checkout procedure (in chapter 2) to verify the unit is fully functional. -
Page 85: Parts List
6/Maintenance and Service Parts list Description Sensors Refer to the sensor chart that accompanies this manual for a list of the sensors you can use with the 3900/3900P. Only OxyTip sensors can be used with this monitor. 3900/3900P Pulse Oximeter User’s Manual Manual ships with a Quick Reference Label Danish 6050-0006-408... - Page 86 3900/3900P User’s Manual Description Power cord Socket Type: Commonly Used In: Australia, China 6030-0000-001 Canada, Japan, Latin America, USA 0208-0943-300 Continental Europe 6030-0000-006 Italy 6030-0000-002 United Kingdom 6050-0002-259...
-
Page 87: 7/Compliance And Specifications
7/Compliance and Specifications This chapter contains • Information about the tests that were conducted and the regulations with which the oximeter complies to assure its safe use. • Performance specifications for the oximeter. Compliance with standards The presence on the monitor of any symbol described below indicates compliance with the standard represented by that symbol. -
Page 88: Electromagnetic Compatibility (Emc)
3900/3900P User’s Manual Electromagnetic compatibility (EMC) The 3900 and 3900P pulse oximeters comply with the requirements of EN 60601-1- 2: Electromagnetic compatibility – Requirements and tests. EN 55011 Group I, Class B Emissions The 3900 and 3900P pulse oximeters were tested with an RS-232 cable and analog output cables attached when operating on AC power. -
Page 89: Specifications
7/Compliance and Specifications Specifications Unless otherwise indicated, all specifications are nominal and are subject to change without notice. Circuitry Microprocessor-controlled Automatic self-test of oximeter when powered on Automatic setting of default parameters Automatic alarm messages Trend (real-time and stored) data output of SpO , pulse rate, PI pulsatile value, and alarm messages to the built-in printer (3900P only), and through the... -
Page 90: Displays
3900/3900P User’s Manual Displays The displayed SpO , pulse rate, and PI values are updated every second. The plethysmographic waveform sweep is updated every 4 seconds. Numeric display (Light-Emitting Diodes–LEDs) Arterial oxygen saturation (SpO ) reading Pulse-rate reading Graphic display (Liquid Crystal Display–LCD) Plethysmographic waveform real-time or stored data graph pulsatile value real-time or stored data graph... -
Page 91: Pulse Rate
7/Compliance and Specifications Pulse rate Range: 30 to 250 bpm Accuracy assuming a constant pulse rate: ± 2% or ± 2 bpm (whichever is greater) Accuracy during conditions of clinical patient motion: unspecified Resolution: 1 bpm pulsatile value Range: 0.00 to 9.99 Averaging interval: 12 seconds Resolution: 0.01 Sensor emitter wavelength ranges... -
Page 92: Power
3900/3900P User’s Manual Power Consumption (typical): 15 watts (3900); 20 watts (3900P) Input voltage range: 90 to 264 VAC at 47-63 Hz Current (typical): 0.45 A(rms) at 100 V, 0.37 A(rms) at 120 V, 0.25 A(rms) at 220/ 230/240 V Current leakage With power on, forward or reverse polarity: 100 microamperes maximum Ground resistance: less than 0.1 Ω... -
Page 93: A/Screen Maps
A/Screen Maps SELECT DATA MODEM STATUS: (12 HRS.) SEND Go to page A-3 SEARCHING … SETUP LABELS H _ GONZALES _ _ _ _ _ – / + Go to page A-2 _ _ _ _ _ _ _ _ _ _ _ _ CLEAR DR_CASEY _ _ _ _ _ _ GENERAL _ _ _ _ _ _ _... - Page 94 3900/3900P User's Manual LABELS CLEARED CLEAR LABELS? LABELS CLEAR LABELS H _ GONZALES _ _ _ _ _ – / + CLEAR SpO AND PI TRENDS? CLEAR TREND _ _ _ _ _ _ _ _ _ _ _ _ CLEAR DR_CASEY _ _ _ _ _ _ CLEAR BOTH...
-
Page 95: Screen Maps
A/Screen Maps MODEM—SELECT DATA and SEND HOURS – / + SELECT DATA SELECT HOURS MODEM STATUS: (18 HRS.) ALL (12 HRS.) SEND SEARCHING … 12 HOURS SETUP PHONE NUMBER SEND REMOTE COMPUTER – / + 12 HOURS –––––––––––––––––––– CLEAR PHONE NUMBER? WAIT FOR CALL CLEAR ––––––––––––––––––––... - Page 96 3900/3900P User's Manual...
-
Page 97: Serial Device Communications
B/Communications This appendix covers • Serial device connections for computer/oximeter communication. • Analog device connections. WARNINGS: Electrical shock hazard • Measure the oximeter’s leakage current whenever an external device is connected to the RS-232. Forward and reverse polarity: 100 microamperes maximum. •... -
Page 98: Rs-232 Interface Cable-Serial Pinout
3900/3900P User’s Manual RS-232 interface cable—serial pinout Important: Use only a cable designed to interface directly between your computer’s connector and the RS-232 connector on the oximeter. Refer to Parts list in chapter 6. Do not use the Datex-Ohmeda modem/analog cable. Configure the RS-232 interface cable as follows: Pin 2 Oximeter receives data RS 232... -
Page 99: Serial Communication Output
B/Communications Serial communication output The oximeter is capable of two-way communication with computers: • Auto-output mode (default)—current data. • Trend-output mode—trend data stored in the oximeter's memory. To use these modes, • The oximeter must be connected to the computer. •... -
Page 100: Auto-Output Mode
3900/3900P User’s Manual Auto-output mode This is the default mode, which transmits monitoring data being currently collected. It is present when the oximeter begins communication with a computer, and is the mode the oximeter returns to when exiting from other modes. Messages relating to SpO , pulse rate, PI , and alarm limits violations that appear... -
Page 101: Rs-232 Serial/Analog Interface Cable-Analog Pinout
B/Communications RS-232 serial/analog interface cable—analog pinout Use the Datex-Ohmeda modem/analog cable to connect an analog recording device to the oximeter. Refer to Parts list in chapter 6. The analog pinout is as follows: RS 232 Pin 5 is used for signal ground Pin 6 is used for analog output 1 (white jack, SpO Pin 9 is used for analog output 2 (red jack, pulse rate) Pins 1, 2, 3, 4, 7, and 8 are not used. - Page 102 3900/3900P User’s Manual...
- Page 103 Index analog communications, B-4 fax modem, 5-6 analog interface cable, B-5 fax modem status, 5-3 alarms features, 1-1, 1-2 alarm limits display, 1-8 functional components, 1-3 alarm silence button, 1-7 PI r pulsatile value, 1-2 all mute, 1-7, 2-16 TruTrak+ technology, 1-1 high priority, 3-5 front panel, 1-6 low priority, 3-6...
- Page 104 Index modem, 5-1 pulse rate cancel transmission, 5-7, 5-10 display, 1-7 computer-initiated transmission, 5-9 data validity, 2-10 connect to oximeter, 5-2 pulse beep volume, 1-11 data transmission, 5-5 set alarm limits, 1-9 fax transmission, 5-6 specifications, 7-5 fax transmission messages, 5-7 guard tone, 5-11 initialization string, custom, 5-11 rear panel, 1-12...
- Page 105 Index PI r pulsatile value, 7-5 power, 7-6 pulse rate, 7-5 sensor wavelength ranges, 7-5 serial output, 7-6 SpO 2 , 7-4 SpO 2 display, 1-7, 2-10 data validity, 2-10 interfering substances, 7-4 set alarm limits, 1-9 trend display button, 1-10 limits below 80%, 2-6 specifications, 7-4 mode printed data, 4-3...
- Page 106 Index...
- Page 107 Oral statements about the 3900 or 3900P Pulse Oximeter do not constitute warranties, shall not be relied on by the buyer or user, and are not part of any warranty extended by GE Healthcare. Except as set forth in this limited warranty, GE Healthcare makes no warranties, expressed or implied, including the implied warranty of merchantability and the implied warranty of fitness for a particular purpose.
Need help?
Do you have a question about the TruTrak+ 3900 and is the answer not in the manual?
Questions and answers