
Subscribe to Our Youtube Channel
Related Manuals for Awoco RH-IT Split Insert Series


Summary of Contents for Awoco RH-IT Split Insert Series
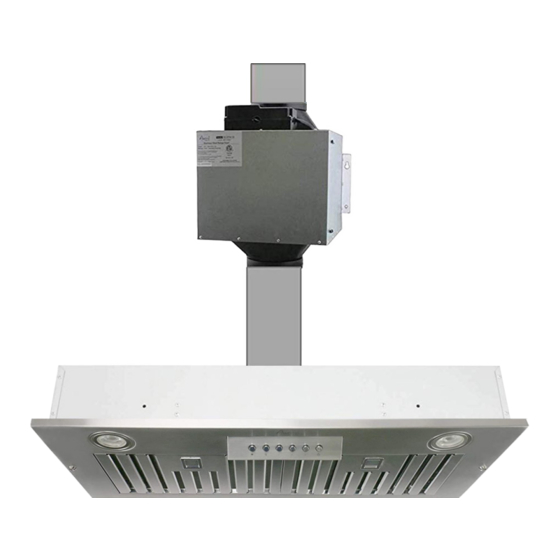
- Page 1 Ver. RH-IT-2020A OWNER'S MANUAL Range Hood Test Run Before Installation RH-IT Split Insert Series...
- Page 2 RH-IT Hood Unit to an Awoco Interior Blower Unit (Model: RH-SP##-BLW) ONLY. the noise level to make sure there isn't any unusual If you have an Awoco Exterior Blower Unit, or any • noise besides it coming from the wind blowing.
-
Page 3: Table Of Contents
Speed High (H) Important This Diagram is for connecting the wires from RH-IT Hood Unit to an Awoco Interior Blower Unit (Model: RH-SP##-BLW) ONLY. • If you have an Awoco Exterior Blower Unit, or any Blower Unit from other Brands: •... -
Page 4: Important Safety Instructions
IMPORTANT SAFETY INSTRUCTIONS TO REDUCE THE RISK OF FIRE, ELECTRIC SHOCK OR spillovers that may ignite. Heat oils slowly on low or PERSONAL INJURY, PLEASE READ THE FOLLOWING medium settings. CAREFULLY BEFORE ATTEMPTING TO ASSEMBLE, • Always turn the hood ON when cooking at high INSTALL, OPERATE OR MAINTAIN THE RANGE HOOD: heat or when flambeing food (i.e. -
Page 5: Installation Preparations
Have 24"-30" distance between the cooktop and In case of this manual destroyed or lost, please visit the range hood. 27" is recommended. https:/ /www.awoco.com and download a digital version. • Use uniformed duct of 6" round duct or 3-1/4 x 10”... -
Page 6: Venting System Setup
INSTALLATION PREPARATIONS DO NOT • End the venting system in an enclosed area indoors. • Use plastic vent. • Use no more than three 90° elbows. • Install 2 elbows together. • Install the range hood outside of the recommended height. -
Page 7: Installation
INSTALLATION Identify the Vent In and Out Openings on the Blower Unit • The Blower Unit has 2 vent openings on 2 opposite sides. One side with just a Vent Opening and the other side with a Black Speed Control Box and a Vent Opening. Blower Unit Installed Vertically Blower Unit Installed Horizontally Vent out to... -
Page 8: Installing The Blower Unit
Unit's Green Speed Wire!!!) Installing the Baffle Filters Important • Peel off the protective film from the baffle filters if If you have an Awoco Exterior Blower Unit, or any there's any: • Blower Unit from other Brands: • Soak the Baffle Filters into hot waters or use •... -
Page 9: Range Hood Use
RANGE HOOD USE Range Hood Control Panel • Power • Pressing the Power button can also turn on and resume the Range Hood to the speed the last time used. • After cooking, press the Power button once will activate the Delayed Auto Shutoff function. -
Page 10: Range Hood Care
RANGE HOOD CARE Cleaning Replacing the Filters: • Replace the baffle filters immediately should they WARNING become worn out due to aging or prolonged usage. • To reduce the risk of electrical shock, DO NOT clean Replacing the LED Lamps: the hood while it's operating. -
Page 11: Range Hood Troubleshooting
RANGE HOOD TROUBLESHOOTING Before Calling for Service Issue Possible Cause / Solution • Check if the range hood is plugged in. Make sure that all The range hood doesn't turn on power is turned ON, the fuse isn't blown and all electrical wirings are properly connected. - Page 12 Provide the product identification information, such mentioned above, subject to the conditions and as model number and lot number, and proof of limitations set forth below, Awoco will, at our options, original purchase. either repair or replace any part of our products •...
- Page 13 Website: www.awoco.com Customer Support: 1-888-412-3428...
Need help?
Do you have a question about the RH-IT Split Insert Series and is the answer not in the manual?
Questions and answers