
Related Manuals for Harvest TEC 201SS


Summary of Contents for Harvest TEC 201SS
- Page 1 Owner’s Manual O Sensor - Model 201SS & 200DM Small Square Baler Precision Moisture Sensing Kit Forage Harvester O Sensor-Owners-201SS-19-Imp&Metric 8/20...
- Page 2 Council of 17 May 2006 and other applicable European Directives including Directive 2014/53/EU on the Radio Equipment Directive and 2014/30/EU. The Harvest Tec moisture system will be turned on after being installed on a farm press which has been declard in conformity with the Machinery Directive.
-
Page 3: Table Of Contents
Android devices. It is recommended for proper communication that the original phone/tablet power cable is used. Many lower cost power cables do not meet requirements to properly charge and communicate to the Harvest Tec H2O module. Tools Needed SAE wrench set... -
Page 4: Installation Of Star Wheels
Installation of Star Wheels Two-Tie Balers Only The pair of star wheels will need to mount on the bottom side as close to the front of the bale chute as possible and at least 3/8” (10mm) away from any metal. They will need to maintain a safe distance away from the twine. Depending on the baler model the star wheels can mount in front of the needle arm Option A (below) if there is space available. -
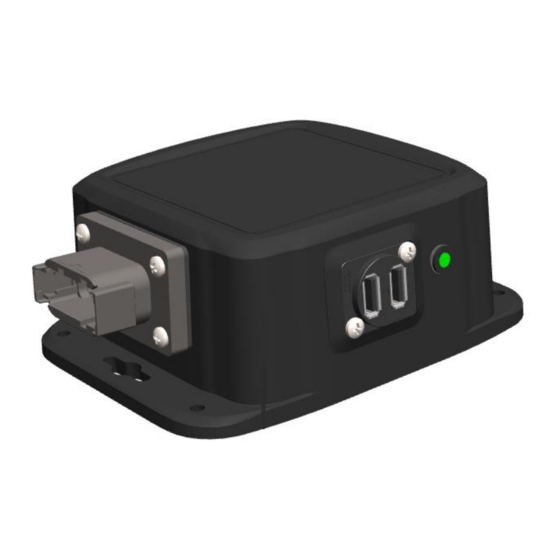
Page 5: Control Box Installation
Solid Green – Device is connected. **It is recommended for proper communication that the original phone/tablet power cable is used. Many lower cost power cables do not meet requirements to properly charge and communicate to the Harvest Tec H2O module. -
Page 6: Dye Marker Installation - 200Dm (Optional)
Note: The mounting location will potentially be different for the tank on each baler model. Due to various baler designs and modifications, Harvest Tec does not offer a specific mounting location for each baler model. Once a mounting location has been identified, mount the tank vertically as shown (right) with the tank lid on the top using the included hardware. -
Page 7: Wiring Diagram
1. Connect the power harness (006-2470P) to the tractor convenience outlet keyed power switch using the red wire with fuse to the positive side and the black wire to the negative. a. Any modifications of the power harness will void the warranty. Contact Harvest Tec before modifications are made. -
Page 8: Downloading H
Downloading H O App The H O App is available on any Apple or Android device running with the current operating system software and one previous version. Download the app by searching for H2O Sensor. App icon shown right. Screen Definitions Main Screen Brightness Adjustment –... -
Page 9: Operation
Operation After installation of the H O app, turn the system on by turning the key in the tractor on. When the connection is made the green light on the control box will illuminate. Reading Moisture When hay begins to enter the bale chamber, current moisture will be displayed Moisture Range 5-33% If the moisture being read is Greater Than 33%... -
Page 10: Dye Marker System
Operation (continued) Dye Marker System When using the dye marker turn on the setting as Dye Marker icon will now appear on the home screen. shown and select the desired moisture to mark a bale. The last bale moisture will be highlighted in red and *Bales at or above this moisture level will be marked. -
Page 11: H 2 O Firmware Update Through App
It is recommended for proper communication that the original phone/tablet power cable is used. Many lower cost power cables do not meet requirements to properly charge and communicate to the Harvest Tec H2O module. -
Page 12: Pin Outs
Pin Outs H2O Wired Moisture Control 006-2473SB Pin 1 Module Power Pin 2 Red/Black EOB + Pin 3 Black EOB - Pin 4 Grey Left Moisture Sensor Pin 5 Brown Right Moisture Sensor Pin 6 Purple EOB Signal Pin 7 Yellow CAN + Pin 8... -
Page 13: Parts Breakdown
Parts Breakdowns Star Wheels Description Part# Washer (per side) 006-4642K Dust Seal (per side) w/006-4642K Snap Ring (per side) w/006-4642K Swivel 006-4642A Star Wheel 030-4641E Insert w/ Ref # 5 Wiring grommet 008-0821A Star wheel block 006-4641D Plug Fitting 003-F38 Block Cover 006-4641B Star wheel assembly... -
Page 14: Fixed Chamber End Of Bale Sensor Kit
Fixed Chamber End of Bale Sensor Kit Description Part # Description Part # End of Bale Sensor 006-7400 EOB Extension 006-7400EXT End of Bale Bracket 001-4648RB Complete Kit 200FCA O Dye Marker Assembly Example Description Part # Description Part # H2O Harness (10’) 006-2470C 1/4"... -
Page 15: Warranty Statement
Harvest Tec, Inc. within 30 days of the failure. If it is determined that a non-Harvest Tec branded hay preservative has been used inside the Harvest Tec applicator system where the failure occurred, then Harvest Tec reserves the right to deny the warranty request at their discretion. - Page 16 HARVEST TEC, INC. P.O. BOX 63 2821 HARVEY STREET HUDSON, WI 54016 USA PHONE: 715-386-9100 FAX: 715-381-1792 Email: info@harvesttec.com...
Need help?
Do you have a question about the 201SS and is the answer not in the manual?
Questions and answers