Xerox Versant 2100 Press Quick Start Manual
Hide thumbs
Also See for Versant 2100 Press:
- System administration manual (104 pages) ,
- Customer expectation & installation manual (49 pages) ,
- Security manual (45 pages)
Table of Contents
Advertisement
Quick Links
Advertisement
Table of Contents

Subscribe to Our Youtube Channel
Related Manuals for Xerox Versant 2100 Press


Summary of Contents for Xerox Versant 2100 Press
- Page 1 Version 1.0 July 2014 702P02816 ® Xerox Versant 2100 Press Quick Start Guide...
- Page 2 ©2014 Xerox Corporation. All rights reserved. Xerox , Xerox and Design , and Versant ® ® are trademarks of Xerox Corporation in the United States and/or other countries. FreeFlow , SquareFold , and CentreWare are trademarks of Xerox Corporation in the ®...
-
Page 3: Table Of Contents
2 Stock Library Manager................2-1 Desktop shortcuts for the Stock Library Manager application......2-3 3 Where to Find Help...................3-1 Diagnostic Tool........................3-1 Help on the Xerox Web Site.....................3-1 Print Server Customer Documentation................3-2 4 Paper and Other Media................4-1 Loading paper in trays 1, 2, and 3.................4-1 Loading Paper in the Bypass Tray (Tray 5)..............4-2... - Page 4 Paper Jams inside the Print Engine................6-2 Clearing Jams in Transfer Drawer (Area 2)...........6-2 Clearing Jams in the Output Module (Areas 3, 4 and 5)......6-5 Paper Jams in Trays 1-3.....................6-9 Paper Jams in the Bypass (Tray 5)................6-10 Xerox ® Versant 2100 Press Quick Start Guide...
-
Page 5: Product Overview
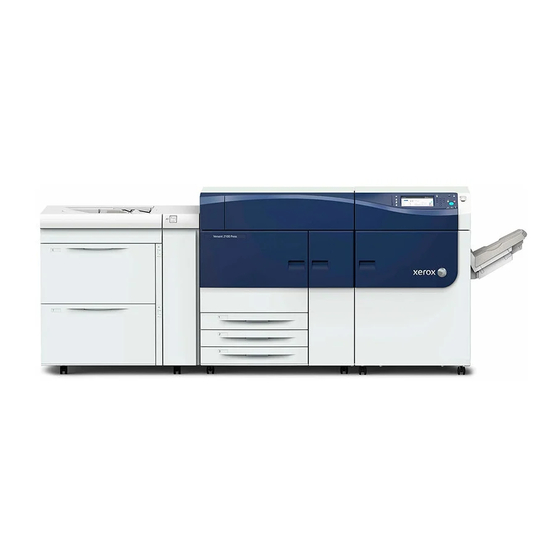
The Xerox ® Versant 2100 Press is a full color/black and white, auto-duplex press that operates at a speed of 100 prints per minute (when printing on 8.5 x 11 inch/A4 paper). The system configuration consists of the Oversized High Capacity Feeder (OHCF/Trays 6 and 7), the print engine with internal feeding trays (Trays 1-3), and an embedded Control Panel and touch screen (the user interface). -
Page 6: Press Components
Open this door to access the registration area and paper handling drawer to clear paper jams. This area also includes the Transfer Drawer and Xerographic Drawer for replacing customer replaceable units (CRUs). Xerox ® Versant 2100 Press Quick Start Guide... -
Page 7: Locating The Press Serial Number
Paper Tray 1 drawer: a) At the press, fully open Paper Tray 1. b) At the left of the feeder tray, on the press frame, locate the plate with the serial number (SER#). Xerox ® Versant 2100 Press Quick Start Guide... -
Page 8: Control Panel
Directly touch the screen to select and set features. Displays instructional and informational messages, fault clearance procedures and general press information. 6 Log In/Out button Use to log in and out of Administrator mode or Authentication mode with user ID and password. Xerox ® Versant 2100 Press Quick Start Guide... -
Page 9: Energy Saver Mode
If Low Power Mode is set to 15 minutes and Sleep Mode is set to 60 minutes, Sleep Mode activates after 60 minutes of total inactivity, not 60 minutes after Low Power Mode begins. Xerox ® Versant 2100 Press Quick Start Guide... -
Page 10: Low Power Mode
The Main Power switch located inside the Center Front Door. This switch is used mainly by the Xerox Service Representative when servicing the press. In rare problem solving cases, you may be directed to power off the press with this switch. -
Page 11: Power On/Off The Press
Check that the Main Power switch behind the Center Front Door is On and then press the Power On/Off button on top of the print engine to the ON position. The Ready Indicator light displays green. Xerox ® Versant 2100 Press Quick Start Guide... -
Page 12: Feeding And Finishing Devices
5. For system support, user help, and service support, call the appropriate number. For the specific number in your area, go to www.xerox.com and select the Support link. Xerox ® Versant 2100 Press Quick Start Guide... -
Page 13: Stock Library Manager
The System Settings feature is available only when logged on as Administrator 6. View tray properties, assign a specific stock to a tray, and set a variety of parameters for that assigned stock Xerox ® Versant 2100 Press Quick Start Guide... - Page 14 For detailed information on the Stock Library Manager application and how to use it, go the print server and from the Stock Library Manager main window, select Help in the upper left corner of the window. Xerox ® Versant 2100 Press Quick Start Guide...
-
Page 15: Desktop Shortcuts For The Stock Library Manager Application
3. To open/access either the Stock Library Manager application or the Stock Library Manager Profiles folder, double click on the desired icon. Depending on which icon is selected, either the Stock Library Manager application opens or the folder containing the Stock Library list opens. Xerox ® Versant 2100 Press Quick Start Guide... - Page 16 Stock Library Manager Xerox ® Versant 2100 Press Quick Start Guide...
-
Page 17: Where To Find Help
Help on the Xerox Web Site For technical product support, Xerox supplies, customer documentation, and answers to frequently-asked questions, go to www.xerox.com. You will find the latest documentation and the knowledge base under Support & Drivers. Use the Contact link for specific contact information/telephone numbers in your area. -
Page 18: Print Server Customer Documentation
The EFI Print Server Help menu on the Command WorkStation window is designed to provide information on specific work flows when using the Command WorkStation. Additional user documentation supplied by EFI is available to you from www.xerox.com under the Support and Drivers link. -
Page 19: Paper And Other Media
Edge Guide until it lightly touches the edge of the material in the tray. Do not load materials above the MAX line located on the rear Edge Guide. 7. Gently push in the tray until it comes to a stop. Xerox ® Versant 2100 Press Quick Start Guide... -
Page 20: Loading Paper In The Bypass Tray (Tray 5)
4. Open the ream of paper with the seam side facing up. 5. Fan the sheets before loading them into the tray. 6. Insert the paper or media into the tray until it stops. Xerox ® Versant 2100 Press Quick Start Guide... -
Page 21: Loading Paper In The Ohcf
Select the stock and assign the stock to the tray to be used. 9. Select OK to save the information and close the Tray Properties window. Xerox ® Versant 2100 Press Quick Start Guide... - Page 22 Paper and Other Media Xerox ® Versant 2100 Press Quick Start Guide...
-
Page 23: Maintenance
Maintenance Ordering Supplies Xerox supplies, paper, and throughput material can be ordered from the web site www.xerox.com and clicking on the Supplies link. For any item that is not orderable from the web site, contact your Xerox Service Representative. Note The cleaning pads used with the ROS Window cleaning wand are not orderable. -
Page 24: Replacing Consumable Supplies
Service. Note Store supply items and Xerox parts in their original packages in a convenient location. Always recycle/dispose the used CRU according to the disposal instructions supplied with the new CRU. - Page 25 Maintenance 2. Lift up and open the Bypass Tray cover to access the feed roll components. 3. Remove and replace the feed roll by squeezing the metal shaft and lifting out. Xerox ® Versant 2100 Press Quick Start Guide...
- Page 26 Select System Settings > Common Service Settings > Maintenance. d) Use the up/down arrow buttons to access the next Maintenance screens. e) Select the Technical Key Operator icon. The Technical Key Operator feature displays. Xerox ® Versant 2100 Press Quick Start Guide...
-
Page 27: Replacing The Ohcf Feed Rolls
After you replace all of the feed rolls, contact your system administrator who will reset the HFSI usuage counter for these CRU components to zero (0). 1. Pull open the top tray of the OHCF to access the feed components. Xerox ® Versant 2100 Press Quick Start Guide... - Page 28 Lift out the nudger roll. 4. Replace the new roll by squeezing both ends of the metal shaft, and pushing down on the black tab, insert and release the roll ends into the notches. Xerox ® Versant 2100 Press Quick Start Guide...
- Page 29 6. Slide the retard assembly all the way to the left so it is out of the slots. Pull the asssemly out towards you until completely removed from the tray. Set aside. Xerox ® Versant 2100 Press Quick Start Guide...
- Page 30 8. Finally, replace the retard roll. Squeeze the orange shafts of the retard roll and lift out of the assembly. Xerox ® Versant 2100 Press Quick Start Guide...
- Page 31 From the screen that displays, select the Tools icon. c) Select System Settings > Common Service Settings > Maintenance. d) Use the up/down arrow buttons to access the next Maintenance screens. Xerox ® Versant 2100 Press Quick Start Guide...
-
Page 32: Replacing A Dry Ink/Toner Cartridge
5. Dispose of or recycle the cartridge per your local authorities and regulations. In the United States, also refer to the Electronic Industries Alliance website: www.eiae.org. For more information about Xerox environmental programs, go to www.xerox.com/environment. 5-10 Xerox ®... -
Page 33: Replacing The Waste Dry Ink/Toner Bottle
After you replace the Waste Dry Ink/Toner bottle, the system automatically resets the HFSI usage counter for this CRU component to zero (0). Check the Consumables Supply screen to verify the reset. 1. Ensure that the press is stopped (not running any jobs). Xerox ® Versant 2100 Press 5-11 Quick Start Guide... - Page 34 7. Remove a new, empty waste bottle from the packaging. 8. Hold the center part on the top of a new bottle and insert it evenly and gently into the press until it comes to a stop. 5-12 Xerox ® Versant 2100 Press Quick Start Guide...
-
Page 35: Replacing A Drum Cartridge
Caution Replace drum cartridges while the press is powered ON. 1. Ensure that the press is stopped and not currently printing jobs. Proceed to the next step. Xerox ® Versant 2100 Press 5-13 Quick Start Guide... - Page 36 Maintenance 2. Open the press Left and Center Front doors. 3. Rotate and turn the R1-R4 Drum Drawer Handle to the unlock position. 5-14 Xerox ® Versant 2100 Press Quick Start Guide...
- Page 37 5. Unwrap the sheet covering the new drum cartridge and place it under the cartridge. Some drum cartridges may include a protective film. Remove the film on the drum cartridge, if the film is present. Xerox ® Versant 2100 Press 5-15 Quick Start Guide...
- Page 38 8. Install the new drum cartridge into the press following the guides with the side marked front facing the front. 5-16 Xerox ® Versant 2100 Press Quick Start Guide...
-
Page 39: Replacing The Suction Filter
HFSI counter for this CRU to zero (0). Caution Make sure the press is powered off before performing this procedure. 1. At the back of the press, locate the Suction filter cover on the lower panel. Xerox ® Versant 2100 Press 5-17 Quick Start Guide... - Page 40 Maintenance 2. Use the Torx driver to remove the screw on the right side of the cover by turning the screw counterclockwise. 3. Pull out and remove the Suction filter cover. 5-18 Xerox ® Versant 2100 Press Quick Start Guide...
- Page 41 From the screen that displays, select the Tools icon. c) Select System Settings > Common Service Settings > Maintenance. d) Use the up/down arrow buttons to access the next Maintenance screens. Xerox ® Versant 2100 Press 5-19 Quick Start Guide...
-
Page 42: Removing The Fuser Module
If you exchange the fuser type, you will need to also connect the associated jumper to the assembly to identify the Fuser Width ID being used: Connecting and Changing the Fuser Width ID Prerequisite: Prepare Your Tools 5-20 Xerox ® Versant 2100 Press Quick Start Guide... - Page 43 1. Power off the press by pressing the On/Off button on the right side of the Control Panel. 2. When the indicator light stops blinking, open the Left Front Door and the Center Front Door and switch off the main power switch. Xerox ® Versant 2100 Press 5-21 Quick Start Guide...
- Page 44 Fuser Belt Module Handle to push through the hole in the Transfer Drawer rail to release the tabs on each side of the drawer. 5-22 Xerox ® Versant 2100 Press Quick Start Guide...
- Page 45 Pinch the tabs on both sides of the black connector and lift to remove. b) Using a Torx driver, gently push the tabs in on each of the three white connectors while pulling slightly on the wires to remove. Xerox ® Versant 2100 Press 5-23 Quick Start Guide...
- Page 46 10. Locate the storage area of the press that holds the pack of Fuser and Pressure Roll Lift Handles. Remove the Lift Handles pack from the storage area. 11. Place the Fuser Belt Module Handles on the posts on each end of the module. 5-24 Xerox ® Versant 2100 Press Quick Start Guide...
-
Page 47: Replacing The Stripper Finger Assembly
13. Place it on the Fuser Holding Rack provided. Align the edge of the roller to the scribe mark on the holding rack frame. 14. If damaged or end-of-life, place it inside the original box and return to Xerox for recycling. -
Page 48: Replacing The Pressure Roll Assembly
Install the Pressure Roll Handles under the bearings on each side of the roll. c) Lift the Pressure Roll straight out of the press and place in an available box. 5-26 Xerox ® Versant 2100 Press Quick Start Guide... -
Page 49: Replacing The Pressure Roll Cleaning Pad Assembly
If a different width fuser is going to be installed, remove the new fuser from its packaging. Otherwise, you will be retrieving the fuser you removed and placed on the Holding Rack. Xerox ® Versant 2100 Press 5-27 Quick Start Guide... - Page 50 There are two in the front and one in the back of the assembly. Proper alignment ensures proper performance. 1. Place the Fuser Belt Module Handles on each side of the belt and reinsert the required Fuser Belt Module into the Fuser Assembly. 5-28 Xerox ® Versant 2100 Press Quick Start Guide...
- Page 51 The Belt Module can be moved front to back and side to side to achieve the proper placement. Make sure the fuser is seated correctly and completely or the Fuser Top Cover will not close and machine damage may result. Xerox ® Versant 2100 Press 5-29 Quick Start Guide...
- Page 52 10. Ask the administrator to reset the HFSI count for this newly-replaced CRU component. The HFSI components that need to be reset at the press touch screen are: Belt Module 1 (No Fuser connector) Belt Module 2 (Fuser connector 1) 5-30 Xerox ® Versant 2100 Press Quick Start Guide...
-
Page 53: Extending Fuser Life
The fuser types available are: 11 inch (A4/Letter SEF) width fuser 12 inch (A3 SEF/A4/Letter LEF/304.8 mm) width fuser 13 inch (SRA 3/330.2 mm) width fuser Custom and other size papers Xerox ® Versant 2100 Press 5-31 Quick Start Guide... - Page 54 Common Settings section of the System Administrator Guide. Always set the NVM settings before using the new fuser. 2. Open both the Left and Front Center Doors. 3. Locate the black fuser cover. 5-32 Xerox ® Versant 2100 Press Quick Start Guide...
- Page 55 6. Locate the two bypass fuser connectors in the kit. The black resistor jumper (left) is used for the 2 range value and the blue jumper (right) represents the 3 range value. For the Range Numbers, refer to the Bypass Connector table in Extending Fuser Life Xerox ® Versant 2100 Press 5-33 Quick Start Guide...
- Page 56 10. If the paper in the print job does not match the width set for the fuser, an error message displays and the job will not print. Cancel the job and submit the correct paper width for that job or install the correct width range fuser. 5-34 Xerox ® Versant 2100 Press Quick Start Guide...
-
Page 57: Paper Jams
You can get injured or burned. Switch off the press immediately and contact the Customer Support Center. Xerox ® Versant 2100 Press Quick Start Guide... -
Page 58: Paper Jams Inside The Print Engine
There are several jam clearance areas of the Transfer Drawer: Registration and Alignment Transport, Registration Roll, Duplex Transport and entrance to Fuser. 1. Make sure that the press has stopped printing before opening doors. 2. Open the Front Left and Center Doors. Xerox ® Versant 2100 Press Quick Start Guide... - Page 59 3. Unlock and pull out the Transfer Drawer by turning the green 2 handle (at the center) to the right until it is in the horizontal position. Pull the drawer straight out until it stops. Xerox ® Versant 2100 Press Quick Start Guide...
- Page 60 5. If paper is jammed at the top of the Transfer Module, remove paper from the registration roll (area 2a) by pulling it straight out. 6. Locate area 2c and pull any jammed paper out towards the left. Xerox ® Versant 2100 Press Quick Start Guide...
-
Page 61: Clearing Jams In The Output Module (Areas 3, 4 And 5)
Exit Module Drawer. Area 3 clears jams at the entrance baffle. Always refer to the press touch screen for what areas of the press have a paper jam. 1. Make sure that the press has stopped printing before opening doors. Xerox ® Versant 2100 Press Quick Start Guide... - Page 62 3. To clear the entrance baffle area (3a and 3b), lift the Upper Cooling 3a lever and also rotate the 3b knob clockwise to advance the paper jammed in the Module Entrance Roll. Ensure paper has completely moved through the roll beyond the entrance area. Xerox ® Versant 2100 Press Quick Start Guide...
- Page 63 5. At the far right of the press, locate the 5a lever and 5b knob. Pull down on the 5a lever to access the inverter area and remove any paper. Rotate the 5b knob clockwise to advance any paper coming down into the inverter. Xerox ® Versant 2100 Press Quick Start Guide...
- Page 64 Rotate the handle to the left to lock the drawer in place. 10. Close the Front Right Door completely. The press will not operate if a door is open even slightly. Xerox ® Versant 2100 Press Quick Start Guide...
-
Page 65: Paper Jams In Trays 1-3
This may cause a malfunction. Check where the paper jam occurred before clearing the problem. 1. Open the tray where the paper jam occurred. 2. Remove the jammed paper. 3. Push the tray in gently until it comes to a stop. Xerox ® Versant 2100 Press Quick Start Guide... -
Page 66: Paper Jams In The Bypass (Tray 5)
2. Lift and open the Cover Tray located near the entrance of the press and remove any jammed paper. 3. Close the tray cover. Note If paper is torn, check inside the press and remove it. 4. Reload paper into the tray and resume printing. 6-10 Xerox ® Versant 2100 Press Quick Start Guide...
Need help?
Do you have a question about the Versant 2100 Press and is the answer not in the manual?
Questions and answers