Table of Contents
Advertisement
Quick Links
Advertisement
Table of Contents

Subscribe to Our Youtube Channel
Related Manuals for Brainboxes CC-357


Summary of Contents for Brainboxes CC-357
- Page 1 %5$ 1 %2 (6 ¢¢—T¢¢—TGQ˜ "= 1.1 EDITION February 2000...
- Page 2 PCI VELOCITY RS232/422/485 CARD These products conform to the following standards: CE standard: EN55022:1987 Class B IEC 801-2: IEC 801-3: IEC 801-4: PCB: IEC 249-2-5 NEMA L1 1-10 DIN 40802 UTE C 93-711 BS 4584 MIL P-13949E UL Approved to 94 V0 TIA /EIA: 485 A (1995) ,423 B (1996) Year 2000:...
-
Page 3: The Layout Of This Manual
PCI VELOCITY RS232/422/485 CARD OUTLINE CONTENTS Chapter 1 - Supplied Serial Solution Software. Chapter 2 - PCI Velocity RS232/422/485 Specifications. Chapter 3 - PCI Velocity RS232/422/485 Software Configuration Guide. Chapter 4 – RS232 Pinouts and Cabling Chapter 5 - Additional RS422/RS485 Information. The Layout Of This Manual Chapter 1 - Serial Solution Software , is an overview of this... -
Page 4: Table Of Contents
TABLE OF CONTENTS CHAPTER 1 SERIAL SOLUTIONS SOFTWARE ... 7 ... 7 NTRODUCTION NTRODUCING ERIAL ERIAL OLUTIONS ERIAL OLUTIONS ERIAL OLUTIONS ERIAL OLUTIONS OMPLETE OCUMENTATION AND CHAPTER 2 PCI VELOCITY RS232/422/485 HARDWARE SETUP... 11 ... 11 NTRODUCTION PCI RS232/422/485 C . - Page 5 Determining PCI RS422/485 Resources... 23 Windows 3.x Software Installation..24 Serial Port Installation..25 Configuring The COM Ports... 27 Deleting Ports in Windows..28 Restarting Windows..28 95 I INDOWS NSTALLATION Card Settings In Windows 95 ... 33 PCI RS232 Port Settings In Windows 95...
- Page 6 CHAPTER 5 ADDITIONAL RS422/485 OPERATION ... 70 RS422 S TANDARD RS485 S TANDARD ERMINATING MPEDANCE HERE IS NO NEED TO ADD ANY MORE AT THE HORT RS422 O PERATION RS422 Serial Port Cables..73 RS485 O PERATION The three wiring schemes given described below are: -... 74 RS485 Cable...
-
Page 7: Chapter 1 Serial Solutions Software
PCI Velocity RS232/422/485 SERIAL SOLUTIONS SOFTWARE Introduction. This chapter is a brief description of the Serial Solutions software package; this can also be purchased SEPARATELY and is available from YOUR DEALER. Introducing Serial Solution Software. The perfect partner for any Serial Port is Serial Solutions Software! Serial Solutions is a fully featured suite of programs designed to squeeze the most from PC serial communications. -
Page 8: Chapter 1 Page 8
PCI Velocity RS232/422/485 of the Serial Solution. implementing both hardware handshaking using any combination of the DTR, DSR, CTS, RTS, and DCD lines, and a software handshake using the XON/XOFF protocol. NewCOM24.sys A device driver providing support for 24 ports. NewCOM32.sys A device driver providing support for 32 ports. -
Page 9: Serial Solutions For Windows 3. X
PCI Velocity RS232/422/485 the particular IRQ line. The program correctly identifies the UART type by employing the built in loop back capability of the PC serial port chip, a full test of the baud rate generator, transmitting and receiving buffer, parity enable and start stop bit is performed. -
Page 10: Serial Solutions For Windows Nt
PCI Velocity RS232/422/485 sscardui.dll ssportui.dll The device manager configuration DLLs and… ssenum.vxd ssv485.vxd ...the virtual device drivers providing the shared ssvel.vxd interrupt handlers and dispatch routines etc for the ssmult.vxd various Serial Solutions serial cards. ssm485.vxd Serial Solutions For Windows NT. Windows NT has an improved communication API and directly supports up to 255 ports. -
Page 11: Chapter 2 Pci Velocity Rs232/422/485 Hardware Setup
PCI Velocity RS232422/485 PCI VELOCITY RS232/422/485 HARDWARE SETUP Introduction. This chapter details the specifications of the PCI Velocity RS232/422/485 card and explains how to configure the RS485 Multiplex jumpers present on this card. This half-sized card will work happily in any PCI 2.0 or greater compliant PC compatible. PCI RS232/422/485 Card Features. -
Page 12: Autogating
PCI Velocity RS232422/485 PCI RS422/485 Serial Port Features Clock Input: Drivers: High Level Voltage: Low Level Voltage: High Level Current: Low Level Current: Receivers: Difftial I/P threshold: 200mV max. Hysteresis: Input Impedance: Autogating. Multitasking operating systems, like Windows 95, Windows NT, OS/2 and UNIX, cannot successfully use the RTS line to control the gating of the PC’s transmitter. -
Page 13: Chapter 2 Page 13
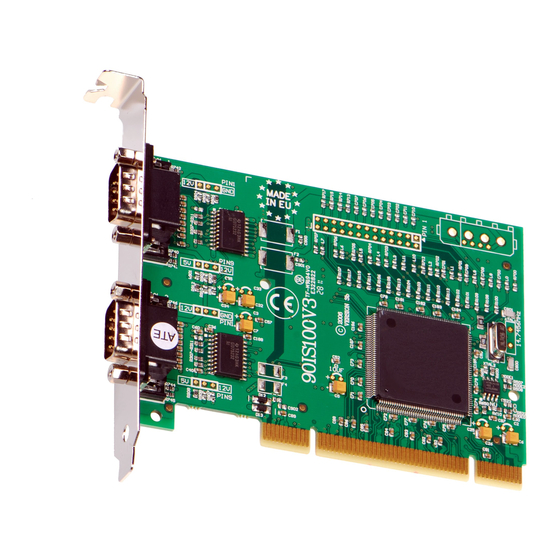
PCI Velocity RS232422/485 Figure 2-1. PCI VELOCITY RS232/422/485 Layout. Figure 2-2. 9 Pin D Connector RS422/485 Port Pinouts. PIN 6 - RECEIVED DATA (RXD-) PIN 7 - RECEIVED DATA (RXD+) PIN 8 - CLEAR TO SEND (CTS-) PIN 9 - CLEAR TO SEND (CTS+) Figure 2-3. -
Page 14: Configuring The Pci Rs232/422/485 Card
PCI Velocity RS232422/485 Configuring The PCI RS232/422/485 Card. PCI cards require no hardware configuration for IRQ and address allocation - this is done automatically at start up by the PC. However, the PC Velocity RS232/422/485 has a set of jumpers for configuration of RS485 multiplex modes, details of configuring these jumpers is shown below. -
Page 15: Chapter 3 Installing The Pc Card In The Computer
PCI Velocity RS232422/485 Installing the Card CHAPTER 3 INSTALLING THE PC CARD IN THE COMPUTER. Serial Ca r d Installation. Once the card has been correctly configured it can then be installed in the PC. Finally cables should be attached and communication with the serial peripheral devices should be established. -
Page 16: Chapter 3 Page 16
PCI Velocity RS232422/485 Figure 3-1. Removing Blanking Cover STEP 3: Choose an empty appropriate expansion slot. Remove the blanking cover protecting the slot on the PC back panel. KEEP the blanking cover screw safely for later (Figure3-1). Figure 3-2. Inserting The PC Serial Card. STEP 5: The D connectors should fit neatly through the slot’s aperture to the outside world. -
Page 17: Problems
PCI Velocity RS232422/485 Problems! If the system fails to power up normally check the following.: i.) Ensure that the PC Serial card is installed correctly. ii.) Ensure that other cards in the PC have not been upset. iii.) Ensure that the power is connected and the PC is switched If all these have been checked and the PC still does not power up then there is probably a fault in the hardware. -
Page 18: Chapter 4 Pci Velocity Rs232/422/485 Software Configuration
PCI Velocity RS232422/485 PCI VELOCITY RS232/422/485 SOFTWARE CONFIGURATION Introduction. This section contains the installation procedures of the PCI VELOCITY RS232/422/485 card, with the DOS, Windows 3.x Windows 95, Windows 98/Millennium, Windows NT and Windows 2000 operating systems. The setup procedures in this chapter assume that your PC has only one serial port present. -
Page 19: Baud Clock Control Is At I/O Address 02D0
PCI Velocity RS232422/485 Baud clock control is at I/O address 02d0 Write 0xf6 for /8 (default), 0xf2 for /4, 0xd6 for /2, 0xd2 for /1. Note down IRQ and I/O which in this case: The IRQ = 11 The I/O address = 0140 NEWCOM.SYS Parameters. -
Page 20: Chapter 3 Page 20
PCI Velocity RS232422/485 Type 1 RS422 RTS/CTS - The PC only transmits when CTS is input true. When the PC is able to receive its sets RTS output true. The DSR and DCD inputs are ignored. The DTR output line is set true just in case the external serial device needs a true signal. -
Page 21: Configuring And Installing Newcom.sys
PCI Velocity RS232422/485 Configuring And Installing NEWCOM.SYS To load the Serial Solutions for DOS device driver an entry needs to be added to the CONFIG.SYS file. Any simple text editor, EDIT for example, can edit the CONFIG.SYS file for example. The installation procedure given below is for a PCI RS232/422/485 as COM5 &... -
Page 22: Hardware Handshaking
PCI Velocity RS232422/485 Software Setup Hardware Handshaking. /H,4 Type 4, 3 Wire Handshake selected for all ports. Type 4, 3 Wire Handshake selected for all ports. Modifying Command Line Parameters. When “assembled” the NEWCOM.SYS command line looks like… DEVICE=NEWCOM.SYS /A5-6,0140 /I 11,5-6 /B6 /S 512 /H,4 …and should be entered into the CONFIG.SYS file. -
Page 23: Windows 3.X Installation
PCI Velocity RS232422/485 Windows 3.x Installation. The Windows 3.x installation procedure consists of two steps after the PCI Velocity RS232/422/485 card is inserted: 1. Determining the resources that the PCI Velocity RS232/422/485 card has claimed. 2. Informing Windows 3.x of those resources. Determining PCI RS422/485 Resources. -
Page 24: Windows 3.X Software Installation
PCI Velocity RS232422/485 Software Setup Windows 3.x Software Installation. Place the supplied Serial Solutions CDROM in a suitable drive. From File Manager choose ‘Run’ and enter D:\diskimg\sswin3x\setup (where D: is the path to the CDROM drive Containing the disk). Click OK, the Setup Program Main Screen is displayed: By default, all component options will be installed, selecting the “Del All”... -
Page 25: Serial Port Installation
PCI Velocity RS232422/485 When you have made your choice of Component Options click Continue and when the setup program has finished select the Done button. Note: If the Serial Port driver options has been selected, after the setup program has finished, Windows will display a restart message - answer Yes and Serial Solutions will be ready to run upon Windows restarting. -
Page 26: Chapter 3 Page 26
PCI Velocity RS232422/485 To add a COM port: Click on the add button and a Window similar to the following will be displayed: In Standard Settings: In the COM Base field, enter the value 0140. Note: COM ports are defined with an i/o address range, which in this case, begins at 0140 and all subsequent ports have an i/o address that is 8 higher than the previous. -
Page 27: Configuring The Com Ports
PCI Velocity RS232422/485 Note: The values used in the above section were those returned by the BBCARDS program, as described in the above section. When you have finished, click on OK. A restart message will be displayed; to save time only restart when both ports have been added and correctly configured. -
Page 28: Deleting Ports In Windows
PCI Velocity RS232422/485 Note: A port that has been added has the default values of: Baud Rate: Data Bits: Parity: top Bits: Flow: Change the communications Settings in the COM Ports to match the baud rate, parity settings etc. of the remote serial device. Deleting Ports in Windows. -
Page 29: Windows 95 Installation
PCI Velocity RS232422/485 Windows 95 Installation. To obtain a trouble free mix-and-match of the COM ports: Switch off your computer, insert your PCI RS422/485 card into a free PCI slot, as described in the section “Hardware Installation” in Chapter 2, and switch your computer on again. During the booting process, Windows 95 will detect the PCI Velocity RS232/422/485, but will display it simply as a “PCI CARD”, and you will briefly see a message box to this effect. -
Page 30: Chapter 3 Page 30
PCI Velocity RS232422/485 Software Setup The Wizard should then display the following: Click Other Locations In the location space type <drive>:\diskimg\sswin9x where drive is the appropriate letter for your CDROM drive Click OK Chapter 3 Page 30... -
Page 31: Chapter 3 Page 31
PCI Velocity RS232422/485 Software Setup Click Finish After copying the file, Windows 95 will then detect each of the serial ports in turn and install them as velocity ports. Using the right-hand mouse button click on the My Computer icon on your desktop. Click on Properties. Chapter 3 Page 31... -
Page 32: Chapter 3 Page 32
PCI Velocity RS232422/485 Software Setup Click on the Device Manager tab When the “Device Manager” is viewed the PCI Velocity RS232/422/485 card will appear under the “Multi-function adapters” branch. Also, two velocity ports will appear under the “Ports (COM & LPT) branch”. For most users who have 4 or less COM ports the new port will appear as COM5 as pictured above, for users with more than 5 COM ports the new port will appear as the first available COM... -
Page 33: Card Settings In Windows 95
PCI Velocity RS232422/485 Card Settings In Windows 95 Select the PCI Velocity RS422/485 card from the “Multi- Function Adapter” entry in Device Manager serial and click on properties to view the cards general properties. Click on the Serial Solutions tab Solutions tab produces. The I/O address and interrupt are assigned to the card by the "Plug and play"... -
Page 34: Pci Rs232 Port Settings In Windows 95
PCI Velocity RS232422/485 Software Setup In this window, the COM port assignment may be changed, simply by selecting a new COM port value from the pull down menu relevant to the port. However, COM port usage other than those for the PCI 1 Port Velocity RS422/485 card itself are not checked, so it is advisable to first check which COM ports are in use - port availability can be checked by viewing the Device Manager: All COM ports present will be listed under the entry “Ports (COM... -
Page 35: Chapter 3 Page 35
PCI Velocity RS232422/485 Settings available in this window are: 1. Baud Rate - determines the baud rate at which the selected port operates, the maximum value available is dependant upon the Maximum Baud Rate Setting (see below.) 2. Data Bits. 3. -
Page 36: Maximum Baud Rate Settings
PCI Velocity RS232422/485 Maximum Baud Rate Settings. 115200 1200 1800 Selectable 2000 Baud 2400 Rates 3600 4800 7200 9600 19200 38400 57600 115200 Note: Many serial comms applications will not actually register the ports as running at baud rates of above 115200. 7. -
Page 37: Chapter 3 Page 37
PCI Velocity RS232422/485 Clicking on the Serial Solutions tab will display: Settings available in this window are: 1. FIFO Settings. Enable FIFO - turns the selected ports FIFO buffer on or off. It is strongly recommended that the FIFO for both ports is left enabled. -
Page 38: Chapter 3 Page 38
PCI Velocity RS232422/485 the interrupt to be serviced quicker, which is good for slow machines. If you have a fast machine, setting a high value will give you more time for multi-tasking operations. Transmit Buffer - These settings allow the selection of a transmitter FIFO trigger setting. -
Page 39: Pci Rs422/485 Port Settings In Windows 95
PCI Velocity RS232422/485 PCI RS422/485 Port Settings In Windows 95. Double clicking on a Velocity RS485 Port entry from the entry “Ports (Com & LPT)” branch in Device Manager will the display general properties window for the selected port (in this case COM5). -
Page 40: Maximum Baud Rate Settings
PCI Velocity RS232422/485 Maximum Baud Rate Settings. 115200 1200 1800 Selectable 2000 Baud 2400 Rates 3600 4800 7200 9600 19200 38400 57600 115200 Note: Many serial comms applications will not actually register the ports as running at baud rates of above 115200. 7. -
Page 41: Chapter 3 Page 41
PCI Velocity RS232422/485 Clicking on the Serial Solutions tab will display: Settings available in this window are: 3. FIFO Settings. Enable FIFO - turns the selected ports FIFO buffer on or off. It is strongly recommended that the FIFO for both ports is left enabled. -
Page 42: Chapter 3 Page 42
PCI Velocity RS232422/485 Transmit Buffer - These settings allow the selection of a transmitter FIFO trigger setting. Selecting a low value will send fewer data-bytes per interrupt, and this is recommended if you are communicating to a slower machine. Selecting a high value will send more data-bytes per interrupt, and will give more time for multi-tasking operations. -
Page 43: Windows 98/Millenium Installation
PCI Velocity RS232422/485 Windows 98/Millenium Installation. To obtain a trouble free mix-and-match of the COM ports: Switch off your computer, insert your PCI RS422/485 card into a free PCI slot, as described in the section “Hardware Installation” in Chapter 2, and switch your computer on again. During the booting process, Windows 98 will detect the PCI Velocity RS422/485, but will display it simply as a “PCI CARD”, and you will briefly see a message box to this effect. -
Page 44: Chapter 3 Page 44
PCI Velocity RS232422/485 The Wizard should then display the following: Select Search for the best driver for your device. Click Next Click Specify a location In the location space type <drive>:\diskimg\sswin9x where drive is the appropriate letter for your CDROM drive Click Next Chapter 3 Page 44 Software Setup... -
Page 45: Chapter 3 Page 45
PCI Velocity RS232422/485 Software Setup Click Next Click Finish Chapter 3 Page 45... -
Page 46: Chapter 3 Page 46
PCI Velocity RS232422/485 After copying the file, Windows 98 will then detect each of the serial ports in turn and install them as communications ports. Using the right-hand mouse button click on the My Computer icon on your desktop. Click on Properties. Click on the Device Manager tab When the “Device Manager”... -
Page 47: Card Settings In Windows 98/Millenium
PCI Velocity RS232422/485 Card Settings In Windows 98/Millenium. Select the PCI Velocity RS232 & RS422/485 card from the “Multi-Function Adapter” entry in Device Manager serial and click on properties to view the cards general properties. Click on the Serial Solutions tab Solutions tab produces. The I/O address and interrupt are assigned to the card by the "Plug and play"... -
Page 48: Pci Rs232 Port Settings In Windows 98/Millenium
PCI Velocity RS232422/485 Software Setup In this window, the COM port assignment may be changed, simply by selecting a new COM port value from the pull down menu relevant to the port. However, COM port usage other than those for the PCI Velocity RS232 & RS422/485 card itself are not checked, so it is advisable to first check which COM ports are in use - port availability can be checked by viewing the Device Manager:... -
Page 49: Chapter 3 Page 49
PCI Velocity RS232422/485 Settings available in this window are: 1. Baud Rate - determines the baud rate at which the selected port operates, the maximum value available is dependant upon the Maximum Baud Rate Setting (see below.) 2. Data Bits. 3. -
Page 50: Maximum Baud Rate Settings
PCI Velocity RS232422/485 Maximum Baud Rate Settings. 115200 1200 1800 Selectable 2000 Baud 2400 Rates 3600 4800 7200 9600 19200 38400 57600 115200 Note: Many serial comms applications will not actually register the ports as running at baud rates of above 115200. 7. -
Page 51: Chapter 3 Page 51
PCI Velocity RS232422/485 Clicking on the Serial Solutions tab will display: Settings available in this window are: 7. FIFO Settings. Enable FIFO - turns the selected ports FIFO buffer on or off. It is strongly recommended that the FIFO for both ports is left enabled. -
Page 52: Chapter 3 Page 52
PCI Velocity RS232422/485 the interrupt to be serviced quicker, which is good for slow machines. If you have a fast machine, setting a high value will give you more time for multi-tasking operations. Transmit Buffer - These settings allow the selection of a transmitter FIFO trigger setting. -
Page 53: Pci Rs422/485 Port Settings In Windows 95
PCI Velocity RS232422/485 PCI RS422/485 Port Settings In Windows 95. Double clicking on a Velocity RS485 Port entry from the entry “Ports (Com & LPT)” branch in Device Manager will the display general properties window for the selected port (in this case COM5). -
Page 54: Maximum Baud Rate Settings
PCI Velocity RS232422/485 Maximum Baud Rate Settings. 115200 1200 1800 Selectable 2000 Baud 2400 Rates 3600 4800 7200 9600 19200 38400 57600 115200 Note: Many serial comms applications will not actually register the ports as running at baud rates of above 115200. 7. -
Page 55: Chapter 3 Page 55
PCI Velocity RS232422/485 Clicking on the Serial Solutions tab will display: Settings available in this window are: 9. FIFO Settings. Enable FIFO - turns the selected ports FIFO buffer on or off. It is strongly recommended that the FIFO for both ports is left enabled. -
Page 56: Chapter 3 Page 56
PCI Velocity RS232422/485 Transmit Buffer - These settings allow the selection of a transmitter FIFO trigger setting. Selecting a low value will send fewer data-bytes per interrupt, and this is recommended if you are communicating to a slower machine. Selecting a high value will send more data-bytes per interrupt, and will give more time for multi-tasking operations. -
Page 57: Windows Nt 4.0 Installation
PCI Velocity RS232422/485 Windows NT 4.0 Installation. Microsoft Windows NT Provides built in support for 255 standard serial ports. To setup your PCI RS232/422/485 serial card you should follow these steps. Please note that to change any kind of hardware configuration under Windows NT you must be logged in as a user with Administrator level privileges, if you do not have these please contact your system administrator. -
Page 58: Examining Card Configuration
PCI Velocity RS232422/485 Software Setup Examining Card Configuration. Go to Control Panel (Start/Settings/Control Panel) and double click on Serial Solutions PCI: You will be presented with a Serial Solutions PCI Port Configuration window: Chapter 3 Page 58... -
Page 59: Configuring Ports
PCI Velocity RS232422/485 Configuring Ports. To view the settings of a port, select it and click on settings, and then click on the resources tab: Settings available in this window are: Settings available in this window are: 1. Baud Rate - determines the baud rate at which the selected port operates, the maximum value available is 921,600 (1 Megabaud.) Note: Many serial comms applications will not actually register the ports as running at baud rates of above... -
Page 60: Advanced Port Settings
PCI Velocity RS232422/485 7. Restore Defaults - when clicked, resets the selected COM port to the following values: Baud Rate: Data Bits: Parity: Stop Bits: Flow Control: Advanced Port Settings. When the Advanced button of Port Settings is selected the following dialogue is displayed: Settings available in this window are: 1. -
Page 61: Chapter 3 Page 61
PCI Velocity RS232422/485 the interrupt to be serviced quicker, which is good for slow machines. If you have a fast machine, setting a high value will give you more time for multi-tasking operations. Transmit Buffer - These settings allow the selection of a transmitter FIFO trigger setting. -
Page 62: Uninstalling Serial Solutions Pci
PCI Velocity RS232422/485 Use FIFO Buffers: Transmit Buffers: Receive Buffers: Use Extended FIFO: Automatic Hardware Flow Control: 485 Mode: Uninstalling Serial Solutions PCI. To uninstall Serial Solutions PCI: From Control Panel, open the Add/Remove Programs applet, then close the Control Panel. Select from the list Serial Solutions PCI. - Page 63 PCI Velocity RS232422/485 Software Setup Chapter 3 Page 63...
-
Page 64: Chapter 4 Rs232 Pinouts And Port Cabling
PCI VelocityRS232/422/485 RS232 Pinouts & Cabling Chapter 4 RS232 PINOUTS AND PORT CABLING. Introduction. This chapter gives details of the 9 and 25 pin RS232 pin outs, cabling and connections, with information on how to connect the serial ports of two PCs and how to make a selftest loop back connector. -
Page 65: Serial Port Pin Outs
PCI VelocityRS232/422/485 Serial Port Pin Outs. The pinouts of the 9 pin Male D connectoris given below. Figure 4-2. Serial Port RS232 Pin Outs. PIN 6 - DATA SET READY (DSR) PIN 7 - REQUEST TO SEND (RTS) PIN 8 - CLEAR TO SEND (CTS) PIN 9 - RING INDICATOR (RI) 9 Pin D Serial Port RS232 Cables. -
Page 66: 9 Pin D Serial Port Connection To Another Pc
PCI VelocityRS232/422/485 9 Pin D Serial Port Connection To Another PC. Suppose we want to connect the AT style 9 pin D Serial Port to the serial port of another IBM PC. See Figure 4-3. 1) Connect the earth lines. Line 5 of Serial Port 2 to lines 1 &... -
Page 67: Chapter 4 Page 67
PCI VelocityRS232/422/485 Figure 4-3. 9 Pin D Serial Port To Other PC Cable. AT SERIAL PORT Side 9 PIN D CONNECTOR SCHEMATIC REPRESENTATION: ACTUAL REPRESENTATION: SCHEMATIC REPRESENTATION ACTUAL REPRESENTATION 9 PIN D CONNECTOR RS232 Pinouts & Cabling Other PC SERIAL PORT Side. 9 PIN D CONNECTOR 25 PIN D CONNECTOR Chapter 4 Page 67... -
Page 68: 9 Pin D Serial Port To A Modem
PCI VelocityRS232/422/485 9 Pin D Serial Port To A Modem. If you are connecting a MODEM to a 9 pin D Serial Port then you will NOT need a cross over cable and a straight through cable connected as the 9 to 25 pin adapter given in Figure 4-5. 9 Pin D Serial Port Loop Back Connector. - Page 69 PCI VelocityRS232/422/485 Figure 4-5. 9 To 25 Way Adapter. This adapter cable makes the AT style 9-pin serial port, look like the standard PC 25 pin serial port. It is NOT a cross over cable! 9 Pin AT SERIAL PORT 9 Pin Female D Connector SCHEMATIC REPRESENTATION: ACTUAL REPRESENTATION:...
-
Page 70: Chapter 5 Additional Rs422/485 Operation
PCI VelocityRS232/422/485 Additional RS422/485 Operation Chapter 5 ADDITIONAL RS422/485 OPERATION The RS422 Standard. The RS422 standard defines a serial communications standard. RS422 is a high speed and/or long distance data transmission. Each signal is carried by a pair of wires and is thus a differential data transmission system. -
Page 71: Terminating Impedance's
PCI VelocityRS232/422/485 than one device may transmit data, the RTS line is used as transmit enable signal, so preventing contention between talkers. Up to 32 Driver/Receiver Pairs Line Length 40 Feet = 400 Feet = 122m 4000 Feet = 1219m Terminating Impedance’s. -
Page 72: Fail Safe Open Circuit Detection
PCI VelocityRS232/422/485 Additional RS422/485 Operation Fail Safe Open Circuit Detection Open circuit is when there are no drivers on the circuit. This occurs by design in party line multi driver/receiver systems and unintentionally when the twisted pair line is accidentally cut or disconnected or the transmitting device fails. -
Page 73: Rs422 Serial Port Cables
PCI VelocityRS232/422/485 CTS handshake inwards. There is no need to carry the ground from one device to another. This RS422 arrangement allows data to be transmitted and received simultaneously since each signal has its own data cable pair. In addition, the receiver can set RTS true so telling the transmitter on its CTS input that the receiver is ready to accept data. -
Page 74: Rs485 Operation
PCI VelocityRS232/422/485 Note: i.) Receiver ends terminated in characteristic impedance ONBOARD resistor networks. ii.) USE BELDEN TYPE 9729 etc. see above. iii.) RS485 Gating & Multiplex Jumpers as Factory Set. RS485 Operation. The RS485 standard is intended for up to 32 driver receiver pairs on the bus. -
Page 75: Rs485 Cable
PCI VelocityRS232/422/485 Additional RS422/485 Operation RS485 Cable. For best noise immunity use twisted pair cables to make the RS485 connection. In Half Duplex wiring only 1 twisted cable pair is needed. Two twisted pair cables are needed for Full Duplex communications. -
Page 76: Rs485 Many Talkers- Many Listeners, Half Duplex
PCI VelocityRS232/422/485 Figure 5-3 Half Duplex Settings of RS485 Multiplex Both jumpers shorted, causing the RXD- & TXD- and the RXD+ & TXD+ signals to short together at the 9-pin connector. RS485 Many Talkers- Many Listeners, Half Duplex. Another popular RS485 layout is for multiple talkers and multiple listeners. -
Page 77: Rs485 Many Talkers- Many Listeners, Full Duplex
PCI VelocityRS232/422/485 RS485 Many Talkers- Many Listeners, Full Duplex. The RS485 many talkers, many listeners, Full Duplex system can be used when all the RS485 devices have separate Transmit and Receive channels. There is NO multiplexing of the TXD and RXD signals on the same device. -
Page 78: Optional Grounding Arrangements
PCI VelocityRS232/422/485 Additional RS422/485 Operation TXD channel, and disables its TXD drivers. The other RS485 devices remain in the receive only mode when they are not being addressed, they do not transmit any data at all. Figure 4-5 gives the jumper settings for the serial card in the RS485 Full Duplex mode. -
Page 79: Chapter 5 Page 79
PCI VelocityRS232/422/485 Figure 5-7 - Optional Grounding Arrangements For A PCI RS422/485 Card. Configuration A) Configuration B) Configuration A) connected to protective ground, at one point only by a 100 resistor with a power dissipation rating of 1/2W. An additional provision may be made for the resistor to be bypassed with a strap to connect signal common and protective ground directly together when specific installation conditions necessitate. -
Page 80: Index
Index 1 Megabaud ... 11 115200 Baud...36, 40, 50, 54 16450 / 16550 ... 7, 11 460800 Baud...36, 40, 50, 54 921600 Baud...36, 40, 50, 54 adapter ... 68, 69 asynchronous ... 11 Autogating ... 11, 12 baud / baud rate... 8, 9 BBCARDS.EXE ... - Page 81 Installing Ports In Microsoft Windows 95 & 98... 29 Installing ports in Windows 3.x ... 24 interrupts... 9 jumper...74, 75, 76, 77, 78 last ... 76 loop back ... 9, 64, 68 Maximum Baud Rate ... 35, 36, 39, 40, 49, 50, 53, 54 mode ...
Need help?
Do you have a question about the CC-357 and is the answer not in the manual?
Questions and answers