Table of Contents
Advertisement
Quick Links
Advertisement
Table of Contents

Related Manuals for Brainboxes CC-431


Summary of Contents for Brainboxes CC-431
- Page 1 Hardware Manual 3 Port RS232 3+1 Port RS232 1.0 EDITION MAY 1998...
- Page 2 Guarantee. FULL 36 MONTHS GUARANTEE. We guarantee your Serial Port Card for a full 36 months from purchase, parts and labour, provided it has been used in the specified manner. In the unlikely event of failure return your interface to your Dealer, with proof of purchase, who will determine whether to repair or replace this product with an equivalent unit.
- Page 3 PCI 3Port RS232 PCI 3 PORT RS232 PCI 3+1 PORT RS232 These products conform to the following standards: CE Standard: IEC 801-2: IEC 801-3: IEC 801-4: TIA / EIA: EN55022:1987 Class B 1991 Level 2 1984 Level 2 1988 Level 2 232 - E Introduction Intro 1...
-
Page 4: Specifications
Introduction PCI 3 PORT RS232 & PCI 3+1 PORT RS232 MANUAL OUTLINE CONTENTS Chapter 1 - Serial Solutions Software. Chapter 2 - PCI 3 Port RS232 & PCI 3+1 Port RS232 Specifications. Chapter 3 - PCI 3 Port RS232 & PCI 3+1 Port RS232 Software Configuration Guide. -
Page 5: Table Of Contents
Serial Solutions For Windows NT..8 Complete Documentation and Technical Backup..8 2 ... 9 HAPTER ..9 NTRODUCTION PCI RS232 C EATURES Configuring PCI Cards..12 RS232 Cabling and Pinouts ... 12 ARDWARE NSTALLATION !... 13 ROBLEMS 3 ... 14 HAPTER . - Page 6 Introduction Serial Port Installation... 27 Configuring The COM Ports... 29 Deleting Ports in Windows..30 Restarting Windows... 30 ONFIGURING ORTS Determining PCI 3Port RS232 Resources..31 NEWCOM.SYS Parameters... 32 Configuring And Installing NEWCOM.SYS... 33 Modifying Command Line Parameters... 34 4 ...
-
Page 7: Chapter 1
PCI 3 Port RS232 SOLUTIONS SOFTWARE. Introduction. This chapter is a brief description of the Serial Solutions software package included with this product; extra copies or licenses for extra copies are available from YOUR DEALER. Introducing Serial Solution Software. The perfect partner for any Serial Port is Serial Solutions Software! Serial Solutions is a fully featured suite of programs designed to squeeze the most from PC serial communications. -
Page 8: Chapter 1 Page 6
Serial Solutions NewCOM.sys A device driver, it supports COM1 to COM16, allowing 16 serial ports to be used under DOS. It also includes an interrupt handler for enhanced performance with user definable buffer languages, it is the heart of the Serial Solution. implementing both hardware using any combination of the DTR, DSR, CTS, RTS, and DCD lines, and a software handshake... -
Page 9: Serial Solutions For Windows 3.X
PCI 3 Port RS232 demonstrate in depth serial port programming in a variety of languages but they are also useful tools for using serial devices. Comtest.exe Comtest is a short but invaluable program that is used to check that the serial port at a particular I/O address is functioning correctly and is connected to the particular IRQ line. -
Page 10: Serial Solutions For Windows 95
Serial Solutions Serial Solutions For Windows 95. Windows 95 has an improved communication API and directly supports up to 255 ports. Our Windows 95 driver supports the shared interrupt mechanism used on our multiport cards. Serial Solutions for Windows 95 consists of the following programs: - SSCards.inf The information file to aid the installation process "Have Disk...”... -
Page 11: Chapter 2
PCI 3 Port RS232 PCI 3 PORT RS232 & PCI 3+1 PORT RS232 SPECIFICATIONS Introduction. This chapter details the specifications of the PCI 3Port RS232 and PCI 3+1 Port RS232 serial card. The difference between the two cards is simply the presence of a port header close to the external ports. -
Page 12: Chapter 2 Page 10
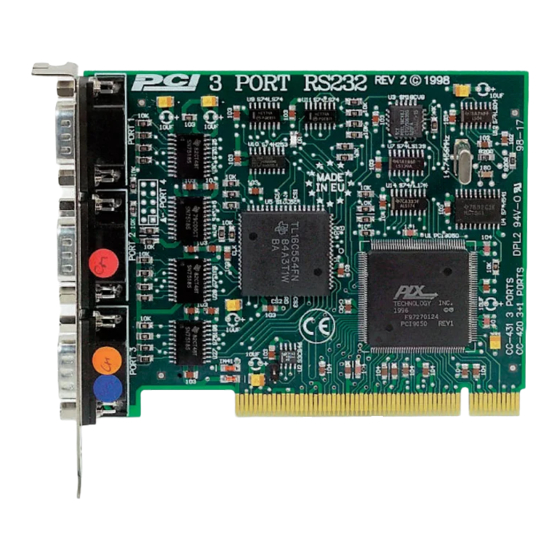
Specifications Figure 2-1. PCI 3Port RS232 Card. Dimensions: 5 x 3 in, 120 x 85 mm I/O Connection: Serial Port 1: 9 pin Male D type. Serial Port 2: 9 pin Male D type. Serial Port 3: 9 pin Male D type. Weight: Chapter 2 Page 10 PCI 3 Port RS232... -
Page 13: Chapter 2 Page 11
PCI 3 Port RS232 Figure 2-2. PCI 3+1 Port RS232 Card. Dimensions: I/O Connection: Weight: 5 x 3 in, 120 x 85 mm Serial Port 1: 9 pin Male D type. Serial Port 2: 9 pin Male D type. Serial Port 3: 9 pin Male D type. Serial Port 4: 9 pin Male D type on optional flylead header. -
Page 14: Configuring Pci Cards
Specifications Configuring PCI Cards. PCI cards, by definition, require no hardware configuration and can be installed "directly from the box". RS232 Cabling and Pinouts For further details of the RS232 standard, pinouts and how to make various types of cables, refer to chapter 4, "RS232 Pinouts and Cabling."... -
Page 15: Problems
PCI 3 Port RS232 STEP 5: The connectors aperture to the outside world. STEP : Now replace the system unit’s cover by carefully sliding it down and back over the system unit. Replace the cover mounting screws. STEP : After attaching all the monitor and keyboard cables, power up the PC. -
Page 16: Chapter 3
Software Configuration PCI 3PORT & PCI 3+1 PORT RS232 SOFTWARE CONFIGURATION GUIDE Introduction. This section contains the installation procedures of the PCI 3Port RS232 card, with the Windows 95, Windows NT DOS, and Windows 3.x operating systems. As previously noted, the install procedure for the 3Port and 3+1 Port PCI RS232 cards are the same, with the only difference being the reported card and port name in Windows 95 and NT 4.0;... -
Page 17: Chapter 3 Page 15
PCI 3 Port RS232 card”. Insert the Windows 95 installation disk into an appropriate drive and click 'Next'. The Wizard should then display something similar to following: Click Finish. A "Copying Files…" window should now appear when it asks you to insert the disk. After copying the file, Windows 95 will then detect each of the serial ports in turn and install them as communications ports. -
Page 18: Chapter 3 Page 16
Software Configuration PCI 3Port Users: PCI 3Port RS232 will appear under the "Multi-function adapters" branch, and three Communications Ports will appear under the "Ports (COM & LPT) branch." PCI 3+1Port RS232 Users: PCI 3+1 Port RS232 will appear under the "Multi-function adapters" branch and four Communications Ports will appear under the "Ports (COM &... -
Page 19: Pci 3Port Rs232 Card Settings In Windows 95 & 98
PCI 3 Port RS232 PCI 3Port RS232 Card Settings In Windows 95 & 98. Select the PCI 3Port RS232 card from the "Multi-Function Adapter" entry in Device Manager and click on properties to view the cards general properties; clicking on the Serial Solutions tab produces: PCI 3Port RS232 users: In this window, the COM port assignment may be changed,... -
Page 20: Chapter 3 Page 18
Software Configuration Settings available in these windows are: 1. Baud Rate - determines the baud rate at which the selected port operates. Maximum Setting is 115200. 2. Data Bits. 3. Parity. 4. Stop Bits. 5. Flow Control. 6. Advanced - clicking on this will display the following window: Chapter 3 Page 18 PCI 3 Port RS232... -
Page 21: Chapter 3 Page 19
PCI 3 Port RS232 Settings available in this window are: Use FIFO Buffers - turns the selected ports FIFO buffer on or off. It is strongly recommended that the FIFO for both ports is left enabled. Receive Buffer - These settings allow the selection of a receiver FIFO trigger setting. -
Page 22: Configuring Ports I N Microsoft Windows Nt 4.0
Software Configuration Configuring Ports In Microsoft Windows NT 4.0 Microsoft Windows NT Provides built in support for 255 standard serial ports. To setup your PCI 3 Port Serial card you should follow these steps. Please note that to change any kind of hardware configuration under Windows NT you must be logged in as a user with Administrator level privileges, if you do not have these please contact your system administrator. -
Page 23: Examining Card Configuration
PCI 3 Port RS232 Examining Card Configuration. Go to Control Panel (Start/Settings/Control Panel) and double click on Serial Solutions PCI: You will be presented with a Serial Solutions PCI Port Configuration window: Software Configuration 3+1Port RS232 users, these entries under card will appear as: 3+1Port RS232... -
Page 24: Configuring Ports
Software Configuration Configuring Ports. To view the settings of a port, select it and click on settings, and then click on the resources tab: Settings available in this window are: 1. Baud Rate - determines the baud rate at which the selected port operates. -
Page 25: Advanced Port Settings
PCI 3 Port RS232 Advanced Port Settings. When the Advanced button of Port Settings is selected the following dialogue is displayed: Settings available in this window are: 1. Use FIFO Buffers - turns the selected ports FIFO buffer on or off. It is strongly recommended that the FIFO for both ports is left enabled. -
Page 26: Uninstalling Serial Solutions Pci
To uninstall Serial Solutions PCI: From Control Panel, open “Devices”, select SSPCI, and click the “STOP” button. This stops the device driver controlling the PCI cards serial ports, this ensures that the driver file is removed. “Close” the devices applet. -
Page 27: Configuring Ports In Windows 3. X
PCI 3 Port RS232 Configuring Ports in Windows 3.x The Windows 3.x-installation procedure consists of two steps after the PCI 3port RS232 CARD is inserted: 1. Determining the resources that the PCI 3Port RS232 Card has claimed. 2. Informing Windows 3.x of those resources. Determining PCI 3Port RS232 Resources. -
Page 28: Windows 3.X Software Installation
Software Configuration Windows 3.x Software Installation. Place the supplied Serial Solutions for Windows 3.x disk in a suitable drive. From File Manager choose ‘Run’ and enter a:\setup (where a: is the path to the floppy drive with the installation disk). Click OK, the Setup Program Main Screen is displayed: By default, all component options will be installed, selecting the "Del All"... -
Page 29: Serial Port Installation
PCI 3 Port RS232 When you have made your choice of Component Options click Continue and when the setup program has finished select the Done button. Note: If the Serial Port driver options has been selected, after the setup program has finished, Windows will display a restart message - answer Yes and Serial Solutions will be ready to run upon Windows restarting. -
Page 30: Chapter 3 Page 28
Software Configuration The following dialogue will be displayed: To add a COM port: Click on the add button and a Window similar to the following will be displayed: In Standard Settings: In the COM Base field, enter the value 0140. Note: COM ports are defined with an i/o address range, which in this case, begins at 0140 and all subsequent ports have an i/o address that is 8 higher than the... -
Page 31: Configuring The Com Ports
PCI 3 Port RS232 Note: The values used in the above section were those returned by the BBCARDS program, as described in the above section. When you have finished, click on OK. A restart message will be displayed; to save time restart only when both ports have been added and correctly configured. -
Page 32: Deleting Ports In Windows
Software Configuration Note: A port that has been added has the default values of: Baud Rate: Data Bits: Parity: top Bits: Flow: Change the communications Settings in the COM Ports to match the baud rate, parity settings etc. of the remote serial device. Deleting Ports in Windows. -
Page 33: Configuring Ports I Ndos
PCI 3 Port RS232 Configuring Ports In DOS. The DOS installation procedure consists of two steps after the PCI 3Port RS232 card is inserted: 1. Determining the resources that the PCI 3Port RS232 has claimed. 2. Informing the Serial Solutions DOS device driver of those resources. -
Page 34: Newcom.sys Parameters
Software Configuration NEWCOM.SYS Parameters. The NewCOM.SYS device driver included with the PCI 3 Port RS232 driver software is used to set up the card in DOS and has the following syntax: NEWCOM.SYS /A port address, /I IRQ,range /B number buffer /S buffer /H hardware handshake Where /A port address specifies COM port number followed by a hexadecimal address in the form /Ax,y where x is COM... -
Page 35: Configuring And Installing Newcom.sys
PCI 3 Port RS232 DCD inputs are ignored. The RTS output line is set true just in case the external serial device needs a true signal. Type 4 3 Wire Handshake - Really no handshake at all since the PC transmits irrespective of the handshake lines. -
Page 36: Modifying Command Line Parameters
Software Configuration IRQ, Range. /I 11,5-7 11 is the IRQ and since the COM port range is COM5 - COM6 range is entered as 5-6. Number Buffer. Six buffers are defined, though only four ports are in use - this is because buffers in DOS are assigned in a sequential order from COM1. -
Page 37: Chapter 4
PCI 3 Port RS232 RS232 PINOUTS AND PORT Introduction. This chapter gives details of the 9 and 25 pin RS232 pin outs, cabling and connections, with information on how to connect the serial ports of two PCs and how to make a self-test loop back connector. -
Page 38: Pin D Serial Port Rs232 Cables
RS232 Pinouts and Cabling Figure 4-2. Serial Port RS232 Pin Outs. 9 Pin connector: PIN 6 - DATA SET READY (DSR) PIN 7 - REQUEST TO SEND (RXD) PIN 8 - CLEAR TO SEND (CTS) PIN 9 - RING INDICATOR (RI) 25 Pin connector: PIN 20 - RING INDICATOR (RI) PIN 22 - DATA TERMINAL READY (DTR) -
Page 39: Pin D Serial Port Connection To Another Pc
PCI 3 Port RS232 9 Pin D Serial Port Connection To Another PC. Suppose we want to connect the AT style 9 pin D Serial Port to the serial port of another IBM PC. See Figure 4-3. Connect the earth lines. Line 5 of Serial Port 2 to lines 1 &... -
Page 40: Chapter 4 Page 38
RS232 Pinouts and Cabling Figure 4-3. 9 Pin D Serial Port To Other PC Cable. AT SERIAL PORT Side 9 PIN D CONNECTOR SCHEMATIC REPRESENTATION: ACTUAL REPRESENTATION: 9 PIN D CONNECTOR SCHEMATIC REPRESENTATION ACTUAL REPRESENTATION Chapter 4 Page 38 PCI 3 Port RS232 Other PC SERIAL PORT Side. -
Page 41: Pin D Serial Port To A Modem
PCI 3 Port RS232 9 Pin D Serial Port To A Modem. If you are connecting a MODEM to a 9 pin D Serial Port then you will NOT need a cross over cable and a straight through cable connected as the 9 to 25 pin adapter given in Figure 4-5. 9 Pin D Serial Port Loop Back Connector. - Page 42 RS232 Pinouts and Cabling Figure 4-5. 9 To 25 Way Adapter. This adapter cable makes the AT style 9-pin serial port, look like the standard PC 25 pin serial port. It is NOT a cross over cable! 9 Pin AT SERIAL PORT 9 Pin Female D Connector SCHEMATIC REPRESENTATION: ACTUAL REPRESENTATION:...
-
Page 43: Index
PCI 3 Port RS232 Index 16450 / 16550 ... 1 adapter ... 39, 40 asynchronous ... 6 baud / baud rate... 2, 3 BBCARDS.EXE ...21, 28, 30 bits ... 34 buffer / buffered ... 2, 3, 6 cable... 3, 10, 34, 35, 39, 40 Changing COM numbers in Windows 95 ... - Page 44 Index PCI 3 Port RS232 mode ... 2 modem ... 6 NEWCOM.SYS ... 29 parity... 2, 3 pin outs ... 34, 35 port / ports... 1, 2, 3, 4, 6, 11, 16, 34, 35, 36, 39, 40 Port Address... 30 protocol...
- Page 45 ALSO AVAILABLE FROM YOUR SUPPLIER VELOCITY SERIAL RANGE 1 Megabaud serial comms AT VELOCITY RS232 VELOCITY RS422/485 PCI SERIAL RANGE PCI RS232 2 PORT PCI RS232 4 PORT PCI RS232 8 PORT PCI VELOCITY RS422/485 PCI VELOCITY RS232 PCI OPTO DUAL RS422/485 STANDARD SERIAL RANGE AT TWIN 9 RS232...
Need help?
Do you have a question about the CC-431 and is the answer not in the manual?
Questions and answers