
Subscribe to Our Youtube Channel
Related Manuals for StarTech.com STNDMTV100


Summary of Contents for StarTech.com STNDMTV100
- Page 1 Mobile TV Cart/Stand - up to 100” User Manual SKU#: STNDMTV100 For the latest information and specifications visit www.startech.com/STNDMTV100 Manual Revision: 11/25/2020...
-
Page 2: Compliance Statements
This manual may make reference to trademarks, registered trademarks, and other protected names and/or symbols of third-party companies not related in any way to StarTech.com. Where they occur these references are for illustrative purposes only and do not represent an endorsement of a product or service by StarTech.com, or an endorsement of the product(s) to which this manual... -
Page 3: Safety Statements
Säkerhetsåtgärder • Installation och/eller montering får endast göras av behöriga yrkespersoner och enligt gällande lokala förordningar för säkerhet och byggnormer. To view manuals, videos, drivers, downloads, technical drawings, and more visit www.startech.com/support... -
Page 4: Warning Statements
• Produkten är endast avsedd för användning inomhus och ska inte användas utomhus. • Dra inte åt skruvarna för hårt när du monterar produkten. Om du måste ta i när du skruvar åt kan du sluta skruva åt. To view manuals, videos, drivers, downloads, technical drawings, and more visit www.startech.com/support... - Page 5 • Rijd de wagen niet over snoeren, kabels of ongelijke oppervlakken. • Voordat u de wagen gaat verplaatsen, moet u de zwenkwielen ontgrendelen. 注意 • 必ず取扱説明書に従って本製品の組み立てを行って下さい。 • 最初に取扱説明書を最後まで読み、 本製品の組み立て方をすべて理解して から組み立て作業を始めて下さい。 To view manuals, videos, drivers, downloads, technical drawings, and more visit www.startech.com/support...
- Page 6 • L’assemblaggio di questo prodotto richiede la presenza di due persone. Non tentare di assemblare il prodotto e installare le apparecchiature senza assistenza. To view manuals, videos, drivers, downloads, technical drawings, and more visit www.startech.com/support...
- Page 7 • Certifique-se de que monta este produto de acordo com as instruções. • Leia todo o manual e certifique-se de que entende as instruções antes de começar a montar e a utilizar este produto. To view manuals, videos, drivers, downloads, technical drawings, and more visit www.startech.com/support...
- Page 8 • Se requieren dos personas para el ensamblaje de este producto. No intente ensamblar este producto e instalar otros equipos sin la debida asistencia de otra persona. To view manuals, videos, drivers, downloads, technical drawings, and more visit www.startech.com/support...
- Page 9 • Bewegen Sie den Wagen nicht über Leitungen, Kabel oder unebenes Gelände. • Stellen Sie sicher, dass die Rollen entriegelt sind, bevor Sie den Wagen in Bewegung setzen. To view manuals, videos, drivers, downloads, technical drawings, and more visit www.startech.com/support viii...
-
Page 10: Table Of Contents
Table of Contents Compliance Statements ................i Safety Statements ..................ii Warning Statements ................iii Product Diagram ..................1 Front View ..............................1 Back View ..............................2 Product Dimensions ................3 Front View ..............................3 Product Information ................4 Package Contents ............................. 4 Requirements ..................6 Technical Specifications .......................... 7 Installation ....................9 Attach the Casters ............................. -
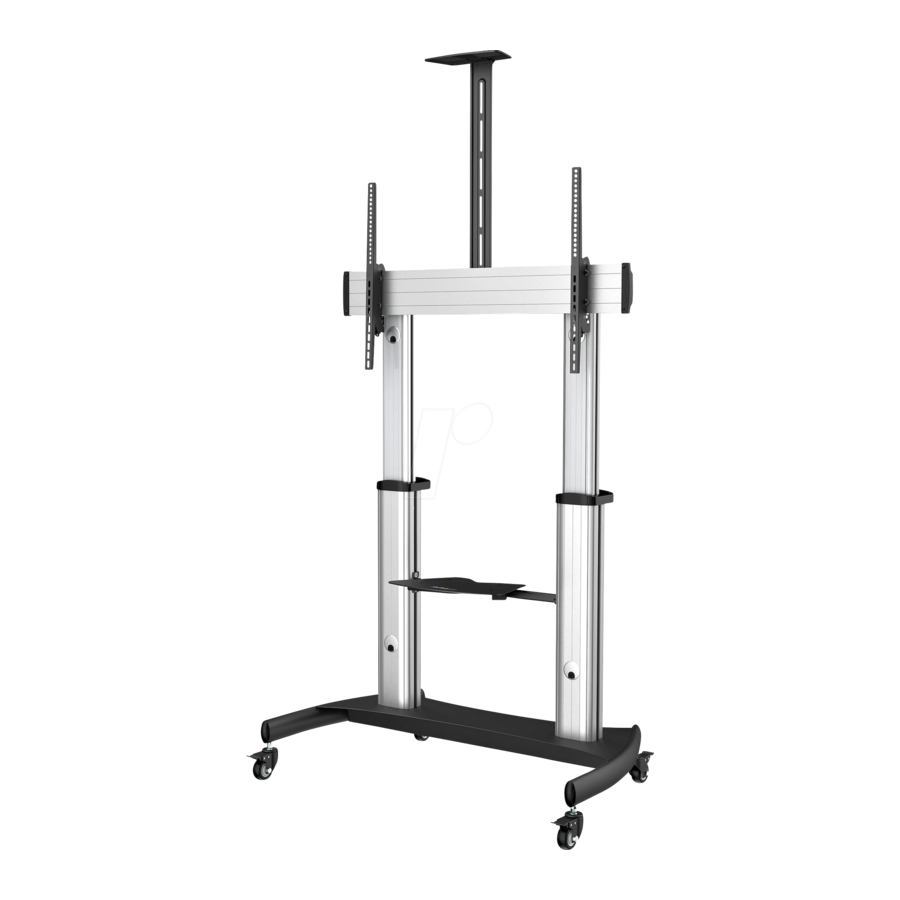
Page 11: Product Diagram
Product Diagram Front View Camera Shelf Plate Connecting Left TV Mounting Right TV Bracket Mounting Bracket Universal Plate Left Column Right Column Casters To view manuals, videos, drivers, downloads, technical drawings, and more visit www.startech.com/support... -
Page 12: Back View
Back View Media Shelf Support Bar Base Casters To view manuals, videos, drivers, downloads, technical drawings, and more visit www.startech.com/support... -
Page 13: Product Dimensions
Product Dimensions Front View To view manuals, videos, drivers, downloads, technical drawings, and more visit www.startech.com/support... -
Page 14: Product Information
Left TV Mounting Mounting Bracket Qty: 1 Qty: 1 Bracket Qty: 1 Qty: 1 Connecting Plate Top Covers Media Shelf Camera Shelf Qty: 1 Qty: 2 Qty: 1 Qty: 1 To view manuals, videos, drivers, downloads, technical drawings, and more visit www.startech.com/support... - Page 15 M6 x 25 mm Support Bar Knobs M4 x 6 mm Screws Screws Qty: 1 Qty: 2 Qty: 4 Qty: 3 M4 x 6 mm M6 x 25 mm Hex M8 x 25 mm Hex M6 x 14 mm Round Head Head Screws Head Screws Screws...
-
Page 16: Requirements
Square Washers Small Spacers Qty: 8 Qty: 1 Qty: 4 Qty: 8 Requirements For the latest requirements, please visit www.startech.com/STNDMTV100 TV x 1 • (Optional) Web Camera x 1 • (Optional) Media Device (e.g. DVD Player) x 1 • (Optional) Padlock •... -
Page 17: Technical Specifications
Camera Shelf -- Up to 11 lb. (5 kg) VESA Compatible 400 x 400 600 x 400 800 x 400 800 x 600 900 x 600 1000 x 600 To view manuals, videos, drivers, downloads, technical drawings, and more visit www.startech.com/support... - Page 18 Tilt Range +5° ~ -10° Height Adjustment 47.2 - 65” (1220-1650 mm) Cable Management To view manuals, videos, drivers, downloads, technical drawings, and more visit www.startech.com/support...
-
Page 19: Installation
Flip the Base upright so that the Casters are making contact with the surface. (For uneven surfaces) Flip the Base upside down and use the Wrench to adjust the Nut located on each Caster. To view manuals, videos, drivers, downloads, technical drawings, and more visit www.startech.com/support... -
Page 20: Attach The Columns To The Base
Tighten the two Hex Screws, using the Hex Key. Repeat steps 2-4 for the Right Column. Ensure both Columns are the same height by referencing the Height Indicators on the inner portion of each Column. To view manuals, videos, drivers, downloads, technical drawings, and more visit www.startech.com/support... - Page 21 Note: The Left Column has not yet been attached to the Base with a Screw. Exercise caution when sliding the Plastic Handles over the Columns. Repeat step 8 for the Right Column. To view manuals, videos, drivers, downloads, technical drawings, and more visit www.startech.com/support...
- Page 22 M8 x 25 mm Hex Head Screws Base Hex Key Figure 4 Tilt the entire Assembly onto its side to gain access to the bottom of the Base. (Figure 4) Note: It is recommended that Two People complete this step and any subsequent steps that involve tilting or moving the Mobile TV Cart.
-
Page 23: Attach The Universal Plate
Insert four M6 x 14 mm Screws through the Universal Plate and into the Columns (two for each Column). Tighten all four M6 x 14 mm Screws, using a Phillips Head Screwdriver. To view manuals, videos, drivers, downloads, technical drawings, and more visit www.startech.com/support... -
Page 24: Assemble The Media Shelf
Place the Support Bar up against the Media Shelf, aligning the holes in the Support Bar with the holes found in the Media Shelf. (Figure 8) To view manuals, videos, drivers, downloads, technical drawings, and more visit www.startech.com/support... -
Page 25: Attach The Media Shelf To The Columns
Support Bar. Tighten the M6 x 14 mm Screws, using a Phillips Head Screwdriver. Attach the Media Shelf to the Columns Support Block Hex Key Media Shelf Figure 9 To view manuals, videos, drivers, downloads, technical drawings, and more visit www.startech.com/support... - Page 26 Repeat step 6 for the Support Block in the Right Column. Slide the Media Shelf Assembly up or down to the desired height. Tighten all four Support Block Hex Screws, using the Hex Key. To view manuals, videos, drivers, downloads, technical drawings, and more visit www.startech.com/support...
-
Page 27: Attach The Tv Mounting Brackets
Place the TV Mounting Brackets, parallel to one another, on the back of the TV over the VESA Mounting Holes. The arrows on the TV Mounting Brackets should be pointing towards the bottom of the TV. To view manuals, videos, drivers, downloads, technical drawings, and more visit www.startech.com/support... -
Page 28: Hang The Tv Onto The Universal Plate
Hang the TV onto the Universal Plate Padlock Screw Figure 11 Loosen the 2 Screws, located at the bottom of the TV Mounting Brackets, using a Phillips Head Screwdriver. (Figure 11) To view manuals, videos, drivers, downloads, technical drawings, and more visit www.startech.com/support... -
Page 29: Assemble The Camera Shelf
Camera Shelf and into the top of the Connecting Plate. Tighten all three M4 x 6 mm Screws, using a Phillips Head Screwdriver. To view manuals, videos, drivers, downloads, technical drawings, and more visit www.startech.com/support... -
Page 30: Attach The Camera Shelf Assembly
Insert two M6 x 25 mm Screws through the Connecting Plate and into the Universal Plate. Tighten the two M6 x 25 mm Screws, using a Phillips Head Screwdriver. To view manuals, videos, drivers, downloads, technical drawings, and more visit www.startech.com/support... -
Page 31: Cable Management
Route the Cables through the Columns. Route the Cables out of the Grommets located at the bottom-front of the Columns and into their respective Power Source and/or Video Source. To view manuals, videos, drivers, downloads, technical drawings, and more visit www.startech.com/support... -
Page 32: Operation
Grip the Plastic Handles and slowly move the Mobile TV Stand Assembly, using two people. Ensure caution is exercised around corners or when navigating over bumps and/or uneven ground. Lock the Brakes on the Casters. To view manuals, videos, drivers, downloads, technical drawings, and more visit www.startech.com/support... - Page 33 Limitation of Liability In no event shall the liability of StarTech.com Ltd. and StarTech.com USA LLP (or their officers, directors, employees or agents) for any damages (whether direct or indirect, special, punitive, incidental, consequential, or otherwise), loss of profits, loss of business, or any pecuniary loss, arising out of or related to the use of the product exceed the actual price paid for the product.
- Page 34 StarTech.com is an ISO 9001 Registered manufacturer of connectivity and technology parts. StarTech.com was founded in 1985 and has operations in the United States, Canada, the United Kingdom and Taiwan servicing a worldwide market.
Need help?
Do you have a question about the STNDMTV100 and is the answer not in the manual?
Questions and answers