Numatic NUC244NX Original Instructions Manual
Compact scrubber dryer
Hide thumbs
Also See for NUC244NX:
- Original instructions manual (20 pages) ,
- Instructions manual (36 pages) ,
- Original instructions manual (24 pages)
Table of Contents
Advertisement
NUC244NX
COMPACT SCRUBBER DRYER
KOMPAKT-SCHEUERSAUGMASCHINE
AUTOLAVEUSE COMPACTE
COMPACTE SCHROBZUIGMACHINE
LAVADORA-SECADORA COMPACTA
FREGADORA-SECADORA COMPACTA
Original Instructions
CAUTION, Read instructions before using the machine.
Originalanleitung.
VORSICHT, Vor Verwendung der Maschine bitte die Anleitung lesen.
Notice originale
MISE EN GARDE. Lisez la notice avant d'utiliser la machine.
Originele instructies
ATTENTIE! Lees deze instructies voor u de machine gebruikt.
Tradução das Instruções Originais
CUIDADO, Leia as instruções antes de usar a máquina.
Instrucciones originales:
PRECAUCIÓN, Lea las instrucciones antes de utilizar la máquina.
www.numatic.com
Advertisement
Table of Contents

Related Manuals for Numatic NUC244NX


Summary of Contents for Numatic NUC244NX
- Page 1 NUC244NX COMPACT SCRUBBER DRYER KOMPAKT-SCHEUERSAUGMASCHINE AUTOLAVEUSE COMPACTE COMPACTE SCHROBZUIGMACHINE LAVADORA-SECADORA COMPACTA FREGADORA-SECADORA COMPACTA Original Instructions CAUTION, Read instructions before using the machine. Originalanleitung. VORSICHT, Vor Verwendung der Maschine bitte die Anleitung lesen. Notice originale MISE EN GARDE. Lisez la notice avant d’utiliser la machine.
- Page 2 PLEASE READ BEFORE COMMENCING OPERATION. KEEP FOR FUTURE REFERENCE After the removal of all the packaging, carefully open and check the contents ● Owner Manual ● Battery Charger & Lead ● Battery Pack ● Scrub Brushes x 2 ● Squeegee Assembly BITTE LESEN VOR DER INBETRIEBNAHME.
-
Page 3: Table Of Contents
NUC244NX C O M PA C T S C R U B B E R D R Y E R K O M PA K T- S C H E U E R S A U G M A S C H I N E... - Page 4 NUC244NX C O M PA C T S C R U B B E R D R Y E R C O M PA C T S C R U B B E R D R Y E R Index...
- Page 5 NUC244NX L AVA D O R A - S E C A D O R A C O M PA C TA F R E G A D O R A - S E C A D O R A C O M PA C TA Índice...
-
Page 6: Vue D'ensemble De La Machine
Machine Overview Allgemeine Übersicht Vue d’ensemble de la machine Overzicht machine Descrição geral da máquina Vista general de la máquina... -
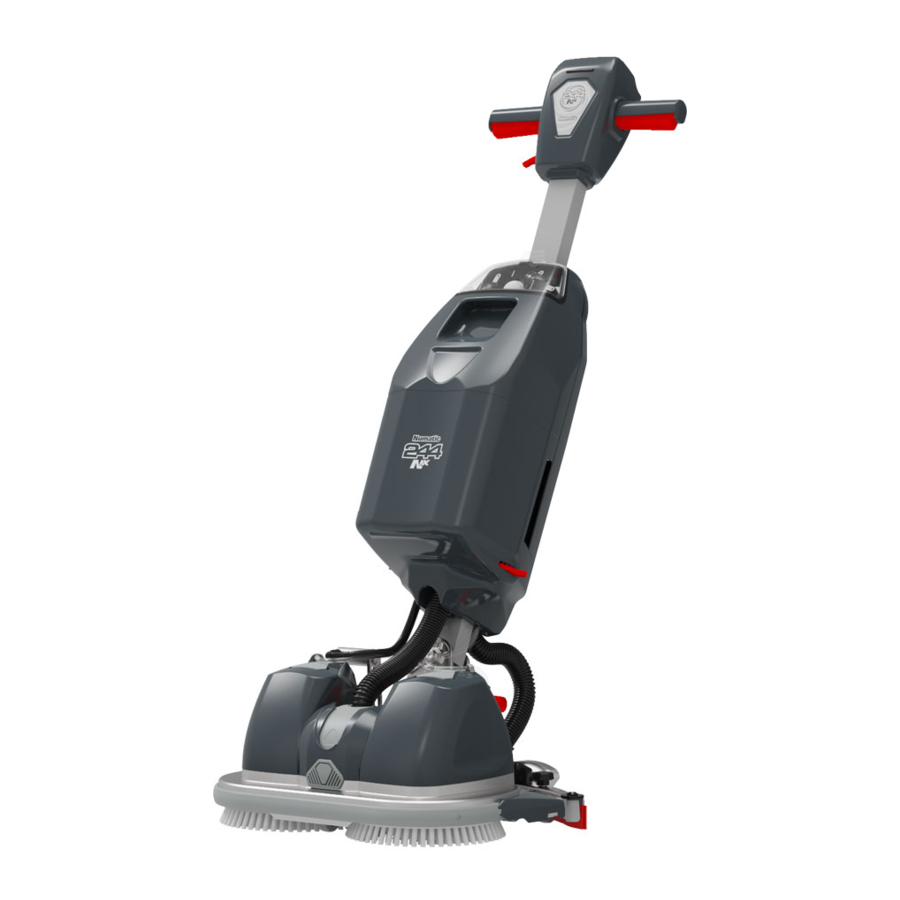
Page 7: Machine Overview
Machine Overview Allgemeine Übersicht Operator control panel Bedienfeld Triggers Abzugsbügel Waste-water tank Schmutzwassertank Clean-water tank Frischwassertank Brush deck Bürstendeck Squeegee blades Abstreifblätter Clean water flow adjustment taps Frischwasserdurchfluss-Einstellventile Clean-water filling / emptying cap Frischwasser-Füll-/Entleerungsdeckel Floor-tool vacuum hose Saugschlauch der Absauglippe Vacuum hose Saugschlauch Separator... -
Page 8: Übersicht Über Das Bedienfeld
Descrição geral da máquina Vista general de la máquina Painel de controlo do operador Cuadro de mandos del operario Gatilhos Gatillos Depósito de água residual Depósito de agua sucia Depósito de água limpa Depósito de agua limpia Plataforma das escovas Cabezal de cepillos Lâminas do rodo Gomas de la boquilla de aspiración... -
Page 9: Control Panel Overview
C O M PA C T S C R U B B E R D R Y E R Control Panel Overview NUC244NX... -
Page 10: Quick Set Up Guide
ES:- LEA ESTA GUÍA ANTES DE EMPEZAR A USAR LA MÁQUINA. TRAS RETIRAR TODO EL EMBALAJE, ABRA CON CUIDADO Y COMPRUEBE EL CONTENIDO. NUC244NX CONTENTS Brush fitting - Make sure battery is removed before fitting or removing brushes ● Owner Manual ●... -
Page 11: Encaixe Das Escovas
CONTEÚDO NUC244NX ● Manual do proprietário ● Carregador e cabo da bateria ● Bateria ● Escovas para lavagem x 2 ● Conjunto do rodo Encaixe das escovas - Certifique-se de que a bateria está retirada antes de encaixar ou retirar as escovas. -
Page 12: Main Tank Assembly Removal
Main tank assembly removal Remove the tank assembly from the front of the Lift and tilt the top of the tank assembly away from the handle as you remove. Place the tank assembly machine. Using the inset handle on the front of on a suitable surface in its upright/uppermost position. -
Page 13: Clean Water Tank Removal & Filling
Clean water tank removal and filling Over head cut away view Over head cut away view After lifting onto a suitable work surface, tilt the Slide your hand under the tank and curl your Remove the clean water tank from the main body of tank assembly slightly forward and slide your hand fingers up in the space in front of the tank, use your the tank holder. - Page 14 Remove the clean water tank from the main body of the tank holder (4&5). To fill remove the rubber stop from the filling neck. Note: There is a T piece keeping the rubber stop from being completely removed. 4/5/6. Nehmen Sie den Frischwassertank aus dem Tankhaltergehäuse (4 und 5). Entfernen Sie zum Befüllen den Gummistopfen vom Einfüllstutzen. Hinweis: Ein T-Stück verhindert ein vollständiges Entfernen des Gummistopfens.
-
Page 15: Battery Fitting & Water Flow Setting
Battery fitting and Water flow setting Lift the battery using the battery handle. Place the battery into the battery compartment ensuring it is Refit the main tank onto the machine. securely in place and the orientation is correct (battery handle folds down towards the machine handle (A)). Batterieanschluss und Wasserdurchflusseinstellung 1/2. - Page 16 4. Kippen Sie die Unterseite des Tanks in Richtung des Griffs über der Batterie. 5. Richten Sie den Tank am Maschinengriff aus und senken Sie den Tank ab. Er muss sicher befestigt sein. 6. Voller Frischwassertank, an der Maschine montiert. 4.
- Page 17 To lower the floor-tool, press down on the left foot pedal lever at the rear of the machine (10-A). To lower the machine deck to the ground. Stand behind the machine, grip the handles. With your right foot push the right pedal forward (11-B). (By pushing lever the front support wheel retracts under the deck (11-C)). Pull the small lever on the right hand side of the handle upwards (12-D) and then pull the handle backwards.
-
Page 18: Machine Handle Operation
Machine handle operation Trigger Start button Trigger To start the machine pull one or both triggers in and press the start button with the deck down, this will start the brushes spinning and the battery power indicator will illuminate to show the power level. Water On / Off Vacuum On / Off With either trigger pulled in press the water on button, this lights up blue to... -
Page 19: Storage & Transportation
Storage and Transport. Aufbewahrung und Transport. Rangement et transport. Opslag en transport. Armazenamento e transporte. Almacenamiento y transporte. Handle lock button Make sure the handle is in the upright position and locked in place, push the handle lock button and locate handle in correct position. Storage and Transport mode option 1 To put the machine into storage mode start with the handle locked in the upright position and the floor-tool down (1), pull the handle backwards until the floor- tool moves up and the transport wheels click out into position the front support wheel is deployed (2). - Page 20 Storage and Transport mode option 2 To raise the floor-tool use the toecap locations to the rear of the floor-tool and lift up (A). To raise the machine deck off the ground. Stand behind the machine, grip the handle. With your right foot push the right pedal down (B) while pulling the machine backwards until the storage wheels click into position and the front support wheel extends.
-
Page 21: Regular Maintenance
Regular Maintenance. Regelmäßige Wartung. Entretien régulier. Regelmatig onderhoud. Manutenção regular. Mantenimiento periódico. Separator removal and cleaning Using thumb and index finger grip the tab of the Lift the separator away from the tank. Take the separator to a suitable cleaning station. separator and pull forwards. -
Page 22: Clean Water Tank Outlet Cleaning
Clean water tank outlets Make sure the clean water tank is empty. Unscrew Remove the clean water outlets from the clean Wash the clean water outlets thoroughly under a the two clean water outlets, A and B. water tank. tap, make sure the filter is clean with no blockages. Check for any damage (if any damage is found replace the clean water outlets). -
Page 23: Ausbau Und Reinigung Des Schwimmerventils Seiten 22
Ausbau und Reinigung des Schwimmerventils 1/2. Zum Ausbau des Schwimmerventils drehen Sie die rote Halteklammer in die von dem Pfeil auf der Halteklammer anzeigte Richtung. 3. Heben Sie das Schwimmerventil aus dem Tank, waschen Sie es und untersuchen Sie es auf Schäden. 4. -
Page 24: Emptying Tanks
Emptying Tanks. Entleeren der Tanks. Vidange des réservoirs. De tanks leegmaken. Esvaziamento dos depósitos. Vaciado de depósitos. When finished using the machine it is good practise to empty and clean the tanks of the machine. To do this firstly remove the tank assembly from the machine ( see set up ), 1. -
Page 25: Changing The Floor-Tool Blades
Changing the Floor Tool Blades. Auswechseln der Abstreifblätter an der Absauglippe. Remplacement des lames du suceur. De wissers van het vloerelement vervangen. Substituir as lâminas da ferramenta do piso. Cambio de gomas de la boquilla de aspiración. Always make sure that the machine is switched off and the battery is removed prior to any maintenance. -
Page 26: Refitting The Floor-Tool Blades
Refitting the Floor Tool Blades Refit the blade holder, retain using the two outer knobs. Make sure the slotted blade goes to the front of the floor-tool. Refit the floor-tool using the two central knobs to the floor-tool. Make sure the end holes on both squeegee blades are positioned correctly on ‘T’... -
Page 27: Battery Removal & Charging
Reinstalar as lâminas da ferramenta do piso Reinstale o suporte da lâmina e fixe-o utilizando os dois botões externos. Certifique-se de que a lâmina ranhurada fica situada na frente da ferramenta do piso. Reinstale a ferramenta do piso utilizando os dois botões centrais da ferramenta do piso. Certifique-se de que os orifícios finais em ambas as lâminas do rodo estão posicionados corretamente nas molduras dos grampos em forma de “T”! (A). -
Page 28: Twintec Maintenance
De accu verwijderen A/B. Verwijder het tanksamenstel van de voorzijde van de machine met behulp van de uitklapbare hendel aan de voorzijde van de tank en til de tank recht naar boven op (A). Trek het tanksamenstel uit de machine en plaats het op de grond. Vervolgens kan de accu aan de hendel uit de machine worden getild om te worden opgeslagen of opgeladen (B). -
Page 29: Specifications
Specifications. Technische Daten. Caractéristiques. Specificaties. Especificações. Especificaciones. Brush / Pad Weight Brush / Pad Pressure Cleaning Area Brush Motor Power Brush Speed Brush / Pad Width in cleaning mode in cleaning mode Andruckkraft von Gewicht von Pads/ Reinigungsbereich Bürstenmotorleistung Bürstendrehzahl Breite der Pads/Bürsten Bürsten Pads/Bürsten... -
Page 30: Troubleshooting
Troubleshooting.Fehlerbehebung. Dépannage. Problemen verhelpen. Resolução de problemas. Resolución de problemas. PROBLEM CAUSE SOLUTION Machine will not operate Battery not connected Connect battery (page 10) Low battery charge Charge battery (page 10) Vacuum will not operate Vacuum not turned on Turn on vacuum (page 18) Poor water pick-up Waste-water tank full Empty waste-water tank (page 24) - Page 31 PROBLÈME CAUSE SOLUTION La machine ne fonctionne pas Batterie non branchée Brancher la batterie (page 10) Charge de batterie faible Chargez la batterie (page 10) L’aspiration ne fonctionne pas L’aspiration n’est pas activée Activer l’aspiration (page 18) Collecte d’eau insuffisante Réservoir d’eau sale plein Videz le réservoir d’eau sale (page 24) Tuyau de raclette obstrué/bloqué...
- Page 32 PROBLEMA CAUSA SOLUÇÃO A máquina não funciona Bateria não ligada Ligue a bateria (página 10) Bateria com pouca carga Carregue a bateria (página 10) O vácuo não funciona O vácuo não está ligado Ligue o vácuo (página 18) Recolha de água insuficiente Depósito de água residual cheio Esvazie o depósito de água residual (página 24) Mangueira do rodo entupida/bloqueada...
-
Page 33: Rating Label / Personal Protective Equipment / Recycling
Approval Mark WEEE symbol Part Number Machine yr/wk Serial number Numatic Support WEEE (Waste, Electrical and Electronic Equipment) Scrubber dryer Accessories and packaging should be sorted for environmentally-friendly recycling. Only for EU countries. Do not dispose of scrubber-dryer into household waste. -
Page 34: Safety Precautions
ORIGINAL INSTRUCTIONS Information for Scrubber Dryer READ MANUAL BEFORE USE COMPONENT INTERVAL INSPECT FOR Mains Lead DAILY Scuffing, cracks, splits, conductors showing Brushes DAILY Bristle damage, wear, drive collar wear Squeegee Blade BEFORE EACH USE Wear, cracks, splits Filters BEFORE EACH USE Clogging and debris retention Tanks AFTER EACH USE... -
Page 35: Typenschild/Persönliche Schutzausrüstung/Recycling
Geräte-QR-Code Zulassungszeichen WEEE-Symbol Teilenummer Herstellungsjahr/-woche-Seriennummer Numatic Support WEEE (Elektro- und Elektronik-Altgeräte) Zubehörteile und Verpackung der Scheuersaugmaschine sollten für umweltfreundliche Entsorgung sortiert werden. Für EU-Länder gilt: Die Scheuersaugmaschine nicht mit dem Hausmüll entsorgen. Die Entsorgung muss entsprechend der WEEE-Richtlinie 2012/19/EU über Elektro- und Elektronik-Altgeräte und ihrer jeweiligen Umsetzung in nationales Recht erfolgen. -
Page 36: Sicherheitsvorkehrungen
ORIGINALANLEITUNG Informationen zur Scheuersaugmaschine HANDBUCH VOR GEBRAUCH LESEN KOMPONENTE INTERVALL UNTERSUCHEN AUF Netzkabel TÄGLICH Abschürfungen, Risse, Brüche, offenliegende Leiter Bürsten TÄGLICH Beschädigte oder verschlissene Borsten, verschlissener Antriebskranz Abstreifblatt VOR JEDEM EINSATZ Verschleiß, Risse, Brüche Filter VOR JEDEM EINSATZ Verstopfung und zurückgehaltener Schmutz Tanks NACH JEDEM EINSATZ Schmutzwassertank nach dem Einsatz spülen... -
Page 37: Plaque Signalétique / Équipement De Protection Individuelle Recyclage
Symbole DEEE Référence pièce Numéro de série année/semaine de la machine Numatic Support DEEE (Déchets d’équipements électriques et électroniques) Pour permettre un recyclage écologique, les accessoires et les emballages de l’autolaveuse doivent être triés. Pays de l’UE uniquement. Ne jetez pas l’autolaveuse avec les ordures ménagères. -
Page 38: Précautions À Prendre
NOTICE ORIGINALE LISEZ LE MODE D’EMPLOI AVANT UTILISATION Informations concernant l’autolaveuse COMPOSANT INTERVALLE RECHERCHER Câble d'alimentation QUOTIDIENNEMENT Éraflures, fissures, crevasses, conducteurs apparents Brosses QUOTIDIENNEMENT Poils endommagés, usure, usure du collier d’entraînement Lame pour raclette AVANT CHAQUE UTILISATION Usure, fissures, fentes Filtres AVANT CHAQUE UTILISATION Obstruction, rétention de débris... -
Page 39: Typeplaatje / Persoonlijke Beschermingsmiddelen / Recycling
QR-code machine Goedkeuringsmerk WEEE-symbool Onderdeelnummer Jaar/week serienr. machine Numatic Support WEEE (Afgedankte Elektrische en Elektronische Apparatuur) De schrobzuigmachine, accessoires en verpakking moeten op een milieuvriendelijke manier worden gerecycled. Uitsluitend voor EU-landen. De schrobzuigmachine mag niet met het huishoudelijk afval worden afgevoerd. -
Page 40: Veiligheidsmaatregelen
ORIGINELE INSTRUCTIES Informatie m.b.t. schrobzuigmachine LEES VOOR GEBRUIK DE HANDLEIDING COMPONENT INTERVAL CONTROLEREN OP Stroomkabel DAGELIJKS Slijtage, barsten, scheurtjes, blootliggende draden Beschadigingen aan borstels, algemene slijtage, sli- Borstels DAGELIJKS jtage aan aandrijfbus Vloerwisserblad VOOR IEDER GEBRUIK Slijtage, barsten, scheurtjes Filters VOOR IEDER GEBRUIK Verstopping en achterblijvende vervuiling Tanks... -
Page 41: Etiqueta De Classificação/Equipamento De Proteção Individual/ Reciclagem
Marca de aprovação Símbolo de REEE Referência da Peça N.º de série ano/semana da máquina Numatic Support REEE (Resíduos de Equipamentos Elétricos e Eletrónicos) Os acessórios e a embalagem da lavadora-secadora devem ser separados para reciclagem de forma a respeitar o ambiente. - Page 42 Informações sobre a TRADUÇÃO DAS INSTRUÇÕES ORIGINAIS lavadora-secadora LEIA O MANUAL ANTES DE UTILIZAR COMPONENTE INTERVALO INSPECIONAR Cabo de alimentação DIARIAMENTE Roturas, fissuras, fendas, condutores à vista Danos ou desgaste das cerdas, desgaste do aro de Escovas DIARIAMENTE acionamento Lâminas do rodo ANTES DE CADA UTILIZAÇÃO Desgaste, fissuras, fendas Filtros...
-
Page 43: Etiqueta De Características/Equipo De Protección Individual/Reciclaje
Símbolo de RAEE Número de pieza N.o Ser. con año/semana de la máquina Numatic Support RAEE (Residuos de aparatos eléctricos y electrónicos) Los accesorios y el embalaje de la fregadora-secadora se deben clasificar para su reciclaje ecológico. Solo para países de la UE. - Page 44 INSTRUCCIONES ORIGINALES LEA EL MANUAL ANTES DE UTILIZAR LA MÁQUINA Información de la fregadora-secadora COMPONENTE INTERVALO EXAMINAR EN BUSCA DE Cable de alimentación DIARIAMENTE Rozaduras, grietas, hendiduras, conductores visibles Cepillos DIARIAMENTE Daño o desgaste de las cerdas, desgaste del mandril Gomas de la boquilla de aspiración ANTES DE CADA USO Desgaste, grietas, hendiduras...
-
Page 45: Recommended Spare Parts
Spare Parts. Ersatzteile. Pièces détachées. Reserveonderdelen. Peças sobressalentes. Repuestos. Part No. SPARES & ACCESSORIES Part No. SPARES & ACCESSORIES 909996 BATTERY 911798 BALL SHUT OFF ASSEMBLY 911334 LITHIUM BATTERY CHARGER 911502 SEPARATOR MOULDING & SEAL OVER MOULD 912365 CHARGER CABLE (UK) 911931 NYLO SCRUB BRUSH SET PACK OF 2 912361... - Page 46 Onderdeelnr. RESERVEONDERDELEN EN ACCESSOIRES Onderdeelnr. RESERVEONDERDELEN EN ACCESSOIRES 909996 ACCU 911798 BALAFSLUITMECHANISME 911334 OPLADER VOOR LITHIUMACCU 911502 SCHEIDERPROFIEL EN AFDICHTING OVER PROFIEL 912365 OPLAADKABEL (GB) 911931 NYLON SCHROBBORSTELSET 2 STUKS 912361 OPLAADKABEL (EURO) 912353 RODE PADS 10 STUKS 912364 OPLAADKABEL (ZWITSERLAND) 912354 WITTE PADS 10 STUKS 912363...
-
Page 47: Schematic Diagram
Kirjeldus / La description / Oписание / Περιγραφή / Leirás / Descrizione / Apibudinimas / Omschrijving / Beskrivelse / Descrição / Opis / Descriere / Oписание / Beskrivning / Opis / Kuvaus: We, Numatic hereby declare under our Ние, Numatic С настоящото Nós, a Numatic declaramos, sob nossa sole responsibility, that the above- декларираме... -
Page 48: Company Address
Tel: 0861 686 284 www.numatic.co.za Numatic International Schweiz AG. Sihlbruggstrasse 3A, 6340 Baar. SCHWEIZ Tel: 0041 (0) 41 76 80 76 - 0 www.numatic.ch Numatic International ULDA. Rua da Boa Viagem, 177 4470.210 Maia. PORTUGAL Tel: +351 220 047 700 www.numatic.pt Numatic International SLU.
Need help?
Do you have a question about the NUC244NX and is the answer not in the manual?
Questions and answers