Table of Contents
Advertisement
Quick Links
EUROSTER 2006TXRX – INSTALLATION AND OPERATION MANUAL
Wireless, programmable thermostat for all types of heating and air conditioning devices.
MANUFACTURER: P.H.P.U. AS, Chumiętki 4, 63-840 Krobia, Poland
In order to take full advantage of thermostat capabilities please read this installation and
operation manual carefully.
This manual is intended for v8 01.2020 version of the thermostat.
1.
DESCRIPTION OF DEVICE
Wireless Euroster 2006TXRX thermostat is used to control room temperature simply and
efficiently without a laborious installation of wires between the thermostat and the heating
device.
It is used to control the operation of the CH boiler and other components of a heating system.
It controls electrical equipment, floor heating, and air-conditioning systems. The thermostat
operates with two temperature levels: comfort (day
temperature. Each temperature may be modified within the range of 5...35 °C. The thermostat
is programmable in seven-day cycles with an accuracy of 0.5 hour, therefore it enables
48 temperature changes in 24 hours. It is possible to program different time ranges for each
day of the week.
2.
BASIC DEVICE FUNCTIONS
•
Does not require laying cable connections between the thermostat and the controlled
device
•
User-friendly thermostat enabling easy control of temperature in living and utility rooms
•
Bidirectional communication ensures high operational reliability and immunity to inter-
ference
•
Possible cooperation with a maximum of 6 4040RX receivers
•
Information on the strength of the radio signal
•
Legible, backlit LCD
•
Two temperature levels: comfort and reduced
•
0.2 °C accuracy of temperature setting
•
0.5-hour accuracy of range programming
•
Numerous useful functions: temporary temperature setting, constant temperature, dis-
charged batteries indication
•
Temperature read-out accuracy of 0.1 °C
•
Temperature readout correction
•
Surface mounting
EUROSTER 2006TXRX
) temperature and economical (night
1
)
Advertisement
Table of Contents

Related Manuals for EUROSTER 2006TXRX


Summary of Contents for EUROSTER 2006TXRX
- Page 1 This manual is intended for v8 01.2020 version of the thermostat. DESCRIPTION OF DEVICE Wireless Euroster 2006TXRX thermostat is used to control room temperature simply and efficiently without a laborious installation of wires between the thermostat and the heating device.
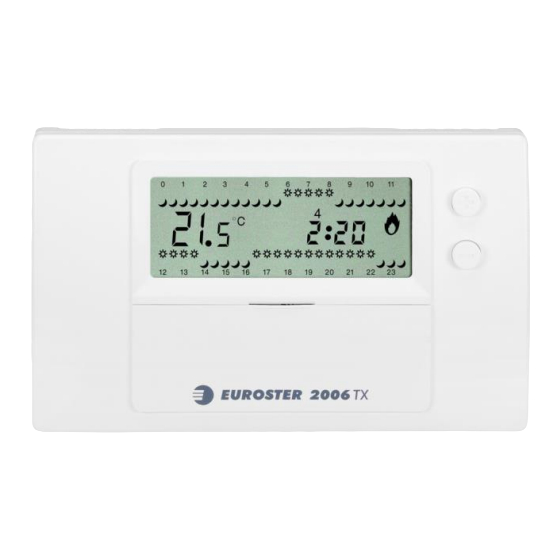
- Page 2 EUROSTER 2006TXRX – INSTALLATION AND OPERATION MANUAL THERMOSTAT VISIBLE ELEMENTS BODY 1. HOLD – use the button to switch the thermostat into the manual mode. The thermostat maintains the set temperature regardless of programmed settings. Press the HOLD but- ton again to restore operation with programmed settings.
-
Page 3: Installation
EUROSTER 2006TXRX – INSTALLATION AND OPERATION MANUAL VISIBLE ELEMENTS OF RX RECEIVER a) A switch activating the continuous operation of the heating device. b) A switch for entering settings, Signaling LEDs. c) Output cable. INSTALLATION 5.1. Safety rules CAUTION! •... - Page 4 EUROSTER 2006TXRX – INSTALLATION AND OPERATION MANUAL 5.3. Opening the thermostat Use a cross-head screwdriver to loosen the housing locking screw. Separate the panel and the base minding the hinges on the left side of the thermostat. 5.4. Selecting thermostat operating mode Jumper position J4 –...
- Page 5 EUROSTER 2006TXRX – INSTALLATION AND OPERATION MANUAL 6.2. MODIFICATION OF TEMPERATURE LEVELS – comfort and economical temperature Temperatures stored under symbols are applicable for all weekdays. a. Set the knob to the START position. b. To allow a change of preset comfort temperature press button.
-
Page 6: Restoring Factory Settings
EUROSTER 2006TXRX – INSTALLATION AND OPERATION MANUAL 6.6. RESTORING FACTORY SETTINGS a. Press simultaneously HOLD and buttons and while holding them press RESET. b. Release all buttons. c. Press the HOLD button twice and press RESET again. Factory settings Default temperatures: Heating mode 20.4°C... - Page 7 EUROSTER 2006TXRX – INSTALLATION AND OPERATION MANUAL 6.10. FLOOR SENSOR CONNECTION a. Check if J1 jumper is in the floor position (point 4.4.) b. Connect the floor sensor to terminals No. 4 and 5 in the thermostat. c. Reset the thermostat.
-
Page 8: First Start
EUROSTER 2006TXRX – INSTALLATION AND OPERATION MANUAL Green – normally open mode (COM – NO). It is the most commonly used operation mode. While the device operation indicator is active the output cables are shorted. Red – normally closed mode (COM – NC). While the device operation indicator is active the output cables are opened. -
Page 9: Maintenance
EUROSTER 2006TXRX – INSTALLATION AND OPERATION MANUAL 3. Euroster RX (receiver) 4. Euroster TX placed in any room In arrangement with a gas boiler Electrical connection block Output cable using COM - NO contact (normally open) Euroster RX (receiver) Euroster TX placed in any room 10. -
Page 10: Kit Contents
14. SIMPLIFIED DECLARATION OF CONFORMITY P.H.P.U. AS AGNIESZKA SZYMAŃSKA-KACZYŃSKA hereby represents that the type of EUROSTER 2006TXRX equipment conforms to the following directives: 2014/35/EU (LVD), 2014/30/EU (EMC), 2014/53/EU (RED), 2011/65/EU (RoHS). The complete text of the Declaration of EU conformity is available at the following Internet address: www.euroster.pl... -
Page 11: Warranty Certificate
EUROSTER 2006TXRX – INSTALLATION AND OPERATION MANUAL WARRANTY CERTIFICATE EUROSTER 2006TXRX thermostat Warranty terms: 1. The warranty is valid for 24 months from the device sale date. 2. The claimed thermostat together with this warranty certificate must be supplied to the seller.
Need help?
Do you have a question about the 2006TXRX and is the answer not in the manual?
Questions and answers