Table of Contents
Advertisement
Quick Links
EUROSTER 2006TXRXG – INSTALLATION AND OPERATION MANUAL
Wireless, programmable thermostat for all types of heating and air conditioning devices
MANUFACTURER: P.H.P.U. AS, Chumiętki 4, 63-840 Krobia, Poland
In order to take full advantage of thermostat capabilities please read this installation and
operation manual carefully.
This manual is intended for the v8 01.2020 version of the thermostat
1. A DESCRIPTION OF THE DEVICE
The Euroster 2006TXRXG wireless thermostat allows you to control the indoor temperature in a
very simple and efficient way, without the need for labor-intensive wiring between the
thermostat and the heating device.
It is used to control the operation of the CH boiler and other heating system components. It
controls electrical equipment, floor heating, and air-conditioning systems. The thermostat
operates with two temperature levels: comfort (day
temperature. Each temperature is modifiable within the range of 5 °C...35 °C. The thermostat
is programmable in seven-day cycles with an accuracy of 0.5 hour, therefore it enables 48
temperature changes in 24 hours. It is possible to program different time ranges for each day
of the week.
2. BASIC FUNCTIONS OF THE THERMOSTAT
•
Does not require leading cable connections between the thermostat and the controlled
device
•
User-friendly thermostat enabling easy control of temperature in living and utility rooms
•
Bidirectional communication ensures high operational reliability and resistance to
interference
•
Up to 6 RXG receivers can be used
•
Radio signal strength information,
•
Legible, backlit LCD
•
Two temperature levels: comfortable and economical (for the entire week)
•
Temperature setting with the accuracy of 0.2 °C
•
Programming ranges with 0.5-hour accuracy
•
Numerous useful functions: temporary temperature setting, constant temperature,
discharged batteries indication
•
Temperature read-out accuracy of 0.1 °C
•
Additional socket for connecting any network-powered device (up to 16 A)
•
Temperature reading correction
•
Surface mounting
EUROSTER 2006TXRXG
) temperature and economical (night
1
)
Advertisement
Table of Contents

Related Manuals for EUROSTER 2006TXRXG


Summary of Contents for EUROSTER 2006TXRXG
- Page 1 This manual is intended for the v8 01.2020 version of the thermostat 1. A DESCRIPTION OF THE DEVICE The Euroster 2006TXRXG wireless thermostat allows you to control the indoor temperature in a very simple and efficient way, without the need for labor-intensive wiring between the thermostat and the heating device.
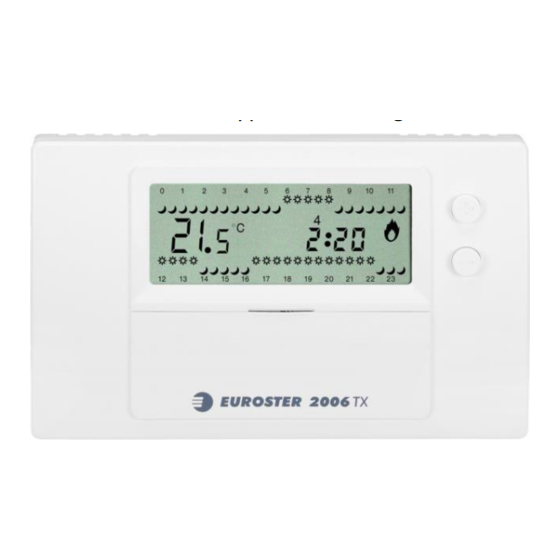
- Page 2 EUROSTER 2006TXRXG – INSTALLATION AND OPERATION MANUAL 3. THERMOSTAT VISIBLE ELEMENTS BODY 1. HOLD – use the button to switch the thermostat into the manual mode. The thermostat maintains the set temperature regardless of programmed settings. Press the HOLD button again to restore operation with programmed settings.
-
Page 3: Installation
EUROSTER 2006TXRXG – INSTALLATION AND OPERATION MANUAL 4. RXG RECEIVER VISIBLE ELEMENTS A. On/off switch continuous operation of the heating device B. Power converter socket C. Output cable D. Two-color LED E. Button used to pair and change settings. 5. INSTALLATION... -
Page 4: Thermostat Settings
EUROSTER 2006TXRXG – INSTALLATION AND OPERATION MANUAL OPENING THE THERMOSTAT Using a cross-head screwdriver to loosen the housing locking screw. Separate the panel from the base, while being cautious about the hinges on the right-hand side of the controller. SELECTION OF THE THERMOSTAT OPERATING MODE Jumper position J4 –... - Page 5 EUROSTER 2006TXRXG – INSTALLATION AND OPERATION MANUAL f) Repeat the sequence to set the minutes. g) After five seconds, the set-point is stored and the device resumes operation. MODIFYING TEMPERATURE LEVELS — comfort and economical The temperatures programmed under symbols are valid for all days of the week.
-
Page 6: Resetting To Factory Settings
EUROSTER 2006TXRXG – INSTALLATION AND OPERATION MANUAL e) IMPORTANT NOTE! Having programmed all 7 days of the week, turn the knob back to the start position. The thermostat will automatically start the set program RESETTING TO FACTORY SETTINGS a) Press HOLD and buttons simultaneously and while holding them down press the RESET button. -
Page 7: Selecting Operating Mode
EUROSTER 2006TXRXG – INSTALLATION AND OPERATION MANUAL CONNECTING FLOOR SENSOR a) Check if the J1 jumper is in the floor position (point 4.4.) b) Connect the floor sensor to terminals 4 and 5 of the thermostat. c) Reset the thermostat. -
Page 8: First Start
EUROSTER 2006TXRXG – INSTALLATION AND OPERATION MANUAL Green – normally open mode (COM – NO). It is the mainly used operation mode. While the device operation indicator is active, the output cables are shorted. Red – normally closed mode (COM – NC). While the device operation indicator is active, the output cables are opened. -
Page 9: Maintenance
EUROSTER 2006TXRXG – INSTALLATION AND OPERATION MANUAL 9. SAMPLE CONNECTION DIAGRAMS The following diagrams are simplified and do not cover all elements necessary for the correct installation. In arrangement with a 230 V 50 Hz device 1. Electrical connection block 2. -
Page 10: Technical Data
Installation and Operation Manual with Warranty Certificate SIMPLIFIED DECLARATION OF CONFORMITY P.H.P.U. AS AGNIESZKA SZYMAŃSKA-KACZYŃSKA hereby declares that the type of EUROSTER 2006TXRXG equipment conforms to the following directives: 2014/35/EU (LVD), 2014/30/EU (EMC), 2014/53/EU (RED), 2011/65/EU (RoHS). -
Page 11: Warranty Certificate
EUROSTER 2006TXRXG – INSTALLATION AND OPERATION MANUAL ELECTRONIC WASTE MANAGEMENT INFORMATION This product is designed and manufactured from high-quality materials and components suitable for reuse. The crossed-out wheelie bin symbol located on the product (Fig. 1) means that the product is subject to selective collection in accordance with the provisions of the Directive 2012/19/EU of the European Parliament and of the Council.
Need help?
Do you have a question about the 2006TXRXG and is the answer not in the manual?
Questions and answers