
Related Manuals for Rottler H85A


Summary of Contents for Rottler H85A
- Page 1 OPERATION AND MAINTENANCE MANUAL 8029 S 200th St. Kent, WA 98032 USA | www.rottlermfg.com | Ph: 253-872-7050 | Fax: 253-395-0230 10.01.2019...
- Page 3 Contact your regional Rottler sales rep for assistance in ordering optional equipment, replacement parts, or tooling. If you are unable to contact your regional Rottler sales rep, call the factory at 253-872-7050 and ask to speak to the parts sales specialist.
-
Page 5: Table Of Contents
Section 1 Introduction H85A Manual INTRODUCTION Contents INTRODUCTION ......................1-1 Description ........................1-2 Disclaimer ........................1-2 Limited Warranty ......................1-3 Online Documentation Access ...................1-4 Specifications ......................1-5 www.rottlermfg.com... -
Page 6: Introduction
“Installation Report” located in the Installation Chapter of this manual. We suggest that the new user of the H85A read the CONTROL DEFINITIONS to get an idea how the machine operates. The Operating Instructions chapter should be read in order to familiarize the user with the actual button pushing sequences required to carry out a job. -
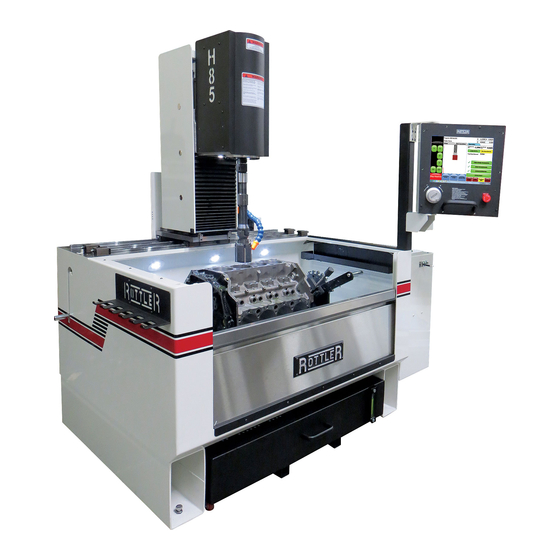
Page 7: Description
The model H85A Honing Machine is a wet, complete cylinder block and general purpose-honing machine A Windows based touch screen panel provides easy and convenient control of the H85A. Block programs can be created and stored to memory for later recall, providing a quick set up for honing common blocks. -
Page 8: Limited Warranty
Should a product not be as warranted, Rottler sole obligation shall be, at its option, to repair, correct or replace the product or to refund the amounts paid for the Product upon its return to a location designated by Rottler. -
Page 9: Online Documentation Access
H85A Manual Online Documentation Access Online documentation for machines and optional equipment can be accessed at the Rottler website. To access documentation open your browser and navigate to https://www.rottlermfg.com. Scroll to the bottom of the page and under the Owner Resources title click the type of documentation you want to access. -
Page 10: Specifications
Section 1 Introduction H85A Manual Specifications www.rottlermfg.com... - Page 11 Section 2 Installation H85A Manual INSTALLATION Contents INSTALLATION REPORT .....................2-2 Machine Dimensions ....................2-8 Machine Working Clearances ..................2-9 Optional Anchor Bolt Locations ................2-10 Work Envelope Dimensions ..................2-11 Side View ..........................2-11 Top View ..........................2-12 Installation Procedure ....................2-13 Location ..........................2-13 Unpacking ........................... 2-13 Leveling ..........................
- Page 12 Section 2 Installation H85A Manual ATTENTION OWNER/BUSINESS MANAGER To validate the warranty on your new Rottler machine, please be sure to sign the installation report after the installation technician has installed the machine and verified the machine is operating correctly and given the operators operation and maintenance training.
-
Page 13: Installation Report
Machine Model:___________ Serial Number:__________ Representative:________________________ MACHINE INSTALLATION: Electrical information MUST be complete to validate this report. Customer responsibility prior to the arrival of Rottler Sales/Service technician. Please Initial each item when it is completed. VERY IMPORTANT: Modern design machines contain electronic low voltage circuitry that provides great advantages and a better machine life. - Page 14 ______Clean any rust inhibitor from the machine surfaces ______Make sure that an Internet connection is available at the machine. The following is the Rottler Sales/Service technician’s responsibility MACHINE START-UP ______BEFORE turning power on to the machine. Check all wires for security by using the correct screw driver and turning CW until movement stops.
- Page 15 ______Once the machine has been fully setup and is ready for operation create a Skype account for the machine following the instructions in the Installation Section of the manual. ______Explain to the customer and the operator how the to log onto Skype and communicate with Rottler when needed.
- Page 16 Section 2 Installation H85A Manual ______The following is a checklist of information needed prior to setting up a job. Finish bore size, cross hatch angle, and finish. • • Bore length. • Center to center dimension of cylinders. • If the job is a V type block, the pan rail to crank line center dimension, and cylinder offset between cylinder banks.
- Page 17 Rottler equipment. It is the responsibility of the end user of Rottler equipment to determine the final dimensions and finishes of the workpiece that they are working on. Any information regarding final dimensions and...
- Page 18 Section 2 Installation H85A Manual www.rottlermfg.com...
-
Page 19: Machine Dimensions
Section 2 Installation H85A Manual Machine Dimensions Overall Height 80 in. (1778 mm) 48 in. (1220 mm) 65 in. (1650 mm) 79 in. (2007 mm) www.rottlermfg.com... -
Page 20: Machine Working Clearances
Section 2 Installation H85A Manual Machine Working Clearances 48 in. (1220 mm) 24 in. (610 mm) 36 in. (915 mm) 24 in. (610 mm) www.rottlermfg.com... -
Page 21: Optional Anchor Bolt Locations
Section 2 Installation H85A Manual 2-10 Optional Anchor Bolt Locations 3.25 8.19 1.06 47.19 33.25 33.25 53.50 www.rottlermfg.com... -
Page 22: Work Envelope Dimensions
Section 2 Installation H85A Manual 2-11 Work Envelope Dimensions Side View Side View 20.17 - 14.52 [512.2 - 368.7] MANUAL Y-TRAVEL 19.92 - 14.77 [505.9 - 375.1] AUTOMATIC Y-TRAVEL www.rottlermfg.com... -
Page 23: Top View
Section 2 Installation H85A Manual 2-12 Top View www.rottlermfg.com... -
Page 24: Installation Procedure
The proper loading arrangement and location for your H85A machine is extremely important. A slow travel (6’ to 10’ per min.) power hoist, operated from either a bridge crane or a jib crane arrangement works very well. -
Page 25: Power Supply
Section 2 Installation H85A Manual 2-14 Power Supply This machine has the following power requirements: • 208 to 240 VAC • Single or Three Phase Power • 50 or 60 Hz • 25 Amps See illustration below for correct connection of incoming power. Measured power at the machine’s main breaker must be within the required range listed above. -
Page 26: Grounding
Section 2 Installation H85A Manual 2-15 Grounding The machine requires a good earth ground. The grounding conductor from the incoming power source must be connected to the grounding block located inside of the electrical cabinet. A ground rod installed in addition to the electrical service grounding conductor is permitted, but must be connected directly to the grounding block inside of the electrical cabinet. -
Page 27: Creating A Skype Account
Section 2 Installation H85A Manual 2-16 Creating a Skype Account Click on create an account Click on: Use your email instead Click on: Get new email address www.rottlermfg.com... - Page 28 Section 2 Installation H85A Manual 2-17 Name the email account using the Rottler machine Model and Serial number. Ex: H85A111, EM69P001 Create a password that is easy to remember. Uncheck the box to receive emails from Microsoft. First Name: Model-Serial Number...
- Page 29 Section 2 Installation H85A Manual 2-18 Type the code exactly as it appears. Click “Next” Click “Continue” If your headset and/or web camera are hooked up you can verify that they are working here. Otherwise, click “Continue” www.rottlermfg.com...
- Page 30 Section 2 Installation H85A Manual 2-19 Click “Add later” to skip this part. Your Skype account is set up and ready for use. www.rottlermfg.com...
- Page 31 Section 3 Safety H85A Manual SAFETY Contents Safety Information .......................3-1 Safety Instructions for Machine Use .................. 3-1 Electrical Power ........................3-3 Machine Operator ......................... 3-4 Computer and Controller System Safety ................3-6 Electrical Safety Features Of Rottler DM Controlled Machines ......3-7 www.rottlermfg.com...
-
Page 32: Safety Information
Section 3 Safety H85A Manual Safety Information For Your Own Safety Read This Instruction Manual Before Operating This Machine. This is the safety alert symbol. It is used to alert you to potential personal injury hazards. Obey all safety messages that follow this symbol to avoid possible injury or death. - Page 33 Section 3 Safety H85A Manual KEEP WORK AREA CLEAN. Clean spilled coolant from floor to avoid slipping hazard. KEEP CHILDREN AND VISITORS AWAY. All children and visitors should be kept a safe distance from work area. WEAR THE PROPER APPAREL. DO NOT wear loose clothing, gloves, rings, bracelets, or other jewelry which may get caught in moving parts.
-
Page 34: Electrical Power
Section 3 Safety H85A Manual Electrical Power All electrical power should be removed from the machine before opening the rear electrical enclosure. In the event of an electrical short, grounding reduces the risk of electric shock by providing a path of least resistance to disperse electric current. -
Page 35: Machine Operator
H85A Manual Machine Operator Operator of this H85A Honing machine should be a skilled machinist craftsman: that is well versed in the caution, care, and knowledge required to safely operating a metal cutting tool. If the operator is not a skilled machinist, the operator must pay strict attention to the operating procedure outlined in this manual, and must get instruction from a qualified machinist in both the productive and safe operation of this H85A Honing Machine. - Page 36 Section 3 Safety H85A Manual Keep clear of spindle when working in tank area. Spindle can drop if there is a failure in the machine. Move spindle out of work area when changing blocks or fixtures. Remember Machine tools have the speed and torque to severely injure any part of the human body exposed to them.
-
Page 37: Computer And Controller System Safety
Wireless using a USB wireless (Wi-Fi) adapter. Updating the Rottler software should ONLY be done when directed to do so by a Rottler service technician. Updating Rottler Software when not directed by Rottler personnel will result in a non-operational machine. -
Page 38: Electrical Safety Features Of Rottler Dm Controlled Machines
H85A Manual Electrical Safety Features Of Rottler DM Controlled Machines All Rottler machines that use the DM operational control system are designed to comply with all applicable safety standards. This includes but is not limited to the following systems: Thermal sensors in all motors and motor controls. - Page 39 Section 4 Control Definitions H85A Manual CONTROL DEFINITIONS Contents Control Definitions ......................4-1 Computer and Controller System Safety for DM Controlled Machines: ......4-1 Definitions of terminology used in this section ..............4-2 Hand Controls ........................4-3 E-STOP Switch ..........................4-3 Handwheel ............................4-3 Boot Up Screen ........................
- Page 40 Section 4 Control Definitions H85A Manual Number Pad ............................. 4-11 Conformation Windows ........................4-12 Change and Choose Windows ......................4-12 Software Set Menus ........................4-13 On Screen Keyboard ........................4-14 STONE HOLDER SIZE CHARTS H85A ..............4-15 www.rottlermfg.com...
-
Page 41: Control Definitions
Ethernet or Wireless using a USB wireless (Wi-Fi) adapter. Updating the Rottler software should ONLY be done when directed to do so by a Rottler service technician. Updating Rottler Software when not directed by Rottler personnel could result in a non-operational machine. -
Page 42: Definitions Of Terminology Used In This Section
H85A Manual COMMON INTERFACE NOTICE All Rottler machines using Direct Motion technology share a common control interface. This allows for a better environment for programing machine functions across a wide range of different machines. This also allows for easier deployment in shops already using Rottler Direct Motion machines. -
Page 43: Hand Controls
Section 4 Control Definitions H85A Manual Hand Controls E-STOP Switch This switch is used in an emergency situation. Pushing the button in will disconnect the power to all the motors that run the machine except the coolant pump motor. The machine will stop dead in place when activated. -
Page 44: Boot Up Screen
Section 4 Control Definitions H85A Manual Boot Up Screen This is the screen you will see when first turn on the power. Start Icon Double Click or double press to start the Rottler operating program www.rottlermfg.com... -
Page 45: Set Up Screen
Section 4 Control Definitions H85A Manual Set Up Screen Jog Button Panel The jog buttons are momentary contact buttons. They activate rapid travel for the axis indicated on the button. The Z+ button will move the spindle up. The Z- button will move the spindle down. -
Page 46: Program Select Section Buttons
The Home button is use to index the hone head when it is installed on the machine. FIXTURE SELECT, and TABLE OF TOOLS buttons are not used on the H85A. The New and Options, buttons are used for creating new engine block profiles that will be saved for later use. -
Page 47: Operation Screen
Section 4 Control Definitions H85A Manual Operation Screen At the top of the screen you will see the block and process that was selected. In the upper right section there is a readout of current location of the different axis’s. All readings are plus or minus from the zero set points. -
Page 48: Operation Screen: Setup Tab
Section 4 Control Definitions H85A Manual Operation Screen: Setup Tab Set Zeros Buttons These button will set the zero point for each axis that is indicated on the button. When touched a conformation pop up screen will appear to confirm that the operator wants to set the zero point. -
Page 49: Operation Screen: Operation Tab
Section 4 Control Definitions H85A Manual Operation Screen: Operation Tab This is the screen where the honing operation will be run from. At the top under the Operation Tab are 2 readouts. The first is Z Distance From Zero. This reading shows the location of the spindle from the zero point. -
Page 50: Operation Buttons
Section 4 Control Definitions H85A Manual 4-10 Operation Buttons FEED STONES TO DIAMETER Button When this button is active touching it will cause the spindle motor to start and the stones to feed out until the finish load setting is reached. When that occurs the spindle motor will shut off. This is the zero point for the stone diameter. -
Page 51: Coolant Pump And Lamp Buttons
Section 4 Control Definitions H85A Manual 4-11 COOLANT PUMP and LAMP BUTTONS These buttons turn the coolant pump and lamps on or off. When they are on they will be red in color. The coolant pump and lamps have an independent power supply and will work even if the E-STOP is engaged. -
Page 52: Conformation Windows
Section 4 Control Definitions H85A Manual 4-12 Conformation Windows These windows will pop up to confirm that the operator wants complete an action. Change and Choose Windows These windows will pop up when the operator wants to enter or change information. -
Page 53: Software Set Menus
Section 4 Control Definitions H85A Manual 4-13 Software Set Menus These menus are for selecting the metric screen readouts and language. www.rottlermfg.com... -
Page 54: On Screen Keyboard
Section 4 Control Definitions H85A Manual 4-14 On Screen Keyboard If a keyboard is not attached the machine an on screen keyboard can be used. To access the on screen keyboard touch the Start button and then touch the On-Screen Keyboard Icon. -
Page 55: Stone Holder Size Charts H85A
Section 4 Control Definitions H85A Manual 4-15 STONE HOLDER SIZE CHARTS H85A MEDIUM HONE HEAD Diameter (New Stones) 0.312 Stones 0.200 Stones 514-10-13A 2.34 2.45 2.12 2.23 514-10-13F 2.44 2.55 2.22 2.33 514-10-13B 2.54 2.65 2.32 2.43 514-10-13G 2.64 2.75 2.42... - Page 56 Section 4 Control Definitions H85A Manual 4-16 LARGE HONE HEAD Diameter (New Stones) 0.312 Stones 0.200 Stones 514-9-6J 2.99 3.45 2.77 3.23 514-9-6A 3.17 3.63 2.94 3.41 514-9-6B 3.42 3.88 3.19 3.66 514-9-6C 3.67 4.13 3.44 3.91 514-9-6D 3.92 4.38 3.69...
- Page 57 Section 4 Control Definitions H85A Manual 4-17 Diameter (New Brushes ) 0.550 Brushes 0.395 Brushes 514-9-6J 3.47 3.93 3.16 3.62 514-9-6A 3.64 4.11 3.33 3.80 514-9-6B 3.89 4.36 3.58 4.05 514-9-6C 4.14 4.61 3.83 4.30 514-9-6D 4.39 4.86 4.08 4.55 514-9-6E 4.64...
- Page 58 Section 4 Control Definitions H85A Manual 4-18 EXTRA LARGE HONE HEAD Diameter (New Stones) 0.312 Stones 0.200 Stones 514-9-25A 6.11 6.43 5.89 6.21 514-9-25B 6.31 6.63 6.09 6.41 514-9-25C 6.61 6.93 6.39 6.71 514-9-25D 6.91 7.23 6.69 7.01 514-9-25E 7.21 7.53...
- Page 59 Section 4 Control Definitions H85A Manual 4-19 Diameter (New Stones) (Metric) 7.925 Stones 5.08 Stones 514-9-25A 155.19 163.32 149.50 157.63 514-9-25B 160.27 168.40 154.58 162.71 514-9-25C 167.89 176.02 162.20 170.33 514-9-25D 175.51 183.64 169.82 177.95 514-9-25E 183.13 191.26 177.44 185.57 514-9-25F 190.75...
- Page 60 Section 4 Control Definitions H85A Manual 4-20 Diameter (New Brushes ) 0.550 Brushes 0.395 Brushes 514-9-25A 6.59 6.91 6.28 6.60 514-9-25B 6.79 7.11 6.48 6.80 514-9-25C 7.09 7.41 6.78 7.10 514-9-25D 7.39 7.71 7.08 7.40 514-9-25E 7.69 8.01 7.38 7.70 514-9-25F 7.99...
- Page 61 Section 4 Control Definitions H85A Manual 4-21 Diameter (New Brushes) (Metric) 13.970 Brushes 10.033 Brushes 514-9-25A 167.28 175.41 159.41 167.54 514-9-25B 172.36 180.49 164.49 172.62 514-9-25C 179.98 188.11 172.11 180.24 514-9-25D 187.60 195.73 179.73 187.86 514-9-25E 195.22 203.35 187.35 195.48 514-9-25F 202.84...
- Page 62 Section 4 Control Definitions H85A Manual 4-22 SIX STONE HONE HEAD STONE SIZE CHART Diameter (New Stones) 0.312 Stones 0.200 Stones 514-9-31J 2.99 3.45 2.77 3.23 514-9-31A 3.17 3.63 2.94 3.41 514-9-31B 3.42 3.88 3.19 3.66 514-9-31C 3.67 4.13 3.44 3.91...
- Page 63 Section 4 Control Definitions H85A Manual 4-23 Diameter (New Stones) (Metric) 7.9248 Stones 5.08 Stones 514-9-31J 75.92 87.73 70.23 82.04 514-9-31A 80.39 92.20 74.70 86.51 514-9-31B 86.74 98.55 81.05 92.86 514-9-31C 93.09 104.90 87.40 99.21 514-9-31D 99.44 111.25 93.75 105.56 514-9-31E 105.79...
- Page 64 Section 4 Control Definitions H85A Manual 4-24 Diameter (New Brushes ) 0.550 Brushes 0.395 Brushes 514-9-31J 3.47 3.93 3.16 3.62 514-9-31A 3.64 4.11 3.33 3.80 514-9-31B 3.89 4.36 3.58 4.05 514-9-31C 4.14 4.61 3.83 4.30 514-9-31D 4.39 4.86 4.08 4.55 514-9-31E 4.64...
- Page 65 Section 4 Control Definitions H85A Manual 4-25 Diameter (New Brushes) (Metric) 13.97 Brushes 10.033 Brushes 514-9-31J 88.01 99.82 80.14 91.95 514-9-31A 92.48 104.29 84.61 96.42 514-9-31B 98.83 110.64 90.96 102.77 514-9-31C 105.18 116.99 97.31 109.12 514-9-31D 111.53 123.34 103.66 115.47 514-9-31E 117.88...
- Page 66 Section 4 Control Definitions H85A Manual 4-26 www.rottlermfg.com...
- Page 67 Section 5 Operating Instructions H85A Manual OPERATING INSTRUCTIONS Contents Honing In General ......................5-1 Large Amount of Material Removal ..................5-1 Common Surface Finishes ....................5-1 Non-Plateau ............................5-1 Plateau ...............................5-2 New Method for Plateau Honing ..................5-3 Method 1: 2 Step Using CBN Stones ....................5-3 OEM Blocks And Other Standard Duty Applications..............5-3...
- Page 68 Section 5 Operating Instructions H85A Manual Stock Removal Rate ........................5-10 Diameter Range ..........................5-10 Cross Hatch Angle and Washout ..................5-11 Coolant: ..........................5-11 Coolant types and Selection: ......................5-11 Refractometer: ..........................5-11 Coolant Pump System: ........................5-11 Honing Alusil, Silitec, and Lokasil Cylinders in Synthetic Coolant Equipped Machines ..............................
-
Page 69: Honing In General
Honing In General The H85A is capable of honing a cylinder very accurately with very little or no work from the operator. The goal of the operator should be to create or choose a block program for the engine being honed. And select the proper hone head, stone holders, and stone set that will allow the machine to hone the cylinder to size with the correct finish. -
Page 70: Plateau
These devices that enable you to measure RpK, RK, Rvk and the Mr1 and MR2 are readily available and reasonable in costs. Rottler has these devices and has done a tremendous amount of testing to determine the proper process to use in order to obtain the plateau finishes required by ring manufacturers. -
Page 71: New Method For Plateau Honing
Section 5 Operating Instructions H85A Manual New Method for Plateau Honing The new method to plateau honing uses a cubic boron nitride abrasive or what is known as CBN. This is a very sharp abrasive that cuts very cleanly and does not tear and fragment the surface of cylinder. This allows operator to eliminate the plateau brush step. -
Page 72: Dart Blocks And Darton Sleeves
Section 5 Operating Instructions H85A Manual Step 1: Start with part number 514-9-14J (270/325 grit) Diamond abrasive and hone to size with roughing load of 50% and finish load of 40% unless cylinders become out of round then use 40% roughing and 30% finishing. -
Page 73: Oem Engines That Are Force Induction Race Applications Or Nitrous Powered
Section 5 Operating Instructions H85A Manual and 40% finish load. Step 2: Follow -up with part number 514-9-35B (600 grit) CBN abrasive with load pressure of 15% with rpm of 80 for 4 to 6 strokes. Oem Engines That Are Force Induction Race Applications Or Nitrous Powered... -
Page 74: Single Step Honing Process
Bond hardness will act differently with different cutting oils. Rottler abrasives were designed to be used with Rottler honing oils or equivalent. In general, Rottler honing oil is of low Sulfur content. Using other honing oils may have an adverse effect on the abrasive performance. Faster spindle rotation and light pressures will make abrasive act harder. -
Page 75: Using Diamond Abrasives
Using Diamond Abrasives General In the proper application, diamond abrasives are very effective for cylinder honing. The Rottler Precision Hone Head brings the cost of diamond honing down to a range that is much more affordable. Competitive hone heads require the purchase of multiple hone heads to cover the same size range as the Precision Head. -
Page 76: Using Cbn Abrasives
Typically for a finish like this we would recommend a 400 grit CBN abrasive. The H85A is capable of removing an unlimited amount of material from a cylinder with a high degree of accuracy. Generally, it is desirable for overall engine block geometry to use a boring machine to bore all material out except for .003 (.0762mm) of hone stock. - Page 77 Section 5 Operating Instructions H85A Manual To start take a small brush and apply the lapping compound into the cylinder. Set the cutting pressure in roughing and finishing mode to 20%. Set RPM to 80 rpm. You will need to set the stock removal for .010 to .015 in (.254 -.381mm) the stock removal window as abrasive will wear...
-
Page 78: Dressing Diamond Abrasives
This is often caused by improper coolant mix, lack of dressing, or the use of high honing pressure during the finishing process. The Rottler hone head is capable of very high loads. If problems with torn metal are encountered verify the coolant mix, proper dressing of the abrasives, and reduce the finishing load during the final hone stage. -
Page 79: Cross Hatch Angle And Washout
This is the cause of washout at the top and bottom of cylinders. Since the H85A has a linear travel spindle this condition does not exist. -
Page 80: Honing Alusil, Silitec, And Lokasil Cylinders In Synthetic Coolant Equipped Machines
• Coolant: Commercial honing oil with a low or medium viscosity. • Hone Head: For HP6A and HP7A Rottler part # 514-9B, For H70 and H80 Series machines Rottler part # 514-9R. • Stone Holders: Rottler parts determined by size of bore. -
Page 81: Honing Alusil, Silitec, And Lokasil Cylinders In Hone Oil Equipped Machines
• Machine: Rottler HP6A, HP7A, H70 Series, H80 Series • Hone Head: For HP6A and HP7A Rottler part # 514-9B, For H70 and H80 Series machines Rottler part # 514-9R. • Stone Holders: Rottler parts determined by size of bore. -
Page 82: Work Envelope Dimensions
Section 5 Operating Instructions H85A Manual 5-14 Work Envelope Dimensions Refer to the dimensions in the illustration below to determine if the machine can handle the intended work piece. www.rottlermfg.com... -
Page 83: Getting Started
The computer will start up and boot screen will appear on the monitor. This may take a few minutes if operating system is doing an update. Double Touch the Start Rottler icon. The HOME screen will appear on the monitor. www.rottlermfg.com... - Page 84 Section 5 Operating Instructions H85A Manual 5-16 This is the Home screen. Using the jog buttons touch the X+ button to move the carriage to the right side of the machine. Touch the Z+ button to raise the spindle all the way to the top. Now the machine is in its block loading position.
-
Page 85: Planning The Job
Section 5 Operating Instructions H85A Manual 5-17 Planning the Job Block Specifications • You will need to know the following information for the job you are planning: Finish bore size, cross hatch angle, and finish. • • Bore length. •... -
Page 86: Stone And Brush Selection
Section 5 Operating Instructions H85A Manual 5-18 Stone and Brush Selection Use the following charts to select the stones and brushes to obtain the desired finish NOTE: Ra - Roughness Average. Value before Ra is in micro inches. Value in brackets um is micro meters. -
Page 87: Loading The Block
Section 5 Operating Instructions H85A Manual 5-19 Loading the Block The next step is to load the block that will be honed onto the fixture. In this tutorial the optional auto rotate fixture is shown. The block loading procedure is the same for the manual fixture. -
Page 88: Programing Set Up
Put holders and stones into the hone head and mount hone head on spindle of machine. The H85A machines use a standard Kwik Switch mount system for the hone heads. To mount a hone head confirm that the locknut is in the open position. - Page 89 Section 5 Operating Instructions H85A Manual 5-21 The hone head will have the standard locking tabs on the mounting adaptor and a drive coupler for adjusting the stones. When mounting the hone head it will be necessary to align the drive coupler with its receiver inside the drive spindle.
- Page 90 Section 5 Operating Instructions H85A Manual 5-22 Consult the tooling charts in the previous section to determine which hone head and stone holders will be needed for the job you are setting up for. Prior to hone head installation confirm that the con rod is at least 1/4”(6mm) up inside the hone body. This will assure that the homing procedure will function correctly.
-
Page 91: Creating A Program
Section 5 Operating Instructions H85A Manual 5-23 Creating a Program On the home screen under the Program Select touch the New button (1) and the New Block Options Window will appear. Name the block,(2) input number of cylinders (3) and choose VBlock or Inline.(4) Touch OK (5) when finished. - Page 92 Section 5 Operating Instructions H85A Manual 5-24 The Options button (2) will bring New Block Options Window back where you can edit information for the block that is highlighted. Highlight the block program you want to edit, then touch the Options button.
-
Page 93: Mode Select Section Of Home Screen
Section 5 Operating Instructions H85A Manual 5-25 Mode Select Section of Home Screen. Click the Setup Software menu tab and this drop down menu will appear. Operator should only concern themselves with the first two. Click on Metric and all readings and settings on the monitor will be metric. - Page 94 Section 5 Operating Instructions H85A Manual 5-26 Touch the New Button (1) and the New Mode Select screen (2) will appear. Highlight Hone (3) and touch OK.(4) The Hone program (5) will appear in the Mode Select section Clicking the Options button (6) will bring the following window. Name of Hone process can be changed in this window.
- Page 95 Section 5 Operating Instructions H85A Manual 5-27 The Std Setup button (7) will bring up the following window. If you want to delete all settings in a block program that is highlighted and return the factory default setting click Yes.
-
Page 96: Operations Setup Screen
Section 5 Operating Instructions H85A Manual 5-28 Click on the Select button (2) to bring up the Setup screen. Operations Setup Screen Setup Tab This is where machines setting are input. www.rottlermfg.com... - Page 97 Section 5 Operating Instructions H85A Manual 5-29 Begin be going to the Stones Load Setup section and inputting the values that will be used for the block you are going to hone. Touching one of the value boxes will bring up the number pad that can be used to input the value you wish to use.
-
Page 98: Setting Zeros
Section 5 Operating Instructions H85A Manual 5-30 Setting Zeros Touch the Setup tab to bring back the Setup screen. In the Set Zeros section touch the Zero Z button. You will get a confirm pop up for that. Touch Yes to continue. -
Page 99: Backing Up And Restoring Block Profiles
Section 5 Operating Instructions H85A Manual 5-31 Backing Up and Restoring Block Profiles This section will explain how to back up and restore the operator created block profiles for DM controlled machines for archival purposes or to transfer to a different machine. - Page 100 Section 5 Operating Instructions H85A Manual 5-32 The following pop up box will appear on your screen. Click on the Open folder to view files option and the following screen will appear. This is the contents of the flash drive you just plugged in.
- Page 101 Section 5 Operating Instructions H85A Manual 5-33 Next resize and arrange both file browsers so that they are side by side. www.rottlermfg.com...
- Page 102 Section 5 Operating Instructions H85A Manual 5-34 Block profiles are backed up each time the machine is run with the current profiles being shown in the RottlerWPF folder. All that needs to be done to back up the current profile is to simply drag it from the RottlerWPF folder to the flash drive folder.
- Page 103 Section 5 Operating Instructions H85A Manual 5-35 To restore or add block profiles go through the first 5 steps explained previously. Highlight the block profiles file in the flash drive and drag it into the RottlerWPF folder on the local hard drive.
- Page 104 Section 5 Operating Instructions H85A Manual 5-36 You will get a pop up window about there being a file of the same name in the destination folder. Click on the Copy and Replace option. www.rottlermfg.com...
- Page 105 Section 5 Operating Instructions H85A Manual 5-37 The archived block profiles will now be installed. Close both browser windows and remove the flash drive. The restore process is now complete. www.rottlermfg.com...
- Page 106 Section 5 Operating Instructions H85A Manual 5-38 www.rottlermfg.com...
- Page 107 Section 6 Maintenance H85A Manual MAINTENANCE Contents Maintenance .........................6-1 Lubrication ..........................6-1 Grease Fittings ..........................6-1 Automatic Lubricator ........................6-1 Electrical Enclosure ......................6-1 Priming Oil Lines ........................6-2 Grease Fitting Locations ..................... 6-5 Honing Coolant ........................6-6 Standard Coolant Filter Unit ....................6-6 Hone Head Exploded View ....................
-
Page 108: Maintenance
Section 6 Maintenance H85A Manual Maintenance Follow all relevant safety procedures as described in Section 3 of this manual before performing any maintenance or repair procedure. Lubrication Refer to the Material Safety Data Sheets on the manual CD for information on proper use and handling of lubricants mentioned in this maintenance section. -
Page 109: Priming Oil Lines
Section 6 Maintenance H85A Manual Priming Oil Lines If there is ever the need to fill the oil lines that provide lubrication on the machine use the following procedure. Do this procedure with the E-STOP engaged to prevent any accidental activation of machine functions. - Page 110 Section 6 Maintenance H85A Manual The second item on the expanded list is the control for the oiler. Click on NormallyOpen (6) and value box will appear. Click on the down arrow (7) and the different values available will appear.
- Page 111 Section 6 Maintenance H85A Manual Click the NormallyClosed value, click the down arrow, then click NormallyOpen. Click on a blank area (10) to set the NormallyOpen value. Close the window. Release the E-STOP. www.rottlermfg.com...
-
Page 112: Grease Fitting Locations
Section 6 Maintenance H85A Manual Grease Fitting Locations www.rottlermfg.com... -
Page 113: Honing Coolant
Change the honing coolant when it gets dirty. When changing coolant, completely clean tank and filter screen. Refill with Rottler 514-4-71C coolant mixed with water to a reading of 3 – 5 on the Refractometer scale. If a Refractometer is not available then a static ratio of 5% - 8% is acceptable. -
Page 114: Hone Head Exploded View
Section 6 Maintenance H85A Manual Hone Head Exploded View (For Reference Only) www.rottlermfg.com... -
Page 115: Hone Head Maintenance
Section 6 Maintenance H85A Manual Hone Head Maintenance This procedure should be performed every 40 hours of machine operation or weekly, which ever comes first. 1. Remove cone rod (1) from body (3) and clean threads. Lubricate threads with high pressure grease. -
Page 116: Replacing The Motherboard Battery
Section 6 Maintenance H85A Manual Replacing the Motherboard Battery If computer fails to boot up and you get a CMOS error message on the screen, then the battery on the computer motherboard has failed and needs to be replaced. The following is the procedure for replacing the motherboard battery. - Page 117 Section 6 Maintenance H85A Manual 6-10 Locate the computer and check to see that the power light is not on. If it is on turn off the power switch. Note: On some machines it may be necessary to unbolt the computer from the enclosure in order to gain access to the cover screws.
- Page 118 Section 6 Maintenance H85A Manual 6-11 Locate the battery on the motherboard. Push the battery retention clip away from the battery. When the clip is released the battery will pop up. Remove the battery and place new battery in the battery holder.
-
Page 119: Belt Tension Adjustment
Section 6 Maintenance H85A Manual 6-12 Belt Tension Adjustment Belt Tension settings for the Z-Axis motor and the spindle drive motor are critical and must be set properly for best performance and to avoid potential damage. Belt Tension Specifications are as follows: Z-Axis motor belt tension, 5 lbs of tension should produce 1/2”... -
Page 120: Z-Axis Motor Belt Adjustment
Section 6 Maintenance H85A Manual 6-13 Z-Axis Motor Belt Adjustment www.rottlermfg.com... -
Page 121: Ballscrew Assemblies Reference
Section 6 Maintenance H85A Manual 6-14 Ballscrew Assemblies Reference Alignment Definitions for Angular Bearings and Belleville Washers Bearing Alignment Belleville Washer Alignment www.rottlermfg.com... -
Page 122: Z-Axis Bearing Installation Stacking Order
Section 6 Maintenance H85A Manual 6-15 Z-Axis Bearing Installation Stacking Order Z-Axis bearings have an asymmetrical inner race design. See illustration below for proper stacking order of bearings. and 3 bearings are install with open end up towards locknut. bearing is installed closed end up towards locknut. -
Page 123: Z-Axis Bearing Installation Section View
Section 6 Maintenance H85A Manual 6-16 Z-Axis Bearing Installation Section View www.rottlermfg.com... -
Page 124: Spindle Housing Bearing Installation Stacking Order
Section 6 Maintenance H85A Manual 6-17 Spindle Housing Bearing Installation Stacking Order bearing is installed with closed end down towards flange. bearing is installed with open end down towards flange. www.rottlermfg.com... -
Page 125: Spindle Housing Bearing Installation Section View
Section 6 Maintenance H85A Manual 6-18 Spindle Housing Bearing Installation Section View www.rottlermfg.com... - Page 126 Section 6 Maintenance H85A Manual 6-19 www.rottlermfg.com...
- Page 127 Please visit the service tab of our web page at Send a Service Request www.rottlermfg.com or contact the Rottler Factory Service at service@rottlermfg.com for assistance and your service request. You may also call Rottler at 1-800-452-0534 or 1-253-872-7050 Please ensure you have the Machine Model and Serial Number available when contacting Rottler for Service www.rottlermfg.com...
- Page 128 Section 7 Troubleshooting H85A Manual www.rottlermfg.com...
- Page 129 Section 8 Machine Parts H85A Manual MACHINE PARTS Contents Machine Parts ......................8-1 Hone Tank and Components ..................8-1 Oiler and Filter Assembly ...................8-2 Linear Rails and X-Axis Rack ....................8-3 Coolant Pump Assembly ..................... 8-4 Doors ............................. 8-5 Base Plate Assembly ....................8-6 Carriage Assembly ......................8-7...
- Page 130 Section 8 Machine Parts H85A Manual Feed Motor Assembly ......................8-19 Lower Section ........................8-20 Spindle Drive Motor Assembly ..................8-21 Spindle Drive Cover ......................8-22 Electrical Enclosure ....................8-23 Door Assembly ........................8-23 Outside Parts ...........................8-23 Inside Parts ............................8-24 Inside Components ......................8-25 Computer Components ......................
-
Page 131: Machine Parts
Section 8 Machine Parts H85A Manual Machine Parts Hone Tank and Components www.rottlermfg.com... -
Page 132: Oiler And Filter Assembly
Section 8 Machine Parts H85A Manual Oiler and Filter Assembly www.rottlermfg.com... -
Page 133: Linear Rails And X-Axis Rack
Section 8 Machine Parts H85A Manual Linear Rails and X-Axis Rack www.rottlermfg.com... -
Page 134: Coolant Pump Assembly
Section 8 Machine Parts H85A Manual Coolant Pump Assembly www.rottlermfg.com... -
Page 135: Doors
Section 8 Machine Parts H85A Manual Doors www.rottlermfg.com... -
Page 136: Base Plate Assembly
Section 8 Machine Parts H85A Manual Base Plate Assembly www.rottlermfg.com... -
Page 137: Carriage Assembly
Section 8 Machine Parts H85A Manual Carriage Assembly Coolant Nozzle and Ballscrew Cover www.rottlermfg.com... -
Page 138: Linear Rails
Section 8 Machine Parts H85A Manual Linear Rails www.rottlermfg.com... -
Page 139: Oiler Distribution Block
Section 8 Machine Parts H85A Manual Oiler Distribution Block www.rottlermfg.com... -
Page 140: Z-Axis Motor Assembly
Section 8 Machine Parts H85A Manual 8-10 Z-Axis Motor Assembly www.rottlermfg.com... -
Page 141: Inner Wire Track Assembly
Section 8 Machine Parts H85A Manual 8-11 Inner Wire Track Assembly www.rottlermfg.com... -
Page 142: Z-Axis Ballscrew Assembly
Section 8 Machine Parts H85A Manual 8-12 Z-Axis Ballscrew Assembly Lower Section www.rottlermfg.com... -
Page 143: Upper Section
Section 8 Machine Parts H85A Manual 8-13 Upper Section www.rottlermfg.com... -
Page 144: Outer Wire Track Assembly
Section 8 Machine Parts H85A Manual 8-14 Outer Wire Track Assembly Mounts www.rottlermfg.com... -
Page 145: Wire Tracks
Section 8 Machine Parts H85A Manual 8-15 Wire Tracks www.rottlermfg.com... -
Page 146: Spindle Drive Assembly
Section 8 Machine Parts H85A Manual 8-16 Spindle Drive Assembly Outer Components www.rottlermfg.com... -
Page 147: Inner Components
Section 8 Machine Parts H85A Manual 8-17 Inner Components www.rottlermfg.com... -
Page 148: Spindle Drive Carriage Assembly
Section 8 Machine Parts H85A Manual 8-18 Spindle Drive Carriage Assembly Oil Lines and Wire Track Attachments www.rottlermfg.com... -
Page 149: Feed Motor Assembly
Section 8 Machine Parts H85A Manual 8-19 Feed Motor Assembly www.rottlermfg.com... -
Page 150: Lower Section
Section 8 Machine Parts H85A Manual 8-20 Lower Section www.rottlermfg.com... -
Page 151: Spindle Drive Motor Assembly
Section 8 Machine Parts H85A Manual 8-21 Spindle Drive Motor Assembly www.rottlermfg.com... -
Page 152: Spindle Drive Cover
Section 8 Machine Parts H85A Manual 8-22 Spindle Drive Cover www.rottlermfg.com... -
Page 153: Electrical Enclosure
Section 8 Machine Parts H85A Manual 8-23 Electrical Enclosure Door Assembly Outside Parts www.rottlermfg.com... -
Page 154: Inside Parts
Section 8 Machine Parts H85A Manual 8-24 Inside Parts www.rottlermfg.com... -
Page 155: Inside Components
Section 8 Machine Parts H85A Manual 8-25 Inside Components www.rottlermfg.com... -
Page 156: Computer Components
Section 8 Machine Parts H85A Manual 8-26 Computer Components www.rottlermfg.com... - Page 157 Section 8 Machine Parts H85A Manual 8-27 www.rottlermfg.com...
-
Page 158: Electrical Panel Assembly
Section 8 Machine Parts H85A Manual 8-28 Electrical Panel Assembly www.rottlermfg.com... -
Page 159: Control Pendant Assembly
Section 8 Machine Parts H85A Manual 8-29 Control Pendant Assembly Outer Components www.rottlermfg.com... -
Page 160: Pendant Mount
Section 8 Machine Parts H85A Manual 8-30 Pendant Mount www.rottlermfg.com... -
Page 161: Coolant Sump Tank
Section 8 Machine Parts H85A Manual 8-31 Coolant Sump Tank www.rottlermfg.com... -
Page 162: Wiring Diagram
Section 8 Machine Parts H85A Manual 8-32 Wiring Diagram www.rottlermfg.com... - Page 163 Section 9 Options H85A Manual OPTIONS Optional Equipment Optional Equipment Catalog and Parts Manual are located on the Manual CD shipped with machine. www.rottlermfg.com...
- Page 164 Section 9 Options H85A Manual www.rottlermfg.com...
- Page 165 Other substances and materials are used in the manufacture, testing, and shipping of this machine. A complete list of the Safety Data Sheets of substances and materials used by Rottler Manufacturing during manufacturing, testing, and shipping is located on the Manual flash drive shipped with the machine.
- Page 166 Section 10 Safety Data Sheets H85A Manual 10-2 SAFETY DATA SHEET Issue Date 17-Dec-2015 Revision Date: 29-Apr-2016 1. IDENTIFICATION OF THE SUBSTANCE/PREPARATION Product identifier Product Name YUMATE SC-870C Other means of identification Product Code YUMATE SC-870C Synonyms None Recommended use of the chemical and restrictions on use Recommended Use Water soluble metalworking fluid.
- Page 167 Section 10 Safety Data Sheets H85A Manual 10-3 Revision Date: 29-Apr-2016 YUMATE SC-870C _____________________________________________________________________________________________ Appearance No information available Physical state liquid Odor Amines Precautionary Statements - Prevention Obtain special instructions before use Do not handle until all safety precautions have been read and understood...
- Page 168 Section 10 Safety Data Sheets H85A Manual 10-4 Revision Date: 29-Apr-2016 YUMATE SC-870C _____________________________________________________________________________________________ Most important symptoms and effects, both acute and delayed Symptoms No information available. Indication of any immediate medical attention and special treatment needed Note to physicians Treat symptomatically.
- Page 169 Section 10 Safety Data Sheets H85A Manual 10-5 Revision Date: 29-Apr-2016 YUMATE SC-870C _____________________________________________________________________________________________ Incompatible materials Acids. Strong oxidizing agents. Nitrites and nitrosating agents. 8. EXPOSURE CONTROLS/PERSONAL PROTECTION Control parameters Exposure Guidelines Chemical Name ACGIH TLV OSHA PEL NIOSH IDLH...
- Page 170 Section 10 Safety Data Sheets H85A Manual 10-6 Revision Date: 29-Apr-2016 YUMATE SC-870C _____________________________________________________________________________________________ Solubility in other solvents No information available Partition coefficient No information available Autoignition temperature No information available Decomposition temperature No information available Kinematic viscosity No information available...
- Page 171 Section 10 Safety Data Sheets H85A Manual 10-7 Revision Date: 29-Apr-2016 YUMATE SC-870C _____________________________________________________________________________________________ Information on toxicological effects Symptoms No information available. Delayed and immediate effects as well as chronic effects from short and long-term exposure Skin corrosion/irritation Repeated exposure may cause skin dryness or cracking.
- Page 172 Section 10 Safety Data Sheets H85A Manual 10-8 Revision Date: 29-Apr-2016 YUMATE SC-870C _____________________________________________________________________________________________ 15. REGULATORY INFORMATION International Inventories TSCA Complies DSL/NDSL Complies Legend: TSCA - United States Toxic Substances Control Act Section 8(b) Inventory DSL/NDSL - Canadian Domestic Substances List/Non-Domestic Substances List...
- Page 173 Section 10 Safety Data Sheets H85A Manual 10-9 Revision Date: 29-Apr-2016 YUMATE SC-870C _____________________________________________________________________________________________ storage, transportation, disposal and release and is not to be considered a warranty or quality specification. The information relates only to the specific material designated and may not be valid for such material used in combination with any other materials or in any process, unless specified in the text.
- Page 174 Section 10 Safety Data Sheets H85A Manual 10-10 Safety Data Sheet According to OSHA HCS 2012 (29 CFR 1910.1200), Health Canada HPR (SOR/2015-17), and Mexico NOM-018-STPS-2015 SECTION 1: Identification Product Identifier Multi-Way Oil HD Phillips 66 Multi-Way Oil HD 32...
- Page 175 Section 10 Safety Data Sheets H85A Manual 10-11 LBPH817776 - Multi-Way Oil HD Page 2/6 Issue Date: 16-Apr-2018 Status: FINAL _ _ _ _ _ _ _ _ _ _ _ _ _ _ _ _ _ _ _ _ _ _ _ _ _ _ _ _ _ _ _ _ _ _ _ _ _ _ _ _ _ _ _ _ _ _ _ _ _ _ _ _ _ _ _ _ _ _ _ _ _ _ _ _ _ _ _ _ _ Inhalation: First aid is not normally required.
- Page 176 Section 10 Safety Data Sheets H85A Manual 10-12 LBPH817776 - Multi-Way Oil HD Page 3/6 Issue Date: 16-Apr-2018 Status: FINAL _ _ _ _ _ _ _ _ _ _ _ _ _ _ _ _ _ _ _ _ _ _ _ _ _ _ _ _ _ _ _ _ _ _ _ _ _ _ _ _ _ _ _ _ _ _ _ _ _ _ _ _ _ _ _ _ _ _ _ _ _ _ _ _ _ _ _ _ _ inert material such as sand or vermiculite, and place in suitable container for disposal.
- Page 177 Section 10 Safety Data Sheets H85A Manual 10-13 LBPH817776 - Multi-Way Oil HD Page 4/6 Issue Date: 16-Apr-2018 Status: FINAL _ _ _ _ _ _ _ _ _ _ _ _ _ _ _ _ _ _ _ _ _ _ _ _ _ _ _ _ _ _ _ _ _ _ _ _ _ _ _ _ _ _ _ _ _ _ _ _ _ _ _ _ _ _ _ _ _ _ _ _ _ _ _ _ _ _ _ _ _ deficient (less than 19.5 percent oxygen) situations, or under conditions that are immediately dangerous to life and health (IDLH).
- Page 178 Section 10 Safety Data Sheets H85A Manual 10-14 LBPH817776 - Multi-Way Oil HD Page 5/6 Issue Date: 16-Apr-2018 Status: FINAL _ _ _ _ _ _ _ _ _ _ _ _ _ _ _ _ _ _ _ _ _ _ _ _ _ _ _ _ _ _ _ _ _ _ _ _ _ _ _ _ _ _ _ _ _ _ _ _ _ _ _ _ _ _ _ _ _ _ _ _ _ _ _ _ _ _ _ _ _ Specific Target Organ Toxicity (Single Exposure): No information available on the mixture, however none of the components have been classified for target organ toxicity (or are below the concentration threshold for classification).
- Page 179 Section 10 Safety Data Sheets H85A Manual 10-15 LBPH817776 - Multi-Way Oil HD Page 6/6 Issue Date: 16-Apr-2018 Status: FINAL _ _ _ _ _ _ _ _ _ _ _ _ _ _ _ _ _ _ _ _ _ _ _ _ _ _ _ _ _ _ _ _ _ _ _ _ _ _ _ _ _ _ _ _ _ _ _ _ _ _ _ _ _ _ _ _ _ _ _ _ _ _ _ _ _ _ _ _ _...
Need help?
Do you have a question about the H85A and is the answer not in the manual?
Questions and answers