
Related Manuals for CAME KIT AGT V + LITHOS


Summary of Contents for CAME KIT AGT V + LITHOS
- Page 1 KIT AGT V + LITHOS FA01429-EN – VAS/101 AGT V LITHOS INSTALLATION MANUAL AGTLVKIT EN English...
-
Page 2: General Precautions
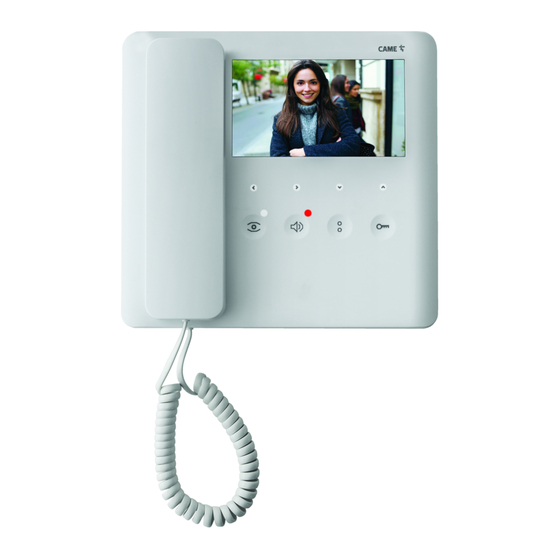
CONTENTS OF THE KIT AGT V – VAS/101 LITHOS General precautions Read the instructions carefully before beginning the installation and carry out the procedures as specifi ed by the manufacturer. • The product must be installed, programmed, commissioned and serviced by qualifi ed technicians, correctly trained with regard to •... - Page 3 AGT V Description Internal video receiver. Function of terminals and jumpers Terminal board M1 BUS-line input – Landing call Alarm input Closing resistance (CL.RES) Master/slave selector (M/S) Technical data Type AGT V Power supply from BUS line (VDC) 15 to 20 Maximum consumption (mA) Consumption in stand-by mode (mA)
-
Page 4: Installation
Installation Unhook the device from the metal support by press- • ① ing the plastic tab and sliding the device smoothly off the support Fix the wall support to the round Ø 60 mm recessed • , to the rectangular box 503 , or to the ②... -
Page 5: System Limits
System limits 4 monitors can be switched on simultaneously only in one- or two- family systems with entry panel X1+VA/01. N° Slave N° Master XDV/304 VCM/1D UTP CAT5 No. Master 4 3 2 1 3 2 1 No. Slave 4 5 6 7 0 6 7 VA/01 2 x 2.5... - Page 6 Configuring melodies 3sec ... beep! ☞ Perform each of the following programming-steps, in suc- cession: 1-Enter programming mode. Press and hold the button for 3 seconds. A short buzzing sound and a red fl ashing LED confi rm that you have entered pro- gramming mode 2-Programming the melody associated with the call from the entry panel.
-
Page 7: Technical Data
VAS/101 Installation The power supply must always be installed horizontally. The device can be installed on DIN rails (EN 50022) on a suit- • able switchboard. See fi gure for dimensions. • NOTE. Ensure there is correct ventilation if the power supply is installed in a metal case. -
Page 8: Wall-Mounted Installation
LVC/01 Wall-mounted installation Use a hex key to unscrew the screws in the front plate and re- move it (fi gure Fix the plugs provided and screw in the entry panel (fi gure at the desired height, bearing in mind the position of the video camera lens (fi... - Page 9 fi x the entry panel to the frame as shown in fi gure . Pull out the plastic terminal cover and make the connections (fi gure Once the connections have been made, reinsert the terminal covers. For information on fi tting accessories, please see the “Button modules assembly”...
-
Page 10: Assembling The Modules
Assembling the modules Insert the button module as shown in fi gure , making sure it is the right way up (fi gure Remove the glass and write the names of the users as shown in fi gure , paying particular attention to which way round the glass is inserted (fi... -
Page 11: Vdc Power Supply
Technical data Type LVC/01 Entry panel Terminal board M1 Power supply 16-18 VDC Power draw 250 mA (100 mA stand-by) BOUT Busbar Size 99x207x30 mm Storage temperature -25°C +70°C 16-18 VDC power supply Operating temperature -15°C +50°C – IP Rating IP 54 Terminal board M2 Video camera... - Page 12 Programming type of keys. Press and hold the fi rst key on the entry panel in the position shown / A until the LED back- lighting stops fl ashing and remains on PROG PROG BOUT handset that Programming the call keys. Lift the receiver you want to program (where present), then press the door lock release button and AUX2 button...
- Page 13 Reprogramming procedure Entering programming mode. Press and hold the PROG key for at least 3 s, then release it (within 6 seconds) as soon as the >3’’ >3’’ PROG PROG LED fl ashes and the button backlighting lights up as <6’’...
- Page 14 Exiting programming. Press the PROG key briefl y . The PROG LED will switch off . NOTE. If no action is performed, the procedure will end automat- PROG <1’’ <1’’ ically after 30 minutes. PROG BOUT Programming type of keys. When “Programming call keys”, press and hold the PROG key for at least 3 seconds, then >3’’...
- Page 15 This product complies with current applicable reference standards. DISPOSAL - Dispose of the packaging and the device at the end of its life cycle responsibly, in compliance with the laws in force in the country in which the product is used. The recyclable components are marked with a symbol and the material ID marker. THE DATA AND INFORMATION IN THIS MANUAL MAY BE CHANGED AT ANY TIME AND WITHOUT NOTICE.
- Page 16 CAME S.p.A. Via Martiri Della Libertà, 15 31030 Dosson di Casier - Treviso - Italy tel. (+39) 0422 4940 - fax. (+39) 0422 4941...
Need help?
Do you have a question about the KIT AGT V + LITHOS and is the answer not in the manual?
Questions and answers