
Related Manuals for CAME BPT KIT FREE DVC Series


Summary of Contents for CAME BPT KIT FREE DVC Series
- Page 1 KIT FREE DC-DVC 24810380 KIT FREE DC A/01 DC/01 ME KIT FREE DVC VA/01 DVC/01 ME www.Came.com English KIT FREE DC-DVC 24810380 16-09-14_EN...
-
Page 2: Installation
General Notes • Read the instructions carefully before beginning the installation and carry out the actions as specifi ed by the manufacturer. • The installation, programming, commissioning and maintenance of the product must only be carried out by qualifi ed technicians, properly trained 43,5 in compliance with the regulations in force, including health and safety measures and the disposal of packaging. - Page 3 +12V BIN1 BIN2 BIN3 BOUT Connectors RS232: Reserved for future use MINI USB: Connector for programming from a PC PROG button RFID PROG Jumper (**) 130 mA 130 mA 35 mA Default Code entry Code deletion LEDs Colour Meaning 500 mA DL1 (**) Yellow Programming status...
-
Page 4: Connection Examples
Programming VA/01 Of an intercom group Programming the intercom group must be done after assigning the type of call key or call code to all the internal receivers. Press the power supply’s PROG key for at least 25 seconds, until the PROG >25’’... - Page 5 VSE/301 VA/01 VA/01 VSE/301 VSE/301 VA/01 KIT FREE DC-DVC 24810380 16-09-14_EN...
-
Page 6: Wall Mounting
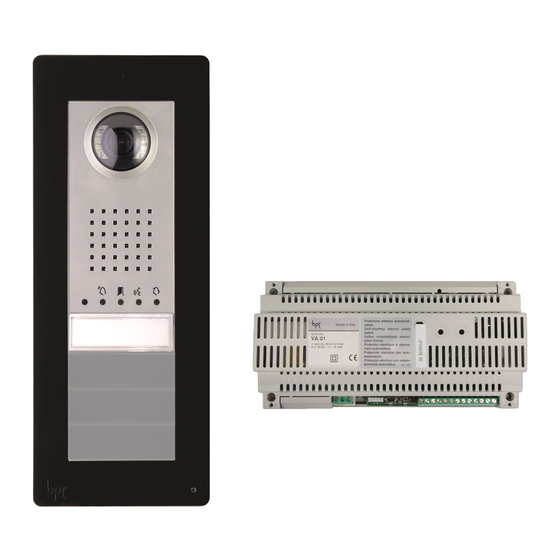
DC/01 ME-DVC/01 ME Wall mounting With the wall plugs provided fi x the entry panel at the desired height respecting the positioning of the lens of the surveillance camera Push through pipe , take off the terminal board cover and make the connections WARNING. -
Page 7: Recessed Installation
Recessed installation Wall in the recessed box at the desired height, respecting the positioning of the lens of the surveillance camera Push the pipe with the system conductors through one of the breaking points ( point A). When installing the recessed box any possible deformations can be avoided by using the spacer provided ( point B). - Page 8 Technical data Type DC/01ME-DVC/01ME Power supply (VDC) 14-18 Absorption (mA) Consumption in stand-by mode (mA) Storage temperature (°C) -25 ÷ + 70 Operating temperature (°C) 0 ÷ +35 IP Degree Camera DVC/01ME Standard video PAL/NTSC Resolution (pixel) 680x512 Minimum lighting (LUX) KIT FREE DC-DVC 24810380 16-09-14_EN...
- Page 9 Functions Terminal boards MINI USB Power supply DATI 14-18 VDC – PROG BOUT Riser BOUT Solenoid lock 12 V - 1 A max – Door lock release button (NA) Door contact input (NC) – Ground Entry panel enabling output (active towards earth) –...
- Page 10 Connection examples VA/01 VA/01 VA/01 AGATA VC-V – CL.RES VA/01 DVC/01-ME RS232 +12V BOUT BIN1 BIN2 BIN3 BOUT AGATA VC-V AGATA VC/B – VA/01 RS232 CL.RES +12V BIN1 BIN2 BIN3 AGATA VC-V BOUT AGATA VC/B – DVC/01-ME CL.RES BOUT AGATA VC-V AGATA VC/B –...
- Page 11 AGATA VC-V AGATA VC-V AGATA VC/B AGATA VC/B – – CL.RES CL.RES XDV/304 AGATA VC-V AGATA VC-V – – CL.RES CL.RES VA/01 DVC/01-ME +12V BOUT BIN1 BIN2 BIN3 RS232 BOUT DVC/01-ME BOUT KIT FREE DC-DVC 24810380 16-09-14_EN...
- Page 12 KIT FREE DC-DVC 24810380 16-09-14_EN...
Need help?
Do you have a question about the BPT KIT FREE DVC Series and is the answer not in the manual?
Questions and answers