
Subscribe to Our Youtube Channel
Related Manuals for Inficon HAPSITE ER


Summary of Contents for Inficon HAPSITE ER
- Page 1 HAPSITE ® Chemical Identification System IPN 074-471-P1D...
- Page 2 Valco Instruments Co. Inc. and VICI AG. Disclaimer The information contained in this manual is believed to be accurate and reliable. However, INFICON assumes no responsibility for its use and shall not be liable for any special, incidental, or consequential damages related to the use of this product.
- Page 3 HAPSITE ER Operating Manual Definition of Note, Hint, Danger, Warning and Caution Paragraphs NOTE: This is a note paragraph. Notes provide additional information about the current topic. HINT: This is a hint paragraph. Hints provide insight into product usage. DANGER This is a Danger paragraph.
-
Page 4: Operating Manual Style Conventions
HAPSITE ER Operating Manual Operating Manual Style Conventions The following information describes the conventions used throughout this manual. When holding down a key and then pressing another key, this is expressed as (for example) “Press Ctrl+C.” It is assumed that the CD drive used is drive d. If using another drive, substitute the drive letter being used for “d:”. -
Page 5: Table Of Contents
2.1.1 HAPSITE ER and Accessories........2-1 Specifications . - Page 6 Operating HAPSITE ER in Portable Mode Starting HAPSITE ER in Portable Mode ......4-1 4.1.1...
- Page 7 HAPSITE ER Icon ........
- Page 8 HAPSITE ER Operating Manual 5.4.3 Regulatory Compliance Information for EUROPEAN Users ... 5-21 5.4.3.1 European Usage Restrictions........5-21 5.4.3.2...
- Page 9 HAPSITE ER Information ........
- Page 10 HAPSITE ER Operating Manual 8.7.1.1 Background Subtraction Using a Range of Points ....8-40 8.7.1.2 Additional Features of the Background Tool ..... . . 8-42 8.7.2...
- Page 11 HAPSITE ER Operating Manual 9.4.16 Tune Status Window Menu ........9-28...
- Page 12 HAPSITE ER Accessories ........
- Page 13 HAPSITE ER Spare Parts ........
-
Page 14: Customer Support
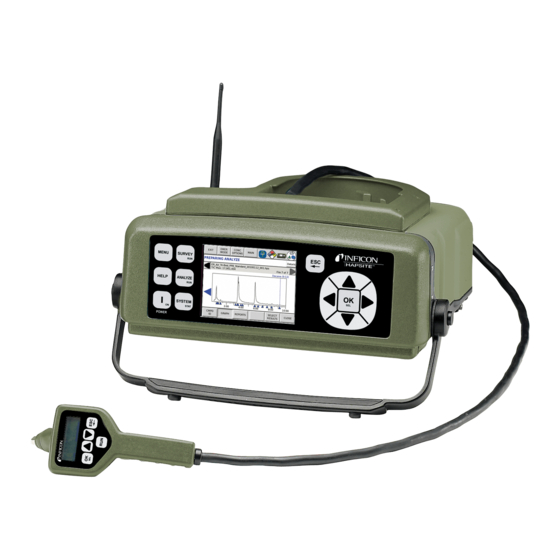
HAPSITE ER Operating Manual Chapter 1 Customer Support 1.1 How to Contact Customer Support Please read the HAPSITE ER Operating Manual before contacting Customer Support. To contact support, please request: Technical Support - for information and questions regarding general operation or software assistance for the HAPSITE ER ... -
Page 15: Returning Your Instrument To Inficon
Prior to returning the instrument, a Declaration of Contamination (DOC) form will need to be completed. The Customer Support Representative will provide the DOC form. All chemicals that have been analyzed by the HAPSITE ER should be reported on the DOC form in order for INFICON’s service personnel to take the proper safety precautions when performing the repair. -
Page 16: Introduction
“HAPSITE ER” are used throughout this manual to refer to the HAPSITE ER. 2.1.1 HAPSITE ER and Accessories HAPSITE ER ....Also known as the Analytical Module (AM). HAPSITE ER contains the Gas... -
Page 17: Specifications
HAPSITE ER Operating Manual 2.2 Specifications Operating temperature range ..5°C to 45°C (41°F to 113°F) Dimensions (LxWxH) ... . . 46 cm x 43 cm x 18 cm (18 in. -
Page 18: Instrument Overview
The separation order is primarily based on the volatility of the sample components. HAPSITE ER GC system utilizes nitrogen as the carrier gas to transport analytes through a column, of which the standard column is a narrow-bore fused silica tube 15 meters in length. -
Page 19: Membrane Isolation Valve
HAPSITE ER uses internal standards to verify the performance of the Gas Chromatograph and Mass Spectrometer. The internal standard is composed of two volatile organic gases which are injected into the sample inlet flow. The internal standards’... -
Page 20: Mass Spectrometer
HAPSITE ER Operating Manual 2.4.2 Mass Spectrometer The Mass Spectrometer is comprised of three basic physical systems: ionizer, mass selector, and ion detector. These are mounted together in a vacuum manifold which also includes: an inlet, two vacuum pumps, and a portion of the vacuum... -
Page 21: Vacuum System
The vacuum is initially created by the turbo-molecular and diaphragm pumps in the Service Module. When a good vacuum is achieved, the pumps in HAPSITE ER are turned on and the vacuum interconnect valve is closed. At this point, the Service Module can be disconnected. -
Page 22: Electronic Systems
2.4.4 Electronic Systems The electronic systems in HAPSITE ER are considered in four groups: Mass Spectrometer Control, see section 2.4.4.1 ... -
Page 23: Interfaces
HAPSITE ER via a specific crossover cable or wireless connection. This linkage permits data and methods to be uploaded from HAPSITE ER. It also allows for new or modified methods to be downloaded to HAPSITE ER. -
Page 24: Hapsite Components And Assemblies
HAPSITE ER Operating Manual Chapter 3 HAPSITE Components and Assemblies 3.1 Ship Kit Packing Lists 3.1.1 930-850-G9, G12 Ship Kit Contents The following items are provided in a typical 930-850-G5, G8 HAPSITE Ship Kit. Box 1 Contents . 036-0015 ..Shoulder Strap ... - Page 25 HAPSITE ER Operating Manual Box 2 Contents ..930-470-G1 Battery Charger Box 3 Contents ..24 V Power Supply (see table) Power Supply Ship Kit Usage 930-469-P1 930-850-G5 110 V USA 930-469-G4...
-
Page 26: 930-850-G10, G11 Ship Kit Contents
HAPSITE ER Operating Manual 3.1.2 930-850-G10, G11 Ship Kit Contents The following items are provided in a typical 930-850-G6, G7 HAPSITE Ship Kit. Box 1 Contents . . 036-0015 ..Shoulder Strap . . 074-290 ..Instruction Sheet (Shoulder Strap) ... - Page 27 HAPSITE ER Operating Manual Box 2 Contents ..930-470-G1 Battery Charger Box 3 Contents ..24 V Power Supply (see table) Power Supply Ship Kit Usage 930-469-P2 930-850-G10 230 V European 930-469-G3 930-850-G11...
-
Page 28: Ship Kits Box 3 And 4
The laptop kits will include the ER IQ Software CD and NIST Library Install CD. 3.2 Basic Assembly CAUTION HAPSITE ER must be operated a minimum of every 3 weeks. Recommended storage is in Extended Standby. Figure 3-2 HAPSITE Parts for Basic Assembly... -
Page 29: Attaching The Probe
HAPSITE ER Operating Manual 3.2.1 Attaching the Probe The probe attaches on the top of HAPSITE ER. The probe has two connections: a ® LEMO communication line and a Valco connector. Remove the silver LEMO port cap from the HAPSITE ER by pulling it outwards. -
Page 30: Installing The Gas Canisters
HAPSITE ER Operating Manual Insert the Valco connector into the top of HAPSITE ER. Screw the Valco connector into place. (See Figure 3-6.) Figure 3-6 Valco Connector NOTE: Save all of the port caps for further use.These caps are necessary when decontaminating HAPSITE ER. - Page 31 HAPSITE ER Operating Manual Insert a yellow banded internal standard canister into the bottom round opening. This opening is marked with a yellow stripe. (See Figure 3-8.) Figure 3-8 Inserting Internal Standard Canister Press the PUSH lever while inserting the internal standard canister. (See Figure 3-9.)
- Page 32 Figure 3-11 Internal Standard Installation Verification CAUTION Closing the front panel when the canisters are not properly installed may damage HAPSITE ER and/or canisters. Insert a purple banded carrier gas canister into the bottom round opening. This opening is marked with a purple stripe. (See Figure 3-12.)
- Page 33 HAPSITE ER Operating Manual Once inserted, release the PUSH lever. (See Figure 3-14.) Figure 3-14 Releasing the PUSH Lever Gently pull the carrier gas canister outwards. It should remain fastened inside HAPSITE ER. (See Figure 3-15.) Figure 3-15 Carrier Gas Installation Verification NOTE: The position of the gas canisters should not be interchanged.
-
Page 34: How To Remove A Gas Canister
HAPSITE ER Operating Manual 3.2.2.1 How to Remove a Gas Canister Removing the gas canisters is advised when HAPSITE ER has been placed into Extended Standby. Also, the gas canister will need to be replaced when the canister is low. A low canister warning will be displayed on the front panel when the canister needs replacement. - Page 35 HAPSITE ER Operating Manual Remove the canister. (See Figure 3-20.) Figure 3-20 Remove the Canister The carrier gas canister will need to be replaced after approximately 12 hours of use. The internal standard canister will need to be replaced after 3 days of continuous use.
-
Page 36: Connect The Power Supply
HAPSITE ER Operating Manual 3.2.3 Connect the Power Supply HAPSITE ER uses an AC to DC power converter power supply. This power supply connects to HAPSITE ER and a power outlet. The connection with the black cord is fitted with a standard power plug. Plug this cord into a power outlet. -
Page 37: Connecting The Laptop
HAPSITE ER Operating Manual Align the red dots on the LEMO connection with the red dots on HAPSITE ER. Insert the connection into the power port. (See Figure 3-24.) Figure 3-24 Aligning Red Dots 3.2.4 Connecting the Laptop HAPSITE ER has two possible configurations for connecting a laptop computer: ... - Page 38 The crossover cable has two ends. One end has a screw top on the modular connector. This end will connect to HAPSITE ER. (See Figure 3-26.) Figure 3-26 Crossover Cable Plug the modular connector with the screw top into HAPSITE ER port. Screw the plug into place. (See Figure 3-27.) Figure 3-27 Modular Connector Plug the opposite end into the laptop.
-
Page 39: Connect Laptop With Wireless Connection
The battery can be charged using the battery charger. Alternately, it can be charged in the HAPSITE ER when it is connected to external power. However, the battery will charge more slowly when charging inside HAPSITE ER. -
Page 40: Loading The Battery Charger
HAPSITE ER Operating Manual Plug the battery charger into a grounded outlet. The ON indicator on the battery charger will illuminate. The battery charger does not have a power switch. (See Figure 3-30.) Figure 3-30 ON Indicator As the battery charger performs a self-test, all the indicators will turn amber. -
Page 41: Understanding The Battery Charger Indicators
HAPSITE ER Operating Manual The respective indicator will turn green and charging will commence immediately. (See Figure 3-32.) Figure 3-32 Charging Indicator CAUTION Do not use excessive force when placing the battery in the battery charger. CAUTION Do not charge batteries in a moving vehicle. -
Page 42: Testing Battery
HAPSITE ER Operating Manual Red ......The receptacle and/or the battery, if one is installed is experiencing a problem. A flashing red light indicates that the charger cannot communicate with the battery. -
Page 43: Removing The Battery
HAPSITE ER Operating Manual Push firmly and listen for the battery to click into place. (See Figure 3-35.) Figure 3-35 Installing Battery Once in place, gently pull the battery outwards to ensure that the battery is securely fastened. 3.3.6 Removing the Battery Firmly push in the battery until a faint click is heard. -
Page 44: Replacing The Concentrator
If the concentrator does not cleanout after numerous cleanout methods, this may be indicative of a chipped or cracked concentrator. Open the front panel of HAPSITE ER and remove the black cover labeled CONCENTRATOR. (See Figure 3-38.) - Page 45 HAPSITE ER Operating Manual Using the 7/16 in. wrench, turn the bottom nut a 1/4 turn counterclockwise. (See Figure 3-39.) Figure 3-39 Turning the Bottom Nut with Wrench Using the 7/16 in. wrench, turn the top nut a 1/4 turn clockwise.
- Page 46 HAPSITE ER Operating Manual Lift the top elbow. Gently lift and angle the concentrator out of the fixture. (See Figure 3-42.) Figure 3-42 Inserting the Concentrator WARNING The elbow fittings may be hot. Allow for these fittings to cool before continuing.
- Page 47 HAPSITE ER Operating Manual The Tri-Bed concentrator is directional. The Tri-Bed concentrator must be installed with the smooth metal sleeve pointing downwards and the grooved metal sleeve pointing upwards. (See Figure 3-44.) Figure 3-44 Proper Tri-Bed Concentrator Orientation Grooved End...
- Page 48 HAPSITE ER Operating Manual The Tenax Concentrator does not have a specific orientation. (See Figure 3-45.) Figure 3-45 Tenax Concentrator Place the Tri-Bed concentrator: Tri-Bed concentrator: While holding the nut and ferrule in place, carefully place the smooth metal sleeve end of the Tri-Bed concentrator into the lower elbow fitting.
- Page 49 HAPSITE ER Operating Manual Insert the top of the concentrator: Tri-Bed concentrator: Carefully lift up on the top elbow fitting and insert the end of the concentrator with the grooved metal sleeve into this fitting. (See Figure 3-47.) Tenax concentrator: Carefully lift up on the top elbow fitting and insert either end of the concentrator into this fitting.
- Page 50 HAPSITE ER Operating Manual While maintaining steady pressure on the top elbow fitting, finger-tighten the bottom nut of the concentrator until tight. (See Figure 3-49.) Figure 3-49 Tightening the Top and Bottom Nut While continuing to maintain steady pressure on the top elbow, finger-tighten the top nut until tight.
- Page 51 HAPSITE ER Operating Manual Using a 7/16 in. wrench, turn the top nut approximately 1/4 of a turn counter clockwise until tight. (See Figure 3-51.) Figure 3-51 Using Wrench to Tighten Top Nut When gentle upward pressure is applied to the top elbow, the elbow should not move.
-
Page 52: Probe Nut Assembly
NOTE: Verify that the guide is clean to prevent the introduction of contaminants into the HAPSITE ER system. Place the small, back ferrule over the narrow end of the guide with the beveled side facing upwards. -
Page 53: Attaching A Bag Sample
Ensure that the bag’s valve remains closed when it is not attached to the probe. WARNING To avoid inhalation of bag’s sample, attach an exhaust tube to the HAPSITE ER exhaust port. Vent the exhaust to a safe area. 3 - 30... - Page 54 HAPSITE ER Operating Manual Before attaching a Tedlar bag to the probe, refer to section 3.3.8, Probe Nut Assembly, on page 3-29 to ensure proper ferrule orientation in the probe nut. Prepare the Tedlar bag sample. Avoid filling bag more than 80% full. Verify that the white valve is closed on the Tedlar bag.
- Page 55 HAPSITE ER Operating Manual When the front panel displays Collect Sample Now, open the Tedlar bag by turning the valve one complete counter-clockwise revolution. (See Figure 3-58.) Figure 3-58 Opening the Tedlar Bag When the sampling period is finished, close the bag by turning it one clockwise revolution until tight.
-
Page 56: Vx/R-33 Conversion Tube
HAPSITE ER Operating Manual Finger-tighten the nut by turning the nut clockwise. (See Figure 3-61.) Figure 3-61 Finger-Tighten the Nut 3.3.10 VX/R-33 Conversion Tube This procedure describes how to prepare HAPSITE to sample VX or RVX using the VX-G conversion tubes (part numbers 930-4292-G1 and 930-4293-G1). - Page 57 HAPSITE ER Operating Manual Figure 3-62 Ferrule Location Swagelok Nut Back Ferrule Front Ferrule (cone faces forward) NOTE: If the nut is removed, ensure that the ferrules are not dropped. It is critical that both ferrules are in place and in proper orientation to ensure a leak-free fit around the VX-G conversion tube.
-
Page 58: Thermal Desorption Tube Sampling
HAPSITE ER Operating Manual Tighten the Swagelok nut finger tight. Pull gently on the conversion tube, to ensure it is held firmly in place. (See Figure 3-64.) Figure 3-64 Tightening the Swagelok Nut NOTE: The VX-G conversion tube must be replaced after eight hours of exposure to light and air, or after exposure to VX or RVX. - Page 59 HAPSITE ER Operating Manual Figure 3-65 Sampling Pump and TD Tube 3 - 36...
-
Page 60: Helpful Guidelines
Go into a potentially explosive Run a background blank once per environment without an LEL meter week or more. and safety checks. HAPSITE ER is not intrinsically safe. Use Extended Standby instead of powering off HAPSITE ER. ... -
Page 61: Operating Hapsite Er In Portable Mode
Figure 4-1 Power Switch NOTE: Power on HAPSITE ER while connected to AC power. Using battery power to turn on and heat HAPSITE ER will consume over 40% of the battery’s charge. HAPSITE ER will boot in approximately one minute and will sense which sample configuration (i.e., concentrator) has been installed. - Page 62 HAPSITE ER Operating Manual HAPSITE ER will begin to prepare various components. These components include heating the HAPSITE and accessory heaters, running AutoTune (see Step 8 on page 4-3), powering the NEG, and if necessary, running concentrator cleanout. During the preparation period, the front panel will display the PREPARING SYSTEM message.
- Page 63 HAPSITE ER Operating Manual The progress of the preparation is shown by a bar graph. If a component is in the process of being prepared, it will be shown in blue. When a component is ready, it will be shown in green. If a component is going to be prepared, but the preparation process has not started, it will be shown in yellow.
- Page 64 HAPSITE ER Operating Manual When HAPSITE ER is ready to run samples, a green SYSTEM READY, SURVEY READY or ANALYZE READY message will display. (See Figure 4-5.) Figure 4-5 System Ready NOTE: If the methods have different temperature setpoints, the method that has been prepared to run will have a green READY message next to the method name.
- Page 65 HAPSITE ER Operating Manual If SURVEY READY is displayed, touch RUN SURVEY or push SURVEY RUN. (See Figure 4-7.) Figure 4-7 Survey Ready If ANALYZE READY is displayed, touch RUN ANALYZE or push ANALYZE RUN. (See Figure 4-8.) Figure 4-8 Analyze Ready NOTE: If the system is preparing a SURVEY run and an ANALYZE method is desired, touch the PREPARE ANALYZE button.
-
Page 66: Emergency Mode (Emer Mode)
HAPSITE ER Operating Manual 4.1.1 Emergency Mode (EMER MODE) In an emergency, the concentrator cleanout can be bypassed to allow for faster startup. This is not recommended for everyday use. While Emergency Mode is active, the concentrator cleanout will continue to be skipped until Emergency Mode is exited. - Page 67 HAPSITE ER Operating Manual A confirmation message will be displayed. Touch Yes or push OK SEL to continue. (See Figure 4-11.) Figure 4-11 Emergency Mode Confirmation The EMER MODE button will turn red when Emergency mode is activated. (See Figure 4-12.)
-
Page 68: Concentrator Options (Conc Options)
The CONC OPTIONS button has two selections: Concentrator Cleanout and Skip Conc Cleanout. When Concentrator Cleanout is selected, the HAPSITE ER will run a manual cleanout. When Skip Conc Cleanout is selected, HAPSITE ER will bypass the concentrator cleanout once while the HAPSITE ER is preparing. 4.1.2.1 Concentrator Cleanout Touch CONC OPTIONS or use the arrow keys to highlight the CONC OPTIONS button and push OK SEL. - Page 69 HAPSITE ER Operating Manual Touch Concentrator Cleanout or highlight Concentrator Cleanout using the arrow keys. Push OK SEL. (See Figure 4-15.) Figure 4-15 Concentrator Cleanout The HAPSITE ER will run a concentrator cleanout. (See Figure 4-16.) Figure 4-16 Concentrator Cleanout 4 - 9...
-
Page 70: Skip Cleanout
HAPSITE ER Operating Manual When the cleanout is successful, the Concentrator Cleanout Succeeded message will be displayed along with the final TIC. Push OK to exit the screen. (See Figure 4-17.) Figure 4-17 Concentrator Cleanout Succeeded 4.1.2.2 Skip Cleanout Touch CONC OPTIONS or use the arrow keys to highlight the CONC OPTIONS button and push OK SEL. -
Page 71: Concentrator Cleanout Failure
Touch Retry to start another concentrator cleanout sequence. Touch Skip to start running a concentrator Analyze method. Touch Abort to return to the Main Screen. NOTE: If Abort is touched, HAPSITE ER will show that the SYSTEM IS NOT READY. 4 - 11... -
Page 72: Quick Reference Sop - Heat-Up And Tune
Press the POWER button on the front panel. HAPSITE ER will heat the necessary components and perform AutoTune. A prompt to run SURVEY or ANALYZE will appear when HAPSITE ER is ready to run a sample. If the default method is not the desired method, touch STOP PREPARE. -
Page 73: Selecting A Different Method Using The Select Method Icon
HAPSITE ER Operating Manual 4.2 Selecting a Different Method Using the SELECT METHOD Icon If the default method is not the desired method, the method can be changed. Changing the method can occur when the system is preparing or when another method has finished preparing. - Page 74 HAPSITE ER Operating Manual The SYSTEM IS NOT READY screen will appear. To select a new method, touch SELECT METHOD or using the arrow keys, highlight SELECT METHOD and push OK SEL. (See Figure 4-23.) Figure 4-23 Selecting a Method Screen Scroll up or down using the scroll bar and touch the desired method to highlight it.
- Page 75 4.2. Touch Select or highlight Select using the arrow keys and push OK SEL. HAPSITE ER will begin preparing the new method. Refer to Steps 4-9 of section 4.2, Selecting a Different Method Using the SELECT METHOD Icon, on page 4-13 for further instructions on system preparation.
-
Page 76: Changing The Default Method
HAPSITE ER Operating Manual 4.2.1 Changing the Default Method The default method for HAPSITE ER can be changed. By changing the default method, HAPSITE ER will prepare the newly selected method upon startup. Touch SELECT METHOD. (See Figure 4-27.) Figure 4-27 Select Method Highlight the desired method. -
Page 77: Show All
HAPSITE ER Operating Manual 4.2.2 Show All HAPSITE ER will only show methods that are compatible with the current sample and/or accessory configuration. By checking the Show All box, all loaded HAPSITE ER methods will appear in the text box, regardless of configuration. - Page 78 If an Analyze method is going to be run after Survey, verify that the appropriate sample configuration (i.e., concentrator) is installed. When powered on or taken out of Extended Standby, HAPSITE ER will automatically start preparing an ER Survey and Analyze method if the probe is attached.
- Page 79 HAPSITE ER Operating Manual Using the touch screen, touch RUN SURVEY. (See Figure 4-32.) Figure 4-32 Run Survey Alternately, push SURVEY RUN using the push buttons. (See Figure 4-33.) Figure 4-33 SURVEY RUN Button The front panel will momentarily display a Start Scanning In message before the Survey run will start.
- Page 80 Hold the probe over the sample of interest for up to 1 minute. A peak may appear if the compound present is greater than 1 ppm. A compound identification may also be present on the HAPSITE ER screen. (See Figure 4-36.)
- Page 81 HAPSITE ER Operating Manual By touching CMPD ID, a list of identified compounds will appear. (See Figure 4-37.) The CAS number, the Fit and the retention time for each compound will also be displayed. This screen will also state the TIC (Total Ion Count, a measure of response) Max, the current TIC and the elapsed time of the method.
- Page 82 4-20. (See Figure 4-40.) NOTE: Monitor the side bar on the HAPSITE ER screen for guidance. The bar rises as the TIC increases and green signifies that the proper sampling distance is being maintained. To avoid saturation, remove the probe from the sample when the bar increases and turns yellow.
- Page 83 HAPSITE ER Operating Manual To confirm the Survey results with a GC/MS run, ANALYZE can be touched or ANALYZE RUN can be pushed during the Survey run. (See Figure 4-41.) NOTE: It is advised to begin an Analyze run either after a peak has been displayed and/or Survey has been run for the full two minutes.
-
Page 84: Quick Reference Sop - Survey Method
(i.e., concentrator) is installed and the proper Analyze method is displayed on the screen. If powering on HAPSITE ER or exiting Extended Standby, the HAPSITE will automatically begin preparing Survey. If needed, touch PREPARE on the touch screen. -
Page 85: Analyze (Gc/Ms) Mode With The Concentrator
Verify that the appropriate concentrator is installed. The HAPSITE ER will automatically start preparing a concentrator method. If HAPSITE ER does not prepare the desired concentrator method, refer to section 4.2, Selecting a Different Method Using the SELECT METHOD Icon, on page 4-13. - Page 86 HAPSITE ER Operating Manual Using the touch screen, touch RUN ANALYZE. (See Figure 4-43.) Figure 4-43 Analyze Button Alternately, if using the push buttons, push ANALYZE RUN. (See Figure 4-44.) Figure 4-44 Analyze Run 4 - 26...
- Page 87 HAPSITE ER Operating Manual When the screen prompts, Collect Sample Now, hold the probe over the sample. Continue to collect sample during both the Line Purge and Concfill screens. (See Figure 4-45.) NOTE: The Line Purge is based on time while the ConcFill is based on volume.
- Page 88 HAPSITE ER Operating Manual Move the probe away from the sample when the screen prompts, Sampling is Done. (See Figure 4-46.) Figure 4-46 Sampling Done on Concentrator Run By touching CMPD ID, a list of found compounds will be displayed. (See Figure 4-47.) This page will display for each compound:...
- Page 89 HAPSITE ER Operating Manual To view the chromatogram while the method is running, touch GRAPH. (See Figure 4-48.) Alternately, use the arrow keys to highlight GRAPH. Push OK SEL. This screen will display: The TIC Max The current TIC ...
-
Page 90: Quick Reference Sop - Concentrator Methods
4.5 Detecting Hazardous Chemicals If the HAPSITE ER Analyze message turns red, the chemical’s concentration is either approaching the IDLH limit or the chemical is a Chemical Warfare Agent. In CMPD ID mode, the compound will be highlighted in red and in GRAPH mode, the name of the compound will be written in red. -
Page 91: View Results/View Reports
HAPSITE ER Operating Manual 4.5.1 View Results/View Reports Data files and reports can be viewed from the main front panel screen or from the sample analysis screen. Follow the instructions below to view results and reports. To access data files and reports from the main screen, touch MAIN. (See Figure 4-51.) - Page 92 HAPSITE ER Operating Manual The most recent file for the selected method will be displayed on the screen. Use the black, touch screen arrow keys to access other data files from the same method. (See Figure 4-55.) If using the push buttons, use the front panel arrow keys.
- Page 93 HAPSITE ER Operating Manual Scroll through the method files until the desired method is highlighted. Either touch Select or push OK SEL. (See Figure 4-55.) Figure 4-55 Review Results Highlighting Black Arrows The big blue arrows are used to scroll through the peaks in the chromatogram.
- Page 94 DANGER If a RED TRIANGLE is displayed, HAPSITE ER has detected a compound with a concentration that is approaching or has reached the IDLH level or it has detected a Chemical Warfare Agent.
- Page 95 HAPSITE ER Operating Manual A link to the NIOSH Pocket Guide to Chemical Hazards (NPG) will also be displayed in blue. The link is entitled Pocket Guide. In the bottom left corner, there is a link to the Immediately Dangerous to Life and Health Concentrations (IDLH).
- Page 96 Figure 4-61.) Figure 4-61 CMPD ID DANGER If a RED TRIANGLE is displayed, HAPSITE ER has detected a compound with a concentration that is 10% of the IDLH level or it has detected a Chemical Warfare Agent. 4 - 36...
- Page 97 4.7, Info Icon, on page 4-41. Figure 4-63 NIOSH Link NOTE: HAPSITE ER can detect more compounds than those contained in these databases. Therefore, if the screen displays N/A and does not have links available, the compound is not included in these databases.
- Page 98 HAPSITE ER Operating Manual To view the run’s Summary, Qualitative and Quantitative Reports, touch the REPORTS button. Alternately, use the arrow keys to highlight the REPORTS button and push OK SEL. (See Figure 4-64.) This can be accessed from the GRAPH page or the CMPD ID from View Results.
- Page 99 HAPSITE ER Operating Manual The Qualitative Report can be found by touching the QUAL key. (See Figure 4-66.) Alternately, highlight the QUAL key and push OK SEL. For each compound found, information regarding the Net Fit, the retention time, the CAS number, the area and the number of hits will be displayed.
-
Page 100: Help Icon
HAPSITE ER Operating Manual Figure 4-68 Type of Method 4.6 Help Icon The Help icon is located on the front panel in the top right hand corner. (See Figure 4-69.) Figure 4-69 Help Icon 4 - 40... -
Page 101: Info Icon
HAPSITE ER Operating Manual Help can be accessed by touching the Help icon or pushing the HELP button that is located on the front panel. (See Figure 4-70.) Figure 4-70 Help Push Button The main Help screen displayed will display a Survey link, an Analyze link, a View Results link, a Select Method link and a Go To Standby link. - Page 102 HAPSITE ER Operating Manual The NIOSH Database screen will be displayed. (See Figure 4-72.) This screen provides links to Immediately Dangerous to Life and Health Concentrations (IDLHS), International Chemical Safety Cards, NMAM, The NIOSH Pocket Guide to Chemical Hazards (NPG), OSHA Sampling and Analytical Methods,...
- Page 103 HAPSITE ER Operating Manual Figure 4-72 NIOSH Pocket Guide to Chemical Hazards 4 - 43...
- Page 104 HAPSITE ER Operating Manual When the publication appears, touch INDEX with CHEMICAL NAMES and SYNONYMS. (See Figure 4-73.) Figure 4-73 NIOSH Pocket Guide 4 - 44...
- Page 105 HAPSITE ER Operating Manual Scroll down to display an alphabet. Touch the first letter of the desired compound. (See Figure 4-74.) Figure 4-74 Pocket Guide Index A list of the chemicals that start with the selected letter will be displayed.
- Page 106 Figure 4-76 NIOSH Pocket Guide for a Specific Chemical Scrolling down will display information about the exposure limit and the boiling point of the chemical. The boiling point will determine if the chemical can be detected by the HAPSITE ER. See section 2.2 for boiling point recommendations.
- Page 107 HAPSITE ER Operating Manual To access information regarding Immediately Dangerous to Life and Health Concentrations (IDLHs), touch the first hyperlink on the info screen. (See Figure 4-78.) Figure 4-78 IDLHs Scroll down or touch DOWN until the IDLHs-Chemical Listing and Documentation link is displayed.
- Page 108 HAPSITE ER Operating Manual Scroll down, press DOWN or use the down arrow to find the desired compound. Press the link to view the compound’s information. (See Figure 4-80.) Figure 4-80 Selecting IDLH of Compound Information regarding the compound’s NIOSH REL, OSHA PEL and toxicity data will be displayed.
-
Page 109: Hapsite Er Icon
HAPSITE ER Operating Manual 4.7.1 HAPSITE ER Icon The HAPSITE ER icon provides information the status of the ER and its consumables. Information regarding battery power, gas consumption, heaters, tune status, and GPS can be accessed through this screen. The System Parameters screen can also be displayed by touching the HAPSITE ER icon. -
Page 110: Battery Icon
HAPSITE ER Operating Manual 4.7.1.1 Battery Icon If a battery is installed, the Battery icon will display information about the battery’s charge level. The charge level is found as a vertical bar graph inside the battery icon. If a battery is not installed, EXTPWR will be displayed under the icon and the icon’s charge level bar graph will turn red. -
Page 111: Internal Standard Icon
HAPSITE ER Operating Manual 4.7.1.3 Internal Standard Icon The Internal Standard icon uses a vertical bar graph to provide a percentage of gas remaining in the canister. Touching the icon will display the canister’s fill date, the canister’s expiration date, and the actual PPM of BPFB and TRIS concentrations in the canister. -
Page 112: Heaters Button
4.7.1.4.1 HEATERS Button Touching the HEATERS icon provides the current temperatures of the column, the membrane, the valve oven, the probe, the GCHL, the Concentrator Elbow, and the NEG Heater as HAPSITE ER is heating. See Figure 4-87. The number after the actual temperature is the setpoint temperature. -
Page 113: Conc Button
AutoTune has been manually aborted or skipped. The icon will turn blue when HAPSITE ER is in the process of tuning. If the TUNE icon is red, the AutoTune has failed or the system is preparing to run an AutoTune. -
Page 114: Tune Reports
HAPSITE ER Operating Manual Figure 4-91 Run AutoTune Touching the TUNE STATUS icon will also provide the file name of the last tune report, the time the instrument tuned, and the date the instrument tuned. It will also show a countdown of the time to the next tune check. -
Page 115: Gps Icon
HAPSITE ER Operating Manual Figure 4-93 Tune Report 4.7.1.6 GPS Icon The GPS icon will give the latitude and longitude coordinates of the HAPSITE ER position. It also provides the number of satellites found on the GPS System. (See Figure 4-94.) -
Page 116: Hapsite System Icon
Figure 4-95.) Figure 4-95 HAPSITE SYSTEM Icon 4.7.1.7.1 HAPS Button The HAPS button provides the HAPSITE name, the HAPSITE ER’s Serial Number, and the current version number of the software. It also provides the software build date. (See Figure 4-96.) -
Page 117: Firmware Button
HAPSITE ER Operating Manual 4.7.1.7.2 FIRMWARE Button The FIRMWARE button gives the version number of the G.C., the front panel board, the mass spectrometer and the probe. (See Figure 4-97.) Figure 4-97 FIRMWARE Button 4.7.1.7.3 DATE TIME Button This button gives the present date and time. (See Figure 4-98.) -
Page 118: Net Button
HAPSITE ER Operating Manual 4.7.1.7.4 NET Button The NET button provides the IP address for HAPSITE ER and the Subnet mask. This will be used when using the wireless connection on the Laptop. See Chapter 5, Communications and Touch Screen Options. -
Page 119: Info
This option will access Turn Off, Reboot or Standby. Turn off will shut down the HAPSITE ER’s power. Reboot will reset the microprocessor in HAPSITE ER and reload the drivers. It will also restart the operating system, HAPSITE ER program and the front panel program. The Standby option will put the system into Extended Standby. - Page 120 HAPSITE ER Operating Manual The three exit options will be displayed on the screen. There will also be a Cancel button. Either touch or use the arrow keys to highlight the desired choice on the screen. If using the push buttons, push OK SEL. (See Figure 4-102.)
-
Page 121: Extended Standby
Extended Standby is the preferred storage mode. In this state, the NEG remains heated at 400°C and the ion pump continues pumping to maintain a vacuum in the Mass Spectrometer. HAPSITE ER turns of the heaters for all other components. When in Extended Standby, remove the gas canisters to avoid consumption. - Page 122 HAPSITE ER Operating Manual Alternately, touch EXIT or use the arrow keys to highlight EXIT. Push OK SEL. (See Figure 4-106.) Figure 4-106 EXIT Button When the screen prompts, Do you want to go into Standby?, touch Yes. Alternately, using the arrow keys, highlight Yes and push OK SEL. (See Figure 4-107.)
-
Page 123: End Standby
HAPSITE ER Operating Manual The HAPSITE will go into Extended Standby. Remove the gas canisters. (See Figure 4-108.) Figure 4-108 Extended Standby 4.8.1.1 End Standby To End Standby, touch END STANDBY or using the arrow keys, highlight END STANDBY and push OK SEL. (See Figure 4-109.) - Page 124 HAPSITE ER Operating Manual When the system prompts, Are you sure you want to end standby?, touch Yes. Alternately, highlight Yes using the arrow keys and push OK SEL. (See Figure 4-110.) Figure 4-110 Confirming End Standby 4 - 64...
-
Page 125: Communications And Touch Screen Options
HAPSITE ER has two communication options: the cross-over cable and the wireless connection. The wireless settings will be configured with the laptop at the factory. Before connecting wirelessly, the wireless radio on HAPSITE ER and the wireless button on the laptop will have to be enabled. Follow the instructions below to turn on the radio. - Page 126 HAPSITE ER Operating Manual Remove the cover from the power switch (for the wireless radio). It is located on the far left side. To remove, unscrew the cover by turning it counter-clockwise. See Figure 5-1. Figure 5-1 Unscrewing wireless cap...
-
Page 127: Wireless Module Indicator Lights
HAPSITE ER Operating Manual Press the power button until a click is heard. The green lights adjacent to Radio and WLAN should illuminate. When the green lights are illuminated, the wireless radio is being powered. See Figure 5-2. Figure 5-2 Pushing wireless button Replace the switch cover by placing it over the switch. -
Page 128: Setting Up Communications
HAPSITE ER Operating Manual 5.2 Setting Up Communications NOTE: Setting up communications is an Advanced user function. To locate the HAPSITE H number on the front panel, touch the HAPSITE icon. (See Figure 5-3.) Figure 5-3 HAPSITE icon Alternately, push the STAT button until the HAPSITE icon is highlighted. - Page 129 HAPSITE ER Operating Manual Touch the HAPSITE System icon. (See Figure 5-5.) Figure 5-5 HAPSITE System Touch the HAPS button or use the arrow keys to highlight the HAPS button and push OK SEL. (See Figure 5-6.) Figure 5-6 HAPS button Locate and note the HAPSITE Name.
- Page 130 HAPSITE ER Operating Manual Open ER IQ Software. (See Figure 5-8.) Figure 5-8 ER IQ Software From the System drop-down menu, select Properties. (See Figure 5-9.) Figure 5-9 Selecting Properties from the System Drop-down Menu Click the HAPSITE List button. (See Figure 5-10.)
- Page 131 HAPSITE ER Operating Manual Enter the H number into the Enter HAPSITE Name or IP Address. Click Add. (See Figure 5-11.) Figure 5-11 Add HAPSITE The newly added HAPSITE will appear in the HAPSITE List. (See Figure 5-12.) Press OK.
- Page 132 HAPSITE ER Operating Manual Press OK on the System Properties window. (See Figure 5-13.) Figure 5-13 System Properties The newly added HAPSITE icon will now appear at the bottom of the System Setup screen. If HAPSITE is displayed, as seen in...
-
Page 133: Configuring Hapsite For Communications
HAPSITE ER Operating Manual If the HAPSITE icon is overlaid with a blue “X”, communication has not been fully established. (See Figure 5-17.) Continue with Configuring HAPSITE for Communications, see section 5.3. Figure 5-17 Blue X If a communication error has occurred, which is indicated by an “X”, follow the instructions in Configuring HAPSITE for Communications, see section 5.3... - Page 134 HAPSITE ER Operating Manual Alternately, push the STAT button until the HAPSITE icon is highlighted. (See Figure 5-19.) Figure 5-19 STAT Button Touch the HAPSITE System icon. (See Figure 5-20.) Figure 5-20 HAPSITE System Touch the HAPS button or use the arrow keys to highlight the HAPS button and push OK SEL.
- Page 135 HAPSITE ER Operating Manual Touch the NET button or use the arrow keys to highlight the NET button and push OK SEL. (See Figure 5-22.) Figure 5-22 Locating the IP Address The IP Address and the Netmask of HAPSITE will be displayed. For example: 10.210.6.148/255.252.0.0.
- Page 136 HAPSITE ER Operating Manual The following window will be displayed. Double-click on the desired connection. Choose local area connection to troubleshoot a crossover cable. Choose Wireless Connection to connect wirelessly. (See Figure 5-24.) Figure 5-24 Wireless Connection The Connection Status window will open. Click Properties.
- Page 137 HAPSITE ER Operating Manual In the General tab, scroll down and highlight Internet Protocol (TCP/IP), click Properties. (See Figure 5-26.) Figure 5-26 Internet Protocol (TCP/IP) Select Use the following IP address. Enter the first number of the IP address into the first slot. For example, if the IP Address is 10.210.6.148, enter 10 into the first slot.
- Page 138 HAPSITE ER Operating Manual For the second number of the IP Address, enter 210 if connecting with the cable and 209 if connecting with the wireless radio into the second slot. (See Figure 5-28.) Figure 5-28 Second Number of IP Address For the third number of the IP Address, add 128 to the number in the IP address.
- Page 139 HAPSITE ER Operating Manual The fourth number of the IP Address is entered into the fourth slot without modification. Therefore, in this example, 148 would be entered into the fourth slot. (See Figure 5-30.) Figure 5-30 Fourth Number of IP Address Enter in the Subnet mask exactly as displayed.
- Page 140 Figure 5-32.) Figure 5-32 Clicking OK Communication between the HAPSITE ER and laptop is now established as indicated by the absence of an “X” over the HAPSITE ER Sensor icon in the System Setup screen. (See Figure 5-33.) Figure 5-33 System Setup...
-
Page 141: Turning Off The Radio
HAPSITE ER Operating Manual 5.3.1 Turning Off the Radio See the following procedure for instructions for turning off the radio when wireless communication is not desired. NOTE: When the HAPSITE radio is on, even if the wireless communication is not being used, a radio signal is being transmitted. -
Page 142: Wireless Information
HAPSITE ER Operating Manual Press the button until a click is heard. The green lights adjacent to Radio and WLAN should extinguish. When the green lights are extinguished, the power to the wireless radio is off. (See Figure 5-35.) Figure 5-35 Pushing wireless button Replace the switch cover by placing it over the switch. -
Page 143: Regulatory Compliance Information For United States Users
HAPSITE ER instrument, ONLY use the antenna that was originally supplied with the instrument. If damage occurs to the original antenna please contact the INFICON... -
Page 144: Fcc Rf Exposure Statement
HAPSITE ER Operating Manual 5.4.1.2 FCC RF Exposure Statement WARNING To satisfy RF exposure requirements, this device and its antenna must operate with a separation distance of at least 20 cm from all persons and must not be co-located or operating in conjunction with any other antenna or transmitter. -
Page 145: Regulatory Compliance Information For European Users
This section of the Operating Manual lists CE and R&TTE compliance information for the HAPSITE system that contains the wireless communication option. HAPSITE ER is marked with the following symbol: This symbol indicates compliance with the essential requirements of Directive 73/23/EEC and the essential requirements of articles 3.1(b), 3.2 and 3.3 of... -
Page 146: European Emc Compliance Statement
Switzerland, United Kingdom 5.4.3.2 European EMC Compliance Statement Table 5-2 European EMC Compliance Statements English Hereby, INFICON Inc. declares that this HAPSITE ER Portable GC/MS is in compliance with the essential requirements and other relevant provisions of Directive 1999/5/EC. Finnish INFICON Inc. -
Page 147: European Safety Compliance Statement
GC/MS è conforme ai requisiti essenziali ed alle altre disposizioni pertinenti stabilite dalla direttiva 1999/5/CE. Spanish Por medio de la presente INFICON Inc. declara que el HAPSITE ER Portable GC/MS cumple con los requisitos esenciales y cualesquiera otras disposiciones aplicables o exigibles de la Directiva 1999/5/CE. -
Page 148: Laptop Operation
6.1.1 Sampling Procedure For assembly instructions, refer to section 3.2, Basic Assembly, on page 3-5. Press the POWER button on the front panel to turn on HAPSITE ER. HAPSITE takes 1-2 minutes to boot. (See Figure 6-1.) Figure 6-1 POWER Button NOTE: If desired and equipped, HAPSITE can be used with the laptop computer via the wireless connection. -
Page 149: Survey Mode
HAPSITE ER Operating Manual 6.2 Survey Mode Survey mode is used for quick analysis and tentative results. It is generally two minutes long and detects compounds with a concentration greater than 1 ppm. CAUTION Do not touch the sample with the probe. Do not allow liquids to enter the probe. - Page 150 HAPSITE ER Operating Manual HAPSITE will check pressures and automatically heat all necessary components to the setpoint temperatures. Progress will be indicated by a bar graph. Once all components have reached their setpoint temperatures, a prompt will be displayed to Press RUN to start method.
- Page 151 HAPSITE ER Operating Manual When the TIC increases 2 to 3 times the baseline level, move the probe away from the sample. A peak may appear if the compound concentration is greater than 1 ppm. A compound identification may also be present on the HAPSITE screen.
- Page 152 HAPSITE ER Operating Manual Click the Stop button, in the center of the Control Panel on the right side of the screen, to stop the sampling process. If it has not already been stopped manually, the Survey run will stop automatically when the run time has reached five minutes.
-
Page 153: Quick Reference Sop - Running Survey Mode
Survey does not show an increase in TIC (total ion count, which is a measure of response), use the ER_Tri-Bed_PPB_Standard method. CAUTION The concentrator feature has increased sensitivity. Use the appropriate method to avoid saturating HAPSITE ER. 6 - 6... -
Page 154: Tenax Concentrator
HAPSITE ER Operating Manual 6.3.2 Tenax Concentrator The Tenax concentrator is also used for analyzing samples with concentration levels in the low part per million to high part per trillion range. The Tenax concentrator will ° not effectively concentrate compounds with boiling points below 80 C, but may be more effective at concentrating compounds with higher boiling points. - Page 155 HAPSITE ER Operating Manual When the AutoTune is finished, the following message will be displayed. Click OK. (See Figure 6-14.) Figure 6-14 AutoTune Complete NOTE: If AutoTune fails, refer to section 9.4, Performing Manual Tune, on page 9-7. A concentrator cleanout will also be run as part of the preparation of HAPSITE.
- Page 156 HAPSITE ER Operating Manual Figure 6-16 Collecting Sample for Concentrator When prompted Sampling is Done on the HAPSITE screen, remove the probe from the sample source. (See Figure 6-17.) Figure 6-17 Sampling is Done For Concentrator As the method runs, the chromatogram will begin to appear on the Laptop screen.
- Page 157 HAPSITE ER Operating Manual The message METHOD FINISHED will appear on the HAPSITE screen when the run is complete. (See Figure 6-18.) An example of a completed chromatogram on the laptop is shown in Figure 6-19. Figure 6-18 Method Finished for Concentrator Figure 6-19 Concentrator Run Finished Review results at the end of the run.
-
Page 158: Quick Reference Sop - Tri-Bed Concentrator Method
HAPSITE ER Operating Manual 6.3.3 Quick Reference SOP — Tri-Bed Concentrator Method Verify that the concentrator is installed. If the system is shutdown or in Extended Standby, either power on HAPSITE or take the system out of Extended Standby. HAPSITE will begin preparing a concentrator method. - Page 159 HAPSITE ER Operating Manual Double-click the Analyze folder. (See Figure 6-21.) NOTE: Use the buttons at the top of the dialog to choose the methods on HAPSITE ER. Figure 6-21 Choosing the Mode of Operation 6 - 12...
- Page 160 HAPSITE ER Operating Manual Choose a folder that matches the sampling configuration of HAPSITE. The concentrator folder refers to the Probe accessory. In this example, the probe is installed. Double-click the Concentrator folder. (See Figure 6-22.) Figure 6-22 Selecting the Sampling Configuration...
- Page 161 AutoTune (if required). A concentrator cleanout will also be run if needed. When it is finished heating, a prompt will appear to indicate HAPSITE ER is ready to run a sample. Click RUN. For detailed instructions, refer to section 6.3,...
-
Page 162: Er Iq Software
7.1 HAPSITE Software - ER IQ ER IQ software is the laptop software that controls instrument operation, runs analyses, manages files and creates reports. Data collected with HAPSITE ER is viewed and interpreted using ER IQ. This software allows for use of the entire NIST mass spectral library. -
Page 163: System Setup Screen
Upon opening ER IQ, the first screen displayed is the System Setup Screen, which controls instrument operation. This screen is used to run analyses, access data files, create or edit methods, and set parameters of various HAPSITE ER components. 7.3.1 System Setup Menu The main menu toolbar includes File, Functions, System, Tools, View, Window and Help options. -
Page 164: File Menu
HAPSITE ER Operating Manual 7.3.1.1 File Menu The File menu is shown in Figure 7-4. Figure 7-4 File menu Open opens a data file from either ER IQ or the laptop. Close closes the data file. Save is grayed out when in the System Setup Screen. However, when a data file is opened, a new screen, the Data Review Screen, will be displayed. -
Page 165: View Log
HAPSITE ER Operating Manual 7.3.1.1.1 View Log HAPSITE will log errors, warnings and events if desired. See Parameters on page 7-36 for information on enabling this function. A warning signifies there is a problem with the unit, such as high pressure. If the warning is ignored, it will become an error. -
Page 166: Log File Toolbar
HAPSITE ER Operating Manual The log file will be displayed. (See Figure 7-7.) Figure 7-7 Displaying the Log file 7.3.1.1.2 Log File Toolbar The following icons will be displayed on the Log File Toolbar. Table 7-1 Log File Toolbar Icon... -
Page 167: Functions Menu
HAPSITE ER Operating Manual 7.3.2 Functions Menu The Functions menu is shown in Figure 7-8. Figure 7-8 Functions menu The Run Method, Calibrate, Overlay and Front Panel Display options function identically to the icons of the same name. For further instructions, see... -
Page 168: Port Settings Tab
7-11.) HAPSITE ER is configured at the factory to connect to the laptop. However, the HAPSITE List option allows the user to add a different HAPSITE ER to the laptop or connect a HAPSITE ER to a new laptop. Figure 7-11 System Properties 7.3.3.2 Display Tab... -
Page 169: Miscellaneous Tab
HAPSITE ER Operating Manual 7.3.3.3 Miscellaneous Tab The Miscellaneous tab displays the default pathways, the data file increment digits, the software, safety and library pathways, the scaling preferences for the chromatogram and option to select Wizard Mode for Method Editor. (See Figure 7-13.) - Page 170 HAPSITE ER Operating Manual The Select Base Folder window will open. (See Figure 7-15.) Figure 7-15 Select Base Folder window Click to highlight the desired folder. (See Figure 7-16.) NOTE: Click Refresh to update the displayed folders if the desired folder is not displayed.
- Page 171 HAPSITE ER Operating Manual Once the desired file is highlighted, click Select. Once Select is clicked, the window will close. (See Figure 7-17.) Figure 7-17 Selecting the pathway The Data file increment digits is used to select the number of digits that are to be appended to a data file.
- Page 172 HAPSITE ER Operating Manual The Method Editor in Wizard Mode checkbox is the next option. (See Figure 7-19.) Figure 7-19 Method Editor in Wizard Mode The Wizard Mode will guide the user through the Method Editor software by using Next > and <Back buttons at the bottom of the screen. (See Figure 7-20.)
- Page 173 HAPSITE ER Operating Manual If the Method Editor in Wizard Mode box is not checked, tabs must be clicked at the top of the Method Editor screen to access method writing options. (See Figure 7-21.) Figure 7-21 Non-Wizard Mode 7 - 12...
-
Page 174: Tools Menu
HAPSITE ER Operating Manual 7.3.4 Tools Menu The Tools menu is shown below. (See Figure 7-22.) Figure 7-22 Tools menu System Setup closes the System Setup screen. System Properties functions identically to the System Properties option in the System menu. Refer to section 7.3.3 on page... -
Page 175: Changing Access Levels
HAPSITE ER Operating Manual 7.3.4.1.1 Changing Access Levels NOTE: When the Normal access level is selected, a prompt will be displayed stating that some areas of ER IQ will have restricted access. Click Yes if continuing is desired. (See Figure 7-23.) -
Page 176: Setting Or Changing The Access Level Password
HAPSITE ER Operating Manual To select advanced access, click on Requested Access Level drop-down menu and select Advanced. If a password has been set, it will need to be entered in the password box before pressing OK. (See Figure 7-26.) -
Page 177: View Menu
HAPSITE ER Operating Manual The window shown in Figure 7-29 will be displayed. Figure 7-29 Change Password window In order to change the password, the correct current password must be entered in the Old Password box. The Old Password box must be left blank if entering a password for the first time. -
Page 178: Window Menu
HAPSITE ER Operating Manual The Sensor Toolbar is shown in Figure 7-32. See Table 7-2 on page 7-40 for icon descriptions. Figure 7-32 Sensor toolbar The Function Toolbar is only available when the Data Review screen is open. (See Figure 7-33.) See... -
Page 179: Help Menu
HAPSITE ER Operating Manual 7.3.7 Help Menu The Help menu is displayed below. (See Figure 7-36.) Figure 7-36 Help menu Help Topics is not available at this time. Module Info shows the build version of various files and product number of the installed software. - Page 180 HAPSITE ER Operating Manual If clicking the NIOSH Pocket Guide to Chemical Hazards link, the following screen will be displayed. (See Figure 7-39.) Figure 7-39 NIOSH Pocket Guide to Chemical Hazards Link This screen will display the following options: Introduction, Index of Chemical Names, Synonyms and Trade Names, Index of Primary Chemical Names, Index of CAS Numbers, Index of RTECS Numbers and Appendices.
- Page 181 HAPSITE ER Operating Manual The following page, with the components of the database listed in alphabetical order, will be displayed. (See Figure 7-41.) Figure 7-41 Index Of Chemical Names, Synonyms and Trade Names Figure 7-42, Benzene was selected by clicking the B and then clicking the SEQ number, the database entry number, which is located to the left of the name.
-
Page 182: Manage Files
The screen shown in Figure 7-43 will be displayed. Figure 7-43 Benzene 7.5 Manage Files The Manage Files function transfers files between HAPSITE ER and the laptop. (See Figure 7-44.) Figure 7-44 Manage Files icon Double-clicking this icon will open the window shown below. (See Figure 7-45.) - Page 183 The <--Backup option will backup the desired files from HAPSITE ER onto the laptop. The <--Backup All option will backup all of the files found on HAPSITE ER onto the laptop. The Backup options will copy the files with a .tgz extension, while the Copy option maintains the .hps or .mth file extensions.
- Page 184 HAPSITE ER Operating Manual To rename a folder or file, click on the desired file and click Rename. (See Figure 7-48.) Figure 7-48 Rename function A new window will be displayed. The former name will be displayed on top and a box for typing in the new name will be displayed beneath it.
- Page 185 HAPSITE ER Operating Manual The Delete option will remove folders or files. To delete folders or files, highlight the desired folder or file and click Delete. (See Figure 7-51.) Figure 7-51 Delete option After Delete is clicked, a confirmation window will be displayed. Click Yes to delete the folder or file.
-
Page 186: Status Icon
After double-clicking the Status icon, the first window displayed is the Status window. This screen displays the current temperatures and pressures of the key components in HAPSITE ER. The battery status and internal standard canister status is also displayed. Additionally, the sample input device, i,e., probe, will be shown. -
Page 187: Hapsite Er Time Zone
HAPSITE ER Operating Manual 7.6.2 HAPSITE ER Time Zone The HAPSITE ER Time Zone tab allows the user to set the time on the HAPSITE ER. Setting this parameter will ensure that the data files are stamped with the proper date and time. (See Figure 7-56.) - Page 188 NOTE: Click Select GMT if Greenwich Mean Time is desired. Figure 7-57 Selecting Time Zone Clicking Set HAPSITE Date/Time to PC Date/Time will automatically synchronize HAPSITE to the laptop date and time. (See Figure 7-58.) Figure 7-58 Set HAPSITE ER Date/Time to PC Date/Time 7 - 27...
- Page 189 HAPSITE ER Operating Manual Clicking the Set HAPSITE Date/Time button will display a date/time window. (See Figure 7-59 Figure 7-60.) Figure 7-59 HAPSITE Date/Time button Figure 7-60 Set Date/Time 7 - 28...
- Page 190 HAPSITE ER Operating Manual Use the top arrow keys to select the correct time. (See Figure 7-61.) Figure 7-61 Time arrow keys To select the proper date, use the arrow keys below the time to scroll to the current month. Click on the current date. (See Figure 7-62.)
-
Page 191: Hapsite Er Information
7.6.3 HAPSITE ER Information The HAPSITE Information tab provides general information regarding the HAPSITE ER system. The top portion, Status Information, provides verification that the system is online. It will also notify the user when a method is running. The... -
Page 192: Pressure Flows And Temperatures
The only pressure that can be changed by a user is the GC Column Pressure. When using HAPSITE ER, the BPFB internal standard should elute from the column between 3:40 and 3:50, with 3:45 being the optimal elution time. -
Page 193: Neg Status
Event Data allows for the user to set the type of Notifications that will be displayed on the HAPSITE ER front panel and laptop. An error will occur when a warning has been displayed, but the warning has been ignored. If Error is checked, an error message will be displayed. - Page 194 HAPSITE ER Operating Manual Figure 7-68 Data settings When an error, warning or event occurs, HAPSITE stores information about the occurrence and date it occurred. The pathway where this data is stored is displayed. The desired number of days for log storage can be set or the logs can be stored indefinitely.
- Page 195 Sensor pathway. All data files that have been created by HAPSITE ER will be stored in the folder that was selected by the Data pathway. All report files which are text files of the quantitative, qualitative and summary report are stored in this folder.
-
Page 196: Functions
HAPSITE ER Operating Manual 7.6.6 Functions The icons shown on the Functions tab perform the same functions as the icons displayed in the System Setup screen. To activate a function, highlight the icon and press OK. (See Figure 7-71.) Figure 7-71 Functions screen... -
Page 197: Parameters
HAPSITE ER Operating Manual 7.6.7 Parameters The Maintenance tab will display the number of hours that the ion pump has been running. It will also display the recommended preventative maintenance guideline of 1500 hours. If it needs replaced, the Replace button will activate. (See Figure 7-72.) See for information on contacting customer support for service. -
Page 198: Service Module
Figure 7-73 Service module 7.7 Front Panel Display Icon Double-clicking on the Front Panel Display icon will reveal an emulation on the laptop of the HAPSITE ER front panel screen, which can be used to control the front panel. (See Figure 7-74.) -
Page 199: Hapsite Sensor Icon
All of the buttons on the emulation operate identically to their front panel counterparts. To utilize the emulation, click on the desired button. 7.8 HAPSITE Sensor Icon Right-clicking on the HAPSITE ER Sensor Status icon will display the following menu. (See Figure 7-76.) -
Page 200: Update Hapsite Software
When the connection is active, the HAPSITE Sensor icon will not be overlaid with an “X”. 7.8.2.1 Communication Messages If the laptop is not communicating with HAPSITE ER, there are three types of “X’s” that may be displayed. The red “X” signifies that communication was suddenly lost. For example, an Ethernet cable was disconnected. -
Page 201: Hapsite Icons
HAPSITE ER Operating Manual CAUTION The Laptop and HAPSITE ER should always have the most current version of the software installed. Verify that the unit software and ER IQ software have the save version number. Do not try to run incompatible versions of software together. - Page 202 HAPSITE ER Operating Manual Table 7-2 HAPSITE Icons (continued) Icon Description Accesses the NIOSH database. Accesses the AMDIS software and library. Allows transfer of files between HAPSITE and laptop. Allows editing and creating methods. Accesses the Service Module when attached.
- Page 203 HAPSITE ER Operating Manual Table 7-2 HAPSITE Icons (continued) Icon Description Displays the software version of ER IQ software that is installed on the laptop. Accesses the Calibrate function. Accesses the ID Unknowns function. Accesses Chromatogram Overlay function. Navigates through files in Data Review.
-
Page 204: Data Review
This does not pause the analysis of the data by the HAPSITE ER......Accesses the Data File Information window. -
Page 205: Accessing The Data Review Feature
HAPSITE ER Operating Manual ......Opens the next file in the current directory......Opens the previous SIM Set. - Page 206 The Recall window will be displayed. Select PC if the file was run using the laptop. Select HAPSITE if the file was run using the HAPSITE ER front panel and the laptop was not connected at the time of sample collection. (See Figure 8-4.)
- Page 207 HAPSITE ER Operating Manual Double-click on the desired data file. (See Figure 8-5.) Figure 8-5 Selecting the data file NOTE: HAPSITE data file extensions end in .hps. The Data Review screen with the selected data file will be displayed. The Data...
-
Page 208: Reports
HAPSITE ER Operating Manual TIC window ....The total ion chromatogram, which is the total intensity of the mass fragments, is plotted in this screen. Basic data analysis, such as background subtraction and peak identification, is also conducted here. - Page 209 HAPSITE ER Operating Manual Alternately, View Search Results may be accessed from Data Review drop-down menu. (See Figure 8-9.) Figure 8-9 Data Review Drop-down menu There are a maximum of three reports available, depending on how the method was configured.
- Page 210 HAPSITE ER Operating Manual Figure 8-10 Summary Reports screen The Qualitative report (see Figure 8-11) includes: date time method name method description GPS info scan number retention time number of hits (possible identifications) ...
- Page 211 HAPSITE ER Operating Manual The Quantitative report (see Figure 8-12) includes: date time method name method description GPS info target library date of the last library calibration peak search parameters target ion ...
- Page 212 HAPSITE ER Operating Manual Figure 8-12 Quantitative Report NOTE: If the method does not contain a calibrated library, the Quantitative tab will display No Report. The Quantitative report can be exported to Excel for further analysis by clicking on the Export to Excel button. (See Figure 8-13.)
-
Page 213: Using The Zoom Function In The Tic/Ric Window
HAPSITE ER Operating Manual 8.4.1 Using the Zoom Function in the TIC/RIC Window In order to magnify the peaks, ER IQ has a zoom capability. Click the Zoom icon. (See Figure 8-14 Figure 8-15.) Figure 8-14 Zoom Figure 8-15 Zoom icon Two vertical lines will be displayed. - Page 214 HAPSITE ER Operating Manual Mouse over the other line. The cursor will again become a double-sided arrow. Move the line to the desired point. (See Figure 8-18.) Figure 8-18 Moving the second line Move the cursor between the two vertical lines. The cursor will become a magnifying glass.
- Page 215 HAPSITE ER Operating Manual Alternately, a zoom can be completed by clicking and holding the left mouse button at the desired zoom starting point. (See Figure 8-21.) Figure 8-21 Zooming using the left mouse button Continue to hold the left mouse button and drag the mouse to the desired zoom ending point.
-
Page 216: Zooming Out
HAPSITE ER Operating Manual Click between the lines to zoom. (See Figure 8-24.) Figure 8-24 Click between the lines 8.4.2 Zooming Out Click on the Zoom Out icon. (See Figure 8-25.) Figure 8-25 Zoom out The screen will return to the expanded view. (See Figure 8-26.) -
Page 217: Using The Zoom Spectrum Function
HAPSITE ER Operating Manual 8.4.3 Using the Zoom Spectrum Function The Spectrum window has a zoom function to magnify the spectra. Click the Zoom icon. (See Figure 8-27.) Figure 8-27 Zoom icon A rectangle will be displayed in the Spectrum window. (See Figure 8-28.) - Page 218 HAPSITE ER Operating Manual If necessary, repeat with other sides of the rectangle in order to adjust the desired zoom area. (See Figure 8-31.) Figure 8-31 Adjusting zoom area Move the cursor into the center of the rectangle. The cursor will become a magnifying glass.
-
Page 219: Analyzing Data Using Amdis
HAPSITE ER Operating Manual 8.5 Analyzing Data Using AMDIS AMDIS is an acronym for Automated Mass Spectrum Deconvolution and Identification System, a tool which was developed by the National Institute of Science and Technology. HAPSITE utilizes an on-board library, HAPSITE.msl, and the AMDIS deconvolution algorithm to make identifications. - Page 220 HAPSITE ER Operating Manual The results screen includes: Retention time window ..AMDIS uses a decimal time format. Multiply the numbers after the decimal point to convert to a seconds format. Identifications window..Lists the identifications in order of retention time.
-
Page 221: Setting The Amdis Pathway
HAPSITE ER Operating Manual Load Results ....Allows for the analyst to select a different data file and perform an AMDIS search on the newly selected file. - Page 222 HAPSITE ER Operating Manual Click Select New to change the library pathway. (See Figure 8-38.) Figure 8-38 Select New The HAPSITE.msl is located at the following pathway: C:\IQ Software\SearchLibraries. If custom libraries are used, they must be located in this directory. Highlight the library and click Open. (See Figure 8-39.)
- Page 223 HAPSITE ER Operating Manual Click Save. (See Figure 8-40.) Figure 8-40 Save Click Run. (See Figure 8-41.) Figure 8-41 Run 8 - 20...
-
Page 224: View Function In Amdis
HAPSITE ER Operating Manual 8.5.2 View Function in AMDIS The View function can be accessed by selecting the View button displayed below or by following through step 3 of the previous section and selecting View. (See Figure 8-42.) Figure 8-42 AMDIS This function displays the components of the HAPSITE.msl library. -
Page 225: Confirm Screen In Amdis
HAPSITE ER Operating Manual 8.5.3 Confirm Screen in AMDIS The Confirm function in AMDIS allows for unidentified peaks to be located by AMDIS and export them to NIST for identification. See below for instructions on using Confirm. Click the Confirm button. (See Figure 8-44.) - Page 226 HAPSITE ER Operating Manual If a peak has not been identified, click on the arrow above it. The arrow will turn red. (See Figure 8-46.) Figure 8-46 Arrow Click Analyze and click Go to NIST MS Program. (See Figure 8-47.) Figure 8-47 Go To NIST MS Program The spectra will be exported to NIST.
-
Page 227: Nist Library Searches
HAPSITE ER Operating Manual 8.6 NIST Library Searches The laptop will come pre-loaded with identification software from the National Institute of Standards and Technology’s (NIST) Mass Spectral Search Program, which contains approximately 192,000 spectra. This library compares the sample spectra to the library spectra in order to determine the SI number based upon purity and fit, the ratio of the intensities of the unknown spectra to the library spectra. - Page 228 HAPSITE ER Operating Manual Check the Search NIST/User box in the Control Panel. The library identification and the library spectra will be displayed above the spectra of the sample. (See Figure 8-50.) Figure 8-50 Search NIST/User The Similarity Index Number (SI #) will be located next to the library identification.
- Page 229 HAPSITE ER Operating Manual The Search Results box will show five identifications from the spectral search. The result with the highest SI number will be displayed first. If the program identifies the same compound more than once, it will display DUP, for duplicate, next to the name of the compound.
- Page 230 HAPSITE ER Operating Manual If the Description box is checked, the highlighted hit, the SI, the formula, and CAS number will be displayed. (See Figure 8-54.) Figure 8-54 Description box If the Search Result Masses box is checked, the masses and relative intensities for the current scan will be displayed as a table for the NIST library spectrum.
-
Page 231: Show/Update Current Peaks
HAPSITE ER Operating Manual If the Scan Spectrum Masses box is checked, the masses and relative intensities are displayed as a table for the unknown spectrum. (See Figure 8-56.) Figure 8-56 Scan Spectrum Masses 8.7 Show/Update Current Peaks The Show/Update Current Peaks function will search the entire chromatogram to qualitatively identify each peak. - Page 232 HAPSITE ER Operating Manual The Show/Update Current Peaks window will display. (See Figure 8-58.) Figure 8-58 Show/Update Current Peaks Check the Search in NIST box. (See Figure 8-59.) Figure 8-59 Search In NIST 8 - 29...
- Page 233 HAPSITE ER Operating Manual Click Search. (See Figure 8-60.) Figure 8-60 Search A NIST search will be performed on the peaks that NIST has located. The Hits Found column will be populated. (See Figure 8-61.) Figure 8-61 Hits Found 8 - 30...
-
Page 234: Show/Update Current Peaks Window Description
HAPSITE ER Operating Manual Each identification has a drop-down menu. Five hits will be displayed in each menu. (See Figure 8-62.) Figure 8-62 Drop-Down Menu Check the Search in AMDIS box. The software will search the peaks using the AMDIS library. The AMDIS identification will be located in the drop-down menu below the NIST hits. - Page 235 HAPSITE ER Operating Manual On the Show/Update Current Peaks window, the highlighted peak will be displayed with the dots along the peak representing each individual scan. The following will also be displayed: Number of Peaks ....The number of peaks that have been identified by the Show/Update Current Peaks program.
-
Page 236: Peak Search Parameters
HAPSITE ER Operating Manual 8.7.0.2 Peak Search Parameters Some of the parameters for peak searching can be selected. These include the Min RIC Area, Min TIC Area, the Min and Max Width, the mass range, the Net fit, the NIST library used for identification and the number of identifications that are displayed by the NIST library. - Page 237 HAPSITE ER Operating Manual Select the NIST Main Library from the folder displayed. Click Select to set the library. (See Figure 8-66.) Figure 8-66 NIST Main Library To reset the NIST Replicate Library: Click Browse..(See Figure 8-67.) Figure 8-67 Browse...
- Page 238 HAPSITE ER Operating Manual To reset the NIST USER Library: Click Browse..(See Figure 8-69.) Figure 8-69 NIST USER Library Select the NIST USER Library from the folder displayed. Click Select to set the library. (See Figure 8-70.) Figure 8-70 NIST USER Library...
-
Page 239: Report Preview
HAPSITE ER Operating Manual 8.7.0.4 Report Preview Report Preview will reformat the Show/Update Current Peaks window into a text file. To view the report, click the Report Preview button. (See Figure 8-71.) Figure 8-71 Report Preview The report will be displayed. (See Figure 8-72.) - Page 240 HAPSITE ER Operating Manual The report can exported to Excel for further data analysis. Click Export to Excel. (See Figure 8-73.) Figure 8-73 Export to Excel The report will need to be saved before Excel will open. Click Save. (See Figure 8-74.)
-
Page 241: Background Subtract
HAPSITE ER Operating Manual Figure 8-76 File Menu 8.7.1 Background Subtract Background Subtract will remove masses in the spectrum that are caused by background interference. Using Background Subtract will increase the SI number of the identification when the low SI number is a result of high background. Follow the instructions below to perform a Background Subtract. - Page 242 HAPSITE ER Operating Manual Drag to an area that is representative of the background on either side of the selected peak. The background masses at this location are automatically subtracted from the peak. (See Figure 8-78.) Figure 8-78 Placing the Subtract Triangle If the background on the opposite side of the peak differs from the subtracted background, a second background subtract can be used.
-
Page 243: Background Subtraction Using A Range Of Points
HAPSITE ER Operating Manual To remove Background Subtract from the chromatogram, place the cursor over the Background Subtract triangle, right-click and select Remove. (See Figure 8-80.) Figure 8-80 Removing Background Subtract 8.7.1.1 Background Subtraction Using a Range of Points Background from a range of points can be subtracted if desired. - Page 244 HAPSITE ER Operating Manual Mouse over the gray line located above the Background Subtract triangle. The cursor will change to a vertical double headed arrow. Left-clicking and holding, while moving the double headed arrow upwards, widens the background range. Moving the arrow downwards, narrows the range of the background.
-
Page 245: Range Tool
HAPSITE ER Operating Manual 8.7.1.2 Additional Features of the Background Tool By placing the mouse over a Background Subtract triangle and right-clicking, see Figure 8-84, the following menu will be displayed: Figure 8-84 Background Subtract Menu Remove ..... . Removes the Background Subtract triangle. - Page 246 HAPSITE ER Operating Manual Move the cursor to the tip of the Range Tool triangle. The cursor will change to a vertical double-headed arrow. Left-click, hold and move the double-headed arrow upwards to widen a range. Moving the arrow downwards narrows the range.
-
Page 247: Additional Features Of The Range Tool
HAPSITE ER Operating Manual 8.7.2.1 Additional Features of the Range Tool By placing the mouse over the Range Tool triangle and right-clicking, the following menu will be displayed. (See Figure 8-88.) Figure 8-88 Range Tool Menu Remove ..... . Removes the range cursor. - Page 248 HAPSITE ER Operating Manual Either from the System Setup screen or the Data Review screen, double-click on the NIST icon. (See Figure 8-89.) Figure 8-89 NIST icon Click on the Names tab at the bottom of the NIST screen. (See Figure 8-90.)
- Page 249 HAPSITE ER Operating Manual Figure 8-93 Top 10 Masses Minimize the NIST window and return to the Data Review screen displaying the chromatogram. Enter the largest peak, 78 for benzene, into the Control Panel underneath the Mass column. Press Enter. The RIC plot will be displayed underneath the TIC window.
- Page 250 HAPSITE ER Operating Manual Figure 8-96 RIC Plot for Benzene Alternately, click on the desired mass fragments in the Spectrum window to create a RIC plot. (See Figure 8-97.) Figure 8-97 Clicking on Mass Fragment 8 - 47...
- Page 251 HAPSITE ER Operating Manual The compound may be present in the unknown sample if all three peaks (mass fragments) align in the RIC plot. Use the Search NIST/User program to confirm identification of the suspected compound. (See Figure 8-98.) NOTE: In this example, the largest peak (mass fragment) is 78, which is displayed in green.
-
Page 252: Chromatogram Overlay
HAPSITE ER Operating Manual 8.9 Chromatogram Overlay In order to compare multiple chromatograms, Chromatogram Overlay allows chromatograms to be superimposed in the same window. Follow the instructions below to overlay chromatograms. Click on the Chromatogram Overlay icon. (See Figure 8-100.) Figure 8-100 Chromatogram Overlay Icon Follow the Data Review icon instructions in order to locate the desired file. - Page 253 HAPSITE ER Operating Manual Both chromatograms will be displayed in the chromatogram window. The color displayed in the check box correlates with the color of the chromatogram. (See Figure 8-103.) Figure 8-103 Displaying Chromatograms NOTE: The mass spectrum will be displayed for the highlighted file.
- Page 254 HAPSITE ER Operating Manual Peaks can be aligned by retention time for further comparison. Determine the time difference between the peaks being compared. The chromatogram will be shifted the desired amount of time by selecting + or - and typing in the time difference.
-
Page 255: Chromatogram Subtract
HAPSITE ER Operating Manual 8.10 Chromatogram Subtract This feature will subtract the TIC from one chromatogram from the TIC of another chromatogram. This is generally used to subtract the blank from the sample and verify the presence of a compound of concern. - Page 256 HAPSITE ER Operating Manual Select the desired file for subtraction from the drop-down menu. This will generally be the file for the blank. (See Figure 8-110.) Figure 8-110 Selecting the Desired File Right-click on the chromatogram. Right-click on the chromatogram. Click Select Chro to Subtract.
-
Page 257: Right-Click Menus Within Data Review
HAPSITE ER Operating Manual To return to the previous view, right click on the chromatogram and click Chro Subtract from the menu to deselect. (See Figure 8-113.) Figure 8-113 Deselecting Chromatogram Subtract 8.11 Right-Click Menus Within Data Review 8.11.1 Right-Clicking in the TIC Window Figure 8-114 shows the functions available when right-clicking on the TIC window. - Page 258 HAPSITE ER Operating Manual Change Plot Color ... . . Changes the color of the TIC plot. Label Chromatogram ... Displays a text box to label the chromatogram.
-
Page 259: Properties Menu
HAPSITE ER Operating Manual Clear the Peaks... . . Clears the identification of peaks from the TIC graph after using Search for Peaks. Label the Peaks ... . Labels identified peaks with retention time and area. -
Page 260: Spectrum Window
HAPSITE ER Operating Manual Figure 8-116 Properties 8.11.2 Spectrum Window Right-clicking in the Spectrum window will access the menu shown in Figure 8-117. Figure 8-117 Spectrum Display Menu Label Masses ....When checked, it will display the atomic weight of the mass fragments in the Spectrum window. - Page 261 HAPSITE ER Operating Manual Show Description ....This will display the SI number, the NIST hit number, the formula, CAS number and the normalization number next to the spectrum.
-
Page 262: Analyzing Data Using Nist
HAPSITE ER Operating Manual 8.11.3 Analyzing Data Using NIST By right-clicking on the Spectrum window, the NIST menu is displayed. (See Figure 8-119.) Figure 8-119 NIST Menu Grab Spectrum for NIST (F9)..This function will select a file to be exported into the NIST database program. -
Page 263: Nist Database Program
8.11.4 NIST Database Program The NIST database program is third-party software that is included with the HAPSITE ER. Instructions for using the software are located by selecting HELP from the Menu selection in either the AMDIS or NIST program. (See... -
Page 264: Grab Spectra For Nist
HAPSITE ER Operating Manual 8.11.5 Grab Spectra for NIST To export the spectrum to the NIST database: Double-click on the desired peak in the TIC/RIC window. (See Figure 8-122.) Figure 8-122 TIC/RIC Window Place the cursor in the Spectrum window and right-click. (See Figure 8-123.) - Page 265 HAPSITE ER Operating Manual Click Grab Spectrum for NIST. (See Figure 8-125.) Figure 8-125 Grab Spectrum for NIST Click Switch to NIST Program. (See Figure 8-126.) Figure 8-126 Switch to NIST Program The identification will be displayed on the screen. (See Figure 8-127.)
-
Page 266: Tune
AutoTune program, which automatically sets and adjust all parameters, however, user can set the parameters by manual tuning. HAPSITE ER uses two gas internal standards which contain mass fragments that span the mass range of interest. The internal standards are: ... - Page 267 Figure 9-3 Tune icon CAUTION Adjusting other parameters without proper training may damage the instrument. Allow HAPSITE ER to AutoTune. When AutoTune is finished, the message Final Results are on the LCD will be displayed. Click OK. (See Figure 9-4.) Figure 9-4 AutoTune complete Close the manual tune screen by clicking the X on the top right corner.
-
Page 268: Viewing A Tune Report
HAPSITE ER Operating Manual 9.3 Viewing a Tune Report The most current tune report can be viewed from the front panel display or from the laptop. Past tune reports can be viewed from the laptop. To view the report from the laptop computer, select File. (See Figure 9-6.) - Page 269 HAPSITE ER Operating Manual Highlight the default.tun file and press OK. (See Figure 9-8.) Figure 9-8 Highlighting default.tun The Tune Reports will be displayed. Tune Reports are stored, by default, for 30 days. (See Figure 9-9.) Figure 9-9 Tune Reports...
-
Page 270: Tune Reports Options
Print ......Prints the selected tune report. Figure 9-10 Tune Reports Screen from Laptop Computer To view the Tune Report from the front panel display, touch the HAPSITE ER icon or push the SYSTEM STAT button until the HAPSITE ER icon is highlighted. - Page 271 HAPSITE ER Operating Manual Touch the TUNE icon. (See Figure 9-12.) Figure 9-12 Tune report Touch the TUNE REPORT button or use the arrow keys to highlight the TUNE REPORT button. The last tune report will be displayed. (See Figure 9-13.)
-
Page 272: Performing Manual Tune
Figure 9-15 Tune report 9.4 Performing Manual Tune Manual tunes are a standard routine maintenance practice for HAPSITE ER and HAPSITE SmartPlus, and should be performed once every 4 to 6 months to maintain optimal performance of the unit’s mass spectrometer. -
Page 273: Outputs
HAPSITE ER Operating Manual 9.4.2 Outputs Base Peak Gain (BPG) BPG influences sensitivity. (See Figure 9-16.) ER ideal setting is 0.5 (range is 0.4 to 0.6) Smart Plus ideal setting is 1.0 (range is 0.8 to 2.0) Figure 9-16 Base Peak Gain Ion Percentages Actual Percentages are listed in the Mass Calibration table, outlined in red. -
Page 274: Inputs
HAPSITE ER Operating Manual Status Column The Status Column provides categorical view of the actual percentages. (See Figure 9-18.) The values OK, OK Low, OK High, Low or High indicate whether the actual percentage for that ion are within best range (OK) or outside (Low or High). - Page 275 HAPSITE ER Operating Manual Adjusting Target Resolution Adjustments are made in increments of 0.05. The number in the Actual Percentage column is affected by the target resolution adjustments. This should fall between the Max. Target and Min. Target. If the masses cannot be brought into range by adjusting the Target Resolution, adjust the Ion Energies.
- Page 276 1600 V, with newer units typically showing lower values and older units showing higher values. If your unit requires an EM volt of 1600 to 2000 to reach BPG of 0.5, please contact INFICON for support, as your unit may require service. Figure 9-22 Adjusting EM Voltage...
-
Page 277: Other Inputs
HAPSITE ER Operating Manual Observing Base Peak Gain (BPG) Properly adjusted Base Peak Gain for a HAPSITE ER is between 0.4 to 0.6, ideally at 0.50. (See Figure 9-23.) Ideal value for HAPSITE SmartPlus is 1.0. Figure 9-23 Observing Base Peak Gain Increasing EM volt will increase BPG. -
Page 278: Set Access Level To Advanced
HAPSITE ER Operating Manual 9.4.5 Set Access Level to Advanced The Access Level must be set to Advanced to manually tune the instrument. The Set Access Level... is used to change ER IQ/Plus IQ user mode. Normal Mode: Allows access to default methods and data analysis ... -
Page 279: Manual Tune
HAPSITE ER Operating Manual On the System Setup window, verify the Access Level is set to Advanced. (See Figure 9-26.) Figure 9-26 Verify access level 9.4.6 Manual Tune Double click the icon. (See Figure 9-27.) Figure 9-27 Tune icon Select default.tun from the tuning pop-up window. -
Page 280: Save Tune
HAPSITE ER Operating Manual Figure 9-28 Emission and EM boxes 9.4.7 Save Tune Verify that OK is displayed in the Status Column. (See Figure 9-29.) Figure 9-29 Status Column 9 - 15... -
Page 281: Tool Bar
HAPSITE ER Operating Manual Once you are satisfied with the quality of the tune, click Save Tune at the top right of the Percentages table. Save the tune as default.tun. (See Figure 9-30.) Figure 9-30 Save Tune Close Manual Tune. -
Page 282: Tune Drop-Down Menu
HAPSITE ER Operating Manual Mass Calibration..Verifies and corrects the ten calibration masses for correct location within the mass range. Noise Check ... . Scans a “quiet” mass range (no peaks) to determine the electronic baseline and threshold noise level. - Page 283 HAPSITE ER Operating Manual Mass Calibration....Verifies and corrects the ten calibration masses for correct location within the mass range. Noise Check ....Scans a “quiet” mass range (no peaks) to determine the electronic baseline and threshold noise level.
- Page 284 HAPSITE ER Operating Manual Figure 9-33 Tune Properties window Show Tune Parameters ..Displays the EM Voltage, Ionizer control, Baseline, Threshold and Rod polarity settings on the Control Panel. Show Mass Tune Controls..Displays the Mass Tune Controls on the Mass Peak Scan windows.
-
Page 285: Tune Control Panel
HAPSITE ER Operating Manual 9.4.10 Tune Control Panel The Tune Control Panel is located on the right side of the screen and will display the individual mass peak scans, the measured intensity and the resolution. (See Figure 9-34 Figure 9-35.) -
Page 286: Tune Parameters
HAPSITE ER Operating Manual 9.4.10.1 Tune Parameters Target Resolution ....Decreasing the Target Resolution narrows the peak, increases the resolution and lowers the peak percentage. Increasing the Target... - Page 287 HAPSITE ER Operating Manual Running Tune Base Peak Gain . . . Current measured Base Peak Gain (BPG). NOTE: The Base Peak Gain will switch to red when BPG is outside the target range. Auto Resolve ....Adjusts the resolution of all mass peaks to the target resolution.
-
Page 288: Peak Scan Window
HAPSITE ER Operating Manual 9.4.11 Peak Scan Window The Peak Scan Window, see Figure 9-36, can be used to manually tune the mass peak. Figure 9-36 The Peak Scan Window and Controls 9.4.11.1 Peak Scan Window Controls Mass Adjust ... . Enables the cursor to select a mass peak and drag the mass peak to a different position on the mass axis. -
Page 289: Setting The Full Scan Range
HAPSITE ER Operating Manual ....Increases the peak resolution....Decreases the peak resolution. -
Page 290: Tune And Mass Calibration Status
HAPSITE ER Operating Manual 9.4.13 Tune and Mass Calibration Status The Tune & Mass Calibration Status Panel is shown in Figure 9-38. Figure 9-38 Tune and Mass Calibration Status Panel Figure 9-39 Tune and Mass Calibration Status Menu Mass ......The mass number of the peak. -
Page 291: Mass Calibration Status
HAPSITE ER Operating Manual Min Target Percentage ..Displays the minimum target percentage required for the mass peak to meet OK criteria. If the actual percentage is below the minimum percentage, the box will turn red. -
Page 292: Scan Window Menu
HAPSITE ER Operating Manual Status ..... . . Status of the mass peak. OK ..... . . Within minimum and maximum values. -
Page 293: Tune Status Window Menu
HAPSITE ER Operating Manual Show Tune Status Panel ..Displays the Tune Status panel. Show Mass Calibration Status . . . Displays the Mass Calibration Status control panel. Control Panel ....Displays the Control Panel. -
Page 294: Method Editor
Normal. Each page of the Method Editor shows a profile at the bottom of the Inlet States and Temperature. See Figure 10-1. For questions relating to method development, please contact INFICON for application support. 10 - 1... - Page 295 HAPSITE ER Operating Manual Figure 10-1 Method Profile Newly created methods start with a default set of Inlet States and a default Temperature Profile, which can be modified as required by the application. NOTE: The bottom of each page will display the inlet states, see section 10.6.1,...
-
Page 296: Reloading Default Hapsite Methods
HAPSITE ER Operating Manual If more than one unit is connected to the laptop, click on the name of the desired HAPSITE ER. See Figure 10-3. Figure 10-3 Method Editor Open Window There are four options for accessing a method: Open . - Page 297 HAPSITE ER Operating Manual Select HAPSITE Default Method to access the default methods. See Figure 10-5. Figure 10-5 Method Editor Verify that ER is checked on the right side of the window. Highlight the desired method and click Load. See Figure 10-6.
- Page 298 HAPSITE ER Operating Manual Figure 10-7 Description Page Click the Save button at the bottom of the Method Editor-Description page. Figure 10-8. NOTE: Two digits will be appended to the method file name (i.e., 01). If the two digits are not desired, remove them before clicking the Save button.
-
Page 299: Default Methods
HAPSITE ER Operating Manual Figure 10-8 Saving the Method 10.3 Default Methods The methods found in the Default Methods window are general purpose methods for each of the HAPSITE configurations. ER_Air_Tri-Bed_PPB_Standard . . Carbon concentrator method (10 minute analysis time) ER_Air_Tri-Bed_PPM_Standard . -
Page 300: Description Page
HAPSITE ER Operating Manual ER_Air_Tenax_PPB_Standard . . . VOC and Chemical Warfare Agent Air Analysis using Tenax Concentrator (10 minute analysis sample time. Consists of 1 minute inlet purge plus one minute sample collection.) ER_Air_Loop_PPM_Standard ..VOC and Chemical Warfare Agent analysis using Sample Loop (10 minute analysis time) ER_HSS_Tri-Bed_PPT_Standard . - Page 301 HAPSITE ER Operating Manual Figure 10-9 Method Editor Description Page Mode of Analysis Analyze (GC/MS)....This analysis uses both the Gas Chromatograph (GC) and Mass Spectrometer (MS) to separate and analyze compounds.
- Page 302 HAPSITE ER Operating Manual Collection Mode Full Scan ..... This mode scans all the masses across a given range, which is 42-300 for default methods.
- Page 303 HAPSITE ER Operating Manual In non-Wizard mode, which is recommended only for experienced users, all pages are available through a tabbed window. To change the Wizard mode settings, refer section 7.3.3.3, Miscellaneous Tab, on page 7-8 for instructions. See Figure 10-11.
-
Page 304: Startup Page
Figure 10-12, displays the initial settings for the HAPSITE ER system heaters. The initial temperature settings for the components described in HAPSITE Temperatures (C) can be modified on this page. The Sample Input Device (i.e., Probe, Headspace, SituProbe or SPME) can be selected on this page. - Page 305 HAPSITE ER Operating Manual Sample Input Device Probe ......Select Probe when using the air probe to sample volatile organic compounds in the air.
-
Page 306: Inlet Page
HAPSITE ER Operating Manual Figure 10-14 SituProbe Temperatures SPME SPME Fiber ....Type in the color of the desired fiber into the box. -
Page 307: Inlet States
HAPSITE ER Operating Manual Figure 10-16 Method Editor Inlet Page for GC/MS Full Scan 10.6.1 Inlet States Inlet States control the HAPSITE ER and accessory valve settings for sampling, analysis and purging of the HAPSITE ER. Figure 10-17 shows the grid used to program the Inlet States. - Page 308 HAPSITE ER Operating Manual To edit the Inlet States grid, select an Inlet State from the drop-down menu. See Figure 10-18. Figure 10-18 Inlet States The following choices are available for all Analyze methods in the Inlet States column: Line Purge....Directs the sample throught the sample pathway and out through the exhaust vent.
- Page 309 HSSample ....Turns on the sample pump to direct sample through the transfer line to the HAPSITE ER. The suggested HSSample duration is approximately 15 seconds.
- Page 310 HAPSITE ER Operating Manual The following Inlet States are only available when the SituProbe is attached: SPLinePurge....Directs carrier gas through the lines, SituProbe assembly and the transfer line to clear out carryover from a previous sample.
-
Page 311: Gc Temperature Profile
NOTE: Rows cannot be inserted after the Standby event 10.6.2 GC Temperature Profile GC Temperature Profiles specify the column temperature, ramp rate and hold settings for the HAPSITE ER Method. Adjusting the temperature program will change the retention times of the internal standards. 10 - 18... -
Page 312: Scan Events
HAPSITE ER Operating Manual Figure 10-21 Method Editor Inlet Page: GC Temperature Profiles Adjustments to the Hold Time, Ramp Rate and Temp columns will automatically update dependent parameters. For example, increasing the Temp will increase the Ramp Time and increasing the Hold Time will adjust the Start time of the next parameter. -
Page 313: Headspace Flow Parameter
HAPSITE ER Operating Manual CAUTION If the Filament delay is too short, the high pressure burst caused by a solvent peak may shut down the HAPSITE ER and stop the analysis. The Run Time is the amount of time that the method will run. -
Page 314: Scan Events For Sim Methods
HAPSITE ER Operating Manual Figure 10-25 SituProbe Flow Pressure 10.6.6 Scan Events for SIM Methods When creating SIM methods, the beginning and end time for each scan set will be displayed. See Figure 10-26. Adjustments to these times can be made on the SIM page. -
Page 315: Param Page
HAPSITE ER Operating Manual 10.7.1 Param Page The Param tab (see Figure 10-27) displays the tune filename, which sets the MS tune parameters for the method. The default filename is default.tun . If a different tune file is desired, the Browse button can be used to locate and specify the desired tune for the method. - Page 316 HAPSITE ER Operating Manual Figure 10-28 Method Editor Tune Parameter Page - Show Details 10 - 23...
-
Page 317: Report Page
HAPSITE ER Operating Manual 10.7.2 Report Page The Report page (see Figure 10-29) displays the AutoTune report in a printable format. Figure 10-29 Method Editor Tune Report Page 10 - 24... -
Page 318: Full Scan Page
HAPSITE ER Operating Manual 10.8 Full Scan Page The Full Scan page sets the mass ranges for the method. The set can be assigned a Scan Set Name for easy identification, if desired. The Filament Delay, from the Inlet Page (see section 10.6.3, Scan Events, on page... -
Page 319: Sim Page
HAPSITE ER Operating Manual End Mass..... The mass at which the Mass Spectrometer will end a scan. The end mass can be set from 1-300 amu. - Page 320 HAPSITE ER Operating Manual Figure 10-31 Method Editor SIM Page for Analyze Methods The Scan Sets fields, in the order recommended for editing, are as follows: Begin Time ....The start time for mass collection.
- Page 321 HAPSITE ER Operating Manual Extra ......This sets the number of extra scans, from 0 - 10, for each mass. Extra scans lower the detection limits by increasing the intensity within the Mass Spectrometer.
-
Page 322: Sim For Survey
HAPSITE ER Operating Manual 10.9.2 SIM for Survey Figure 10-32 SIM for Survey The SIM page for Survey mode provides the ability to create only one scan set. Refer to Figure 10-32. Scan Set Name ....References the specific set of ions being detected. -
Page 323: Creating A Sim Method
HAPSITE ER Operating Manual 10.9.3 Creating a SIM Method Follow Step 1 through Step 4 section 10.2, Reloading Default HAPSITE Methods, on page 10-3 Change the Collection Mode to SIM. See Figure 10-33. Figure 10-33 Changing Collection Mode Select Next until the SIM page is displayed. See Figure 10-34. - Page 324 HAPSITE ER Operating Manual Figure 10-34 Displaying the SIM Page 10 - 31...
- Page 325 HAPSITE ER Operating Manual For the Begin Time, enter in the number displayed in the Filament Delay. For default ER methods, this is 15 seconds. See Figure 10-35. Figure 10-35 Begin Time 10 - 32...
- Page 326 HAPSITE ER Operating Manual Enter the desired the End Time so that the Begin Time and the End Time surround the expected retention time of the compound. See Figure 10-36. Figure 10-36 End Time 10 - 33...
- Page 327 HAPSITE ER Operating Manual Enter the name of the chemical of interest. (See Figure 10-37.) Figure 10-37 Entering the Chemical of Interest 10 - 34...
- Page 328 HAPSITE ER Operating Manual Enter at least three mass fragments for the selected chemical of interest. (See Figure 10-38.) Figure 10-38 Entering Mass Fragments 10 - 35...
- Page 329 HAPSITE ER Operating Manual It is recommended that the Dwell Time is adjusted until the Round Trip is approximately one second. (See Figure 10-39.) Figure 10-39 Adjusting Dwell Time Repeat Step 4 through Step 8 if successive chemicals are desired.
-
Page 330: Search Page
HAPSITE ER Operating Manual 10.10 Search Page The Search Page sets the necessary parameters to qualify and quantify data. To quantify data, a calibration library must be created. See Figure 10-40. See Chapter 11, Calibration for instructions on creating a calibration library. -
Page 331: Setting Up A Qualitative Search
HAPSITE ER Operating Manual Quantitative....Generates a Quantitative (Quant) report at the end of the run by referencing the designated library. Qualitative/Quantitative ..Searches AMDIS to provide identifications during a run and generates a Quantitative report. - Page 332 Performance Check ... . This analysis verifies that the HAPSITE ER is properly identifying performance standards.
- Page 333 HAPSITE ER Operating Manual Figure 10-43 Performance Window Low Mass ....The lowest mass in the range of masses being considered.
- Page 334 HAPSITE ER Operating Manual The HAPSITE.MSL is the default AMDIS library for the system. See Figure 10-45. Figure 10-45 The Libraries To view other library choices, select the Browse button, refer to Figure 10-45. There are several small and specific libraries in addition to the HAPSITE.MSL. See Figure 10-46.
- Page 335 HAPSITE ER Operating Manual Advanced Settings Figure 10-47 Advanced Settings NOTE: INFICON does not recommend changing the Advanced Settings. Noise Thresholding Level ..Refers to the minimum signal recorded. Will filter out noise along the baseline.
-
Page 336: Setting Up A Quantitative Search
HAPSITE ER Operating Manual Every ____ min:sec ... . Determines the time intervals for running an AMDIS search. End of Run ....An AMDIS search will only be conducted at the end of a run. -
Page 337: Peak Search
HAPSITE ER Operating Manual Clicking the Library Search Parameters button on the Method Editor Search page will display the following window. See Figure 10-50. Figure 10-50 Library Search Parameters Window 10.10.3 Peak Search The peak search section is compromised of the parameters that are used in distinguishing a peak from the baseline. - Page 338 HAPSITE ER Operating Manual Window Expand Factor ..This option multiplies the retention time of the peak by the Window Expand Factor to give a period of time by which the search window will be expanded.
- Page 339 HAPSITE ER Operating Manual Min. Purity ....This compares the purity level of the detected peak to the mass peak in the library.
-
Page 340: Alarm
HAPSITE ER Operating Manual The Elimination Rules section gives parameters for peaks to be reported. There are three options. See Figure 10-52. Figure 10-52 Elimination Rules Window Keep no more than... . . This check box determines the number of peaks that will be displayed. - Page 341 HAPSITE ER Operating Manual Figure 10-53 Alarm Box 10 - 48...
- Page 342 HAPSITE ER Operating Manual Enter the desired alarm level into the box with the units. The alarm will be displayed when any analyte is detected at a concentration above the alarm level. To enter in alarm levels for individual analytes, see Figure 10-54.
-
Page 343: Edit Options
HAPSITE ER Operating Manual 10.10.5 Edit Options Clicking the Edit box will display the following information about the calibration library. See Figure 10-56. Figure 10-56 Edit 10 - 50... - Page 344 HAPSITE ER Operating Manual The Analyte List will be displayed. See Figure 10-57. Figure 10-57 Analyte List The name of the compound will be displayed in the name column, followed by the CAS number, the target ion and the predicted retention time. See In the Standard column, either Internal or Analyte will be selected.
- Page 345 HAPSITE ER Operating Manual The Conc. (concentration) column will be populated for internal standards. It will be left blank if the compound is an analyte. See Figure 10-59. Figure 10-59 Concentration In the IS Ref column, all internal standards are given a number. For the air internal standards, this is 1-6.
- Page 346 HAPSITE ER Operating Manual On the Mass Peaks tab, the mass fragments for the highlighted compound will be displayed with their intensity. See Figure 10-62. Figure 10-62 Mass Peaks On the Calibration tab, the calibration curve for the analyte will be displayed. See Chapter 11, Calibration.
- Page 347 HAPSITE ER Operating Manual The Alarm tab allows for an alarm level to be entered for each individual compound. To enter in an alarm: Highlight the desired compound. See Figure 10-65. Figure 10-65 Highlighting Desired Compound Check the Alarm box. See Figure 10-66.
- Page 348 HAPSITE ER Operating Manual Enter the desired concentration followed by the desired units. See Figure 10-67. Figure 10-67 Entering Desired Concentration The Shift RTs option allows the predicted retention time for the highlighted analyte to be shifted by a desired amount of time. To shift the retention time: Click Shift RTs.
- Page 349 HAPSITE ER Operating Manual The Shift RT’s window will be displayed. See Figure 10-69. Figure 10-69 Shift RTs Select Add or Subtract from the drop-down menu. See Figure 10-70. Figure 10-70 Add or Subtract Type in the desired amount of time. See Figure 10-71.
-
Page 350: Template/Calibration Files
HAPSITE ER Operating Manual 10.10.6 Template/Calibration Files The first column will display the names of the files that were used to create the calibration curve, time that the file was saved, the concentration of the file and the units. See Figure 10-74. - Page 351 HAPSITE ER Operating Manual The default window that will be displayed is the Internal Standard Calibration Response Table. See Figure 10-76. This table will display the file names, the area of the peak and the response factor (the ratio between the signal produced by the analyte and the quantity of the analyte which produces a signal).
- Page 352 HAPSITE ER Operating Manual Selecting All will display the information contained in the Internal Standard Calibration Report and the Analyte Standard Calibration Report. (See Figure 10-78.) Figure 10-78 All The Cal/Quant Report can be viewed by selecting Calibration Report from the drop-down menu.
-
Page 353: Data Page
HAPSITE ER Operating Manual 10.11 Data Page The Data Page customizes the names and the storage location of the data files for the method. See Figure 10-80. Figure 10-80 Method Editor Data Page 10.11.1 Data File Information Use default filename ... When checked, the method will use a default format for the data filename. -
Page 354: Date And Time Appendix
HAPSITE ER Operating Manual Figure 10-81 Use Default Filename File increment digits ... Sets the number of digits appended to the data file name. By default, File Increment Digits is set to three digits. - Page 355 Figure 10-86 As Prefix Save Data to Removable Drive . . . Data is saved to the USB on the HAPSITE ER as well as to the HAPSITE ER hard drive in the folder (directory) shown immediately above this check box.
-
Page 356: Data Display
HAPSITE ER Operating Manual 10.11.3 Data Display A Manual Response Y number can be entered, which will scale the Y-axis of the chromatogram to the desired counts. If there is not a number in this section, the TIC will automatically scale to the largest number. See Figure 10-87. -
Page 357: Summary Page
HAPSITE ER Operating Manual 10.12 Summary Page The Summary page provides selections to display the selected components of the method in a text report. The method settings can be reviewed in this report before the method is saved. See Figure 10-88. - Page 358 If more than one unit is connected to the laptop, click on the name of the desired HAPSITE ER. See Figure 10-90. Figure 10-90 Selecting Desired HAPSITE ER Click the HAPSITE Method Sequence option. See Figure 10-91. Figure 10-91 HAPSITE Method Sequence If desired, type in a new name for the method.
- Page 359 HAPSITE ER Operating Manual Click the button that is highlighted in the figure below. See Figure 10-93. Figure 10-93 Click Highlighted Button Double-click on the desired folder to access the desired method. For instructions on selecting folders, refer to section 8.3, Accessing the Data Review Feature, on page 8-2.
- Page 360 HAPSITE ER Operating Manual Select Sleep until to enter a specific time. For example, if 1:30 is entered, the second method will start at 1:30 a.m. See Figure 10-95. NOTE: Sleep until uses 24 hour notation. Figure 10-95 End Run...
- Page 361 HAPSITE ER Operating Manual Figure 10-97 Saving Method Select the desired location for saving the method. The method can be saved to the laptop or the HAPSITE by clicking the desired option at the top of the window. 10 - 68...
-
Page 362: Introduction To Quantitative Analysis
Prepare the standards as necessary to achieve the desired concentrations. Run each standard separately on HAPSITE ER using the desired method. Each standard will have its own separate run. The method used for HAPSITE ER can be a default method or custom method created with the Method Editor. See Chapter 11, Calibration. - Page 363 HAPSITE ER Operating Manual Click the Data File Information window. (See Figure 11-2.) Figure 11-2 Data File Information Enter in the concentration and the units into fields highlighted in Figure 11-1. NOTE: If desired, a description can be entered into the Description field.
- Page 364 HAPSITE ER Operating Manual Selecting the Calibrate function will display a dialog box used to select either an Analyze (GC/MS) method or a Survey method. The Select Method First box should remain checked. Click OK. (See Figure 11-5.) Figure 11-5 Selecting the Type of Quantitative Method The Method File window will be displayed if the Select Method First box remained checked.
- Page 365 HAPSITE ER Operating Manual If the Select Method First box was unchecked, select the Browse button in order to select a method file. (See Figure 11-7.) Figure 11-7 Browse button Click the Browse button under Data Files. Select the desired data file for library template creation.
- Page 366 HAPSITE ER Operating Manual Set the Concentration Reference to Global or Analyte. (See Figure 11-11.) NOTE: Select Global for standards that contain analytes that have the same concentration. This is most common with liquid standards diluted into a liquid. NOTE: Select Analyte for standards that contain analytes with different concentrations.
- Page 367 HAPSITE ER Operating Manual Set Peak Search to Search. (See Figure 11-14.) Figure 11-14 Setting Peak Search Check Select. (See Figure 11-15.) Figure 11-15 Select Click Start. (See Figure 11-16.) Figure 11-16 Start All compounds that have been identified by AMDIS will be labeled with a red T over the apex of the peak.
- Page 368 HAPSITE ER Operating Manual The highlighted compound in the library template will correspond to the peak with the red dotted line. (See Figure 11-18.) Figure 11-18 Peak Correspondence Verify that all analytes have a Net Fit greater than 70 by hovering the mouse over the analyte name.
- Page 369 HAPSITE ER Operating Manual If unidentified compounds are present, which are indicated by a blank row, right click on a compound and select Clear All Empty Compound Entries. (See Figure 11-21.) Figure 11-21 Clear All Empty Compounds Click Yes to confirm the deletion of the unidentified compounds. (See Figure 11-22.)
- Page 370 HAPSITE ER Operating Manual If a compound was not correctly identified, type in the correct name. Alternately, the down arrow next to the compound name can be used to select a different name if AMDIS has identified more than one possible match. (See Figure 11-25.)
- Page 371 HAPSITE ER Operating Manual NOTE: When adding more than one quant ion, the following message will be displayed. Click Yes to allow for the recalibration to continue. (See Figure 11-28.) Figure 11-28 Recalibration Enter the lowest concentration of each analyte into the Conc column if Analyte has been selected.
- Page 372 HAPSITE ER Operating Manual Save the template by clicking the Save Library button. (See Figure 11-31.) Figure 11-31 Save Library Enter a library name and a user name. (See Figure 11-32.) Figure 11-32 Entering Library and User Name Click OK. (See Figure 11-33.)
- Page 373 HAPSITE ER Operating Manual To calibrate the library, click Browse to select the desired data files. (See Figure 11-34.) Figure 11-34 Browse to Select Data File Select Calibrate Library. (See Figure 11-35.) Figure 11-35 Calibrate Library Check all of the data files and click the Start button under Peak Search. (See Figure 11-36.)
- Page 374 HAPSITE ER Operating Manual Review the curves for each analyte by clicking the Calibrate tab. (See Figure 11-38.) Figure 11-38 Calibrate tab Click each analyte to display the corresponding calibration curve. The curve should fit the data points. The drop-down menu provides four curve fit options: Linear, Linear, Forced through the Origin, Quadratic and Quadratic, Forced through the Origin.
- Page 375 HAPSITE ER Operating Manual It is possible to delete points from the calibration curve. (See Figure 11-41.) NOTE: Removal of points in the middle of a calibration curve is contrary to established analytical standards. Points can be removed from the highest and lowest level of the curve, but this will affect the calibration range.
- Page 376 HAPSITE ER Operating Manual Click Delete. (See Figure 11-43.) Figure 11-43 Deleting Point NOTE: If a point was inadvertently deleted, the original calibration points can be restored by clicking the Restore Initial Record button. (See Figure 11-44.) Figure 11-44 Restoring Initial Record If a point is missing because it does not meet the peak search criteria, the peak search parameters can be adjusted.
- Page 377 HAPSITE ER Operating Manual To recalibrate the library with the new parameters: Check the Reset Library box. (See Figure 11-46.) Figure 11-46 Reset Library Verify that the Peak Search is set to Search. (See Figure 11-47.) Figure 11-47 Search 11 - 16...
- Page 378 HAPSITE ER Operating Manual Click Start. (See Figure 11-48.) Figure 11-48 Start Repeat Step 17 through Step When the method is satisfactory, click Save Library. (See Figure 11-49.) Figure 11-49 Saving Library Click OK. (See Figure 11-50.) Figure 11-50 Clicking OK...
- Page 379 HAPSITE ER Operating Manual Save the library to the method by clicking Save. (See Figure 11-51.) Figure 11-51 Saving Library to the Method Click OK. (See Figure 11-52.) Figure 11-52 Clicking OK 11 - 18...
-
Page 380: Definition Of Terms In The Calibrate Window
HAPSITE ER Operating Manual 11.3 Definition of Terms in the Calibrate Window Figure 11-53 Calibrate Window 11.3.1 Method Browse ..... . Allows the user to select a method for calibration. -
Page 381: Peak Search
HAPSITE ER Operating Manual Conc/Factor....Data file concentration of analytes if Global is selected, or concentration multiplier if Analyte is selected. Selection ....If checked, file will be processed upon clicking Start. -
Page 382: Analytes
HAPSITE ER Operating Manual 11.3.4 Analytes Analytes in Library... . . Displays the analytes in the library. Analytes in File....Displays the analytes in the currently displayed or selected file. - Page 383 HAPSITE ER Operating Manual Click on an empty row without an identification. (See Figure 11-55.) Figure 11-55 Unidentified Compound Click the NIST Search button. (See Figure 11-56.) Figure 11-56 NIST Search The identification from the NIST library will be displayed. (See Figure 11-57.)
-
Page 384: Extracted Mass Peaks
HAPSITE ER Operating Manual Q Ion ......Shows the Quantitation Ion for the analyte. Ret. Time ..... Show the Retention Time for the analyte. -
Page 385: Calibration
HAPSITE ER Operating Manual 11.3.7 Calibration Displays the calibration curve and curve statistics for the selected analyte. (See Figure 11-59.) Figure 11-59 Calibration tab 11.4 Build/Edit Template Menu When Build/Edit template is selected, right-clicking on the template will display the following options: Duplicate Row. - Page 386 HAPSITE ER Operating Manual Select the type of file. (See Figure 11-61.) Figure 11-61 Select File Type Verify that the Select Method First box is checked. (See Figure 11-62.) Figure 11-62 Select Method First Click OK. (See Figure 11-63.) Figure 11-63 Click OK Select the desired method file.
- Page 387 HAPSITE ER Operating Manual Click Browse in the Data Files section for the desired data file. (See Figure 11-65.) Figure 11-65 Browse Select the desired data file. (See Figure 11-66.) Figure 11-66 Selecting Data File Click Start to open the Quant Report and the chromatogram. (See Figure 11-67.)
- Page 388 HAPSITE ER Operating Manual Click Close to exit the Quant Report. (See Figure 11-68.) Figure 11-68 Closing Quant Report If the compound is part of the calibration library, ID Unknowns will label the peak with a “T”. (See Figure 11-69.)
-
Page 389: Definition Of Terms In The Id Unknowns Window
HAPSITE ER Operating Manual If the compound is not part of the calibration library, it is necessary to use AMDIS (refer to Analyzing Data Using AMDIS, see section 8.5 on page 8-16) or NIST (NIST Library Searches, see section 8.6 on page 8-24) to make an identification. -
Page 390: Data Files
HAPSITE ER Operating Manual Search Settings ....Displays the search parameter settings. See section 8.7.0.2, Peak Search Parameters, on page 8-33. Unknown Reports By File ....Displays report by file. - Page 391 HAPSITE ER Operating Manual View Report....Displays the selected calibration report. # ......Shows the analyte number in the library.
-
Page 392: Display Function
HAPSITE ER Operating Manual 11.7 Display Function The Display button in the Data Files section of both Calibrate and ID Unknowns shows the chromatogram and spectrum of the selected data file. This feature is beneficial when reviewing and revising identifications, selecting spectral peaks, adding to a library and manually integrating peak areas. -
Page 393: Introduction
HAPSITE ER Operating Manual Chapter 12 Maintenance 12.1 Introduction This chapter outlines basic maintenance and troubleshooting procedures. It also provides an overview of common errors. 12.2 HAPSITE Symptom - Cause - Remedy Chart Table 12-1 Diagnosing Problems - HAPSITE Symptom... - Page 394 Probe is not recognized by the The probe is not fully inserted into Insert the probe into the port until it HAPSITE ER, but appears to be the port. clicks into place. plugged into the port Bent or broken pins on LEMO plug. Gently straighten bent pins and reinsert probe.
- Page 395 HAPSITE ER Operating Manual Table 12-1 Diagnosing Problems - HAPSITE (continued) Symptom Cause Remedy Elevated baseline Background contamination, MS Run a noise check in manual tune leak, or improper MS tune. to verify MS is not leaking. Manually tune unit according to instructions in Chapter 9.
- Page 396 INFICON service personnel. WARNING Attaching or venting HAPSITE ER with a NEG that has not cooled will cause total NEG consumption and possibly result in severe damage to the HAPSITE Mass Spectrometer components. It may also result in physical injury since extreme heat generation from NEG consumption will create hot surfaces.
-
Page 397: Saturation Of The Probe And Probe Line
Analyze (GC/MS) Mode. 12.3.0.2 Decontaminate Saturation Remove the probe from HAPSITE ER. Hold the probe and probe line in a “U” shape. Holding the probe, pour methanol from a squeeze bottle into the probe nut. -
Page 398: Attaching Hapsite To The Service Module
HAPSITE ER Operating Manual the Service Module, on page 12-6. The high pressure error may also indicate that the NEG pump is worn and needs replacing. (See Figure 12-1.) Please continue reading for information on how to troubleshoot NEG pumps. -
Page 399: Attaching Hapsite To The Service Module Using Iq Software
HAPSITE ER Operating Manual NOTE: If the HAPSITE is turned on with the NEG at 400 C, then the NEG must be cooled before preceding. Turn off the HAPSITE and allow it to cool for approximately 24 hours or until the NEG is at room temperature. - Page 400 HAPSITE ER Operating Manual CAUTION Prior to attaching HAPSITE to the Service Module, unplug the black NEG cable inside the HAPSITE front panel. This will ensure that the NEG will not heat when using the Service Module to provide vacuum.
-
Page 401: Attaching Hapsite To The Service Module Using The Hapsite Front Panel Controls
HAPSITE ER Operating Manual Are you sure you want to attach the service module? confirmation message is displayed. Click Yes. (See Figure 12-5.) Figure 12-5 Confirmation message The Roughing Pump will start first, then the Turbo Pump will begin, as shown... - Page 402 HAPSITE ER Operating Manual Figure 12-8 STOP PREPARE button ◄▲▼► If using the push button keys, highlight STOP PREPARE with Tap OK SEL. (See Figure 12-9.) Figure 12-9 Arrow Keys The SYSTEM IS NOT READY message will appear at the top of the screen.
- Page 403 HAPSITE ER Operating Manual ◄▲▼► Tap the ATTACH SM button or using highlight the ATTACH SM button and tap OK SEL. (See Figure 12-11.) Figure 12-11 Service Model Attach Button A status bar displaying the progress of the attach procedure will be displayed.
-
Page 404: Bakeout Procedure
A bakeout can be performed with or without the use of the Service Module. A bakeout heats the NEG pump to 700°C for a specified length of time. (The default time setting is two hours). Contact INFICON technical support before performing this procedure. -
Page 405: Reactivating The Neg Pump
12-15.) Figure 12-15 Service window If the bakeout is complete, run a blank method. If the bakeout was successful HAPSITE ER will be operational. If the bakeout was unsuccessful, a high pressure error will occur. 12.6.1 Reactivating the NEG Pump Reactivating the NEG pump requires having the Service Module attached to HAPSITE for at least 22 hours. - Page 406 HAPSITE ER Operating Manual Figure 12-16 Service Button on the Service Module tab Use the Activate NEG settings below as a guideline. However, change the HAPSITE Pumpdown Time to 180. (See Figure 12-17.) Figure 12-17 Service window Click the Activate NEG button.
-
Page 407: Part Numbers
NEG Pump Installed, Blue 930-2100-G21 HS Analytical Module w/Standard Column NEG Pump Installed, Blue 930-850-G5 120V HAPSITE ER 930-850-G6 230V HAPSITE ER Continental Europe 930-850-G7 230V HAPSITE ER United Kingdom 930-850-G8 230V HAPSITE ER Australia/China 930-206-G6 Hand Control Unit, Green... -
Page 408: Hapsite Er Accessories
068-002 ..... . Battery Charger / Service Module Power Cord, U.S. 074-5009-G1 ....HAPSITE ER User Guide CD Cables 600-1319-G2 . -
Page 409: Hapsite Consumables
HAPSITE ER Operating Manual 930-249-G2 ....Concentrator Cover 930-250-G1 ....Sample Loop Cover Concentrator Tubes 930-251-G1 . -
Page 410: Headspace Spare Parts
HAPSITE ER Operating Manual 930-4611-P1....Extended Life Carrier Gas (110 liter cylinder) Internal Standard Canisters 930-433-P6....Canister, Internal Standard Gas, 6 each 930-433-P12. -
Page 411: Service Module Spare Parts
HAPSITE ER Operating Manual Line Insulation 931-401-P3....4 ft Line 931-409-P2....6 ft Line 931-405-P1. -
Page 412: Glossary
HAPSITE ER Operating Manual Chapter 14 Glossary 14.1 Glossary Air peak ..... . A response by the mass spectrometer to the components of air. - Page 413 HAPSITE ER Operating Manual Column ..... . The column is a long glass capillary which is lined with a material (called the “stationary phase”) with which the analytes interact...
- Page 414 (if selected). Mass Calibration ....A function of the HAPSITE ER which uses internal standard gas to check the alignment of masses, and also to check the relative intensities of the tune masses.
- Page 415 PEEK ......A contamination resistant material used for a number of fittings in the HAPSITE ER. 14 - 4...
- Page 416 HAPSITE ER Operating Manual Phase......The coating on the inside of the gas chromatograph column by which organic vapors are retained.
- Page 417 HAPSITE ER Operating Manual % RSD ..... . . Percent Relative Standard Deviation. This is a measure of the linearity (using...
- Page 418 VSO Valve ....Voltage Sensitive Orifice valve. This valve uses voltage applied to the valve to control the size of its orifice. This in turn controls the flow rate of gas through the HAPSITE ER. 14 - 7...
-
Page 419: Hapsite Target Compounds
HAPSITE ER Operating Manual Chapter A HAPSITE Target Compounds A.1 Compounds in Order of Elution Name Formula Quantion I.S. CAS # Chloromethane CH3Cl 0.08 74-87-3 Vinyl Chloride CH2=CHCl 0.11 75-01-4 Bromomethane CH3Br 0.17 74-83-9 Chloroethane CH3CH2Cl 0.19 75-00-3 Acetone CH3COCH3 0.27... -
Page 420: Calibrating Gas Mixtures
HAPSITE ER Operating Manual Appendix B Calibrating Gas Mixtures B.1 Acquisition, Preparation, and Handling CAUTION Failure to calibrate the instrument may give you inaccurate identifications when sampling. WARNING When using chemicals, wear the appropriate PPE according to the MSDS. HAPSITE (or any GC/MS instrument) must be calibrated at one or more concentration levels of the organic compound(s) of interest for quantitative analysis. -
Page 421: Using Cylinders Charged With Each Concentration
HAPSITE ER Operating Manual B.1.1.1 Using Cylinders Charged with Each Concentration A gas supplier (such as Scott Specialty Gases ) can provide a choice of cylinder sizes with the compounds of interest mixed in a suitable matrix at the requisite concentrations. -
Page 422: Diluting The Gas On-Site
HAPSITE ER Operating Manual B.1.1.2 Diluting the Gas On-site Guidelines to verify acceptable performance of suitable dynamic gas mixing/dilution systems are suggested in the Federal Register (vol. 59, No. 148, Aug. 3, 1994 Proposed Rules, 40 CFR Part 51 Method 205). -
Page 423: Inert Sample Bag
1/4 in. size and a short vent line to a fume hood or other exhaust system. The smaller “leg” of the sampling tee is coupled to the HAPSITE ER. The total flow to the sampling tee should be approximately 1 liter/min. to allow sufficient excess over the HAPSITE sampling flow rate which is approximately 100 cc/min. -
Page 424: Gas Cylinder Safety, Contamination Checks, And Corrective Steps
The 1/8 in. end of the adapter is a swaged connection to the 1/8 in. male Swagelok fitting on the end of the HAPSITE ER probe, so wrenches will be required to make a leak free connection. - Page 425 HAPSITE ER Operating Manual A supply of clean Tedlar bags can be useful for quick standards preparation by direct liquid injection of VOC's not regularly analyzed into an N or air matrix in the bags. This allows a more convenient and rapid alternative to gaseous cylinder mixes in such uses as new applications development or verification of unknown VOCs by component spiking.
-
Page 426: Shipping The Hapsite And Consumables
However, these boxes will not suffice for frequent shipping. A heavy-duty fitted shipping case for HAPSITE is available from INFICON (part number 930-464-P1). The case for the Service Module is part number (930-465-P1). The protection provided by these cases will allow the instruments to survive handling by most airline, air freight and trucking handlers. - Page 427 HAPSITE ER Operating Manual INFICON and order the required gases to be shipped directly to the site. If previously purchased gases are to be shipped, the original cartons can be used. If new cartons must be used, refer to the old shipping packages for the required labeling.
-
Page 428: Empty Canisters
HAPSITE ER Operating Manual Although the airline will carry the box of canisters in the same cargo hold as the baggage, they will not accept hazardous materials at the check-in counter. Take the box of canisters with the form filled out to the desk of your airline at the air freight terminal at your airport. - Page 429 HAPSITE ER Operating Manual Index Symbols column 2-3, 14-2 compounds % RSD 14-6 CONC Button 4-53 ConcCooldown 10-16 Concentrator in Portable Mode 4-25, curve statistics 11-21 samples Customer Support alignment 14-1 Repair Service AMDIS 11-21, 14-1 Sales library 10-37 Technical Support...
- Page 430 HAPSITE ER Operating Manual HSPurge 10-16 molecular weight 14-4 multiplier voltage 14-4 nitrogen flow pressure 10-20 purge 14-5 sample 10-16 bakeout 12-12 reactivating 12-13 I.S. Reference 14-3 troubleshooting 12-5 Info Icon 4-41 NEG Button 4-52 Inlet State Net Button 4-58...
- Page 431 HAPSITE ER Operating Manual Selecting a New Method on Laptop 6-11 sensitivity 10-40 shipping canisters HAPSITE signal to noise ratio 10-26 SIM 10-9, 10-26, 14-6 Survey 10-29 SituProbe inlet states 10-17 nitrogen flow pressure 10-20 components spectrometer control Standby 10-16...
- Page 432 HAPSITE ER Operating Manual 074-471-P1D © 2017 INFICON...
Need help?
Do you have a question about the HAPSITE ER and is the answer not in the manual?
Questions and answers