Advertisement
Quick Links
RP1 Big Deal Pawn
RP2 River Pass
RP3 Margaret's
Volunteer Fire Dept.
Market/ Boot Repair
RP6 River Pass
RP7 Dyden #2
RP8 Floyd's Barbershop/
Apts.
Binder Book Shop
River Pass
LAYOUT
RP11 Patriot
RP12 River's Hotel
RP13 Dyden #1
Appliance
RIVER PASS BUILDING KITS GENERAL INSTRUCTIONS
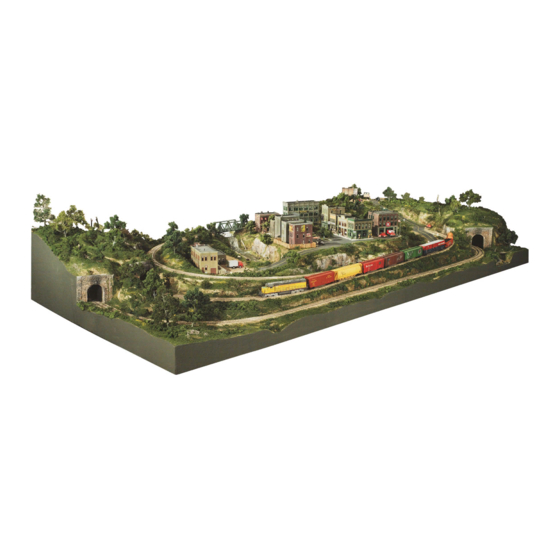
With 15 separate HO scale buildings and more than 200 detailed accessories, River Pass Building Kits are a great way to add
structures and detail to your model railroad layout. These easy-to-assemble buildings were created for the 4x8-foot HO scale River
Pass: however, they can be used on any HO scale layout.
RP4 Dyden #3
RP5 Main Street
River Pass consists of three separate kits: the River Pass Layout Kit #1 (ST1484), River Pass Scenery Kit #2 (S1488) and the River
Apts.
Pass Building Kits #3 (S1487).
RP1 . . . . . . . . . . Big Deal Pawn
RP2 . . . . . . . . . . River Pass Volunteer Fire Dept.
RP3 . . . . . . . . . . Margaret's Market/ Boot Repair
RP4 . . . . . . . . . . Dyden #3
RP5 . . . . . . . . . . Main Street Apts.
RP9 Rosie's/Antiques
RP10 Don's Hardware
TRAILER
CRATES &
BARRELS
ANIMALS
LAUNDRY
AWNINGS
FENCING
ADDITIONAL ITEMS INCLUDED WITH KIT
Transfer Decal sheet - 1 • Billboard signs - 6 • Signs & Flags - 30 • Window Canopies - 12 • Awnings - 2 • Plaster Dock - 1 • Plaster Steps - 1
PLACEMENT INSTRUCTIONS
We have included a "footprint" on the back page showing the placement of the buildings used on River Pass. Since the buildings are packaged and
assembled individually, you can use any arrangement you wish.
Each building includes its own set of instructions. The following is a list of General Instructions for preparing, gluing and painting the individual parts and
castings.
The various white metal castings and details can be placed on the layout anywhere you wish. For instance, the barrels, crates and skids can sit next to
RP14 Merls Dry
RP15 Dad's Museum
the factory or behind the buildings. Street lights and light poles should be placed in front of buildings next to a street.
Goods
WOODLAND SCENICS • P.O. BOX 98 • LINN CREEK, MO 65052 • www.woodlandscenics.com
WOODLAND SCENICS
®
BUILDING LIST
RP6 . . . . . . . . . . River Pass Apts.
RP7 . . . . . . . . . . Dyden #2
RP8 . . . . . . . . . . Floyd's Barber/Binder Book Shop
RP9 . . . . . . . . . . Rosie's/Antiques
RP10 . . . . . . . . . Don's Hardware
DETAILS LIST
Part No.
Name
Qty.
Part No.
Name
1
Bed
1
BILLBOARD
30
Billboard
2
Side boards
2
31
Catwalk
3
End Board
1
32
Light Bar
4
Axle
1
33
Outer Brace
5
Wheels
2
34
Inner Brace
6
55 Gallon Drum
9
ROOF
35
Med. Roof Vents
7
3 Barrel Grouping
1
ACCESSORIES 36
Lg. Roof Vent
8
10 Crates/1 Barrel
37
Ex. Lg. Roof Vent
Group
1
38
Roof Hatches
9
4 Crates/1 Barrel
39
Double Chimney
Group
1
40
Septic Vents
10
Crates of Fruit Group 2
41
Chimney W/Vent
11
Basket of Fruit
1
AUTOMOTIVE
42
Truck Tires
12
Whisky Barrels
PARTS
43
Car Tires
W/Flowers
2
44
Wheels (12 spoke)
13
Empty Crates
2
45
Wheels (6 spoke)
14
Sm. Crates
2
46
Tractor Wheels
15
Med. Crates
2
47
Rear End Axle
16
Lg. Crate
1
48
Radiator W/Lights
49
Muffler & Tail Pipe
17
Doghouse
1
50
Car Ramps
18
Dogs
3
19
Cat
1
SIGNS
51
Sidewalk Sign
52
Dad's Sign Topper
20
Pants
2
53
Sign Boards
21
Shirts
2
54
Road Signs
22
Briefs
1
55
Sandwich Board
56
Barber Post
23
Large Awing
1
24
Small Awning
1
TRASH/JUNK
57
Dumpster
58
Trash Cans
25
Picket Fence W/Post 2
59
Trash Can/Barrel
26
Picket Fence Without
60
Trash Can/Crate
Post
2
61
Trash Can Spilled
27
Picket Fence Gate
1
62
Trash Can W/Lid off
28
Wooden Fence Sm.
3
63
Oil Drum W/Pump
29
Wooden Fence Lg.
1
64
Drum W/Trash
65
Smashed Drum
66
Misc. Junk
67
Skids W/Junk
Black paper. - 12 (7 3/4" X 4 1/2") • Wire for Flagpole - 1 (3") • Fence Material - 3 • Fence Posts - 8 • Dry
S1487
RP11 . . . . . . . . . Patriot Appliance
RP12 . . . . . . . . . River's Hotel
RP13 . . . . . . . . . Dyden #1
RP14 . . . . . . . . . Merls Dry Goods
RP15 . . . . . . . . . Dad's Museum
Qty.
Part No.
Name
Qty.
1
LIGHTS
68
Yard Light on Post
1
1
69
Flood Lights
6
2
70
Flood Lights/Bracket 2
2
71
Pole for Utility Light
1
1
72
Utility Light
1
73
Street Lights
6
9
74
Ladders
4
1
75
Lamp Posts
2
1
DETAILS
76
Mail Sack
1
8
77
Cinder Blocks
18
1
78
Electric Meter Box
1
9
79
Double Electric Meter 1
1
PAINTING
80
Pipes
4
4
We recommend airbrushing with solvent-based
81
Pipe Valve Handle
2
6
82
Wooden Kegs
3
enamel paints, such as Floquil. Use water-
3
3
83
Aluminum Kegs
3
soluble flat paint, such as Polly 'S' for brushing
84
Mail Drop Box
1
2
(color is your choice). See photo on box for
85
Small Louver
1
1
suggested coloring. Paint roofs in flat tones and
86
Benches
4
1
vary colors to resemble weathering and enhance
87
Bench W/Books
1
1
88
Lawn Mower
2
2
shingle detail. Color of window and door frames
89
Down Spouts
4
can match or contrast with building. Building
1
90
Flour Sack Pile
1
may be aged with chalks, or lightly misted by
1
91
Skids
12
7
airbrushing with thinned flat black paint such
92
Pop Machine
1
2
93
Man Sleeping
1
as Floquil "Grimy Black." Small details painted
1
94
Man Sitting
1
in contrasting colors will enhance the building's
1
appearance. Scrape paint from glue points as
95
Hand Cart
1
1
necessary. Walls and other parts may be painted
96
Hand Cart W/2 Crates 1
4
97
Water Can
1
before assembling. If buildings are painted after
1
98
Washing Machine
1
assembly, be careful not to paint over the clear
1
99
Shovels
2
1
window material.
100
Tool Grouping
1
1
101
Spooled Cable
3
1
DRY TRANSFER DECAL INSTRUCTIONS
102
Propane Cylinder
1
1
A. Place Dry Transfer Decals on proper building
1
FISHING DOCK 103
Dock Floor
1
as indicated on decal sheet, i.e. RP1, RP2, RP3,
12
104
Sm. Dock Supports
2
3
105
Lg. Dock Supports
2
etc.
B. Place sheet with decal pressed against
surface. Hold sheet firmly so decal will not move
while applying. Rub top of sheet over desired
*Hydrocal is a product of US Gypsum
decal with a burnisher or dull pencil.
C. Carefully remove decal sheet. If transfer was
incomplete, let sheet fall back into place and
repeat procedure.
D. Place backing paper over decal and reburnish
to set the decal in place.
TIP: If decals are fragmented, they can still be
used. This effect adds a realistic, weathered look.
©2002 OCO MADE IN USA
PREPARATION OF PLASTIC PARTS
Use a hobby knife or
diagonal cutters (i.e.
Fiskars) to remove
excess plastic
created by molding
process. Do not cut
into details.
Sand draft angles (left from molding process)
from edges of all the molded parts that will
be glued until edges are flat. Tack 100 grit
sandpaper to flat surface. Make sanding area
longer than the longest wall of the model. Using
squaring block, keep edges flat and hold panels
square as you sand. Move wall panel, not the
block. Sanding is essential to achieve proper
fit later. Be careful not to sand into detail of
buildings. Lightly sand or file the smooth sides
and bottom of chimneys for proper fit.
To glue plastic walls and pieces use plastic
model cement or solvent.
PAINTING & DETAILING PLASTIC PARTS
Advertisement

Related Manuals for WOODLAND SCENICS RIVER PASS S1487


Summary of Contents for WOODLAND SCENICS RIVER PASS S1487
- Page 1 Street lights and light poles should be placed in front of buildings next to a street. Appliance Goods WOODLAND SCENICS • P.O. BOX 98 • LINN CREEK, MO 65052 • www.woodlandscenics.com ©2002 OCO MADE IN USA...
- Page 2 Follow these instructions for preparing the For the rest of the kits, proceed as follows. Measure inside dimensions of roof opening(s). Draw measurements on cardboard, then cut out and line of Woodland Scenics Dry Transfers and castings. Refer to box photos for some general placement test fit cardboard.
- Page 3 ® STRUCTURE KIT VEHICLES AND FIGURES NOT INCLUDED MADE IN USA ©2002 OCO Scale Model Materia #RP1 WOODLAND SCENICS BIG DEAL PAWN P.O. BOX 98, LINN CREEK, MO 65052 2 3/4" W x 4" D x 4 7/8" H www.woodlandscenics.com...
- Page 4 #RP1 WOODLAND SCENICS ® Big Deal Pawn Please follow the River Pass General Instructions which are enclosed in this kit. You will be referred to the drawings and notes printed here. Please read through all instructions before beginning to build your kit. Chimneys Lightly sand bottom edge of chimney backs (RP1-5 and RP1-6) flat.
- Page 5 STRUCTURE KIT VEHICLES AND FIGURES NOT INCLUDED MADE IN USA ©2002 OCO #RP2 RIVER PASS VOLUNTEER FIRE Scale Model Materia DEPARTMENT WOODLAND SCENICS 4 3/4" W x 5" D x 5" H P.O. BOX 98, LINN CREEK, MO 65052 www.woodlandscenics.com...
- Page 6 #RP2 River Pass WOODLAND SCENICS ® Volunteer Fire Department Please follow the River Pass General Instructions which are enclosed in this kit. You will be referred to the drawings and notes printed here. Please read through all instructions before beginning to build your kit. The firehouse can be modified to create two open doors.
- Page 7 STRUCTURE KIT VEHICLES AND FIGURES NOT INCLUDED MADE IN USA ©2002 OCO #RP3 MARGARET’S MARKET/ Scale Model Materia WOODLAND SCENICS BOOT REPAIR P.O. BOX 98, LINN CREEK, MO 65052 2 3/4" W x 4" D x 4 3/8" H www.woodlandscenics.com...
- Page 8 #RP3 WOODLAND SCENICS ® Margaret’s Market/ Boot Repair Please follow the River Pass General Instructions which are enclosed in this kit. You will be referred to the drawings and notes printed here. Please read through all instructions before beginning to build your kit. Chimney Lightly sand bottom of chimney (RP3-5) and glue to roof after roof installation.
- Page 9 WOODLAND HO SCALE SCENICS ® STRUCTURE KIT MADE IN USA ©2002 OCO Scale Model Materia #RP4 WOODLAND SCENICS DYDEN #3 P.O. BOX 98, LINN CREEK, MO 65052 6 3/4" W x 3 1/4" D x 4 1/4" H www.woodlandscenics.com...
- Page 10 #RP4 WOODLAND Dyden #3 SCENICS ® Please follow the River Pass General Instructions which are enclosed in this kit. You will be referred to the drawings and notes printed here. Please read through all instructions before beginning to build your kit. Chimneys Lightly sand bottom of chimney (RP4-8) and glue to roof after roof installation.
- Page 11 SCENICS ® STRUCTURE KIT FIGURES NOT INCLUDED MADE IN USA ©2002 OCO #RP5 MAIN STREET Scale Model Materia WOODLAND SCENICS APARTMENTS P.O. BOX 98, LINN CREEK, MO 65052 2 1/2" W x 4 1/4" D x 4 7/8" H www.woodlandscenics.com...
- Page 12 #RP5 WOODLAND SCENICS ® Main Street Apartments Please follow the River Pass General Instructions which are enclosed in this kit. You will be referred to the drawings and notes printed here. Please read through all instructions before beginning to build your kit. Chimneys Lightly sand bottom of chimneys (RP5-5) flat and glue to top edge of side walls.
- Page 13 SCENICS ® STRUCTURE KIT FIGURES NOT INCLUDED MADE IN USA ©2002 OCO #RP6 RIVER PASS Scale Model Materia APARTMENTS WOODLAND SCENICS P.O. BOX 98, LINN CREEK, MO 65052 2 1/2" W x 4 1/4" D x 4 7/8" H www.woodlandscenics.com...
- Page 14 #RP6 WOODLAND SCENICS ® River Pass Apartments Please follow the River Pass General Instructions which are enclosed in this kit. You will be referred to the drawings and notes printed here. Please read through all instructions before beginning to build your kit. Chimneys Lightly sand bottom of chimneys (RP6-5) flat and glue to top edge of side walls.
- Page 15 WOODLAND HO SCALE SCENICS ® STRUCTURE KIT MADE IN USA ©2002 OCO #RP7 Scale Model Materia DYDEN #2 WOODLAND SCENICS 6 1/4" W x 5 3/4" D x 3 1/2" H P.O. BOX 98, LINN CREEK, MO 65052 www.woodlandscenics.com...
- Page 16 #RP7 WOODLAND Dyden #2 SCENICS ® Please follow the River Pass General Instructions which are enclosed in this kit. You will be referred to the drawings and notes printed here. Please read through all instructions before beginning to build your kit. Chimney Lightly sand bottom edge of chimney back until flat (RP7-1).
- Page 17 VEHICLES AND FIGURES NOT INCLUDED MADE IN USA ©2002 OCO #RP8 Scale Model Materia FLOYD’S BARBER SHOP/ WOODLAND SCENICS BINDER BOOK SHOP P.O. BOX 98, LINN CREEK, MO 65052 4 1/4" W x 2 3/4" D x 4 1/8" H www.woodlandscenics.com...
- Page 18 #RP8 WOODLAND SCENICS Floyd’s Barber Shop/ ® Binder Book Shop Please follow the River Pass General Instructions which are enclosed in this kit. You will be referred to the drawings and notes printed here. Please read through all instructions before beginning to build your kit. Chimney Lightly sand bottom edge of chimney back (RP8-6) flat.
- Page 19 WOODLAND HO SCALE SCENICS ® STRUCTURE KIT FIGURES NOT INCLUDED MADE IN USA ©2002 OCO #RP9 Scale Model Materia WOODLAND SCENICS ROSIE’S P.O. BOX 98, LINN CREEK, MO 65052 4 3/4" W x 3" D x 4 1/4" H www.woodlandscenics.com...
- Page 20 #RP9 WOODLAND Rosie’s SCENICS ® Please follow the River Pass General Instructions. You may be referred to the drawings and notes printed here. Please read through all instructions before beginning to build your kit. Chimneys Lightly sand bottom edge of chimney backs until flat (RP9-7). Sand or file the smooth sides of chimney backs and molded-in chimney fronts so back and front fit tightly and are flush with each other.
- Page 21 HO SCALE SCENICS ® STRUCTURE KIT FIGURES NOT INCLUDED MADE IN USA ©2002 OCO #RP10 Scale Model Materia DON’S HARDWARE WOODLAND SCENICS 4 3/4" W x 2 3/4" D x 4 1/2" H P.O. BOX 98, LINN CREEK, MO 65052 www.woodlandscenics.com...
- Page 22 #RP10 WOODLAND Don’s Hardware SCENICS ® Please follow the River Pass General Instructions. You may be referred to the drawings and notes printed here. Please read through all instructions before beginning to build your kit. Chimneys Sand the smooth sides of chimney halves (RP10-7) so they fit flush with each other; glue together. When completely dry, file or sand to and bottom, keeping edges flat and square so no rounding occurs.
- Page 23 SCENICS ® STRUCTURE KIT VEHICLES AND FIGURES NOT INCLUDED MADE IN USA ©2002 OCO #RP11 Scale Model Materia WOODLAND SCENICS PATRIOT APPLIANCE P.O. BOX 98, LINN CREEK, MO 65052 3" W x 4 1/2" D x 5 1/2" H www.woodlandscenics.com...
- Page 24 #RP11 WOODLAND Patriot Appliance SCENICS ® Please follow the River Pass General Instructions which are enclosed in this kit. You will be referred to the drawings and notes printed here. Please read through all instructions before beginning to build your kit. Chimney Sand the smooth sides of chimney halves (RP11-5) so they fit flush with each other;...
- Page 25 HO SCALE SCENICS STRUCTURE KIT ® VEHICLES NOT INCLUDED MADE IN USA ©2000 OCO Scale Model Materia #RP12 WOODLAND SCENICS RIVER’S HOTEL P.O. BOX 98, LINN CREEK, MO 65052 www.woodlandscenics.com 7 3/4" W x 2 3/4" D x 6" H...
- Page 26 #RP12 WOODLAND River’s Hotel SCENICS ® Please follow the River Pass General Instructions which are enclosed in this kit. You Window Sprues will be referred to the drawings and notes printed here. Please read through all instruc- To remove window sprues, we recommend using Fiskars Diagonal Cutters. If not tions before beginning to build your kit.
- Page 27 HO SCALE SCENICS ® STRUCTURE KIT FIGURES NOT INCLUDED MADE IN USA ©2002 OCO Scale Model Materia #RP13 WOODLAND SCENICS DYDEN #1 P.O. BOX 98, LINN CREEK, MO 65052 3" W x 4 3/4" D x 2 3/4" H www.woodlandscenics.com...
- Page 28 #RP13 WOODLAND Dyden #1 SCENICS ® Please follow the River Pass General Instructions which are enclosed in this kit. You will be referred to the drawings and notes printed here. Please read through all instructions before beginning to build your kit. Chimney Lightly sand bottom of chimney, retaining angle so that chimney sits straight when glued to roof.
- Page 29 SCENICS ® STRUCTURE KIT VEHICLES AND FIGURES NOT INCLUDED MADE IN USA ©2002 OCO Scale Model Materia #RP14 WOODLAND SCENICS MERL’S DRY GOODS P.O. BOX 98, LINN CREEK, MO 65052 www.woodlandscenics.com 3" W x 4 1/2" D x 6" H...
- Page 30 #RP14 WOODLAND SCENICS ® Merl’s Dry Goods Please follow the River Pass General Instructions. You may be referred to the drawings and notes printed here. Please read through all instructions before beginning to build your kit. Chimneys Lightly sand bottom edge of chimney backs (RP14-5). Sand or file the smooth sides of chimney backs and molded-in chimney fronts so back and front fit tightly and are flush with each other.
- Page 31 SCENICS ® STRUCTURE KIT VEHICLES AND FIGURES NOT INCLUDED MADE IN USA ©2002 OCO Scale Model Materia #RP15 WOODLAND SCENICS DAD’S MUSEUM P.O. BOX 98, LINN CREEK, MO 65052 2 3/4" W x 4" D x 4 7/8" H www.woodlandscenics.com...
- Page 32 #RP15 WOODLAND SCENICS ® Dad’s Museum Please follow the River Pass General Instructions. You may be referred to the drawings and notes printed here. Please read through all instructions before beginning to build your kit. Chimneys Lightly sand bottom edge of chimney backs (RP15-5). Sand or file the smooth sides of chimney backs and molded-in chimney fronts so back and front fit tight and are flush with each other.
- Page 34 Dyden Wool Mill Suggested WOODLAND Building Placement SCENICS ® Dyden Wool Mill is a wool manufacturer. Because of the company's growth in the wool industry, additional buildings were constructed on to the main building (Dyden #1). Dyden #2 was the first addition, then Dyden #3.
Need help?
Do you have a question about the RIVER PASS S1487 and is the answer not in the manual?
Questions and answers