Advertisement
Quick Links
INSTRUCTION BOOKLET
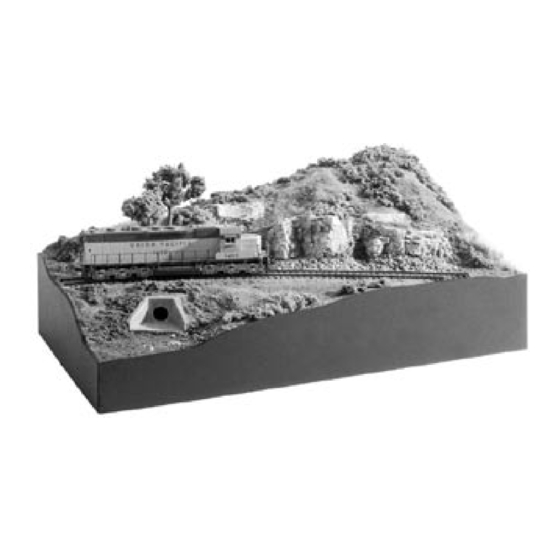
The Scenery Kit S927
We feel confident you will be happy with the display piece that you are about to build.
This kit includes the base and materials needed to construct a 10" x 18" diorama on
which you can display an engine, piece of rolling stock, or military model. We will
teach you how to use our terrain and landscaping systems.
Before you begin, identify the contents of the box as listed on the next page. Be
sure to save the cardboard box the items are packed in, because this will be used in
the construction. Make sure you have the additional items required for construction
available. Then, begin building!
Advertisement

Related Manuals for WOODLAND SCENICS S927


Summary of Contents for WOODLAND SCENICS S927
- Page 1 INSTRUCTION BOOKLET The Scenery Kit S927 We feel confident you will be happy with the display piece that you are about to build. This kit includes the base and materials needed to construct a 10" x 18" diorama on which you can display an engine, piece of rolling stock, or military model. We will teach you how to use our terrain and landscaping systems.
- Page 2 THE SCENERY KIT CONTENTS Listed below are the items contained in this kit. DESCRIPTION QUANTITY Pre-cut side frames: 1/8" thick hardboard Corner Blocks Pre-cut Sub-roadbed piece: 1/4" thick hardboard Cardboard packing box for the kit Plaster Cloth 5 sq.ft. Concrete Culvert Casting Strip of Liquid Pigments - Black, Burnt Umber, Yellow Ocher Sprayhead for bottle Scenic Cement...
- Page 3 BEGINNING CONSTRUCTION In this section of The Scenery Kit instructions you will assemble the hardboard base to which terrain and landscaping will be added. Check the illustrations carefully during assembly. Try to match your diorama to the drawings. Let all the glue dry completely before continuing.
- Page 4 C. Apply Scenic Glue generously to the taller edge and two wooden blocks of the other side section. With the pieces in an upright position, attach the side to the back section (right side). Make sure the edges are even and square. Use masking tape to hold in place until glue sets.
- Page 5 the Track-Bed against the sub- Fig. 7 roadbed. With a pair of scissors, SUB-ROADBED or a hobby knife, trim the ends of the Track-Bed to match the angles of the sub-roadbed. Set the Track-Bed aside for later. C. Apply Scenic Glue to the ends of the hardboard piece and attach inside the front and left sides of the base.
-
Page 6: Plaster Cloth
newspaper wads should create Fig. 9 a gentle slope which generally follows the contours of the back, sides and front of the hardboard frame but should be no higher than the illustrations show. A shallow ditch will later be formed along the back of the sub-roadbed piece, so leave the paper in this area lower than the sub-roadbed (Fig. - Page 7 create a clean, finished edge at Fig. 12 the front and back. D. Continue, adding the SHALLOW DITCH rest of the full sheets in the same manner, working from left to right on the diorama. Press each edge down firmly on the hardboard.
- Page 8 embankment beneath the track. E. Mix Lightweight Hydrocal to use as an adhesive. In a disposable container add 2 1/2 teaspoons of Lightweight Hydrocal to one teaspoon of water. Mix thoroughly with a craftstick. F. When using Lightweight Hydrocal as an adhesive, both surfaces must be wet for the adhesive to be effective.
- Page 9 E. Generously spread Lightweight Fig. 18 Hydrocal on the back of the rock castings and press into place on the Plaster Cloth. Hold in place until setting begins. F. Use any remaining Lightweight Hydrocal you have mixed to fill in behind the rock castings.
- Page 10 the color and add highlights. Dry completely. E. Shake the bottle of Scenic Cement to mix it. Attach the spray head to the bottle. Spray the Scenic Cement on the rock castings to set the color. Dry completely. F. Use the remaining Black wash (left from staining the Culvert), or make more if you need it, to add more color to the rock castings.
-
Page 11: Low Ground Cover
bottle. Save some Hob-e-Tac for Fig. 22 later use with trees and Field Grass. Lay the track in place. Place some weights on the track until the Hob-e- Tac dries. D. Open the bag of Ballast and pour an even amount over the track (Fig. -
Page 12: Medium Ground Cover
style. When you like the coloring, lightly overspray with Scenic Cement to help secure permanently. D. If you are using the diorama for something other than a model railroad display, you may wish to use the Earth or Soil Fine Turf to create a dirt road on the sub-roadbed area. Spray the area with Scenic Cement and shake on the Turf in a fairly heavy layer. - Page 13 C. Lightly overspray the Clump-Foliage Fig. 27a bushes with Scenic Cement. Use very light sprinklings of Burnt Grass and Yellow Grass Turf on top of the bushes for color highlights. Dry completely (Fig. 26c). D. Talus is the rock debris which collects beneath cliffs, around the base of mountains, and in and near water areas.
- Page 14 Fig. 30 Fig. 29c the other end evenly in an appropriate length (Fig. 29a). Dip the even end of the Field Grass in the Hob-e-Tac (Fig. 29b) and install where desired on the diorama (Fig. 29c). Continue adding random clumps of Field Grass. B.
- Page 15 It was skillfully produced for every level of modeler. It will show you how to create scenery the easy way. The Woodland Scenics video “The Clinic” (R990) is a live demonstration on using the various Terrain and Landscaping products in...
- Page 16 We hope you have enjoyed using the Woodland Scenics materials included in this kit. The following list gives you the Woodland Scenics product number for the terrain and landscape products in the kit. DESCRIPTION PRODUCT NUMBER GRAY BLEND BALLAST LIGHTWEIGHT HYDROCAL...
Need help?
Do you have a question about the S927 and is the answer not in the manual?
Questions and answers