Advertisement
Product Installation Guideline
SMVA21 (42030)
SPECIFICATIONS
This product has a unique design concept that eliminates the institutional look and provides anti-
ligature features and vandal resistant compliance.
Easy operation allows the shower to be activated with your palm or fingers.
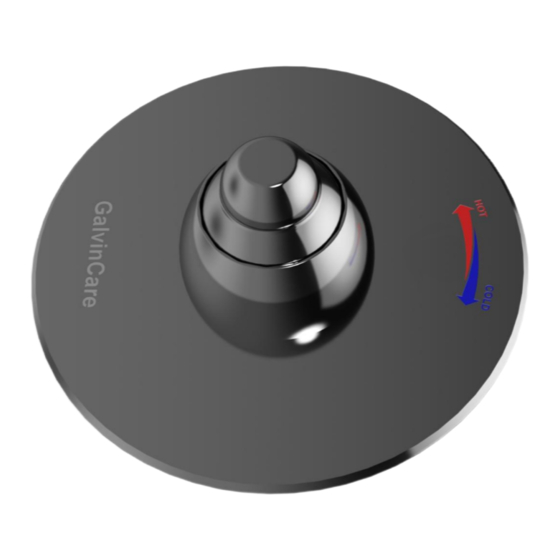
170mm round face plate with polished stainless steel finish for a homely look, but is able to
withstand heavy knocks.
Easy Temperature blending and operation to ensure comfort and safety for the user.
Bevelled edges for maximum tight fixing.
This item is designed for easy panel installation (Maximum thickness 18mm).
Access to the rear of the unit is required to fit this product.
Water supplies shall be at reasonably balanced pressures from a common source (e.g. hot and cold
supplies both from the same storage or both from a supply pipe). Where the fitting is supplied from
unbalanced supplies (e.g. hot and cold supplies from separate sources) an 'Approved' single check valve
or some other no less effective backflow prevention device shall be fitted immediately upstream of both hot
and cold water inlets.
TECHNICAL DATA
Inlet connections (BSP Female)
Working Pressure Range (kPa)
Maximum Working Temperature (°C)
NOTE:
As the Galvin Specialised Design and Development team continually strive to improve our products, specifications may change without
notice.
PRE-INSTALLATION
MOUNTING DETAILS – HOLE CENTRES
Cut 70mm-72mm hole in mounting panel then drill 3
holes 8mm as shown in the rough in details
Maximum panel thickness to be 18mm
Tools required: Power drill, spanner or adjustable cresent
Revision 3, 6 February 2017, Page 1 of
1/2"
Min
150
Max
500
41
3
Advertisement
Table of Contents

Related Manuals for Galvin Specialised SMVA21


Summary of Contents for Galvin Specialised SMVA21
- Page 1 1/2” Working Pressure Range (kPa) Maximum Working Temperature (°C) NOTE: As the Galvin Specialised Design and Development team continually strive to improve our products, specifications may change without notice. PRE-INSTALLATION MOUNTING DETAILS – HOLE CENTRES Cut 70mm-72mm hole in mounting panel then drill 3 ...
- Page 2 Version 16 February 2017 Page 2 of 3 INSTALLATION IMPORTANT: Galvin Specialised products must be installed in accordance with these installation instructions and in accordance with the national and local regulatory water requirements. Water and/or electrical supply conditions must also comply to the applicable National standards.
- Page 3 Product Installation Guideline Version 16 February 2017 Page 3 of 3 4. Remove faceplate 5. Remove handle 6. Remove face plate nut and check cartridge Unscrew dome flange. Losen grub screw. Slide off faceplate. Unscrew handle. ...
Need help?
Do you have a question about the SMVA21 and is the answer not in the manual?
Questions and answers