Table of Contents
Advertisement
Quick Links
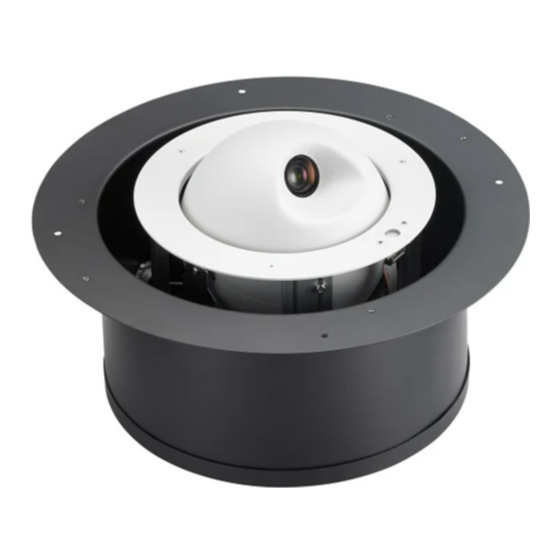
Installing the RoboFLIP 30 HDBT In-Ceiling HD PTZ Camera
This guide contains only the information required to install this product.
Refer to the Complete Manual for the RoboFLIP 30 HDBT In-Ceiling
HD PTZ Camera for additional product information.
Overview
This guide describes installation and related information for the
RoboFLIP 30 HDBT in-ceiling HD PTZ camera:
Camera with OneLINK HDMI camera
n
extension – 999-99800-100 (North
America), 999-99800-101 (Europe/UK),
999-99800-109 (Australia/New Zealand)
Camera with OneLINK Bridge A/V
n
interface – 999-99800-200 (North
America), 999-99800-201 (Europe/UK),
999-99800-209 (Australia/New Zealand)
Unpacking the Camera
Note
This camera is shipped with a tile brace for use in suspended acoustic tile ceilings. Safety wires for
suspending and leveling the tile brace are not included, but are strongly recommended. (we recommend the
Speed Connect Hardware Kit from Chief, part number CMSHDW)
Make sure you receive all the items you expected.
RoboFLIP 30 HDBT with OneLINK HDMI
999-99800-100 (North America), 999-99800-101
(Europe/UK), 999-99800-109 (Australia/New Zealand)
RoboFLIP 30 HDBT camera
n
Trim ring with mounting screws (shown mounted to
n
the camera)
Tile support brace
n
Cutting template
n
IR remote
n
OneLINK HDMI Receiver kit – includes:
n
OneLINK HDMI receiver
o
48 VDC power supply and AC cord set(s)
o
EZCamera RS-232 Control Adapter
o
Installation Guide
n
Document Number 411-0049-31 Rev A – November 2020
Advertisement
Table of Contents

Subscribe to Our Youtube Channel
Related Manuals for LEGRAND vaddio RoboFLIP 30 HDBT


Summary of Contents for LEGRAND vaddio RoboFLIP 30 HDBT
- Page 1 Installing the RoboFLIP 30 HDBT In-Ceiling HD PTZ Camera This guide contains only the information required to install this product. Refer to the Complete Manual for the RoboFLIP 30 HDBT In-Ceiling HD PTZ Camera for additional product information. Overview This guide describes installation and related information for the RoboFLIP 30 HDBT in-ceiling HD PTZ camera: Camera with OneLINK HDMI camera extension –...
-
Page 2: Installing The Camera
Installation Guide for the RoboFLIP 30 HDBT In-Ceiling HD PTZ Camera RoboFLIP 30 HDBT with OneLINK Bridge 999-99800-200 (North America), 999-99800-201 (Europe/UK), 999-99800-209 (Australia/New Zealand) RoboFLIP 30 HDBT camera Trim ring with mounting screws (shown mounted to the camera) Tile support brace Cutting template IR remote OneLINK Bridge AV Interface kit –... -
Page 3: Cabling Notes
Installation Guide for the RoboFLIP 30 HDBT In-Ceiling HD PTZ Camera Notes All above-ceiling work must conform to local building codes and be performed by qualified personnel. PoE type networks connected to this equipment are for intra-building use only and should not be connected to lines that run outside of the building in which this product is located. -
Page 4: Functional Check
Installation Guide for the RoboFLIP 30 HDBT In-Ceiling HD PTZ Camera Functional Check Before you install the camera, you may want to verify functionality. 1. Connect the camera in its minimum functional configuration. If not powered by a OneLINK device, the camera can be connected to an HDBaseT-capable third-party control device through a PoE++ power injector (not provided). -
Page 5: Selecting The Installation Area
Installation Guide for the RoboFLIP 30 HDBT In-Ceiling HD PTZ Camera Selecting the Installation Area Note All above-ceiling work must conform to local building codes and should be performed by qualified personnel. Verify that the area above the ceiling where the camera is to be installed is clear of obstructions and provides enough room for the camera enclosure. - Page 6 Installation Guide for the RoboFLIP 30 HDBT In-Ceiling HD PTZ Camera Camera powered by OneLINK Bridge The OneLINK Bridge AV interface provides audio connections and SDI video output as well as standard OneLINK capabilities.
-
Page 7: Preparing The Camera
Installation Guide for the RoboFLIP 30 HDBT In-Ceiling HD PTZ Camera Installing the Camera in a Suspended Tile Ceiling The camera is mounted above the ceiling, with only the trim ring and the camera shell accessible from below. The camera rests on a support plate above the ceiling tile; the support plate is suspended and leveled by safety wires. -
Page 8: Compliance And Conformity Statements
Installation Guide for the RoboFLIP 30 HDBT In-Ceiling HD PTZ Camera Compliance and Conformity Statements FCC Part 15 Compliance This equipment has been tested and found to comply with the limits for a Class A digital device, pursuant to Part 15, Subpart B, of the FCC Rules. These limits are designed to provide reasonable protection against harmful interference when the equipment is operated in a commercial environment. - Page 9 Installation Guide for the RoboFLIP 30 HDBT In-Ceiling HD PTZ Camera Immunity: KN24 2008 (CISPR 24: 1997 + A1: 2000 + Information Technology Equipment Immunity A2: 2002) EN 55035: 2017 +A11: 2020 Electromagnetic Compatibility of Multimedia Equipment – Immunity Requirements EN 61000-4-2 Electrostatic Discharge Requirements EN 61000-4-3...
- Page 10 ©2020 Legrand AV Inc. Vaddio is a registered trademark of Legrand AV Inc. All other brand names or marks are used for identification purposes and are trademarks of their respective owners. All patents are protected under existing designations.
Need help?
Do you have a question about the vaddio RoboFLIP 30 HDBT and is the answer not in the manual?
Questions and answers