
Related Manuals for YASKAWA Motoman GP8 EduCart


Summary of Contents for YASKAWA Motoman GP8 EduCart
- Page 1 Motoman GP8 EduCart System Manual Upon receipt of the product and prior to initial operation, read these instructions thoroughly, and keep for future reference. Part Number: 186638-1CD Revision: 1 of 88...
- Page 2 YASKAWA customers to assist in the operation of Motoman robots, related equipment and software This manual is copyrighted property of YASKAWA and may not be sold or redistributed in any way. You are welcome to copy this document to your computer or mobile device for...
- Page 3 Robot, as well as giving continuing safety education and training. • Teaching, operation, and maintenance of the Robot are specified as “Hazardous Operations” in the Industrial Safety and Health Act (for Japan only). Personnel engaged in these operations must receive special training offered by YASKAWA. 186638-1CD 3 of 88...
- Page 4 • Personnel engaged in operation, maintenance, or management of the Robot must receive required training before using the Robot. For more information on training, contact a local YASKAWA representative. • Make sure to have and follow all manuals, read them thoroughly and understand the contents of them.
- Page 5 Some operations require standard passwords and while others require special passwords. • If a manual is damaged or lost, contact a local YASKAWA representative to order a new copy. Make sure to tell the local YASKAWA representative the Part Number listed on the front cover.
- Page 6 186638-1CD GP8 EduCart Safety Notes for Safe Operation Notes for Safe Operation Read this manual carefully before installing, operating, maintaining, or inspecting the system. In this instruction, Safe Operations are classified as “DANGER”, “WARNING”, “CAUTION” or “NOTICE”. Indicates an imminently hazardous DANGER situation which, if not avoided, WILL result in death or serious injury.
- Page 7 186638-1CD GP8 EduCart Safety EduCart Explanation of Safety Labels EduCart Explanation of Safety Labels The following labels are attached to the EduCart. Always follow these safety labels. Fig. : EduCart Safety Labels Location Weight Limit Label This label notifies that if someone leans on the panels damage can occur. ...
- Page 8 186638-1CD GP8 EduCart Safety EduCart Explanation of Safety Labels Machine Nameplate Date The Machine Nameplate Data supplies important electrical information that is required for installation. Shock Hazard This label indicates that hazardous voltages are present and there is a danger of getting electrical shock.
- Page 9 Maintenance and inspection must be performed by specified personnel. Failure to observe this caution may result in electric shock or injury. • For disassembly or repair, contact a local YASKAWA representative. • Do not remove the motor, and do not release the brake.
- Page 10 186638-1CD GP8 EduCart Safety Installation and Wiring Safety CAUTION • Make sure all covers and shields are installed correctly before operating. – Some drawings in this manual may have protective covers or shields removed to show details. Not having all covers and shields installed correctly can result in injury. •...
- Page 11 186638-1CD GP8 EduCart Safety Ensure Safety Ensure Safety DANGER • When the power supplies of the Manipulator and YRC1000micro Controller are turned ON at start-up, be sure to confirm the following: – Safety protection devices such as the E-STOP circuit, door interlocks, etc.
- Page 12 186638-1CD GP8 EduCart Safety Ensure Safety WARNING • Turn OFF servo power before operating. – Press the Emergency Stop button to turn off SERVO POWER. When servo power is OFF, the SERVO ON LED on the Programming Pendant is OFF. Severe injury or death may result during an emergency if the Emergency Stop button(s) do not work correctly.
- Page 13 186638-1CD GP8 EduCart Safety Ensure Safety All personnel working with the Robot (safety administration, installation, operation, and maintenance personnel) must always be prepared and “Safety First” minded, to ensure the safety of all personnel. WARNING • In the vicinity of the area where the Robot is installed, avoid any dangerous actions, such as entering the Robot's operating range without due care.
- Page 14 186638-1CD GP8 EduCart Safety Ensure Safety CAUTION • All operators, programmers, maintenance personnel, supervisors, and anyone working near the system must be familiar with the operation of this equipment. – All personnel involved with the operation of the equipment must understand potential dangers of operation.
- Page 15 186638-1CD GP8 EduCart Safety Operation Safety Operation Safety DANGER • Personnel engaged in teaching or inspection, etc. of the Robot must receive special training required by applicable laws and regulations. • While performing inspection and maintenance, wiring, or attaching a tool to the Robot, etc., make sure to turn OFF the power supply of the YRC1000micro Controller and the tool, and keep the switch of the power supply locked so that unauthorized personnel cannot turn...
- Page 16 186638-1CD GP8 EduCart Safety Operation Safety DANGER • Before operating the Robot, make sure the servo power is turned OFF by performing the following operations. When the servo power is turned OFF, the SERVO ON LED on the Programming Pendant is turned OFF.
- Page 17 Failure to observe this Warning may result in electric shock or injury. • Contact a local YASKAWA representative for disassembly or repairs. Not contacting a local YASKAWA representative can result in electrical shock or injury. 186638-1CD xvii 17 of 88...
- Page 18 186638-1CD GP8 EduCart Safety Operation Safety CAUTION • Do not operate the Robot when a [COOLING FAN2 ERROR] appears on the Programming Pendant. If operation continues with a warning message, equipment damage can occur. • During high speed continuous operation the Robot temperature may rise quickly depending on ambient temperature and operation pattern.
- Page 19 186638-1CD GP8 EduCart Safety Maintenance Safety Maintenance Safety WARNING • Make sure equipment has no potentially hazardous conditions. – area is clean and free of water, oil, debris, etc. – all safeguards are in place. – all safety equipment work correctly. Repair or replace any non- functioning safety equipment immediately.
- Page 20 See the Bill of Material for a list of the manuals. If any of them are missing, contact a local YASKAWA representative. The telephone numbers of our offices are listed on the back cover of this manual.
- Page 21 Safety Definition of Terms Used Often in This Manual Definition of Terms Used Often in This Manual The Robot is a YASKAWA industrial robot product. The Robot usually consists of a Manipulator, YRC1000micro Controller, Programming Pendant, and Robot cables. In this manual, the equipment is designated as follows:...
- Page 22 186638-1CD GP8 EduCart Safety Registered Trademark Descriptions of the Programming Pendant keys, buttons, and displays are shown as follows: Equipment Manual Designation Programming Character Keys The keys which have characters or symbols Pendant /Symbol Keys printed on them are denoted with [ ]. e.g.
- Page 23 186638-1CD GP8 EduCart Robot Disposal Registered Trademark Robot Disposal WARNING • Take precautionary measures to prevent the Robot from overturning, such as anchoring it firmly, etc., even when temporarily storing it before disposal. Failure to observe this instruction may cause overturning of the Robot, which may result in personal injury.
-
Page 24: Table Of Contents
186638-1CD GP8 EduCart Table of Contents Table of Contents 1 Introduction ............................. 1-1 1.1 Purpose ..........................1-1 1.2 System Overview ....................... 1-1 1.2.1 GP8 EduCart Components ................... 1-1 1.3 Tools Required........................1-3 1.4 System Overview and Variations ..................1-3 1.4.1 System Teaching ....................1-4 1.4.2 System Operation .................... - Page 25 186638-1CD GP8 EduCart Table of Contents 9 Replacement Parts ......................... 9-1 9.1 Common Replacement Parts..................... 9-1 9.2 Recommended Electrical Spare Parts................9-1 10 Parts List ............................. 10-1 10.1 Robot Gripper Kit ......................10-1 Appendix A ............................A-1 A.1 Glossary ..........................A-1 186638-1CD 25 of 88...
-
Page 26: Introduction
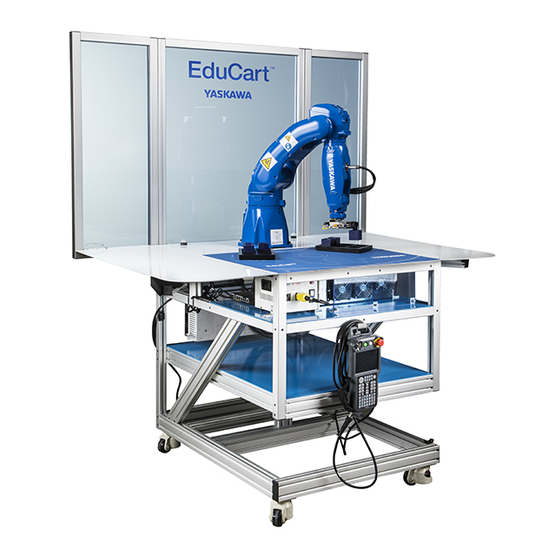
186638-1CD GP8 EduCart Introduction 1.1 Purpose Introduction Purpose This manual is intended to supply information for; • Uncrating GP8 EduCart, see “GP8 EduCart READ ME” • “Assembly of GP8 EduCart” see chapter 2 • “Powering Up GP8 EduCart” see chapter 3 •... - Page 27 Port Charlotte, FL33948 Phone: 800-966-0975 Fax: 800-966-0917 Email: sales@magnetking.com The default template for the table top is available from YASKAWA: part # 186955-1. 1.2.1.4 Table Top Indicators Two domed indicators are mounted onto the table top, behind the Manipulator. These three-color LEDs (Light Emitting Diodes) are controlled by the robot’s Concurrent I/O logic.
-
Page 28: Tools Required
• Detect tool wear in • Measure dimensions The vision kit includes • Cognex Camera • YASKAWA custom software for the Programming Pendant • Telescoping Mount Tools Required The following items may be required to unpack and assemble the GP8 EduCart: •... -
Page 29: System Teaching
Introduction 1.4 System Overview and Variations An optional vision kit is available. The vision kit includes a Cognex Camera, YASKAWA custom software for the Programming Pendant, and a telescoping mount allowing the camera to be used is various configurations. 1.4.1 System Teaching WARNING •... -
Page 30: System Operation
186638-1CD GP8 EduCart Introduction 1.4 System Overview and Variations 1.4.2 System Operation WARNING • Check all programs, safety functions, and EduCart interactions before operating in an automatic operation. Failure to observe this warning can potentially be a hazardous situation which results in death or serious injury. Place the EduCart into automatic operation by completing the following: 1. -
Page 31: Key Safety Devices
186638-1CD GP8 EduCart Introduction 1.4 System Overview and Variations 1.4.3 Key Safety Devices 1.4.3.1 YRC1000micro Controller with FSU software functions: • Dual channel Programming Pendant EMERGENCY-STOP • Dual channel Programming Pendant “Enable” switch • Functional Safety Unit (FSU) software features NOTICE I/O interface for the Functional Safety Unit (FSU) is NOT included. - Page 32 186638-1CD GP8 EduCart Introduction 1.4 System Overview and Variations The state of the scanner in PLAY mode is easy to tell by viewing either of the table top indicators. The table top indicators follow the colors from the scanner, but only indicate the status in PLAY mode. For example, if the scanners are violated the table top indicators are red when in PLAY mode.
- Page 33 186638-1CD GP8 EduCart Introduction 1.4 System Overview and Variations • Grey areas are unmonitored areas • Orange zone is the monitored area • Green area is the SAFE area NOTICE Operator and Programming Pendant must be in the SAFE area when operating in PLAY mode.
-
Page 34: Safety Logic Implementation
186638-1CD GP8 EduCart Introduction 1.4 System Overview and Variations The diagram below shows the required configuration for safe operation of the EduCart. Placement of the EduCart against the wall prevents unsafe approaches from the rear, where the safety scanner is unable to monitor a person approaching. - Page 35 186638-1CD GP8 EduCart Introduction 1.4 System Overview and Variations • Robot Range Limit File #1 Settings: – Definition of access, allowed by the Robot and gripper in the EduCart. This has several functions: • To keep the Robot out of the area of potential operators reaching overs.
- Page 36 186638-1CD GP8 EduCart Introduction 1.4 System Overview and Variations 1.4.4.3 Optional Vision Kit When the vision kit option is installed an additional Robot Range Limit file is added. The purpose of this file is to protect the Robot from crashing into the vision equipment.
-
Page 37: Reference Documents
• YRC1000micro Option Instructions for Concurrent I/O Customer Support Information The following information is for a YASKAWA representative in America, for other locations refer to the back cover. (937) 847-3200 The YASKAWA representative also has an e-mail address for routine... - Page 38 Use e-mail for routine inquiries only. If there is an urgent or emergency need for service, replacement parts, or information, contact a local YASKAWA representative at the telephone on the back cover of this manual. Have the following information ready before calling a YASKAWA representative: •...
-
Page 39: Assembly Of Gp8 Educart
186638-1CD GP8 EduCart Assembly of GP8 EduCart Assembly of GP8 EduCart 1. Unpack the shipping crate and set the GP8 EduCart on the floor. 2. Inspect the cell for any damaged components, particularly the aluminum structure, clear blue panels, or gripper fingers. 3. - Page 40 186638-1CD GP8 EduCart Assembly of GP8 EduCart 6. Insert a lock pin, securing the rear folding panel to each side of the drop panel 7. Reach under the drop panel and swing the panel brace out. Slightly lift the drop panel to lock the panel brace in position. CAUTION •...
- Page 41 186638-1CD GP8 EduCart Assembly of GP8 EduCart 9. Turn the star nut by hand to lower the stabilizer pads, thus lifting the EduCart off the caster wheels. NOTICE • The stabilizer pads reduce EduCart shaking due to robot motion. • Before moving the EduCart make sure to raise the stabilizer pads.
-
Page 42: Powering Up Gp8 Educart
186638-1CD GP8 EduCart Powering Up GP8 EduCart Powering Up GP8 EduCart The GP8 EduCart is designed to run on 120 VAC, 15 amp circuit. WARNING • Read and follow all local and federal regulation when connecting the EduCart to the required power sources. Not reading and following all local and federal regulation when connecting power source may cause death or serious injury. -
Page 43: Check Gripper Operations Using Programming Pendant
186638-1CD GP8 EduCart Powering Up GP8 EduCart 3.1 Check Gripper Operations Using Programming Pendant NOTICE Normally the EduCart ships with the transformer and YRC1000micro Controller power switches in the ON position. If the YRC1000micro Controller does not power up when turning ON the power strip, make sure the transformer and YRC1000micro Controller are in the ON position. -
Page 44: Moving Robot To Second Home Position
186638-1CD GP8 EduCart Moving Robot to Second Home Position Moving Robot to Second Home Position WARNING • Before operating the Robot, make sure the SERVO ON LED is turned OFF when the Emergency Stop button on the Programming Pendant is pressed. Injury or damage to machinery may result if the Robot cannot be stopped in case of an emergency. - Page 45 186638-1CD GP8 EduCart Moving Robot to Second Home Position CAUTION • Always return the Programming Pendant to the hook after use. If the Programming Pendant is left on a fixture, on the floor, or on the Robot may result in damage to the Programming Pendant or damage to the Robot.
- Page 46 186638-1CD GP8 EduCart Moving Robot to Second Home Position 2. Press the once the JOB LIST displays. SECOND HOME POS Button 3. Observe the SECOND HOME POS screen appears. (The screen will look similar to the screen shot below besides the values will differ). 186638-1CD 46 of 88...
- Page 47 186638-1CD GP8 EduCart Moving Robot to Second Home Position 4. Move Robot to the second home position by pressing and holding the Enable switch, , and until the CURRENT column is selected and released. NOTICE While pressing the Enable switch DO NOT press the switch too hard or it will not work.
- Page 48 186638-1CD GP8 EduCart Moving Robot to Second Home Position 5. Using the outlines on the template for guidance for placing the Block Nests on the template. 186638-1CD 48 of 88...
-
Page 49: Using Teaching Aids
186638-1CD GP8 EduCart Using Teaching Aids Using Teaching Aids WARNING • Before operating the Robot, make sure the SERVO ON LED is turned OFF when the Emergency Stop button on the Programming Pendant is pressed. Injury or damage to machinery may result if the Robot cannot be stopped in case of an emergency. -
Page 50: Using A Tcp Kit
186638-1CD GP8 EduCart Using Teaching Aids 5.1 Using a TCP Kit Using a TCP Kit 1. Install pointer in gripper mount. Press keys: INTERLOCK + [ . ] ---- and observe the gripper opens. Insert designated TCP in gripper mount. •... -
Page 51: Using A Marker
186638-1CD GP8 EduCart Using Teaching Aids 5.2 Using a Marker Using a Marker NOTICE The marker is customer supplied. 1. Install marker stop collar on marker. 2. Press keys: INTERLOCK + [ . ] ---- and observe the gripper opens. 3. -
Page 52: Configuration Of The Programming Pendant
186638-1CD GP8 EduCart Configuration Of The Programming Pendant 6.1 Programming Pendant Configuration Of The Programming Pendant Programming Pendant 1. Press the {I/F Panel} on the Programming Pendant display. 2. Place the “OPERATION” switch to “PERM” by pressing the [INTERLOCK] key on the keypad and pressing the “OPERATION” switch on the display of the Programming Pendant. - Page 53 186638-1CD GP8 EduCart Configuration Of The Programming Pendant 6.1 Programming Pendant NOTICE In this example, “INPUT 402 CONTROL” switch is used. 4. Confirm only the selected “INPUT *** CONTROL” switch is set on the “GENERAL PURPOSE INPUT” screen by pressing the {DISPLAY}. 5.
- Page 54 186638-1CD GP8 EduCart Configuration Of The Programming Pendant 6.1 Programming Pendant 6. Observe the “OUTPUT *** STATUS” are filled in, indicating active status. 186638-1CD 54 of 88...
-
Page 55: Motosim Notes For Educart Simulation
186638-1CD GP8 EduCart MotoSim Notes for EduCart Simulation 7.1 F-Safe Robot Range Limit Interface Alarm MotoSim Notes for EduCart Simulation F-Safe Robot Range Limit Interface Alarm When starting an EduCart MotoSim Simulation one alarm frequently occurs. It is expected and easy to resolve. When the alarm below occurs simply press {RESET} on the Programming Pendant display to clear the alarm and continue. -
Page 56: Alarms And Messages
186638-1CD GP8 EduCart Alarms and Messages 8.1 Cell Messages Alarms and Messages Cell Messages Message Cause Suggested Resolution SAFETY AREA SENSOR A person or object is 1. Check for obstructions. VIOLATED detected within the 2. Refer to safety sensor monitored protection zone documentation to of the safety sensor. -
Page 57: Replacement Parts
186638-1CD GP8 EduCart Replacement Parts 9.1 Common Replacement Parts Replacement Parts Common Replacement Parts The following table is a list of common parts that may be required at some point with the GP8 EduCart. Description Qty/ System 186622-1 Finger, Gripper, Pet-G 187258-1 Cable Assy, Upper Arm,GP8,Gripper 186377-1... -
Page 58: Parts List
186638-1CD GP8 EDUCart 10 Parts List 10.1 Robot Gripper Kit 10 Parts List 10.1 Robot Gripper Kit 10 10 Item Title 479154-3 CLAMP, CABLE SUPPORT 186378-1 CABLE ASSY,PIGTAIL,BASE,USER,I/O,20 CONTACT CONN,FLYING LEADS, GP8 STEM 479296-6 SCREW,SHC,M5X16,CLASS 12.9, 182519-1 WASHER,CONICAL SPRING,HEAVY LOAD,M5,JIS B,TYPE 2 479296-5 SCREW,SHC,M5X12,CLASS 12.9, 186622-1... -
Page 59: Glossary
186638-1CD GP8 EduCart Appendix A A.1 Glossary Appendix A Glossary 3D Graphic Display Function The 3D Graphic Display Function (henceforth described as 3D Display Function) is that, a 3D model of the robot is displayed on the programming pendant window, and the current value of the robot can be confirmed. By using the multi-window function, the job's teaching position displayed in the job content can also be confirmed on the 3D display window. - Page 60 186638-1CD GP8 EduCart Appendix A A.1 Glossary ANSI/RIA R15.06-2012 American National Standard for Industrial Robots and Robot Systems This standard provides guidelines for the manufacture and integration of Industrial Robots and Robot Systems with emphasis on their safe use, the importance of risk assessment and establishing personnel safety.
- Page 61 186638-1CD GP8 EduCart Appendix A A.1 Glossary Base The stable platform to which an industrial robotic arm is attached. Base Coordinate System The Base Coordinate System (sometimes referred to as World Coordinate System) defines a common reference point for a cell or application. This is useful when using multiple robots or devices as positions defined in Base Coordinates will be the same for all robots and devices.
- Page 62 186638-1CD GP8 EduCart Appendix A A.1 Glossary Cartesian Topology A topology, which uses prismatic joints throughout, normally arranged to be perpendicular to each other. Cartesian-coordinate Robot A Cartesian-coordinate Robot is a robot whose manipulator-arm degrees of freedom are defined by Cartesian Coordinates. This describes motions that are east-west, north-south and up-down, as well as rotary motions to change orientation.
- Page 63 186638-1CD GP8 EduCart Appendix A A.1 Glossary Collaborative Robot Term used to describe a robot system designed to operate in one or more of the four collaborative modes. • "Safety Monitored Stop" • "Hand Guiding" • "Speed and Separation Monitoring" •...
- Page 64 A Coordinate System (or Frame) defines a reference position and orientation from which a robot position can be measured. All robot positions are defined with reference to a Coordinate System. YASKAWA robots utilize the following Coordinate Systems: • "Base Coordinate System"...
- Page 65 186638-1CD GP8 EduCart Appendix A A.1 Glossary Cycle A single execution of a complete set of moves and functions contained within a robot program. (R15.05-2) Cyclic Coordinate System A coordinate system that defines the position of any point in terms of an angular dimension, a radial dimension and a height from a reference plane.
- Page 66 186638-1CD GP8 EduCart Appendix A A.1 Glossary Dynamics The study of motion, the forces that cause the motion and the forces due to motion. The dynamics of a robot arm are very complicated as they result from the kinematical behavior of all masses within the arm's structure.
- Page 67 186638-1CD GP8 EduCart Appendix A A.1 Glossary External Force Limit The threshold limit where the robot moves to or retains position, even when external forces are applied (provided that forces do not exceed limits that would cause an error). Feedback The return of information from a manipulator or sensor to the processor of the robot to provide self-correcting control of the manipulator.
- Page 68 Appendix A A.1 Glossary Functional Safety Unit (FSU) The Functional Safety Unit (FSU) is a component of the YASKAWA robot controller that provides programmable safety functions that enable collaborative operation of the robot. As these safety functions are programmable, the FSU allows the minimization of nearby overall equipment footprint, as well as human accessible areas.
- Page 69 INFORM The robot programming language for YASKAWA robots. INFORM language allows the robot user to: instruct the robot to use its basic capabilities to fulfill a defined set of expectations and also to describe to the robot, through a definition of parameters and conditions, what the expectations are in some given situations or scenarios.
- Page 70 186638-1CD GP8 EduCart Appendix A A.1 Glossary Input Devices A variety of devices, which allow a human to machine interface. This allows the human to program, control, and simulate the robot. Such devices include programming pendant, computer keyboards, a mouse, joy-sticks, push buttons, operator panel, operator pedestal etc.
- Page 71 JOB is the YASKAWA name for a robot program created using YASKAWA’s INFORM robot programming language. Typically, a JOB consists of instructions that tell the YRC1000micro Controller what to do and data that the program uses when it is running.
- Page 72 186638-1CD GP8 EduCart Appendix A A.1 Glossary Kinematics The relationship between the motion of the endpoint of a robot and the motion of the joints. For a Cartesian Robot this is a set of simple linear functions (linear tracks that may be arranged in X, Y, Z directions), for a revolute topology (joints that rotate) however, the kinematics are much more complicated involving complicated combinations of trigonometry functions.
- Page 73 186638-1CD GP8 EduCart Appendix A A.1 Glossary Magnetic Detectors Robot sensors that can sense the presence of ferromagnetic material. Solid-state detectors with appropriate amplification and processing can locate a metal object to a high degree of precision. See "Sensor". Manipulator A machine or robotic mechanism usually consisting of a series of segments (jointed or sliding relative to one another) for the purpose of grasping and/or moving objects (pieces or tools), usually in several...
- Page 74 186638-1CD GP8 EduCart Appendix A A.1 Glossary Motion Axis The line defining the axis of motion either linear or rotary segment of a manipulator. Motor See "Servo Motor". Muting While testing a robot program, the deactivation of any presence sensing safeguarding devices during the full robot cycle or a portion of the cycle.
- Page 75 186638-1CD GP8 EduCart Appendix A A.1 Glossary Palletizing The process of stacking packages (i.e., boxes, bags, containers, etc.) in an organized fashion on a pallet. PAM Function – Position Adjustment by Manual Position Adjustment by Manual allows position adjustment by simple operations while observing the motion of the manipulator, and without stopping the manipulator.
- Page 76 186638-1CD GP8 EduCart Appendix A A.1 Glossary Performance Level e (PLe) ISO Performance Level (PL) “e” means that the average probability of dangerous failure per hour of the safety related parts of the control system falls within = 10-8 to < 10-7. Additionally, other factors such as proper installation, maintenance and protection against environmental factors also apply.
- Page 77 186638-1CD GP8 EduCart Appendix A A.1 Glossary Pose Alternative term for robot configuration, which describes the linear and angular position. The linear position includes the azimuth, elevation and range of the object. The angular position includes the roll, pitch and yaw of the object.
- Page 78 See "Inductive Sensor". Pulse Coordinates YASKAWA robots define robot joint axes position in degrees for revolute joints. Pulse is also another way to specify robot joint position, and it does so in robot motor encoder pulse counts.
- Page 79 186638-1CD GP8 EduCart Appendix A A.1 Glossary Rectangular-Coordinate Robot A robot whose manipulator arm moves in linear motions along a set of Cartesian or rectangular axis in X, Y and Z directions. The shape of the work envelope forms a rectangular figure. See "Work Envelope". Reliability The probability or percentage of time that a device will function without failure over a specified time period or amount of usage (R15.02).
- Page 80 FSU generated signals. The safety logic circuit is programmed via an intuitive user interface that is supported on the YASKAWA programming pendant. It enables to set up the logical operations, such as stopping the manipulator or outputting a signal if the servos are on.
- Page 81 (where all axes are at pulse 0). The second home position can be changed. Security Mode Levels of operator modes on YASKAWA YRC1000micro Controller, include: Operation Mode, Edit Mode, Management Mode, Safety Mode and One Time Management mode.
- Page 82 YASKAWA for a rebate. Shock Detection Function Shock detection is a function supported by the YASKAWA YRC1000micro Controller that reduces the impact of a robot collision by stopping the manipulator without any external sensor when the tool or the manipulator collide with a peripheral device.
- Page 83 (X,Y,Z) frames and utilizes human coordinate references for easy command of robot movement. SLURBT SLURBT are terms that YASKAWA Motoman uses to describe each axis of the robot for convenience. The definition of each value is as follows: S – Swing or Swivel L –...
- Page 84 186638-1CD GP8 EduCart Appendix A A.1 Glossary Teach To program a manipulator arm by manually guiding it through a series of motions and recording the position in the YRC1000micro Controller memory for playback. Teach Lock While the Teach Lock is set, the mode of operation is tied to the Teach Mode and the machines cannot be played back using either [START] or external input.
- Page 85 186638-1CD GP8 EduCart Appendix A A.1 Glossary Tool Against Tool Interference is checked by using a cylinder that is slightly larger than the arm or tool. A sphere is placed on both ends of the cylinder. If the cylinder and spheres of one manipulator have any contact with those of the other while moving, the manipulators stop because interference was detected.
- Page 86 186638-1CD GP8 EduCart Appendix A A.1 Glossary User Coordinate System The User Coordinate System is any reference point that a user has defined for their application. This is often attached to an object such as a pallet and allows a user to teach points relative to this object. For example, a set of position could be taught relative to a User Coordinate System attached to a pallet and then easily transferred to a different User Coordinate System on another pallet.
- Page 87 186638-1CD GP8 EduCart Appendix A A.1 Glossary World Coordinates A reference coordinate system in which the manipulator arm moves in linear motions along a set of Cartesian or rectangular axes in X, Y, and Z directions. The shape of the work envelope forms a rectangular figure. See "Rectangular-Coordinate Robot".
- Page 88 Motoman GP8 EduCart System Manual For inquiries or after-sales service on this product, contact your local YASKAWA representative as shown below. YASKAWA ELECTRIC CORPORATION 2-1 Kurosakishiroishi, Yahatanishi-ku, Kitakyushu, 806-0004, Japan Phone: +81-93-645-7703 Fax: +81-93-645-7802 http://www.yaskawa.co.jp YASKAWA AMERICA, INC. (MOTOMAN ROBOTICS DIVISION) 100 Automation Way, Miamisburg, OH 45342, U.S.A.
Need help?
Do you have a question about the Motoman GP8 EduCart and is the answer not in the manual?
Questions and answers