
Related Manuals for Lissmac COMPACTCUT 300 P


Summary of Contents for Lissmac COMPACTCUT 300 P
- Page 1 OPERATING MANUAL FLOOR SAW COMPACTCUT 300 P COMPACTCUT 300 E LISSMAC Maschinenbau GmbH Lanzstrasse 4 D-88410 Bad Wurzach Telephone +49 (0) 7564 / 307-0 Fax +49 (0) 7564 / 307-500 lissmac@lissmac.com www.lissmac.com 1/48...
- Page 2 2/48...
- Page 3 Imprint The operating manual is valid for: LISSMAC Floor saw • COMPACTCUT 300 P • COMPACTCUT 300 E Manufacturer: LISSMAC Maschinenbau GmbH Lanzstraße 4 D - 88410 Bad Wurzach Phone: +49 (0) 7564 / 307 – 0 Fax: +49 (0) 7564 / 307 – 500 lissmac@lissmac.com...
- Page 4 BASIC SAFETY INSTRUCTIONS Warning notices and symbols in this operating manual SIGNAL WORD! Type and source of danger Consequences of non-compliance Actions to avert the danger. The signal word behind the danger symbol indicates the degree of danger: DANGER! This signal word signifies an extremely dangerous situation.
- Page 5 The following warning and safety symbols were attached on the machine: This symbol indicates the reference to the operating manual. This symbol indicates that hearing protection must be worn. This symbol indicates the noise power level of the machine (CC 300 P). This symbol indicates the noise power level of the machine (CC 300 E).
- Page 6 Operating manual petrol motor LISSMAC assumes no responsibility or liability for the completeness of any additional documents. Changes and reservations We attempt for this operating manual to be correct and up-to-date. To maintain our technological lead, it can be necessary to change the product without advance notice and to perform their operation.
- Page 7 Notes 7/48...
-
Page 8: Table Of Contents
Table of Contents 1. Description of performance .................... 9 1.1. Basics of intended use ....................10 1.2. Organisational measures ....................10 1.3. Personnel choice and personnel qualification; basic responsibilities ......11 1.4. Safety instructions for operation phases ................ 12 1.4.1. Transport, assembly and installation ..............12 1.4.2. -
Page 9: Table Of Contents 1. Description Of Performance
Optimal saw blade rotation speed up to a diameter of 500 mm. Best transport option using crane lifting hook and handle. Standard with parking brake. Including LISSMAC diamond cutting wheel Ø 450 mm for asphalt (only for CC 300 P). 9/48... -
Page 10: Basics Of Intended Use
Appropriate usage The LISSMAC Floor saw is a floor cutting grinder and is designed exclusively for cutting grooves into concrete or asphalt using water. Cutting uses saw blades, up to a maximum of 15 mm and may only be operated for cutting of floors. -
Page 11: Personnel Choice And Personnel Qualification; Basic Responsibilities
Use personal protection equipment if necessary or required by regulations! Keep all safety instructions and danger warnings on the Floor saw and in legible condition! Replace safety and danger instructions that are damaged or non-readable any more. For safety-related changes to the machine or its running behaviour, stop the machine immediately and mark it accordingly. -
Page 12: Safety Instructions For Operation Phases
1.4. Safety instructions for operation phases 1.4.1. Transport, assembly and installation Transport, assembly and installation on/with the Floor saw may only be carried out in transport position. Secure the Floor saw against rolling away. Transport, assembly and installation on/with the Floor saw may only be carried out with removed saw blade and when the engine is turned off. -
Page 13: Operation
1.4.3. Operation Refrain from working in any manner that is questionable in regard to safety! Take measures to ensure that the Floor saw is operated only in a safe, functional condition! The Floor saw must be checked at least once per shift for externally identifiable defects or damages! Any changes which occur (including operating behaviour) must be reported immediately to the responsible post/person! If necessary, immediately stop the machine and secure it against restart! Immediately stop and secure the Floor saw in case of malfunctions! Immediately correct... -
Page 14: Special Work While Using The Machine
1.4.6. Special work while using the machine Follow all setup, maintenance, and inspection activities and schedules prescribed by the operating manual, including all information about the replacement of parts / assemblies! These activities may only be carried out by technical personnel. Inform operating personnel before beginning special and maintenance work! Name a supervisor! If the Floor saw is turned off during maintenance and repair work, it must be secured against unexpected application of power. -
Page 15: Electric Power
1.5.2. Electric power Use only original fuses with the specified current rating! In case of malfunctions, turn the Floor saw off immediately! Electrical work may only be carried out by technical and qualified personnel. Carry out maintenance or repair work only when the motor of the Floor saw is turned off and the saw blade is not running any more. -
Page 16: Packaging And Storage
1.7. Packaging and Storage To ensure sufficient protection during shipping and transport, the machine and its components are carefully packaged. When receiving the machine, the machine should be checked for damage. The packaging of the device consists of materials which can be recycled. Put these by type into the relevant recycling containers, so that they can be recycled properly. -
Page 17: Description Of The Device
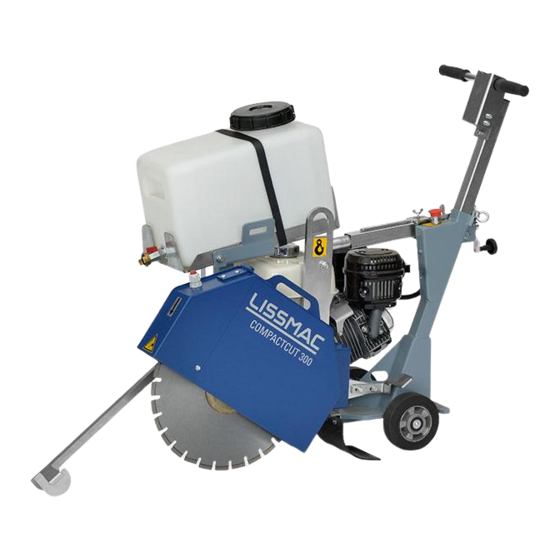
2. DESCRIPTION OF THE DEVICE 2.1. Name of machine parts Pos. 1 Saw blade protective hood Pos. 2 Drive motor Pos. 3 Vibration dampened handle Pos. 4 EMERGENCY STOP switch Pos. 5 Chassis (Base frame) Pos. 6 Water tank with ball valve and GEKA water connection Pos. -
Page 18: Safety Guards
Pos. 8 Screw to secure the saw blade protective hood Pos. 9 Ball valve with GEKA water connection Pos. 10 Height adjustment of the saw arm consists of: Crank with spring lock for locking Pos. 11 Depth stop Pos. 12 Drive motor cover Pos. -
Page 19: Technical Data
2.3. Technical data COMPACTCUT 300 P COMPACTCUT 300 E Max. cutting depth 180 mm Max. saw blade diameter 500 mm Max. saw blade width 15 mm Saw blade holder 25.4 mm Saw blade speed 2300 rpm 1900 rpm Empty weight... -
Page 20: Noise Power Level
The measured noise level L 109 dB(A) The emission noise pressure at the operator's place L 92 dB(A) The guaranteed noise power level is: COMPACTCUT 300 P 110 dB(A) COMPACTCUT 300 E 96 dB(A) The values are determined by the noise emission measurement. -
Page 21: Hand Arm Vibration
The given value was determined with a maximum saw blade diameter of 500 mm. The impact can be reversely proportional to the weight of the operator. Total vibration value: COMPACTCUT 300 P a 6.0 m/s COMPACTCUT 300 E a 2.5 m/s The following standards were complied with during measurement: EN ISO 5349, VD 2057 Sheet 2, Directive 2002/42/EC. -
Page 22: Commissioning
3. COMMISSIONING 3.1. Connections and operating materials Operating motor oil The motor is filled with motor oil by the manufacturer. Only motor oil approved by the manufacturer may be used. The details and the quality requirements are contained in the operating manual of the fuel motor. Fuel The Floor saw must be filled with petrol. -
Page 23: Filling The Fuel Tank
3.2. Filling the fuel tank DANGER! Highly flammable fuel vapours Death or injury from explosion Smoking is absolutely forbidden during this process. Remove all ignition sources. WARNING! Risk of burning on hot motor parts Severe physical burns Do not touch any motor parts and/or wear gloves. ... -
Page 24: Parking Brake
3.3. Parking brake WARNING! Unintentional position changes of the machine Injury due to unintentional position changes of the machine. In order to secure the Floor saw against rolling away, the parking brake must be used. The parking brake is set via the height adjustment of the saw arm. ... -
Page 25: Install Saw Blade
3.5. Install saw blade DANGER! Removing and opening the saw blade protective hood Death or injury from rotating saw blade. Removing or opening of the saw blade protective hood or reaching into the rotating saw blade during cutting is prohibited. ... -
Page 26: Drive Belt
3.6. Drive belt DANGER! Removing and opening the saw blade protective hood Death or injury from rotating saw blade. Removing or opening of the saw blade protective hood or reaching into the rotating saw blade during cutting is prohibited. This work may only be carried out with the saw blade at a standstill and the drive motor turned ... -
Page 27: Transport
4. TRANSPORT 4.1. Transport position WARNING! Unintentional position changes of the machine Injury due to unintentional position changes of the machine. Only transport the Floor saw in the transport position. Secure the Floor saw at the attachment points. NOTE! Transport of the machine When transporting the Floor saw, unintentional position changes must be prevented. -
Page 28: Move With The Crane
4.2. Move with the crane DANGER! Heavy loads Injury from falling parts. Do not stand under lifted machines or parts. Only use undamaged lifting gear and loading equipment with sufficient lifting capacity and length. The centre of mass of the machine is off-centre. WARNING! Garbage or damage from attachments Injury from machine parts. -
Page 29: Operation
5. OPERATION 5.1. Safety DANGER! Removing and opening the saw blade protective hood Death or injury from rotating saw blade. Removing or opening of the saw blade protective hood or reaching into the rotating saw blade during cutting is prohibited. This work may only be carried out with the saw blade at a standstill and the drive motor turned ... -
Page 30: Preparations For Starting
5.2. Preparations for starting NOTE! Cutting without obstacles Damage from objects in the cutting area or the saw blade. All obstacles must be cleared away from the cutting area and make sure there is sufficient lighting. The cut area can be labelled using a marking spray to orient the operator for cutting. To be able to use the Floor saw safely and properly, the following pre-requisites must be fulfilled: ... -
Page 31: Moving Or Setting Up The Floor Saw
5.3. Moving or setting up the Floor saw WARNING! Danger of injury from rotating saw blade If rotating cutting blades are touched , clothes and extremities can be cut off. When moving the machine the saw blade must be at a stand still. ... -
Page 32: Cutting With The Floor Saw
5.4. Cutting with the Floor saw WARNING! All start preparations must be fulfilled. The machine may only be put into operation, if all starting preparations (see Chapter 5.2 Preparations for starting) are met. If start preparations cannot be fulfilled, it is prohibited to operate the machine. ... -
Page 33: Cutting With An Open Saw Blade Protective Hood
5.5. Cutting with an open saw blade protective hood DANGER! Removing and opening the saw blade protective hood Death or injury from rotating saw blade. Opening the saw blade protective guard while the saw blade is rotating is prohibited. ... -
Page 34: Maintenance
6. MAINTENANCE 6.1. Service DANGER! Danger of injury from rotating saw blade! Death or injury from rotating saw blade. Maintenance and repair works may only be carried out when the machine is turned off. Maintenance and repair works must only be carried out by qualified personnel. ... -
Page 35: Troubleshooting Table
6.2. Troubleshooting table Pull the power plug before any maintenance or repair work! Measures must be taken, so that an accidental start-up by others is not possible! Maintenance and service works may only be carried out by qualified personnel! Error Cause Remedy Low cutting performance... -
Page 36: Torque Of Screw Connections
6.3. Torque of screw connections Strength class: 10.9 12.9 Dimensions Max. tightening torque in Nm Max. tightening torque in Nm Max. tightening torque in Nm 11.2 11.3 16.5 19.3 27.3 40.1 46.9 1057 1136 1329 1176 1674 1959 1597 2274 2662 36/48... -
Page 37: Maintenance Plan
6.4. Maintenance plan This section should be used as a proof of already performed maintenance and as a service book. All warranty and service work must be entered as proof. Machine/type: Serial number/year of manufacture: Date Performed maintenance or service works Date/signature 37/48... -
Page 38: Tools
To have the best results, the parameters must match. With this diagram, the optimal cutting performance can be determined. In the LISSMAC sales booklet, the prices for the tools are determined. This sales booklet can be obtained from the manufacturer at any time. -
Page 39: Warranty
8. WARRANTY The warranty for this machine is 12 months. For the following listed wear parts the warranty only applies if the wear is not caused by operation. Wear parts are parts that with intended use of the machine have limited operational wear. The wear time is not uniformly specified, it differs according to intensity of use. - Page 40 9. REPLACEMENT PARTS Spare part Item Item no. Designation Specification Units Recommendati 300044 HEXAGON NUT DIN 934 24x1.5 601020 PRESSURE DOSC 613428 SAW BLADE FLANGE 601019 SAW BLADE FLANGE 300267 SET SCREWS WITH SLOT AND FLAT POINT DIN 427 10x25 A2 301272 HEX SOCKET HEAD CAP SCREW WITH ALLEN DIN 912 6x30 12.9...
- Page 41 Spare part Item Item no. Designation Specification Units Recommendati 30.1 208715 CLAMPING SET 31.1 680019 BRASS NUT 31.2 300644 HEX SOCKET HEAD CAP SCREW WITH ALLEN DIN 912 6x35 8.8 galv. 615277 SPACER BUSHING 33.1 615015 MOTOR FLANGE RD 150x34 33.2 615407 MOTOR FLANGE...
- Page 42 Spare part Item Item no. Designation Specification Units Recommendati 681399 MANUAL CRANK COMPLETE 42.1 615467 ROTATING LEVER 42.2 300840 SPRING PIN ISO 8748 6x24 Spiral 42.3 201183 SEPARATOR 42.4 209177 HANDLE 42.5 360108 HEX SOCKET HEAD CAP SCREW WITH ALLEN DIN 912 8x60 42.6 300273...
- Page 43 Spare part Item Item no. Designation Specification Units Recommendati 68.1 ------ HOUSING 68.2 ------ GEHÄUSE DECKEL 69.1 400057 PILZSCHALTER ROT 69.2 404646 IDENTIFICATION SIGN 69.3 400058 SWITCH ELEMENT 70.1 403441 MAIN SWITCH INSERT 70.2 400482 ROTATING HANDLE 71.1 403440 STAR TRIANGLE SWITCH INSERT 71.2 402230 COVER PLATE...
- Page 44 44/48...
- Page 45 -45-...
- Page 46 46/48...
- Page 47 LISSMAC Maschinenbau GmbH, D-88410 Bad Wurzach Machine description: The LISSMAC Floor saw is a floor cutting grinder and is designed exclusively for cutting grooves into concrete or asphalt using water. Cutting uses saw blades, up to a maximum of 15 mm and may only be operated for cutting of floors.
- Page 48 48/48...
Need help?
Do you have a question about the COMPACTCUT 300 P and is the answer not in the manual?
Questions and answers