Table of Contents

Related Manuals for Lissmac COMPACTCUT 400 E


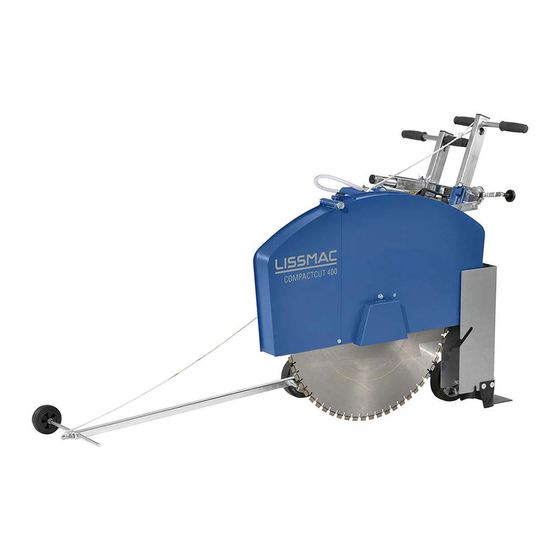
Summary of Contents for Lissmac COMPACTCUT 400 E
- Page 1 CONSTRUCTION TECHNOLOGY OPERATING MANUAL FLOOR SAW COMPACTCUT 400 E LISSMAC Maschinenbau GmbH Lanzstrasse 4 D-88410 Bad Wurzach Telephone +49 (0) 7564 / 307- 0 Fax +49 (0) 7564 / 307 - 500 lissmac@lissmac.com www.lissmac.com...
- Page 2 2/45...
- Page 3 Imprint The operating manual is valid for: LISSMAC floor saw • COMPACTCUT 400 E Company headquarters: LISSMAC Maschinenbau GmbH Lanzstraße 4 D - 88410 Bad Wurzach Phone: +49 (0) 7564 / 307 – 0 Fax: +49 (0) 7564 / 307 – 500 lissmac@lissmac.com...
-
Page 4: Basic Safety Instructions
BASIC SAFETY INSTRUCTIONS Warning notices and symbols in this operating manual Indicates that failure to comply could lead to severe injury or even death. Danger! Indicates that failure to comply could sometimes lead to injuries. Caution! Note Indicates that failure to comply leads to damage to the machine or other property. Handling information for operators The defined sequence of the handling steps makes proper and safe handling of the machine easier. - Page 5 OPERATING MANUAL Preface This operating manual should make it easier to get to know the machine and make use of its intended applications. The operating manual contains important information on how to operate the machine safely, properly and economically. Your close attention helps avoid risk, repair costs and downtime, and increase the reliability and lifetime of the machine.
- Page 6 Notes: 6/45...
-
Page 7: Table Of Contents
Table of Contents 1. Description of performance ....................8 1.1. Basics of intended use ......................9 1.2. Organisational measures ..................... 9 1.3. Personnel choice and personnel qualification; basic responsibilities ......10 1.4. Safety instructions for operation phases ................11 ... -
Page 8: Table Of Contents 1. Description Of Performance
• LISSMAC electrical floor saws are low noise and therefore are particularly suited for cutting work in and on buildings • The COMPACTCUT 400 E is fast and can be simply dismantled into three pieces. This means it can be easily transported inside buildings •... -
Page 9: Basics Of Intended Use
1.1.4 The LISSMAC floor saw is a floor cutting grinder and is designed exclusively for cutting grooves into concrete or asphalt using water. Cutting uses saw blades and the machine may only be operated for cutting of floors. -
Page 10: Personnel Choice And Personnel Qualification; Basic Responsibilities
1.2.5 Use personal protection equipment if necessary or required by regulations! 1.2.6 Keep all safety instructions and danger warnings on the floor saw and in legible condition! Replace safety and danger instructions, that are damaged or non-readable any more. 1.2.7 For safety-related changes to the machine or its running behaviour, stop the machine immediately and mark it accordingly. -
Page 11: Safety Instructions For Operation Phases
1.4. Safety instructions for operation phases 1.4.1. Transport, assembly and installation 1.4.1.1 Transport, assembly and installation on/with the floor saw may only be carried out in transport position. Secure the floor saw against rolling away. 1.4.1.2 Transport, assembly and installation on/with the floor saw may only be carried out with removed saw blade and when the drive motor is turned off. -
Page 12: Operation
1.4.3. Operation 1.4.3.1 Refrain from working in any manner that is questionable in regard to safety! 1.4.3.2 Take measures to ensure that the floor saw is operated only in a safe, functional condition! 1.4.3.3 The floor saw must be checked at least once per shift for externally identifiable defects or damages! Any changes which occur (including operating behaviour) must be reported immediately to the responsible post/person! If necessary, immediately stop the machine and secure it against restart! -
Page 13: Special Work While Using The Machine
1.4.5. Special work while using the machine 1.4.5.1 Follow all setup, maintenance, and inspection activities and schedules prescribed by the operating manual, including all information about the replacement of parts / assemblies! These activities may only be carried out by technical personnel. 1.4.5.2 Inform operating personnel before beginning special and maintenance work! Name a supervisor! 1.4.5.3... -
Page 14: Electric Power
1.5.2. Electric power 1.5.2.1 Use only original fuses with the specified current rating! In case of malfunctions, turn the floor saw off immediately! Electrical work may only be carried out by technical and qualified personnel. 1.5.2.2 Carry out maintenance or repair work only when the motor of the floor saw is turned off and the saw blade is not running any more. -
Page 15: Packaging And Storage
1.7. Packaging and Storage To ensure sufficient protection during shipping and transport, the machine and its components are carefully packaged. When receiving the machine, the machine should be checked for damage. The packaging of the device consists of materials which can be recycled. Put these by type into the relevant recycling containers, so that they can be recycled properly. -
Page 16: Description Of The Device
2. DESCRIPTION OF THE DEVICE 2.1. Name of machine parts Pos. 1 Water hose Pos. 8 Saw blade Pos. 2 Saw arm Pos. 9 Steering rod Pos. 3 Handle Pos. 10 Fold up part of the saw blade protective hood Pos. -
Page 17: Technical Data
2.3. Technical data COMPACTCUT 400 E Max. cutting depth 320 mm Max. saw blade diameter 800 mm Saw blade holder 25.4 mm Saw blade speed 1250 1/min Operating weight 167 kg Left/right cut Drive motor Electric motor Power consumption 400V / 16.1 A... -
Page 18: Hand Arm Vibration
The given value was determined with the maximum saw blade diameter. The impact can be reversely proportional to the weight of the operator. Total vibration value: COMPACTCUT 400 E a less than 2.5 m/s The following standards were complied with during measurement: EN ISO 5349, VD 2057 Sheet 2, Directive 2002/42/EC. -
Page 19: Commissioning
Tools must be protected against humidity during storage. The applied segments around the saw blade must be protected from damage. Note In the LISSMAC sales booklet, the prices for the tools are determined. This sales booklet can be obtained from the manufacturer at any time. 3.3. Parking brake Danger! In order to secure the floor saw against rolling away, the parking brake must be used. -
Page 20: Install Saw Blade
3.4. Install saw blade Removing or opening of the saw blade protective hood or reaching into the rotating saw blade Danger! during cutting is prohibited. These works may only be carried out with the saw blade at a standstill and the drive motor turned off. Note No rotating tools which have a maximum rotation speed smaller than the nominal speed of the machine can be used. -
Page 21: Changing Saw Blade Direction
3.5. Changing saw blade direction Removing or opening of the saw blade protective hood or reaching into the rotating saw blade Danger! during cutting is prohibited. These works may only be carried out with the saw blade at a standstill and the drive motor turned off. In order to change the saw blade direction, the following steps must be carried out: ... -
Page 22: Drive Belt
3.6. Drive belt Removing or opening of the saw blade protective hood or reaching into the rotating saw blade Danger! during cutting is prohibited. These works may only be carried out with the saw blade at a standstill and the drive motor turned off. Inspection Inspection of the drive belts can be done by pushing them with the thumbs. -
Page 23: Transport
4. TRANSPORT 4.1. Transport position In order to secure the floor saw against rolling away, the floor saw may only be transported in Danger! transport position. Note When transporting the floor saw, unintentional position changes must be prevented. Motor oil can leak into the combustion area of the motor and damage it. -
Page 24: Disassembling The Machine
4.3. Disassembling the machine The floor saw can be dismantled into individual parts with a few movements for transport, relocating or storage. 24/45... -
Page 25: Operation
5. OPERATION 5.1. Safety The operator authorized to cut must introduce feed movement using the handle. Standing is Danger! limited to this area of the floor saw. The floor saw may only be operated by one person. Inform people to keep away from the cutting area, or block it off. Removing or opening of the saw blade protective hood or reaching into the rotating saw blade Danger! during cutting is prohibited. -
Page 26: Cutting With The Floor Saw
5.4. Cutting with the floor saw The floor saw may only be put into operation, if all starting preparations (see 5.2) are met. If this Danger! is not possible, the operation of the floor saw is prohibited. Dry cutting without water is prohibited! ... -
Page 27: Wall Gliding Saw Hood (Optional)
5.6. Wall gliding saw hood (optional) Removing or opening of the saw blade protective hood or reaching into the rotating saw blade Danger! during cutting is prohibited. These works may only be carried out with the saw blade at a standstill and the drive motor turned off. -
Page 28: Maintenance
6. MAINTENANCE 6.1. Service Maintenance and repair works must only be carried out by qualified personnel. The floor saw must Danger! be secured against turning on by other people. The saw blade protective hood may only be removed when the saw blade is at a standstill. Maintenance and repair works may only be carried out when the machine is turned off. -
Page 29: Troubleshooting Table
6.2. Troubleshooting table Pull the power plug before any maintenance or repair work. Measures must be taken, so that an Danger! accidental start-up by others is not possible. Maintenance and service works may only be carried out by qualified personnel. Error Cause Remedy... -
Page 30: Torque Of Screw Connections
6.3. Torque of screw connections Strength class: 10.9 12.9 Dimensions Max. tightening torque in Nm Max. tightening torque in Nm Max. tightening torque in Nm 11.2 11.3 16.5 19.3 27.3 40.1 46.9 1057 1136 1329 1176 1674 1959 1597 2274 2662 30/45... -
Page 31: Maintenance Plan
6.4. Maintenance plan Note This section should be used as a proof of already performed maintenance and as a service book. All warranty and service work must be entered as proof. Machine/type: Serial number/year of manufacture: Date Performed maintenance or service works Date/signature 31/45... -
Page 32: Tools
To have the best results, the parameters must match. With this diagram, the optimal cutting performance can be determined. Note In the LISSMAC sales booklet, the prices for the tools are determined. This sales booklet can be obtained from the manufacturer at any time. 32/45... -
Page 33: Conditional Connections
8. CONDITIONAL CONNECTIONS Conditional connections according to EN 61000-3-3 or IEC 61000-3-11 RA=0.15Ω jXA=0.1Ω on 50 Hz RN=0.1Ω jXN=0.06Ω on 50 Hz 33/45... -
Page 34: Warranty
9. WARRANTY The warranty for this machine is 12 months. For the following listed wear parts the warranty only applies if the wear is not caused by operation. Wear parts are parts that with intended use of the machine have limited operational wear. The wear time is not uniformly specified, it differs according to intensity of use. -
Page 35: Replacement Parts
10. REPLACEMENT PARTS Spare part Item Item no. Designation Specification Units Recommen dation 1038 681399 HAND CRANK COUPL. 1038.1 300208 SPRING PIN ISO 8748 8 X 26 1038.2 300273 HEXAGON NUT DIN 934 8 1038.4 615467 ROTATING LEVER 1038.5 201183 SPACER SLEEVE 1038.6 209177... - Page 36 Spare part Item Item no. Designation Specification Units Recommen dation 4002 681875 HANDLE ASSBLY. 1018 691344 HANDLE ASSBLY. 1019 280042 HANDLE PVC 1020 206233 SLIDE STOPPER 4003 681876 MOTOR FIXTURE ASSBLY. 2010 360131 HEX SOCKET HEAD CAP SCREW WITH ALLEN KEY DIN 912 10x60 GALV.
- Page 37 Spare part Item Item no. Designation Specification Units Recommen dation 4008 680347 SPRAY PROTECTION ASSMBLY. 2136 628025 SPRAY PROTECTION PANEL 2137 628026 SPRAY PROTECTION PANEL 2138 300270 HEX SOCKET HEAD CAP SCREW WITH ALLEN KEY DIN 912 5x16 GALV. 2139 206261 RUBBER SPRAY PROTECTION 2141...
- Page 38 Spare part Item Item no. Designation Specification Units Recommen dation 1085 201386 TENSION CHECK STAY 1086 300319 STEEL WASHER DIN 125 A5.3 V 1087 300832 LOCK NUT BIW V-FORM 5 1100 206293 PLASTIC FLUSH SLEEVE 1101 300177 STEEL WASHER DIN 125 10.5 MM GALV. 1102 300240 LOCK NUT...
- Page 39 Spare part Item Item no. Designation Specification Units Recommen dation 2072 300048 SAFETY SCREW 6 X 12 2074 300248 DISC DIN 125 A 6.4 V 2075 300833 HEXAGON NUT BIW V-FORM 6 2076 613115 HOSE NIPPLE 2077 300135 SINGLE-EAR CLAMP 16,5 R 2078 200322...
- Page 40 1057 4000 4000 1058 1059 1038 1038 1058 1057 1054 1055 1048 1049 1084 1047 1078 1085 1056 1046 1055 1045 1078 1054 1032 1041 1033 1044 1032 1028 1043 1086 1032 1087 1069 1053 1031 1061 1068 1038.1 1052 1027 1062 1026...
- Page 41 4006 4006 2101 2100 2099 2105 2023 2026 2097 2022 2102 2025 2024 4005 4005 2026 2111 2098 2112 2116 2117 2103 2104 2070 2118 2125 2123 2121 2069 2122 4003 4003 2068 2019 2124 2044 2071 4004 4004 2020 2019 2042 2072...
- Page 42 3053 3022.1 3022.2 3013 3023.1 3022.3 3022.4 3048 3024.1 3024.2 3050 3013 3049 3016 3042 3041 3010 3023.2 3017 3044 3018 3023.3 3040 3006 3045 3038 3024.2 4009 4009 3046 3024.2 3008 3024.3 3005 3019 3007 4010 4010 3020 3005 3037 3004 3001...
- Page 43 43 / 45...
- Page 44 D-88410 Bad Wurzach Technical documentation retained by LISSMAC Maschinenbau GmbH, D-88410 Bad Wurzach The LISSMAC floor saw is a floor cutting grinder and is designed exclusively for cutting grooves Machine description: into concrete or asphalt using water. Cutting uses saw blades and the machine may only be operated for cutting of floors.
- Page 45 45 / 45...
Need help?
Do you have a question about the COMPACTCUT 400 E and is the answer not in the manual?
Questions and answers