
Related Manuals for Lissmac COMPACTCUT 201 P


Summary of Contents for Lissmac COMPACTCUT 201 P
- Page 1 OPERATING MANUAL FLOOR SAW COMPACTCUT 201 P LISSMAC Maschinenbau GmbH Lanzstrasse 4 D-88410 Bad Wurzach Telephone +49 (0) 7564 / 307 - 0 Fax +49 (0) 7564 / 307 - 500 lissmac@lissmac.com www.lissmac.com 1/72...
- Page 2 2/72...
- Page 3 Imprint This operating manual is for: LISSMAC floor saw • COMPACTCUT 201 P Company headquarters: LISSMAC Maschinenbau GmbH Lanzstraße 4 D - 88410 Bad Wurzach, Germany Phone: +49 (0) 7564 / 307 – 0 Fax: +49 (0) 7564 / 307 – 500 lissmac@lissmac.com...
- Page 4 Instructions to the operator The warnings in this manual cannot cover all possible hazard scenarios. LISSMAC cannot foresee every potential hazard. Appropriate safety rules and precautions with respect to working methods and operation must be implemented, as with any other machine.
- Page 5 Warning and safety notices: Read the operating manual Wear hearing protection Wear safety goggles Wear gloves Wear a protective helmet Wear suitable work clothes and wash dusty clothes Lifting point Wear a dust mask Highly flammable fuel vapors Crush hazard Suspended loads Danger of cuts and amputation through rotary cutting tools Risk of being pulled in by open belt drive...
- Page 6 Suffocation hazard from of toxic exhaust fumes Do not relocate the machine while the tool is rotating No use by unauthorized persons Do not use high-pressure cleaners No smoking Hazardous material: fine silica dust Set ignition switch to OFF / 0 Do not perform maintenance while the engine is running Check v-belt tension Rotation direction of diamond blade...
- Page 7 Internal combustion engine operating instructions LISSMAC assumes no responsibility or liability for the completeness of further documentation. Changes and reservations We strive to keep this operating manual correct and up to date. In order to maintain our technological advance, it may be necessary to make changes to the product and its operation without advance notice.
-
Page 8: Table Of Contents
Table of contents 1. Properties & Advantages ....................9 2. General safety ........................ 10 2.1. Intended use policy ......................10 2.2. Organizational measures ....................11 2.3. Choice of personnel and qualifications; fundamental obligations ........12 2.4. Safety notices regarding the operating phases............... 12 2.4.1. -
Page 9: Table Of Contents 1. Properties & Advantages
1. PROPERTIES & ADVANTAGES • Floor saws in robust and compact design • Stepless lowering and lifting of the saw blade via a threaded spindle avoids damage to the saw blade • Cutting depth display adjustable to all tool diameters •... -
Page 10: General Safety
Intended use The LISSMAC floor saw is a Floor cutting-off machine and is exclusively designed for wet-cutting joints in concrete or asphalt. Cutting requires a tool in the form of a diamond saw blade. The floor saw may only be operated by one person. -
Page 11: Organizational Measures
2.2. Organizational measures This operating manual must be kept within easy reach for everybody at the place of use. Supplements to the operating manual include general statutory and other binding regulations for preventing accidents and protecting the environment and must be obeyed. Similar obligations may also arise in relation to e.g. -
Page 12: Choice Of Personnel And Qualifications; Fundamental Obligations
2.3. Choice of personnel and qualifications; fundamental obligations Operators must be at least 18 years of age and mentally and physically capable of operating the floor saw. All persons must be instructed in the operation and be expressly assigned, in writing by the employer, to operate the floor saw. -
Page 13: Commissioning
2.4.2. Commissioning Observe the cutting direction of the diamond blade when installing. All cuts are performed as down-cuts. When fitting the saw blade, protect your hands from sharp edges. Clear all obstacles from the cutting area and provide good lighting. Supply water for saw blade cooling. -
Page 14: Relocating The Floor Saw
2.4.4. Relocating the floor saw The floor saw may only be relocated when the saw blade is stopped. The combustion engine must be started and stopped on the side facing away from the saw blade. Before leaving the machine the operator has to activate the parking brake. 2.4.5. -
Page 15: Dust
2.5.2. Dust When working in enclosed areas observe any existing national regulations. For indoor cutting the use of an APF 10 (N-95) half mask is mandatory. To prevent dust formation while cutting, the saw blade must be continuously sprayed with water. Do not eat, drink or smoke in the work area. -
Page 16: Packaging And Storage
2.7. Packaging and storage In order to ensure sufficient protection during dispatch and transport, the machine and its components have been carefully packed. On receipt of the machine, it should be checked for damage. The device packaging consists of recyclable materials. Please place these into the appropriate collection containers, so that they can be recycled. -
Page 17: Machine Description
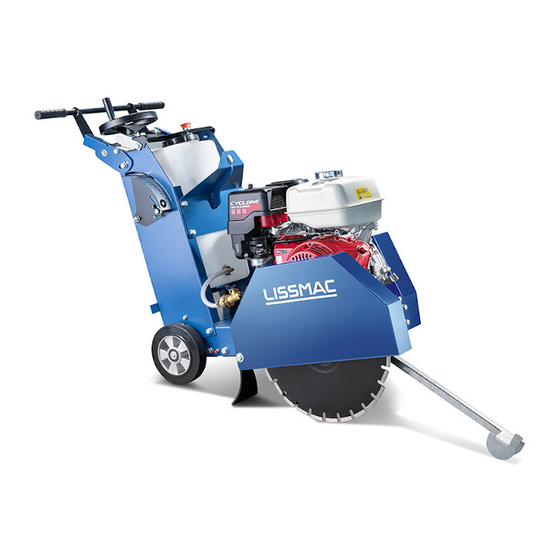
3. MACHINE DESCRIPTION 3.1. Denomination of machine parts Pos. 1 Handwheel for cutting depth adjustment Pos. 2 Handwheel locking device Pos. 3 Water tank Pos. 4 Lifting point Pos. 5 Engine Pos. 6 Pointer Pos. 7 Blade guard Pos. 8 Belt guard Pos. -
Page 18: Technical Data
3.2. Technical data COMPACTCUT 201 P COMPACTCUT 201 P 1-Cylinder Honda 1-Cylinder Loncin max. Cutting depth 200 mm max. Diamond blade diameter 500 mm Blade arbor 25,4 mm Blade RPM 2300 1/min Weight 108 kg 108 kg Water tank capacity... -
Page 19: Sound Power Level
The emissions sound pressure at the workplace is L 92 dB(A) The guaranteed sound power level is: COMPACTCUT 201 P 110 dB(A) The values are found by measuring the sound emissions. The test was performed with a load using the largest permissible saw blade in the floor saw. -
Page 20: Commissioning
4. COMMISSIONING 4.1. Connections and Consumables Motor oil The engine is filled by the manufacturer with SAE 10W-30 engine oil. Only use engine oil of service class API, MS, SD, SE or better approved by the manufacturer. The specifications and quality requirements are contained in the engine operating manual. Fuel The floor cutter must be filled with unleaded, sulphur-free petrol according to DIN EN 228 (ROZ 95 octane). -
Page 21: Refueling
4.3. Refueling WARNING Fire and Explosion hazard Extremely flammable fuel vapors. Risk of burns or severe injury from explosion. Smoking is absolutely prohibited during the refueling process Keep all ignition sources away Do not overfill the tank or spill fuel ... -
Page 22: Parking Brake
4.4. Parking brake WARNING Risk of being crushed by an unsecured machine Cut and crush hazard due to the machine unintentionally rolling or shifting position. Always activate the parking brake when the machine is not in use. Always activate the parking brake before leaving the machine. Procedure Activate: •... -
Page 23: Pushbar Setup
4.6. Pushbar setup • Release screw (Pos. 1) on both sides • Set the pushbar to the adequate height for the operator. • Tighten screws. 4.7. Depth adjustment and indicator NOTICE Always lower blade slowly to avoid damage to the blade segments. •... -
Page 24: Aligning Machine With Cut Line
4.8. Aligning Machine with cut line Use the pointer and the rear nose on the frame to exactly align the diamond blade on the cut line. 24/72... -
Page 25: Installing/Replacing The Saw Blade (Tool)
4.9. Installing/replacing the saw blade (tool) WARNING Cut hazard and pull-in hazard by rotating saw blade Touching the rotating saw blade can cause burns cuts, and severing of limbs. It is forbidden to remove or open the saw blade protective hood or to interfere with the rotating ... - Page 26 Left-hand thread! NOTICE Installing the saw blade When installing the saw blade, make sure the surface of the blade is clean. The saw blade must lie directly against the flange. Match the rotational direction of the saw blade to the rotational direction arrow (down-cutting).
-
Page 27: Transport
5. TRANSPORT 5.1. Transport position WARNUNG Crush hazard from unsecured machine Machine can shift position or parts will fall off if not secured correctly. Transport machine only in the transport position. Use suitable lashing equipment and method for safe lashing. NOTICE Transporting the machine When transporting the floor saw, large sloping positions must be avoided. -
Page 28: Lifting By Crane
5.2. Lifting by crane WARNING Suspended Loads Risk of injury from falling parts. Do not step under raises machine or parts Only use undamaged lifting device with sufficient load capacity The machine may only be lifted in the transport position ... -
Page 29: Tie Down For Transport
5.3. Tie down for transport WARNING Crush hazard due to slipping or tilting of the machine Unintentional changes in the position of the machine can crush people. Only transport the floor saw in transport position. Secure the floor saw via the chain points. ... -
Page 30: Operation
6. OPERATION 6.1. Safety • The floor saw may only be operated by one person. General rules Banish other persons from the work area, or cordon off work area. • The operator is not permitted to leave the machine while the engine is running. •... -
Page 31: Start Preparations
CAUTION Burn hazard Engine parts and tools become hot during operation and can cause burns Avoid contact with the skin Wear personal protection equipment Leave the engine to cool down before working on the device 6.2. Start preparations NOTICE Cutting without obstacles Damage to objects in the cutting area or the saw blade. -
Page 32: Starting And Stopping The Engine
6.3. Starting and Stopping the Engine WARNING Automatic startup of cutting tool The diamond blade will start spinning as soon as the engine is turning. There is no clutch. Always keep a safe distance to the diamond blade. Pos. 1 Choke Pos. - Page 33 Stopping the engine The operator must always switch off the motor from the side facing away from the saw blade. WARNING: Always maintain the greatest possible safety distance from the saw blade! Sequence Lift blade fully out of the kerf. Activate the parking brake Set throttle to MIN Close fuel valve...
-
Page 34: Relocating The Floor Saw
6.4. Relocating the floor saw WARNING Cut hazard at rotating saw blade When touching the rotating saw blade, clothing and limbs can be pulled in and severed. The machine may not be maneuvered while the blade is spinning. During relocation, the operator may not leave the intended working position behind the handle ... -
Page 35: Cutting With The Floor Saw
6.5. Cutting with the Floor Saw Ensure a straight cut to avoid tilting of the saw blade. Make deep cuts in several passes. Do not apply excessive feed force. Make all movements when handling the machine in a controlled and jerk-free manner. Always ensure a safe stand and good visibility. -
Page 36: Servicing
7. SERVICING 7.1. Maintenance WARNING Cut and crush hazard Serious injuries when coming into contact with a rotating saw blade or belt drive. Maintenance and repairs may only take place when the machine is switched off Maintenance and repairs may only be carried out by trained personnel. The machine must be secured against anyone else switching it on. -
Page 37: Belt Drive
7.2. Belt drive WARNING Cut and crush hazard at open belt drive Hands and clothing may be pulled in if belt cover is open. Never operate the machine with the belt guard removed. Service may only be performed with the engine securely shut off. ... - Page 38 Exchange an Tensioning of Drive Belt Sequence Remove the belt cover. Loosen the nuts on the motor carriage (Pos. 2). Loosen the lock nut (Pos. 3). Increase or decrease the belt tension with the tensioning screw (Pos. 2). Remove the drive belt (Pos. 4) in a relaxed state and replace it with a new set. Adjust the belt tension with the tensioning screw.
-
Page 39: Air Filter Maintenance
7.3. Air Filter Maintenance The air filter filters the ambient air and prevents foreign matter from entering the combustion chamber. Over time, these foreign substances settle in the air filter and reduce the flow of air. The air filter should be checked regularly and replaced in good time to prevent engine damage. Operating the engine without an air filter is not permitted. -
Page 40: Lubrication Points
7.5. Lubrication points The engine must be switched off before maintenance or repair work. Secure the machine against being unintentionally reactivated. Maintenance and service work may only be carried out by qualified technical personnel. See Engine manufacturer manual for service details. monthly daily 40/72... -
Page 41: Troubleshooting
7.6. Troubleshooting NOTICE The following points must be checked first in the event of cutting problems: Is the saw blade blunt or defective? Is there too little water to cool the saw blade? Has the correct saw blade been selected? ... -
Page 42: Maintenance Plan
7.7. Maintenance Plan This section is intended to serve as evidence of maintenance work carried out and service log book. All maintenance work and services must be logged as evidence. Machine/type: Serial number/year of manufacture: Date Maintenance work or servicing completed Date/signature 42/72... -
Page 43: Tools
The parameters must be correct in order to achieve the best results. The optimal cutting performance can be determined with this diagram. The prices of the tools can be determined in the LISSMAC sales booklet. This sales booklet can be obtained from the manufacturer at any time. -
Page 44: Warranty
9. WARRANTY The warranty for this machine is 12 months. For the wear parts listed below, the warranty is only valid for wear that is not due to operation. Wear parts are those parts that are subject to operational wear when the machine is used as intended. The wear time cannot be defined in a uniform manner, it differs according to the usage intensity. -
Page 45: Spare Parts
10. SPARE PARTS 45/72... - Page 46 46/72 Abb. 0...
- Page 47 47/72 Abb. 01...
- Page 48 48/72 Abb. 01.1...
- Page 49 Abb. Pos Artikel-Nr. Spezifikation Deutsch English 01.1 1072642 Grundrahmen Base frame 01.1 208074 ALEV 200/20K, Blickle Schwerlastrad Heavy duty bike 01.1 1072673 Verstärkungsplatte Reinforcing plate 01.1 300392 DIN933-M10x55 verz. Sechskantschraube Hexagon bolt 01.1 300240 DIN980-M10 verz. Sicherungsmutter Locking nut 01.1 300177 DIN 125-A10,5 verz.
- Page 50 50/72 Abb. 01.2...
- Page 51 Abb. Pos Artikel-Nr. Spezifikation Deutsch English 01.2 1072672 Wippe Seesaw 01.2 201921 Ø 125 Vollgummi-Rad rubber wheel 01.2 1072692 Lagerklotz Bearing block 01.2 1002838 BB 2517 DU Bundbuchse Collar bushing 01.2 300237 DIN9021-Ø8,4 verz. Scheibe Washer Senkschraube m. 01.2 300384 DIN7991 8x20 verz.
- Page 52 52/72 Abb. 01.3...
- Page 53 Abb. Pos Artikel-Nr. Spezifikation Deutsch English 01.3 1072697 Sägeblattwelle Saw blade shaft 01.3 1072720 UCFL 205, NSK Flanschlager Flange bearing 01.3 1072698 Keilrippenscheibe V-ribbed pulley 01.3 1072730 12 PK 633 Keilrippenriemen V-ribbed belt 01.3 1072709 Sägeblattflansch Saw blade flange 01.3 1072710 Druckscheibe Thrust washer...
- Page 54 54/72 Abb. 02...
- Page 55 Abb. Pos Artikel-Nr. Spezifikation Deutsch English 206245 Benzinmotor Petrol engine 1.01 XXX 1.02 XXX 1.03 XXX 1.04 XXX 1.05 XXX 1.06 XXX 1072708 Keilrippenscheibe Motor V-ribbed pulley Motor 300729 DIN9021 8,4x38x1,5 Karosseriescheibe Body pane 300356 DIN933-M8x35 verz. Sechskantschraube Hexagon bolt 200387 DIN6885 A7x7x32 Passfeder...
- Page 56 56/72 Abb. 03...
- Page 57 57/72 Abb. 03.1...
- Page 58 Abb. Pos Artikel-Nr. Spezifikation Deutsch English 03.1 1072590 Seitenblech links Side plate left 03.1 1072591 Seitenblech rechts Side panel right 03.1 1072647 Kranblech crane plate 03.1 1072581 Deckblech Cover plate 03.1 1072637 Halteblech retaining plate 03.1 1072780 Blechhaken Sheet metal hooks 03.1 1072691 Halteklammer...
- Page 59 59/72 Abb. 03.2...
- Page 60 Abb. Pos Artikel-Nr. Spezifikation Deutsch English 03.2 1072689 Aushub-Gestänge Excavation Booms 03.2 1072592 Tiefenanzeige Depth display 03.2 1072636 Zeiger Pointer 03.2 1072690 Blech Sheet metal 03.2 1072609 TR20 x 8P4 Trapezspindel Trapezoidal spindle 03.2 1072707 10-22-100, 1100 N Gasdruckfeder Gas pressure spring 03.2 1072105 UCFL204, NTN...
- Page 61 61/72 Abb. 03.3...
- Page 62 Abb. Artikel-Nr. Spezifikation Deutsch English 03.3 1072776 Wassertank kpl. 03.3 30.01 1072777 25 Liter Wassertank 03.3 30.02 280109 MS m. SKT AG 1/2" IG 3/4" Reduzier-Gewindenippel 03.3 30.03 262697 für G 1/2", Polyamid Dichtung 03.3 30.04 263361 1/2"AGx9mm Schlauchverschraubung 03.3 30.05 200322 9x3mm mit Einlage PVC-Schlauch...
- Page 63 63/72 Abb. 03.4...
- Page 64 Abb. Artikel-Nr. Spezifikation Deutsch English 03.4 1072554 Handgriff kpl 03.4 32.01 1072515 Handgriff 03.4 32.02 1072566 Halteblech li. 03.4 32.03 1072560 Halteblech re. 03.4 32.04 211416 Handgriff 03.4 32.05 1072559 MGI 30 x 30 Gummipuffer 03.4 32.06 300343 DIN933-M10x20 verz. Sechskantschraube Hexagon bolt 03.4...
- Page 65 65/72 Abb. 03.6 Abb. 03.5...
- Page 66 Abb. Artikel-Nr. Spezifikation Deutsch English 03.5 1074361 Sperrhebel kpl. Locking lever cpl. 03.5 33.01 1072584 Sperrblech Locking plate 03.5 33.02 300343 DIN933-M10x20 verz. Sechskantschraube Hexagon bolt 03.5 33.03 300177 DIN125-A10,5 verz. Scheibe Washer Abb. Artikel-Nr. Spezifikation Deutsch English 03.6 1074362 Rad - Feststeller wheel - lock 03.6...
- Page 67 67/72 Abb. 03.4...
- Page 68 Abb. Artikel-Nr. Spezifikation Deutsch English 03.4 1072514 Sägehaube kpl. Saw hood cpl. 03.4 1074365 Wassergabel kpl. Water fork cpl. 03.4 2.01 1072506 Wassergabel Water fork 03.4 2.02 280263 MS verchromt SK 2x IG1/2" Kugelhahn Ball valve 03.4 2.03 280104 MS m. Außengewinde 1/2" GEKA-Kupplung GEKA coupling 03.4...
- Page 69 69/72 Abb. 05 Abb. 06...
- Page 70 Abb. Artikel-Nr. Spezifikation Deutsch English 1074372 Riemenschutz kpl. Belt guard cpl. Abb. Artikel-Nr. Spezifikation Deutsch English 1074380 Peilstab kpl. Pointer cpl. Um Fehllieferungen zu vermeiden, sollten Sie bei Ersatzteil-Bestellungen die vollständige Typenbezeichnung, das Baujahr und die Maschinen-Nummer angeben! Technische Änderungen vorbehalten! Wir machen ausdrücklich darauf aufmerksam, dass nicht von uns gelieferte Teile auch nicht von uns geprüft und freigegeben sind.
- Page 71 Translation of Original EC declaration of conformity This EC declaration of conformity applies to the following machine: LISSMAC COMPACTCUT 201 P floor saw. This declaration only refers to the machine in the condition in which it was sold; parts retrofitted by the end user and / or retrospective intervention is not covered by this declaration.
- Page 72 72/72...
Need help?
Do you have a question about the COMPACTCUT 201 P and is the answer not in the manual?
Questions and answers