
Related Manuals for Lissmac COMPACTCUT 301 P


Summary of Contents for Lissmac COMPACTCUT 301 P
- Page 1 OPERATING MANUAL FLOOR SAW COMPACTCUT 301 P LISSMAC Maschinenbau GmbH Lanzstrasse 4 D-88410 Bad Wurzach, Germany Phone +49 (0) 7564 / 307-0 Fax +49 (0) 7564 / 307-500 lissmac@lissmac.com www.lissmac.com 1/46...
- Page 2 2/46...
- Page 3 Legal notice The operating manual is valid for: LISSMAC floor saw • COMPACTCUT 301 P Manufacturer: LISSMAC Maschinenbau GmbH Lanzstrasse 4 D - 88410 Bad Wurzach Phone: +49 (0) 7564 / 307 – 0 Fax: +49 (0) 7564 / 307 – 500 lissmac@lissmac.com...
- Page 4 BASIC SAFETY NOTICES Warning notices and symbols in this manual SIGNAL WORD Type and source of danger Consequences of non-compliance Action to avert the hazard The signal word behind the danger symbol indicates the degree of danger: This indicates an extremely dangerous situation. If the situation is not avoided, it will likely result in DANGER fatal injuries.
- Page 5 The following warning and safety notices are used: Read and observe the operating manual Warning of hot surfaces Automatic start-up of the cutting tool when starting the Wear hearing protection engine Do not move the machine outside the cutting area with Wear eye protection the saw blade rotating Wear gloves...
- Page 6 Operating manual combustion engine LISSMAC accepts no responsibility or liability for the completeness of further documentation. Changes and reservations We have taken every effort to ensure that this operating manual is correct and up to date. In order to maintain our technological lead, it may be necessary to make modifications to the product and to its operation without notice.
-
Page 7: Table Of Contents
Table of contents 1. Features & advantages ....................8 2. General safety notices ..................... 9 2.1. Purpose; intended use ...................... 9 2.2. Organizational measures ....................10 2.3. Choice of personnel and qualification; fundamental obligations ........11 2.4. Safety notices relating to the phases of use ..............11 2.4.1. -
Page 8: Table Of Contents 1. Features & Advantages
1. FEATURES & ADVANTAGES Thanks to its compact and robust design, the COMPACTCUT 301 series is ideal for use on confined construction sites. The saw blade is lowered and raised steplessly via a closed lead screw with cutting depth display, thus preventing damage to the saw blade. -
Page 9: General Safety Notices
Intended The LISSMAC floor saw is a floor cutting machine and is intended exclusively for cutting joints in concrete or asphalt. Cutting includes saw blades up to a maximum width of 15 mm. The device may only be used for cutting on the floor. -
Page 10: Organizational Measures
2.2. Organizational measures This operating manual must be kept within easy reach for everyone at the place of use. Supplements to the operating manual include general statutory and other binding regulations for preventing accidents and protecting the environment and must be obeyed. Such regulations may also deal with, for example, the handling of hazardous substances, the wearing of personal protective equipment and with road traffic regulations. -
Page 11: Choice Of Personnel And Qualification; Fundamental Obligations
2.3. Choice of personnel and qualification; fundamental obligations Operators must be aged 18 or above and they must be mentally and physically capable of operating the floor saw. All persons must be instructed in the operation and be expressly assigned by the employer with the operation of the floor saw. -
Page 12: Commissioning
2.4.2. Commissioning Check the direction of operation when fitting the saw blade. The cutting process must always be synchronized (downwards), otherwise the material will tear out and small pieces will fly around. When fitting the saw blade, protect your hands from sharp edges. Make sure the substrate that is used for cutting meets the load-bearing capacity. -
Page 13: Relocating The Floor Saw
2.4.4. Relocating the floor saw The floor saw may only be relocated when the saw blade is stationary. Before leaving the operating position on the floor saw, the combustion engine must be switched off and the saw blade must be at a standstill. The combustion engine must be started and stopped on the side facing away from the saw blade. -
Page 14: Dust
2.5.2. Dust With work in confined spaces, observe existing national regulations where applicable. To prevent the formation of dust during cutting, the saw blade must be continuously sprayed with water and cooled. Dry cutting is only permitted with a special conversion kit and dust extraction. Do not eat, drink or smoke in the work area. -
Page 15: Packaging And Storage
2.7. Packaging and storage In order to ensure sufficient protection during dispatch and transport, the machine and its components were packed carefully. The machine should be checked for damage upon receipt. The packing of the device consists of recyclable materials. Place them into the containers provided for recycling so that they can be recycled. -
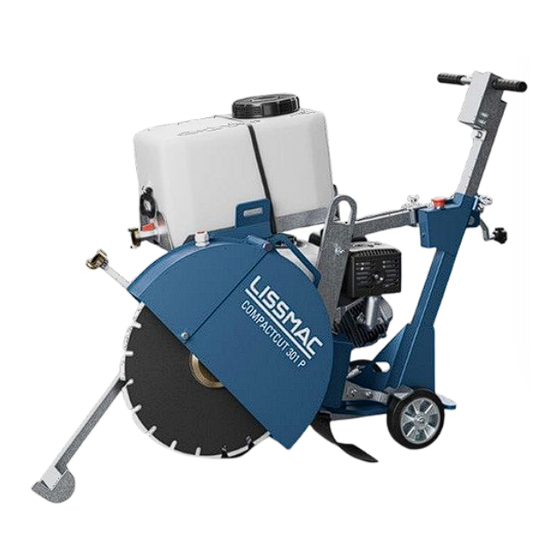
Page 16: Device Description
3. DEVICE DESCRIPTION 3.1. Designation of the machine parts Pos. 1 Saw blade guard with folding function Pos. 2 Pointer Pos. 3 Water connection blade guard Pos. 4 Water tank with safety belt Pos. 5 Attachment point for lifting gear Pos. - Page 17 Pos. 8 Cutting depth adjustment with lock Pos. 9 Vibration-damped handlebar Pos. 10 Engine stop switch Pos. 11 Cutting depth display Pos. 12 Multi-purpose wrench Pos. 13 Water connection for hose with regulation Pos. 14 Ignition switch Pos. 15 Pull starter Pos.
-
Page 18: Technical Data
3.2. Technical Data COMPACTCUT 301 P Max. cutting depth 180 mm max. saw blade diameter 500 mm Max. saw blade width 15 mm Saw blade arbor 25.4 mm Saw blade speed 2300 1/min Empty weight 105 kg Water tank capacity... -
Page 19: Sound Power Level
The specified value was determined with the maximum saw blade diameter of 500 mm. The effects can be inversely proportional to the weight of the operator. Vibration total value: COMPACTCUT 301 P a 6.0 m/s The specified values were measured while cutting concrete at a cutting depth of 5 cm. In practice, this value is affected by the following conditions: ... -
Page 20: Commissioning
4. COMMISSIONING 4.1. Connections and operating materials Motor oil The motor is filled with SAE 10W-40 motor oil by the manufacturer. Only motor oil of service class SJ or better approved by the manufacturer may be used. The specifications and quality requirements are contained in the operating manual for the fuel engine. Fuel The floor saw must be refueled with unleaded, sulphur-free gasoline in accordance with DIN EN 228 (RON 95 octane). -
Page 21: Refueling With Fuel
4.3. Refueling with fuel WARNING Danger of fire and explosion Highly flammable fuel vapors. Danger of burns or serious injury due to explosion. Smoking is absolutely prohibited during the process Keep all ignition sources away Do not overfill the tank or spill fuel ... -
Page 22: Parking Brake
4.4. Parking brake WARNING Crushing and cutting injuries Crushing injuries due to the machine rolling away or cutting injuries due to the rotating saw blade. Activate the parking brake every time you stop Switch off the motor before leaving the machine ... -
Page 23: Installing / Changing The Saw Blade
4.6. Installing / changing the saw blade WARNING Cutting injury and danger of being drawn in by the rotating saw blade Touching the rotating saw blade can result in cuts, severed limbs and burns. It is forbidden to remove or open the saw blade guard, or to reach into the rotating saw blade ... - Page 24 Activate the parking brake, stop the Sequence: motor, wait for all parts to come to a standstill Release the guard lock (Pos. 1) Saw blade guard can be removed upwards Loosen the flange nut (Pos. 2) with the on-board tool Remove the spacer ring (Pos.
-
Page 25: Drive Belt
4.7. Drive belt WARNING Cutting and crushing injuries on the rotating belt drive Risk of body parts and clothing being pulled in when opening and removing the belt cover. Removing or opening the belt cover or engaging in the rotating belt drive is prohibited ... - Page 26 Loosen the screw connections and remove the belt guard plate. Loosen the screw (Pos. 1) and slacken the belt using the tensioning screw (Pos. Replace the belt set. Reassemble in reverse order. NOTICE Replacing belts Only use belts of the same type and manufacturer. We strongly recommend that you only ever replace complete belt sets.
-
Page 27: Transport
5. TRANSPORT 5.1. Transport position WARNING Crushing due to unsecured machine Injuries due to the unintentional change of the position of the machine or the falling of parts. Only transport the floor saw in transport position. Secure the floor saws using attachment points NOTICE Machine transport Avoid large inclinations when transporting the floor saw. -
Page 28: Relocating Using A Crane
5.2. Relocating using a crane WARNING Suspended loads Danger of injury due to falling parts. Do not stay under hoisted machines or parts. Only use undamaged lifting gears with the sufficient load bearing capacity and length. The machine must only be moved in the transport position. ... -
Page 29: Securing The Machine For Transport
5.3. Securing the machine for transport WARNING Injuries through slipping or tilting of the machine People can be crushed by accidental position changes of the machine. Only ever transport the machine in transport position. Secure the machine at the suitable attachment points. ... -
Page 30: Operation
6. OPERATION 6.1. General safety • The floor saw may only be operated by one person. Ensure that other people vacate the work area or set up a barrier. • Never start the machine when the saw blade rests on the ground. The drive will be overloaded. -
Page 31: Special Types Of Danger
6.1. Special types of danger 6.1.1. Combustion engines DANGER Poisonous exhaust gases The exhaust gases of the combustion motor contain carbon monoxide. It is an invisible, odorless and tasteless gas that can cause unconsciousness and suffocation. It can accumulate quickly in closed rooms and remain there for hours, even after the motor was switched off. -
Page 32: Starting And Stopping The Machine
6.2. Starting and stopping the machine WARNING Automatic starting of the cutting tool The saw blade rotates as soon as the engine is running. It cannot be decoupled. Always maintain the greatest possible safety distance from the saw blade. 6.2.1. -
Page 33: Stopping
6.2.2. Stopping The ignition on/off switch is located at the front of the engine. The operator must always switch off the engine from the side facing away from the saw blade. CAUTION: Always maintain the greatest possible safety distance from the saw blade! Sequence: 1. -
Page 34: Setting Up And Moving The Floor Saw
6.3. Setting up and moving the floor saw WARNING Cutting injuries due to rotating saw blade By touching the rotating saw blade clothes can be pulled in and limbs severed. Any movement of the machine outside the area where cutting work is to be performed must be ... -
Page 35: Cutting With The Floor Saw
6.4. Cutting with the floor saw Sequence: Place the floor saw in position Fold the dipstick down Align the dipstick and saw blade above the cutting line Open the ball valve on the water canister or water connection Start the engine and apply the throttle lever of the fuel engine as far as it will go Slowly lower the blade to cutting depth using the crank handle Initiate feed movement via the handlebar Adjust the feed speed... -
Page 36: Depth Setting
6.6. Depth setting NOTICE Always lower the blade slowly to prevent damage. Sequence: Lower the saw blade using the crank until it barely touches the floor. Loosen the wing nut on the depth display (Pos. 2). Slide the depth display on the pipe up to „0“on the scale and tighten the wing nut. ... -
Page 37: Cutting With The Blade Guard Opened
6.8. Cutting with the blade guard opened WARNING Danger of cutting on the exposed saw blade Serious injuries due to rotating saw blade or ejected material. Conversion only when the blade is stationary and the drive is safely deactivated Keep the machine’s cutting area free ... -
Page 38: Maintenance
7. MAINTENANCE 7.1. Maintenance WARNING Danger of injury due to rotating parts. Serious injuries due to rotating saw blade or belt drive Maintenance and repairs must only ever be carried out when the machine is switched off. Maintenance and repairs may only be carried out by qualified personnel. The machine must be secured against being switched on by other persons ... - Page 39 7.2. Lubrication points Lubricate the threaded rod of the hand crank and locking bolt monthly. Lubricate the swivel joint monthly. For details on maintenance of the gasoline engine, please refer to the manufacturer's instructions. 39/46...
- Page 40 7.3. Cleaning/exchanging the air filter The air filter filters the ambient air and prevents the penetration of foreign matter into the combustion chamber. These foreign matters settle on the air filter in the course of the time and reduce the flow of air. The air filter should be checked regularly and replaced in good time to prevent engine damage.
-
Page 41: Rectification
7.5. Rectification Disconnect the mains plug before carrying out maintenance or repair work. Take suitable measures to prevent accidental restarting. Maintenance and service work must only be carried out by qualified technical personnel. Error Cause Remedy Poor cutting performance Saw blade is blunt Replace saw blade Too little cooling water Check water supply... -
Page 42: Maintenance Schedule
7.6. Maintenance schedule This section is to serve as evidence for the maintenance and service book already supplied. All maintenance and service work must be registered as evidence. Machine/type: Serial number/year of manufacture: Date Maintenance or service work carried out Date/signature 42/46... -
Page 43: Tools
For the best results, the parameters must be correct. With this diagram, the optimum cutting performance can be determined. The prices of the tools can be determined in the LISSMAC sales booklet. This sales booklet can be obtained from the manufacturer at any time. -
Page 44: Warranty
9. WARRANTY The warranty for this machine is 12 months. Warranty is only provided for the wear parts listed below if the wear is not due to operation. Wear parts are parts which undergo operation-dependent wear during the intended use of the machine. The wear time cannot be defined uniformly;... - Page 45 The technical documentation is also stored at this location. In charge of documentation: Head of Design Series. Machine description: The LISSMAC floor saw belongs to the floor cutting machines and is intended exclusively for cutting joints in concrete or asphalt. Harmonized standards:...
- Page 46 46/46...
Need help?
Do you have a question about the COMPACTCUT 301 P and is the answer not in the manual?
Questions and answers