
Related Manuals for ProActiv HUSK-E


Summary of Contents for ProActiv HUSK-E
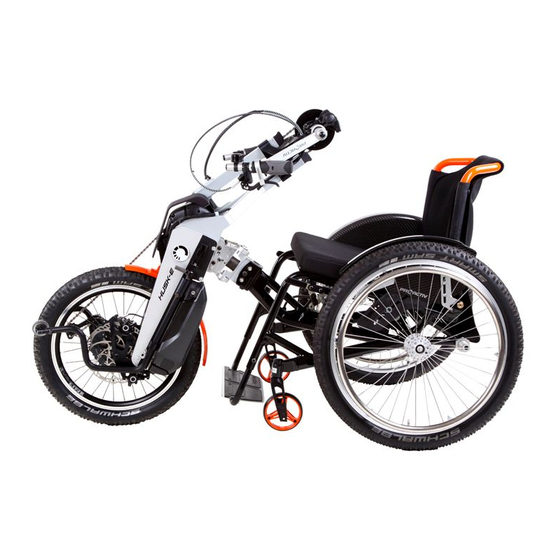
- Page 1 HUSK-E usage instructions Usage instructions Service booklet HUSK-E Adaptive bike...
-
Page 2: Table Of Contents
HUSK-E usage instructions Contents 1 Preface ............................... 4 2 Legend ..............................4 3 Declaration of conformity / other information ..................4 3.1 Classification ..........................4 3.2 Declaration of Conformity ......................4 3.3 Manufacturer ..........................4 4 Scope of delivery and testing the product on receipt ................. 4 5 Introduction ............................ - Page 3 HUSK-E usage instructions 20.2 Bottom bracket support & crank ....................15 20.2.1 Seating position ......................15 20.2.2 Folding down the bottom bracket support..............15 20.2.3 Pedal bearing position ....................16 20.2.4 Crank length and grip width ..................18 20.3 Grips ............................18 20.4 Gear shift ..........................
- Page 4 The following instructions are intended for and may only be carried out by the rehabilitation specialist dealer or PRO ACTIV. This document is available in PDF format at www.proactiv-gmbh.com for visually impaired people. Using the zoom function, the font can be increased as desired.
-
Page 5: Preface
Classification Congratulations on purchasing your new PRO ACTIV product. You have bought a The HUSK-E adaptive bike (in the following quality product which has been especially referred to as "product") is classified as a class customised to meet your requirements. -
Page 6: Introduction
HUSK-E usage instructions The product is tested to ensure it is completely about the use and settings of your product as functional before shipping and packed in well as all the safety accessories available special boxes. However, please check the (e.g. -
Page 7: Purpose And Indication
PRO ACTIV. Proper use The HUSK-E is designed to be used outdoors on tarmac and adequately paved roads that ensure the traction and the stability of the Figure 2: Anti-roll back device... -
Page 8: Technical Specifications
HUSK-E usage instructions Proper use of the product is a prerequisite for distribution between the wheelchair wheels safe operation. The product may generally be and the product's drive wheel, the total weight used only for applications that are listed and of the combination, and the friction coefficient described in these usage instructions. -
Page 9: Basic Equipment And Dimensions
HUSK-E usage instructions values given in the wheelchair's usage instructions or the restrictions dependent on the settings. Turning circle: approx. 4 m without manoeuvring back and forth approx. 2.6 m with manoeuvring back and forth (much dependent on the number of... -
Page 10: Introduction To The Product And The Surroundings
HUSK-E usage instructions 11 Introduction to the product and found on the tyres. When the tyre pressure is too low, it has a detrimental effect on the the surroundings driving behaviour, the range, and the braking During the initial commissioning of the product, reaction of the product. -
Page 11: Safety Instructions - While Driving/Using
HUSK-E usage instructions To minimise the risk of suffering serious Do not stop on a steep slope, otherwise head injuries in the event of a fall, a helmet there is a risk of losing control of the product. should always be worn when driving with the Do not turn on a slope or change your product. -
Page 12: Safety Instructions Regarding Obstacles
HUSK-E usage instructions road traffic licensing regulations (StVZO) must If the weight load on the drive wheel be observed. decreases (e.g. when driving on slopes) or when driving on loose/slippery surfaces, the Avoid driving on unpaved or loose braking action of the wheel may be surfaces (e.g. -
Page 13: Safety Instructions Regarding Dangerous Locations And Dangerous Situations
HUSK-E usage instructions ramp. During the lifting or lowering operation of 15 Safety instructions regarding the ramp or the lifting equipment, the drive dangerous locations and system must be switched off and the service dangerous situations brake of the product must be actuated. -
Page 14: Drive Wheel And Tyre Pressure
HUSK-E usage instructions 19 Drive wheel and tyre pressure Check the tyre inflation pressure at regular intervals as well as after extreme temperature effects. The recommended tyre pressure is printed on the side of the tyre. This should be observed. -
Page 15: Functional Elements
HUSK-E usage instructions 20.1.2 Parking stand height adjustment 20 Functional elements The following instructions are intended 20.1 Parking stand for and may only be carried out by a 20.1.1 Active and passive positions rehabilitation specialist dealer or PRO ACTIV By pressing down and turning the operating... -
Page 16: Bottom Bracket Support & Crank
HUSK-E usage instructions be avoided where possible. The height of the Attach- pedal bearing in this case is selected to be Distance ment bolt slightly higher (chest height or higher). from the ground to Sporty users with the appropriate trunk... -
Page 17: Pedal Bearing Position
HUSK-E usage instructions and two positions can be used as travel The angle is adjusted via the locking position positions. of the locking bolt on the right fork tube and/or gearing directly below the bottom bracket. 1. Adjusting the angle via the locking... - Page 18 HUSK-E usage instructions Rectangular tube Plastic chain guides Figure 18: Plastic chain guides in rectangular tube Figure 16: Alternative position of the insert for additional positions of the bottom bracket support 2. Adjusting the angle via the gearing directly below the bottom bracket: To...
-
Page 19: Crank Length And Grip Width
HUSK-E usage instructions Please note that, after a large adjustment Always hold onto the crank handles with to the chain pedal bearing position, the lines both hands while driving, braking, and and the cable lengths must be adjusted. manoeuvring. If a driving situation requires you... -
Page 20: Hub Gear
HUSK-E usage instructions Please note that the braking effect can be strongly reduced by one or all of the following conditions: 11-speed cassette Worn tyre profile Soiled and wet tyres Wet, soiled, loose and uneven ground ... -
Page 21: Parking Brake
HUSK-E usage instructions 20.5.2 Parking brake 20.5.3 Back-pedalling brake on the Shimano Di2 hub gear A mechanical disk brake with a locking lever is installed as a parking brake as The back-pedalling brake is operated by standard. Turning the lever applies or releases rotating the crank backwards. -
Page 22: Rechargeable Battery Pack
HUSK-E usage instructions instructions in the usage instructions from the drive manufacturer. Activating the Deactivating the crank crank Improper handling of the rechargeable release function release function battery can cause electrolyte fluid to leak. This can cause skin injuries or damage to clothing. -
Page 23: Drive System
HUSK-E usage instructions 20.7 Drive system The driving characteristics and speed parameters can be displayed and some can be 20.7.1 Switching on and off changed using the display. Changes to the The main power is powered ON/OFF using the programming may only be carried out by your rechargeable battery's on/off switch. -
Page 24: Bell
HUSK-E usage instructions switched on and off using the respective Control switch 3 actuation button on the lights. Control switch 2 Control switch 1 Actuation button Figure 34: Control switch for activating LED lighting for the front lights Figure 32: Actuation button for the front lights 20.9 Bell... -
Page 25: Storage
HUSK-E usage instructions Subject to changes to the links provided by the removed and stored separately at an component manufacturers. appropriately tempered location. 21 Storage 22 Transport Store the product on an easy-to-clean surface 22.1 Securing handling of the product... -
Page 26: Transport In Aircrafts
HUSK-E usage instructions persons or other products. Before transport, the airline and this should be discussed in check with your vehicle dealer about safely advance of the flight or the booking. securing it using the existing fitted lashing rings or other securing devices. Suitable brackets... -
Page 27: Maintenance
HUSK-E usage instructions After cleaning, check to make sure that the instructions of the manufacturer which were plug connectors are not damp and, if required, included in delivery are followed. allow them to dry before re-starting the Only manufacturer's original parts may be product. -
Page 28: Proof Of Maintenance
HUSK-E usage instructions PRO ACTIV for safe operation of the product 26 Disposal and recycling and to minimise the risk to the user or third- At the end of the service life, the product can parties. be disposed of by PRO ACTIV or your... -
Page 29: Warranty
HUSK-E usage instructions Before the product can be reused, it must be The product has been commissioned and prepared with care. A disinfection agent that is used in non-compliance with these suitable for medical products must be sprayed operating instructions. -
Page 30: Appendix: Tightening Torques And Securing Details
HUSK-E usage instructions 30 Appendix: Tightening torques and securing details The following table shows the torques for shaft screws with a metric control thread (valid providing the drawing, assembly, or usage instructions do not state different values!): Torque MA in Nm depending on how tight the screws are Dimension Stability 8.8... -
Page 31: Appendix: Medical Product Passport/Record Of Training
HUSK-E usage instructions 31 Appendix: Medical product passport/record of training Product specifications: Serial number: Key number/s: Customer data: Surname, forename: Street: Postcode, city: Phone: Paying organisation: Training carried out by: Rehabilitation specialist dealer PRO ACTIV Field Representative/ Stamp / Date / Rehabilitation specialist dealer's signature... -
Page 32: Appendix: Hand-Over Certificate
HUSK-E usage instructions 32 Appendix: Hand-over certificate 32.1 Required compliance criteria to authorise use Completed/ Topics Remarks fulfilled The product is suitable for the customer based on their own judgement and the customer information received regarding the disability-related restrictions. The use intended by the customer is fully consistent with the intended use as described in the usage instructions (see chapter “Purpose and indication”). -
Page 33: Check List For Training The User
HUSK-E usage instructions 32.2 Check list for training the user Completed/ Topics fulfilled Advised of the applicable legal regulations when driving on public roads (www.stvzo.de). All mechanical function controls have been explained and their function demonstrated. Adaptation of the adapter to the wheelchair and removing the adapter from the wheelchair has been demonstrated and then performed by the user themselves and/or an assistant. -
Page 34: Appendix: Inspection Lists
HUSK-E usage instructions 33 Appendix: Inspection lists Initial inspection: After 200 km or after 5 months Serial number: ____________________ OK / not OK resolved carried out Kilometre reading: ____________________ Check that all screws/fastening elements are firmly seated Carry out a functional and safety check of all lights (if fitted), steering... - Page 35 HUSK-E usage instructions Subsequent inspection: After another 1,000 km or 1 year after the last inspection or after heavy use Serial number: ____________________ OK / not OK resolved carried out Kilometre reading: ____________________ Check that all screws/fastening elements are firmly seated...
- Page 36 HUSK-E usage instructions Subsequent inspection: After another 1,000 km or 1 year after the last inspection or after heavy use Serial number: ____________________ OK / not OK resolved carried out Kilometre reading: ____________________ Check that all screws/fastening elements are firmly seated...
- Page 37 HUSK-E usage instructions Subsequent inspection: After another 1,000 km or 1 year after the last inspection or after heavy use Serial number: ____________________ OK / not OK resolved carried out Kilometre reading: ____________________ Check that all screws/fastening elements are firmly seated...
- Page 38 HUSK-E usage instructions Subsequent inspection: After another 1,000 km or 1 year after the last inspection or after heavy use Serial number: ____________________ OK / not OK resolved carried out Kilometre reading: ____________________ Check that all screws/fastening elements are firmly seated...
- Page 39 HUSK-E usage instructions Subsequent inspection: After another 1,000 km or 1 year after the last inspection or after heavy use Serial number: ____________________ OK / not OK resolved carried out Kilometre reading: ____________________ Check that all screws/fastening elements are firmly seated...
- Page 40 HUSK-E usage instructions Subsequent inspection: After another 1,000 km or 1 year after the last inspection or after heavy use Serial number: ____________________ OK / not OK resolved carried out Kilometre reading: ____________________ Check that all screws/fastening elements are firmly seated...
- Page 41 HUSK-E usage instructions Subsequent inspection: After another 1,000 km or 1 year after the last inspection or after heavy use Serial number: ____________________ OK / not OK resolved carried out Kilometre reading: ____________________ Check that all screws/fastening elements are firmly seated...
- Page 42 HUSK-E usage instructions Subsequent inspection: After another 1,000 km or 1 year after the last inspection or after heavy use Serial number: ____________________ OK / not OK resolved carried out Kilometre reading: ____________________ Check that all screws/fastening elements are firmly seated...
- Page 43 HUSK-E usage instructions Subsequent inspection: After another 1,000 km or 1 year after the last inspection or after heavy use Serial number: ____________________ OK / not OK resolved carried out Kilometre reading: ____________________ Check that all screws/fastening elements are firmly seated...
- Page 44 HUSK-E usage instructions Your rehabilitation specialist dealer: PRO ACTIV Reha-Technik GmbH Im Hofstätt 11 D-72359 Dotternhausen – Germany Phone +49 7427 9480-0 Fax +49 7427 9480-7025 Email: info@proactiv-gmbh.de www.proactiv-gmbh.com...
Need help?
Do you have a question about the HUSK-E and is the answer not in the manual?
Questions and answers