
Related Manuals for Inepro PM - Copy Coin CM7000 - Xerox Config


Summary of Contents for Inepro PM - Copy Coin CM7000 - Xerox Config
- Page 1 PM - Copy Coin CM7000 - Xerox Config Technical Manual | PM - Copy Coin CM7000 - Xerox Config © 2019 Inepro B.V. All rights reserved...
- Page 2 We strongly recommend you read the license agreement to fully understand its coverage and your responsibilities of ownership. Your Inepro dealer is dedicated to your satisfaction and will be pleased to answer your questions and your concerns. Best wishes,...
- Page 3 PM - Copy Coin CM7000 - Xerox Config All rights reserved. No parts of this work may be reproduced in any form or by any means - graphic, electronic, or mechanical, including photocopying, recording, taping, or information storage and retrieval systems - without the written permission of the publisher.
-
Page 4: Table Of Contents
Table of Contents Introduction Intr oduction ....................2 M odels ....................3 C onnectivity ....................3 Hardware Setup Unpack ....................5 Disassemble / A ssemble a P ayM atic ....................6 C onnection to the copier ....................8 Installing mounting br acket .................... - Page 5 Table of Contents Appendix VI Xer ox M FP C onfigur ation ....................4 8...
- Page 6 WEEE Dir ective ( Waste of Electr ical and Electr onic Equipment) Inepro considers it important to properly take the climate into account. We therefore produce as many climate-friendly products. Your new dev ice contains materials w hich can be recy cled and then reused.
-
Page 7: Introduction
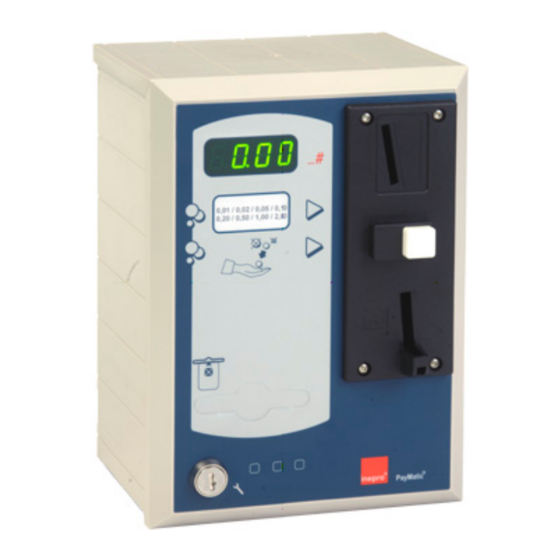
Introduction Part... - Page 8 The Pay Matic ® COIN can be programmed v ia the three buttons at the f ront of the coin box. The ov erride key switch enables the f ree usage mode. Read this manual carefully to obtain the best performance of your PayMatic ® coin box. PM - Copy Coin CM7000 - Xerox Config...
-
Page 9: Models
Introduction Models The Pay Matic ® COIN is av ailable in v arious ty pes. The dif f erences in the coin boxes is based on the coin insert and interf ace cables. Connectivity The Pay Matic ® COIN is equipped with the latest v ersion of the circuit board, the CM7000. This circuit board has opto coupler in and outputs f or connection the coin box to the photo copier. -
Page 10: Hardware Setup
Hardware Setup Part... -
Page 11: Unpack
Hardware Setup Unpack PayMatic Af ter unpacking of the coin box, inspect it f or any possible shipping damage. If the coin box is damaged, notif y the shipping company immediately . Only the consignee ( the person or company receiv ing the coin box) can f ile a claim against the carrier f or shipping damage. We recommend that y ou keep the original shipping carton and packing materials to reuse if y ou need to transport or ship y our coin box in the f uture. -
Page 12: Disassemble / Assemble A Paymatic
3. Take out the two security pins. 4. Slide the f ront plate down under that angle. Open the f ront plate under a 15 degree angle. PM - Copy Coin CM7000 - Xerox Config... - Page 13 Hardware Setup 5. Slide the top to the back. Lif t the top of the case. To assemble f ollow the procedure in rev erse order, making sure that the security pins are placed in step 3 and that the top is assembled bef ore attaching the main case to a wall (using the 4 including screws).
-
Page 14: Connection To The Copier
Some copiers are supplied with a plug and play connector. Inepro keeps a large copier database where all interf aced copiers are stored. If y ou need specif ic inf ormation please check the documentation or contact Inepro. - Page 15 Hardware Setup Installation of the Pay Matic ® column Bef ore starting, decide on which side of the copier the Pay Matic ® column is to be installed. The bottom panel is to be f ixed by means of 2 included M5 x 16 mm. screws. Remov e the coin box f rom the Pay Matic ®...
-
Page 16: Paymatic ® Column (Optional)
PayMatic ® column (optional) PM - Copy Coin CM7000 - Xerox Config... -
Page 17: Software Setup
Software Setup Part... -
Page 18: Setting Up The P Aym Atic ® C O
Setting up the PayMatic ® COIN. Setting up the PayMatic ® COIN INEPRO has set up the coin box with all of it’s required settings. The settings of the Pay Matic ® COIN can be changed. For changing pricings and other setting the Pay Matic ®... -
Page 19: Menu Safety
. For security reasons all key s supplied with this coin box are specif ic to it, The Inepro Group cannot supply spare key s should the originals become lost. Please keep the key s in a saf e place. -
Page 20: Changing Cost Per Copy
If in doubt, please check with y our serv ice prov ider bef ore carry ing out any of these changes. Reading copy meters Please ref er to Appendix I f or reading out the copy meters / audit inf ormation. PM - Copy Coin CM7000 - Xerox Config... -
Page 21: Free Usage Of The Copier
Software Setup Free usage of the copier Turning the ov erride key switch, located at the f ront of the coin box, into the serv ice position enables the f ree usage mode. Each copy made in this mode is not deducted f rom the credit but is registered under special counters, see audit (or Copy meter) f unctions C16 till C31. -
Page 22: Routine Maintanance
Routine Maintanance Part... -
Page 23: Storage
Routine Maintanance Routine Maintenance Routine maintenance will improv e perf ormance and extended the working lif etime of y our Pay Matic ® coin box and reduce the need f or more inv olv ed repairs. Frequently or maintenance will depend on env ironment and number of transactions. For normal env ironments, cleaning is recommended ev ery six. -
Page 24: Emptying The Coin Box
If the cash box is f illed to the top it might be dif f icult to empty it because of its weight. We theref ore adv ise y ou to empty the coin box regularly ! Emptying the cash box in time will help you to avoid problems! PM - Copy Coin CM7000 - Xerox Config... -
Page 25: Troubleshooting
Troubleshooting Part... - Page 26 Cash box is stuck to the pillar · Ca sh b o x is to o fu ll Contact y our supplier, a f ield serv ice engineer might be needed to solv e this issue. PM - Copy Coin CM7000 - Xerox Config...
- Page 27 Appendix I Part...
-
Page 28: Operator Functions
. That is why price 3 of ten has to coincide with the v alue of price 2. The other price conf igurations (f unction 4 to f unction 8) are not applicable. PM - Copy Coin CM7000 - Xerox Config... - Page 29 Appendix I Function 01 to Function 08, Price configurations - Extended (F18 is enabled) All these f unctions are price conf igurations. Price 1 is “standard” the price f or A4 Black-white. The other price conf igurations depend on the connections. The copy price, which can be introduced in these f unctions, has to be div ided by a basic v alue (f unction 79).
- Page 30 Af ter the correct introduction of the password in f unction 29, all higher f unctions (f unction 31 to 100) will be released. If the correct password is introduced in f unction 30, then the other INEPRO f unctions will be released. PM - Copy Coin CM7000 - Xerox Config...
- Page 31 Appendix I Function 31, Hold select paper (IR 1600 copier) Time that must be expired af ter the last key counter pulse bef ore there can be selected a new input status Function 32, Take over paper select (IR 1600 copier) Selected paper will be selected when there are no changing's f or 3,5 seconds at the inputs of the print / copier Functions 33-40, Not applicable...
-
Page 32: Configuaration Functions
63 and Output 2 with f unction 64. Modif y ing the outputs status is ef f ected activ e “on” or Activ e “of f ”. In the stand-by mode, not activ ated, the outputs will react the other way round. PM - Copy Coin CM7000 - Xerox Config... - Page 33 Appendix I Function 65 not applicable Function 66, Output 2 mode Standard it is in the OFF position. Function of the parameters: Value Description Function Normal, Default position Switch on both outputs when there is enough credit for one copy. Inp 2 Input 2 Switch on output 2 when there is enough credit for an A3 copy.
- Page 34 Function 85, Display updates speed This conf iguration determines the automatic update time f or all inf ormation shown on the display . The conf iguration is programmable in steps of 10 milliseconds. PM - Copy Coin CM7000 - Xerox Config...
- Page 35 Appendix I Function 86 and f unction 87, In and Output process Function 86, option between –S and –I The f unction of “-S” If price 1 (f unction 1) is reached, both outputs to release the copier are activ ated. Input 1 is def ined as a counter input.
- Page 36 8 prices can be ef f ected. In the binary mode, input 5 is not applicable. Input 1 alway s has to be shortly activ ated during the activ e input signals. PM - Copy Coin CM7000 - Xerox Config...
- Page 37 Appendix I Input 2 3 Input 3 Input 4 Paper size Price programming Deactivated Deactivated Deactivated Activated Deactivated Deactivated Deactivated Activated Deactivated Activated Activated Deactivated Deactivated Deactivated Activated Activated Deactivated Activated Deactivated Activated Activated Activated Activated Activated - The f unctioning of “lev el” With the lev el programming, one input has alway s to be activ ated.
- Page 38 It is strongly recommend that a pre-prepared spread sheet is av ailable to enter the inf ormation as each meter is display ed f or approximately 1 second only . The resettable meters cannot be cleared in this mode. PM - Copy Coin CM7000 - Xerox Config...
- Page 39 Appendix I Reading and resetting the audit information manually: To activ ate the audit mode press the “Up” button and simultaneously turn the ov erride key switch into the “Serv ice” position; Release the “Up” button. On the display is display ed C.0; With the “UP”...
-
Page 40: Reading Audit Information
To reset the counter, press simultaneously the “Up” and “Down” key s; · Press the “Fu” key to leav e the selected f unction. Total counters are not resettable Only av ailable with the optional ECOS Volume Discount option. PM - Copy Coin CM7000 - Xerox Config... -
Page 41: Appendix Ii
Appendix II Part... -
Page 42: Inter Face Cables
Colour of the Polarity Signal name Observations connector connector lead 1 J-6 Green Output 1 Relay output Neutral 2 J-6 Yellow 1 J-7 White Counter input Opto-coupler (Input 1) input 2 J-7 Brown PM - Copy Coin CM7000 - Xerox Config... -
Page 43: Appendix Ii
Appendix II Connection sheet for positive and negative input signals · The power supply of the input signals needs to be minimum 5V DC and maximum 30V DC. The inputs are separated by of galv anisation by means of an opto-coupler in order to av oid any risk of damage to the electronics of the copier. - Page 44 Appendix III VIII Part...
-
Page 45: O Ver View Main Boar
Appendix III Overview main board... - Page 46 Appendix IV Part...
- Page 47 Appendix IV Coin acceptor Coin blocking Coin blocking may occur in v arious way s. One possibility is the general blocking of the input line, which will block the coin acceptor f rom accepting all coins. Secondly , it is possible to block coins or groups of coins indiv idually through 16 DIP blocking switches on the coin acceptor.
-
Page 48: Coin Acceptor
The remaining space on the label is dev oted to the specif ication of the programmed coins. These specif ications are in the f orm of a table. The columns hav e the f ollowing meaning: Coin ty pe (Value and currency ) PM - Copy Coin CM7000 - Xerox Config... -
Page 49: Appendix Iv
Appendix IV Teach mode channels are marked with TKn. „n“ = number of blocking switch, which has to be used to activ ate the teach mode f or this channel. Blocking switch f or the broad channel Blocking switch f or the narrow channel Blocking switch f or the v ery narrow channel Blocking switch f or a coin ty pe or coin group (currency ) Output line... - Page 50 Reconnect the communication cable. Of all the cables, only the communication cable must be connected, the cable with the white connector routed f rom the f ront plate must not be connected. PM - Copy Coin CM7000 - Xerox Config...
- Page 51 Appendix V Part...
-
Page 52: General Technical Specifications
Metric 10 – 35 degrees Celsius Non-metric 50 – 95 degrees Fahrenheit Relative humidity 20% - 85% Non condensing Features Number of price lines 8 (according to the type of copier and connecting cable) PM - Copy Coin CM7000 - Xerox Config... - Page 53 Appendix VI Part...
- Page 54 Press the "Machine Inf o" button in the bottom lef t corner of the Xerox console panel to enter the menu. Go to the Tools tab. At Accounting Settings -> Accounting Mode PM - Copy Coin CM7000 - Xerox Config...
- Page 55 Appendix VI Set Accounting Mode to Auxiliary Access. Set Auxiliary Device Type to Card Activated.
- Page 56 At Service Access & Accounting make sure all serv ices are selected to restrict and Copy is selected at serv ices y ou want to track usage. Set Job Timeout to "1" second. PM - Copy Coin CM7000 - Xerox Config...
- Page 57 Appendix VI Set Double Count Large Impressions to Count Once. Set Premium Select to None. Press Sav e.
- Page 58 "Log in / Log out" button in the upper right corner of the Xerox console panel again. Select "Logout" to logout as administrator. The def ault screen should now be the f ollowing: PM - Copy Coin CM7000 - Xerox Config...
Need help?
Do you have a question about the PM - Copy Coin CM7000 - Xerox Config and is the answer not in the manual?
Questions and answers