Huawei TP3106 Commissioning Manual
Telepresence system
Hide thumbs
Also See for TP3106:
- User manual (75 pages) ,
- Quick start manual (7 pages) ,
- Installation manual (152 pages)

Related Manuals for Huawei TP3106


Summary of Contents for Huawei TP3106
- Page 1 HUAWEI TP3106&TP3118&TP3118S V100R001C06SPC200 Commissioning Guide Issue Date 2015-02-12 HUAWEI TECHNOLOGIES CO., LTD.
- Page 2 All other trademarks and trade names mentioned in this document are the property of their respective holders. Notice The purchased products, services and features are stipulated by the contract made between Huawei and the customer. All or part of the products, services and features described in this document may not be within the purchase scope or the usage scope.
-
Page 3: About This Document
Commissioning Guide About This Document About This Document Overview This document provides guidance for deploying TP3106, TP3118, and TP3118S telepresence systems. Product Usage Principles and Suggestions When using multimedia video conference server products, strictly comply with related laws and regulations during the usage and maintenance of the recording and live broadcast services to ensure that personal information is fully protected. - Page 4 4, 5, Delivered the C03 version. and 7 Guangxing V100R001C01B316 2012-08-2 Upgrade the C03 version. SP07 Guangxing V100R001C02B921 2013-01-0 Renew the UI of touch panel SP02 Yanfeng Issue 01 (2015-02-12) Huawei Proprietary and Confidential Copyright © Huawei Technologies Co., Ltd.
- Page 5 Renew configuration of table display and combine TP3106, Yanfeng TP3118S, and TP3118 configuration data as one document. V100R001C06SPC1 2014-6-10 All the passwords of codec Zhan change to Change_Me. Dewang Issue 01 (2015-02-12) Huawei Proprietary and Confidential Copyright © Huawei Technologies Co., Ltd.
-
Page 6: Table Of Contents
3 System Upgrade...........................46 3.1 Upgrade Procedures..............................46 4 Parameter Configuration......................47 4.1 Telepresence Codec..............................48 4.1.1 Precautions.................................48 4.1.2 Configuring General Settings............................48 4.1.3 Configuring Input and Output Settings........................50 4.1.4 Controlling Devices..............................53 Issue 01 (2015-02-12) Huawei Proprietary and Confidential Copyright © Huawei Technologies Co., Ltd. - Page 7 7.1.1 Saving Camera Parameter Settings..........................152 7.1.2 Commissioning Video Effects..........................154 7.1.3 Saving Camera Parameter Settings..........................161 7.2 Setting the Wireless Router IP Address in IMS integration..................163 7.3 BOSE Host switch change............................168 Issue 01 (2015-02-12) Huawei Proprietary and Confidential Copyright © Huawei Technologies Co., Ltd.
- Page 8 7.7 Configuring eSpace Conferences..........................175 7.8 Importing the SiteCall Certificate..........................176 7.9 Abnormal Display on the Software of Huawei Telepresence..................176 7.10 PassCode Configuration for Anonymous Conferences....................176 7.11 With 720P/50 Hz Video Source, There Is a Black Edge on the Screen for Panasonic 50C Screen......179 7.12 Red line Under Chapter of HID..........................180...
-
Page 9: System Introduction
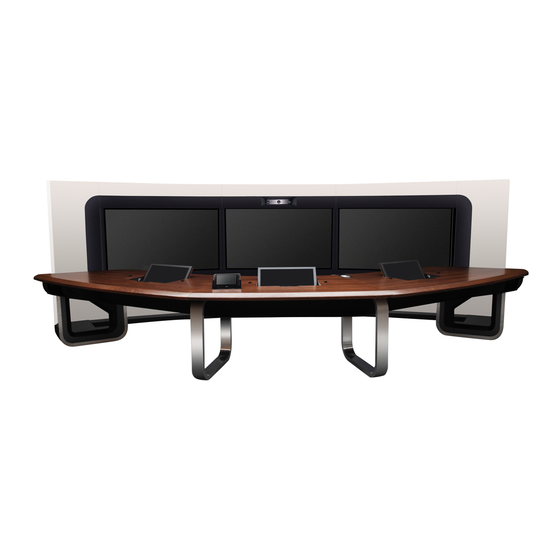
Figure 1-1. Figure 1-1 TP3106 suite 1.1.2 TP3118S Tri-screen telepresence system with two rows of conference tables seating fourteen participants, as shown in Figure 1-2. Issue 01 (2015-02-12) Huawei Proprietary and Confidential Copyright © Huawei Technologies Co., Ltd. -
Page 10: Tp3118
Figure 1-2 TP3118S suite 1.1.3 TP3118 Tri-screen telepresence system with two rows of conference tables seating eighteen participants, as shown in Figure 1-3. Figure 1-3 TP3118 suite Issue 01 (2015-02-12) Huawei Proprietary and Confidential Copyright © Huawei Technologies Co., Ltd. -
Page 11: Direction Conventions
Tabletop display V100R001C01B927 Camera TC310: V100R001C01B032 TC320: V100R001C01B018 Touch panel V200R001C01SPC102 This guide is intended for engineers responsible for deploying the TP3106&TP3118s&TP3118 running the version of C06 onsite. Issue 01 (2015-02-12) Huawei Proprietary and Confidential Copyright © Huawei Technologies Co., Ltd. -
Page 12: Deployment Preparation
If any abnormalities exist, confirm the issue with the supply chain. Label cables Sort and label the cables. Sort and label the cables according to the system connection diagrams. Issue 01 (2015-02-12) Huawei Proprietary and Confidential Copyright © Huawei Technologies Co., Ltd. -
Page 13: Tools List
To unpack and install the telepresence system, you need the tools listed in Table 2-2. Table 2-2 Tools list Tool Illustration Specification Description Phillips screwdriver Used for installing mechanical parts. Issue 01 (2015-02-12) Huawei Proprietary and Confidential Copyright © Huawei Technologies Co., Ltd. - Page 14 Spirit level Used for joining HD displays. Converter Serial-to-USB converter. Safety gloves One pair per person. Safety glasses One pair per person. Pliers Issue 01 (2015-02-12) Huawei Proprietary and Confidential Copyright © Huawei Technologies Co., Ltd.
-
Page 15: Checking Devices
Chinese- standard power cables included. Switch Quidway S3700 Speaker Bose Two sets of lifestyle 2.1 stereo speaker systems. Tabletop TA100 TP3106: 3 display TP3118S: 7 Issue 01 (2015-02-12) Huawei Proprietary and Confidential Copyright © Huawei Technologies Co., Ltd. -
Page 16: Labeling Cables
Audio- TP3106: 6 Technica TP3118S: 12 ES947 TP3118: 16 Relay IRS- S800CC10 2.4 Labeling Cables Please refer to HUAWEI TP3106&TP3118&TP3118S Cable Connection Guide to paste cable labels. Issue 01 (2015-02-12) Huawei Proprietary and Confidential Copyright © Huawei Technologies Co., Ltd. -
Page 17: Powering Devices On
The network ports on the network switch can communicate with each other. 2.6 Setting IP Addresses Before installing the TP3106&TP3118S&TP3118, assign six internal IP addresses (for access to the telepresence system's internal network) to: Issue 01 (2015-02-12) Huawei Proprietary and Confidential... - Page 18 Center telepresence codec Right telepresence codec Telepresence host Touch panel Wireless router's LAN interface Before installing the TP3106&TP3118S&TP3118, obtain four external IP addresses (for access to the customer's LAN) for: Left telepresence codec Center telepresence codec Right telepresence codec Telepresence host The telepresence host and the telepresence codecs are connected to external networks through their service network ports LAN1.
-
Page 19: Configuring Vlans On The Network Switch
2.6.1 Configuring VLANs on the Network Switch Virtual Local Area Network (VLAN) configuration: Network ports 1-12 are external network ports and 13-24 are internal network ports, as shown in Figure 2-2. Issue 01 (2015-02-12) Huawei Proprietary and Confidential Copyright © Huawei Technologies Co., Ltd. - Page 20 Figure 2-3. Figure 2-3 Connection Description dialog box Enter a name and select an icon. Then click OK. The dialog box shown in Figure 2-4 is displayed. Issue 01 (2015-02-12) Huawei Proprietary and Confidential Copyright © Huawei Technologies Co., Ltd.
- Page 21 Figure 2-5 is displayed. Figure 2-5 COM1 Properties dialog box NOTE The COM port selected must be the computer's COM port to which the switch is connected. Issue 01 (2015-02-12) Huawei Proprietary and Confidential Copyright © Huawei Technologies Co., Ltd.
- Page 22 The HyperTerminal window is displayed, as shown in Figure 2-6. Figure 2-6 HyperTerminal window1 Choose File > Properties, as shown in Figure 2-7 Figure 2-8. Figure 2-7 HyperTerminal window2 Issue 01 (2015-02-12) Huawei Proprietary and Confidential Copyright © Huawei Technologies Co., Ltd.
- Page 23 From the displayed dialog box, click Settings. From Emulation, select VT100, and click OK, as shown in Figure 2-9. The switch is now connected to the computer and you can configure VLANs. Issue 01 (2015-02-12) Huawei Proprietary and Confidential Copyright © Huawei Technologies Co., Ltd.
- Page 24 2 quit interface Ethernet 0/0/16 port link-type access port default vlan 2 quit interface Ethernet 0/0/17 port link-type access port default vlan 2 Issue 01 (2015-02-12) Huawei Proprietary and Confidential Copyright © Huawei Technologies Co., Ltd.
-
Page 25: Setting The Telepresence Codec Ip Addresses
Step 2 Connect the telepresence codec's standard power adapter to a power supply. Set the power switch on the telepresence codec to ON so that the telepresence codec automatically starts after it is powered on, as shown in Figure 2-11. Issue 01 (2015-02-12) Huawei Proprietary and Confidential Copyright © Huawei Technologies Co., Ltd. - Page 26 Figure 2-12 Telepresence codec's login page Step 4 Choose System Settings > Network > IP Settings, and change the IP address, as shown in Figure 2-13 Table 2-6. Figure 2-13 IP settings Issue 01 (2015-02-12) Huawei Proprietary and Confidential Copyright © Huawei Technologies Co., Ltd.
-
Page 27: Setting The Telepresence Host Ip Addresses
Step 1 Connect a computer directly to the telepresence host. Change the computer's IP address to be in the same network segment of the telepresence host's external IP address (192.168.1.1), as shown Figure 2-14. Issue 01 (2015-02-12) Huawei Proprietary and Confidential Copyright © Huawei Technologies Co., Ltd. - Page 28 Figure 2-15 Telepresence host's login page Step 4 Choose System Settings > Network, and change the telepresence host's internal and external IP addresses, as shown in Figure 2-16 Table 2-7. Issue 01 (2015-02-12) Huawei Proprietary and Confidential Copyright © Huawei Technologies Co., Ltd.
- Page 29 Network interface Auto detection Fixed value. mode Internal Network Connection type Static IP Fixed value. IP address 172.16.21.10 Fixed value. Subnet mask 255.255.255.0 Fixed value. Issue 01 (2015-02-12) Huawei Proprietary and Confidential Copyright © Huawei Technologies Co., Ltd.
-
Page 30: Setting The Tabletop Display Ip Addresses
NOTE After all cables are connected, set the power switch to ON. The default IP addresses for all tabletop displays are 172.16.21.30, as shown in Figure 2-18. Issue 01 (2015-02-12) Huawei Proprietary and Confidential Copyright © Huawei Technologies Co., Ltd. - Page 31 DIP switch settings. The corresponding IP address is 172.16.21.30. Figure 2-19 Left tabletop display's DIP switch settings Figure 2-20 shows the center tabletop display's DIP switch settings. The corresponding IP address is 172.16.21.31. Issue 01 (2015-02-12) Huawei Proprietary and Confidential Copyright © Huawei Technologies Co., Ltd.
- Page 32 DIP Switch Settings Corresponding IP (Switches 1 to 3 from (Switches 4 to 7 from Address Left to Right) Left to Right) 0000 0000 172.16.21.30 0000 1000 172.16.21.31 Issue 01 (2015-02-12) Huawei Proprietary and Confidential Copyright © Huawei Technologies Co., Ltd.
-
Page 33: Setting The Wireless Router Ip Address
Figure 2-22. Figure 2-22 Network of the TP3106&TP3118s&TP3118's wireless router Connect the wireless router's LAN port to the network switch. Assign the LAN port an IP address (such as 172.16.21.64) that is in the same network segment with the telepresence host and telepresence codecs. - Page 34 Figure 2-24 Login Step 4 Click OK to log in. The web page for managing the wireless router is displayed, as shown in Figure 2-25. Issue 01 (2015-02-12) Huawei Proprietary and Confidential Copyright © Huawei Technologies Co., Ltd.
- Page 35 If this page is displayed in Chinese, set language to English at the top right corner. ----End Setting the Security Connection Step 1 Click wireless under BASIC. The wireless settings page is displayed, as shown in Figure 2-26. Figure 2-26 Wireless settings Issue 01 (2015-02-12) Huawei Proprietary and Confidential Copyright © Huawei Technologies Co., Ltd.
- Page 36 Step 3 Click Advanced Setup under ADVANCED, and click Advanced Wireless Settings in Advanced Setup to display the Advanced Wireless Settings page. Select Enable wireless Router Radio and click Apply to save the settings, as shown in Figure 2-27. Issue 01 (2015-02-12) Huawei Proprietary and Confidential Copyright © Huawei Technologies Co., Ltd.
- Page 37 Step 4 Click WAN Setup under Setup to display the WAN Setup page. Enable Respond to Ping on Internet Port, and click Apply, as shown in Figure 2-28. Figure 2-28 WAN Setup Issue 01 (2015-02-12) Huawei Proprietary and Confidential Copyright © Huawei Technologies Co., Ltd.
- Page 38 Step 6 Click Remote Management under Advanced Setup, deselect Turn Remote Management On, and click Apply to save the configuration, as shown in Figure 2-30. Issue 01 (2015-02-12) Huawei Proprietary and Confidential Copyright © Huawei Technologies Co., Ltd.
-
Page 39: Setting The Touch Panel Ip Address And Connecting The Touch Panel To The Telepresence Host
This chapter is divided into (A) Huawei MediaPad and (B) Huawei the S7 slim two parts, corresponding to the configuration of the touchscreen of the two models, please configure according to the actual delivery. - Page 40 The Wi-Fi settings screen is displayed, as shown in Figure 2-33. Figure 2-33 Selecting Wi-Fi Step 4 Select TP3106 from the available Wi-Fi network list, enter the password 22rTP3106, select Static for IP settings, and click Connect. TP3106 is the SSID you set, as shown in Figure 2-34 Table 2-11.
- Page 41 HUAWEI TP3106&TP3118&TP3118S Commissioning Guide 2 Deployment Preparation Figure 2-34 TP3106 Wi-Fi network information Table 2-11 Touch panel network settings Parameter Value Remarks Password 22rTP3106 Recommended value. Recommended value. Proxy settings None Recommended value. IP settings Static Recommended value. IP address 172.16.21.65...
- Page 42 Procedure NOTE The software installation applies to Huawei S7, S7 Slim, and 10-inch Asus touch panels. If a Huawei S7 touch panel is used and you cannot download HID.apk using the browser provided with the touch panel, use either of the following methods: l Use the upgrade tool to upgrade the HID application.
- Page 43 Step 3 After the software is downloaded, exit the browser, and tap My apps on the desktop, then Downloads, as shown in Figure 2-37. Figure 2-37 Checking the downloaded file Step 4 Tap HID.apk in the downloaded file list, as shown in Figure 2-38. Issue 01 (2015-02-12) Huawei Proprietary and Confidential Copyright © Huawei Technologies Co., Ltd.
- Page 44 Step 6 When installation succeeds, the MediaPad 10 Link+ user needs to tap Settings on the desktop. On the system setting screen, tap Notification Manager. On the Rules tab page of the Notification Manager screen, set Huawei Telepresence to Allow, as shown in Figure 2-40.
- Page 45 Commissioning Guide 2 Deployment Preparation Figure 2-40 Notification management setting The installation is complete. Step 7 Access the applications screen and tap Huawei Telepresence. The dialog box shown in Figure 2-41 is displayed, asking you to enter the administrator password.
- Page 46 The value is case insensitive. ----End Method 2 This method applies only to installing the telepresence application on the Huawei MediaPad. Step 1 On the installation wizard, choose the installation language and tap Next, as shown in Figure 2-43.
- Page 47 Step 2 Enter the internal IP address of the telepresence host and tap Install, as shown in Figure 2-44 Figure 2-45. Figure 2-44 Entering the telepresence host IP address Issue 01 (2015-02-12) Huawei Proprietary and Confidential Copyright © Huawei Technologies Co., Ltd.
- Page 48 Step 3 When installation succeeds, the MediaPad 10 Link+ user needs to tap Settings on the desktop. On the system setting screen, tap Notification Manager. On the Rules tab page of the Notification Manager screen, set Huawei Telepresence to Allow, as shown in Figure 2-46.
- Page 49 If the touch panel is not connected to the correct SSID, that is, the Wi-Fi name setting on the Connection Settings screen is inconsistent with that set on the wireless router, an error message is displayed, as shown in Figure 2-49. Issue 01 (2015-02-12) Huawei Proprietary and Confidential Copyright © Huawei Technologies Co., Ltd.
-
Page 50: Setting The System Language
Traditional Chinese characters using regional and the site name and address book must be edited in traditional Chinese. Access the Huawei telepresence and choose Settings > Language, and then Select the system language based on the actual situation, as shown in Figure 2-50. -
Page 51: Connecting Telepresence Codecs To The Telepresence Host
Figure 2-51. Figure 2-51 Host web interface Step 2 Enter the internal IP address of the three telepresence codecs and click Save, as shown in Figure 2-52. Issue 01 (2015-02-12) Huawei Proprietary and Confidential Copyright © Huawei Technologies Co., Ltd. - Page 52 Use the default value. Upgrade password ****** Use the default value. Telepresence IP address 172.16.21.10 Telepresence host's internal IP address. Monitor video Enable Use the default value. Issue 01 (2015-02-12) Huawei Proprietary and Confidential Copyright © Huawei Technologies Co., Ltd.
- Page 53 HUAWEI TP3106&TP3118&TP3118S Commissioning Guide 2 Deployment Preparation Figure 2-53 Settings ----End Issue 01 (2015-02-12) Huawei Proprietary and Confidential Copyright © Huawei Technologies Co., Ltd.
-
Page 54: System Upgrade
HUAWEI TP3106&TP3118&TP3118S Commissioning Guide 3 System Upgrade System Upgrade 3.1 Upgrade Procedures For details, see the HUAWEI TP3106&TP3118s&TP3118 System Upgrade Guide in the version file package. Issue 01 (2015-02-12) Huawei Proprietary and Confidential Copyright © Huawei Technologies Co., Ltd. -
Page 55: Parameter Configuration
4 Parameter Configuration Parameter Configuration NOTICE l Set video resolution as 720p/60 Hz for the Huawei internal network version, or set the resolution as 1080p/60 Hz. Please note the difference between the baseline version and Huawei internal network version l If the recording system is included, see related configuration in the Commissioning Guide to the Recording Subsystem of Huawei Telepresence System. -
Page 56: Telepresence Codec
Figure 4-1 Answer and Make Calls Table 4-1 Answer and Make Calls Parameter Value Remarks Do not disturb Disable Default value. Answer call automatically Disable Recommended value. Issue 01 (2015-02-12) Huawei Proprietary and Confidential Copyright © Huawei Technologies Co., Ltd. - Page 57 For the left and right telepresence codecs, select Network indicator only, as shown in Figure 4-3. Figure 4-3 Icon overlap settings for the left and right telepresence codecs Issue 01 (2015-02-12) Huawei Proprietary and Confidential Copyright © Huawei Technologies Co., Ltd.
-
Page 58: Configuring Input And Output Settings
Table 4-3 Common Camera Settings Parameter Value Remarks Type of serial port 1 RS232 Fixed value. Type of serial port 2 RS232 Fixed value. Remote control Do not allow Fixed value. Issue 01 (2015-02-12) Huawei Proprietary and Confidential Copyright © Huawei Technologies Co., Ltd. - Page 59 Configuring Video Output Settings Step 1 Configure common settings. Choose System Settings > Input/Output > Video Output > Common Settings, as shown Figure 4-7. Figure 4-7 Common settings Issue 01 (2015-02-12) Huawei Proprietary and Confidential Copyright © Huawei Technologies Co., Ltd.
- Page 60 Refresh rate 60 Hz Set this parameter as required. Display mode Display local video and Fixed value. Display remote video Small window position Lower right corner Fixed value. Issue 01 (2015-02-12) Huawei Proprietary and Confidential Copyright © Huawei Technologies Co., Ltd.
-
Page 61: Controlling Devices
YPrPb IN 2 Video Output Source HD Video Out 1 Local video Fixed value. ----End 4.1.5 T.140 Caption Devices Choose System Settings > Caption, as shown in Figure 4-10. Issue 01 (2015-02-12) Huawei Proprietary and Confidential Copyright © Huawei Technologies Co., Ltd. -
Page 62: Telepresence Host
NOTE When the recording system is used, you need to telnet to the telepresence host and enable the recording function. For details, see the Commissioning Guide to the Recording Subsystem of Huawei Telepresence System. Setting the Model of Telepresence Host... - Page 63 Log in to the Telepresence host through the telnet interface. The default user name is debug, and the default password is Change_Me. Input cm sethostrebootSwitch 1 to open restart at night function. Input cm sethostrebootSwitch 0 to open restart at night function. Issue 01 (2015-02-12) Huawei Proprietary and Confidential Copyright © Huawei Technologies Co., Ltd.
-
Page 64: Using The Wizard (Web)
From the wizard, set the local IP address, subnet mask, gateway IP address for the telepresence system's external network, and click Next. Step 2 Configure the left telepresence codec, as shown in Figure 4-15 Table 4-8. Issue 01 (2015-02-12) Huawei Proprietary and Confidential Copyright © Huawei Technologies Co., Ltd. - Page 65 In this field, enter the left mask telepresence codec's internal subnet mask. Network interface mode Auto detection Fixed value. 100 Mbps, full duplex Standard value for Huawei internal network Issue 01 (2015-02-12) Huawei Proprietary and Confidential Copyright © Huawei Technologies Co., Ltd.
- Page 66 Internal-network IP address 172.16.21.61 In this field, enter the center codec's internal IP address. Internal-network subnet 255.255.255.0 In this field, enter the center mask codec's internal subnet mask. Issue 01 (2015-02-12) Huawei Proprietary and Confidential Copyright © Huawei Technologies Co., Ltd.
- Page 67 In this field, enter the right mask telepresence codec's external subnet mask. External-network gateway IP 10.11.250.1 In this field, enter the right address telepresence codec's gateway IP address. Issue 01 (2015-02-12) Huawei Proprietary and Confidential Copyright © Huawei Technologies Co., Ltd.
- Page 68 Figure 4-18 Wizard-Serial Ports Table 4-11 Wizard-Serial Ports Parameter Value Remarks Left HD display 9600; 8; 1; None Fixed values. Center HD display 9600; 8; 1; None Fixed values. Issue 01 (2015-02-12) Huawei Proprietary and Confidential Copyright © Huawei Technologies Co., Ltd.
- Page 69 Then click Next. Step 6 Configure video ports, as shown in Figure 4-19, Figure 4-20, Figure 4-21 Table 4-12. Figure 4-19 Wizard-Video Ports-Slot 11 Figure 4-20 Wizard-Video Ports-Slot 10 Issue 01 (2015-02-12) Huawei Proprietary and Confidential Copyright © Huawei Technologies Co., Ltd.
- Page 70 Left tabletop Fixed value. input Port 4 Right tabletop Fixed value. input Output Ports Port 1 Center codec Fixed value. video Port 2 Center codec Fixed value. presentation Issue 01 (2015-02-12) Huawei Proprietary and Confidential Copyright © Huawei Technologies Co., Ltd.
- Page 71 4 of slot 10 as external display device, then press "send presentation" on touch panel to activate this function. Step 7 Configure codec video output, as shown in Figure 4-22 Table 4-13. Issue 01 (2015-02-12) Huawei Proprietary and Confidential Copyright © Huawei Technologies Co., Ltd.
- Page 72 Set the video resolution and refresh rate for the video and presentation output, as shown in Figure 4-22. Step 8 Configure microphone ports, as shown in Figure 4-23, Figure 4-24 Figure 4-25. Issue 01 (2015-02-12) Huawei Proprietary and Confidential Copyright © Huawei Technologies Co., Ltd.
- Page 73 NOTICE l The microphones are numbered from left to right. l The microphone settings of the TP3106, TP3118S, and TP3118 are different. For details, see the following content. Microphones 1, 2, 3, 4... in the system respectively match microphones A, B, C, D... in the system connection diagrams.
- Page 74 HUAWEI TP3106&TP3118&TP3118S Commissioning Guide 4 Parameter Configuration Figure 4-25 Microphone locations of the TP3118 The number of microphones differs in the TP3106, TP3118S, and TP3118 systems. Table 4-14 describes the microphone configuration. Table 4-14 Tabletop display IDs Product Model Tabletop Display...
- Page 75 MIC7 15 dB; 0.2 sec; None Fixed values. MIC8 15 dB; 0.2 sec; None Fixed values. NOTE The microphones are numbered from left to right. Issue 01 (2015-02-12) Huawei Proprietary and Confidential Copyright © Huawei Technologies Co., Ltd.
- Page 76 15 dB; 0.2 sec; First- Fixed values. row left MIC2 15 dB; 0.2 sec; First- Fixed values. row left MIC3 15 dB; 0.2 sec; First- Fixed values. row center Issue 01 (2015-02-12) Huawei Proprietary and Confidential Copyright © Huawei Technologies Co., Ltd.
- Page 77 0 dB; 0 sec; None Fixed values. MIC16 0 dB; 0 sec; None Fixed values. TP3118S Microphone configuration, as shown in Figure 4-29, Figure 4-30, Table 4-17, Figure 4-31 Table 4-18. Issue 01 (2015-02-12) Huawei Proprietary and Confidential Copyright © Huawei Technologies Co., Ltd.
- Page 78 15 dB; 0.2 sec; First- Fixed values. row left MIC3 15 dB; 0.2 sec; First- Fixed values. row center MIC4 15 dB; 0.2 sec; First- Fixed values. row center Issue 01 (2015-02-12) Huawei Proprietary and Confidential Copyright © Huawei Technologies Co., Ltd.
- Page 79 MIC14 15 dB; 0.2 sec; Fixed values. Second-row right MIC15 15 dB; 0.2 sec; Fixed values. Second-row right MIC16 15 dB; 0.2 sec; Fixed values. Second-row right Issue 01 (2015-02-12) Huawei Proprietary and Confidential Copyright © Huawei Technologies Co., Ltd.
- Page 80 Input port for right AUDIO IN 2-2 Fixed value. audio channel Step 9 Configure audio line output ports, as shown in Figure 4-32 Table 4-19. Issue 01 (2015-02-12) Huawei Proprietary and Confidential Copyright © Huawei Technologies Co., Ltd.
- Page 81 Fixed value. Center speaker 2 AUDIO OUT 0-4 Fixed value. Right speaker AUDIO OUT 0-2 Fixed value. Step 10 Configure power, as shown in Figure 4-33 Table 4-20. Issue 01 (2015-02-12) Huawei Proprietary and Confidential Copyright © Huawei Technologies Co., Ltd.
-
Page 82: Configuring System Settings (Web)
After completing the preceding settings, click Finish. ----End 4.2.3 Configuring System Settings (Web) Introduction System settings include general settings, network settings, user settings, 4E1 settings, H.323 and SIP settings, and conference settings. Issue 01 (2015-02-12) Huawei Proprietary and Confidential Copyright © Huawei Technologies Co., Ltd. - Page 83 Traditional Chinese characters using regional and the site name and address book must be edited in traditional Chinese. Procedure Step 1 Configure general settings, as shown in Figure 4-34. Figure 4-34 General settings Issue 01 (2015-02-12) Huawei Proprietary and Confidential Copyright © Huawei Technologies Co., Ltd.
- Page 84 Table 4-21 Site Name Display Parameter Value Remarks Left site name Site (left) Set this parameter as required. Middle site name Site (middle) Set this parameter as required. Issue 01 (2015-02-12) Huawei Proprietary and Confidential Copyright © Huawei Technologies Co., Ltd.
- Page 85 Set parameters in the Time and Time Zone area, as shown in Table 4-23. Table 4-23 Time and Time Zone Parameter Value Remarks Time zone (UTC+08:00) Set this parameter as required. Time format 24-hour Recommended value. Issue 01 (2015-02-12) Huawei Proprietary and Confidential Copyright © Huawei Technologies Co., Ltd.
- Page 86 Line type specifies the line types supported for placing calls. l Select all options under Icon Superimposition. Step 2 Configure network settings, as shown in Figure 4-35 Table 4-24. Issue 01 (2015-02-12) Huawei Proprietary and Confidential Copyright © Huawei Technologies Co., Ltd.
- Page 87 Network interface Auto detection Fixed value. mode Internal Network Connection type Static IP Fixed value. IP address 172.16.21.10 Fixed value. Subnet mask 255.255.255.0 Fixed value. Issue 01 (2015-02-12) Huawei Proprietary and Confidential Copyright © Huawei Technologies Co., Ltd.
- Page 88 Figure 4-38, Figure 4-39, Figure 4-40, Table 4-25, Table 4-26 Table 4-27. Figure 4-36 Current login user (super administrator) settings Figure 4-37 Current login user (administrator) settings Issue 01 (2015-02-12) Huawei Proprietary and Confidential Copyright © Huawei Technologies Co., Ltd.
- Page 89 HUAWEI TP3106&TP3118&TP3118S Commissioning Guide 4 Parameter Configuration Figure 4-38 User Setting 1 Issue 01 (2015-02-12) Huawei Proprietary and Confidential Copyright © Huawei Technologies Co., Ltd.
- Page 90 HUAWEI TP3106&TP3118&TP3118S Commissioning Guide 4 Parameter Configuration Figure 4-39 User Settng 2 Issue 01 (2015-02-12) Huawei Proprietary and Confidential Copyright © Huawei Technologies Co., Ltd.
- Page 91 Set this parameter as required. Confirm password Table 4-26 Current login user (administrator) settings Parameter Value Remarks Administrator Name admin Fixed value (cannot be changed). Old password Change_Me by default. Issue 01 (2015-02-12) Huawei Proprietary and Confidential Copyright © Huawei Technologies Co., Ltd.
- Page 92 Set this parameter as required (Change_Me by default). Confirm password Account status Enable Set this parameter as required. Serial Port User Name DEBUG LOGIN Fixed value (cannot be changed). Issue 01 (2015-02-12) Huawei Proprietary and Confidential Copyright © Huawei Technologies Co., Ltd.
- Page 93 Fixed value (cannot be changed). Password Set this parameter as required (Change_Me by default). Confirm password Upgrade password Password Set this parameter as required (Change_Me by default). Confirm password Issue 01 (2015-02-12) Huawei Proprietary and Confidential Copyright © Huawei Technologies Co., Ltd.
- Page 94 If 4E1 lines are not used on the network, you can skip the following steps for configuring 4E1 settings. Figure 4-41 4E1 settings Table 4-28 4E1 settings Parameter Value Remarks Account Set this parameter as required. Password Set this parameter as required. Issue 01 (2015-02-12) Huawei Proprietary and Confidential Copyright © Huawei Technologies Co., Ltd.
- Page 95 Long line Set this parameter as required. Step 5 Configure H.323 and SIP settings, as shown in Figure 4-42, Figure 4-43 Table 4-29. Figure 4-42 H.323 settings Issue 01 (2015-02-12) Huawei Proprietary and Confidential Copyright © Huawei Technologies Co., Ltd.
- Page 96 H.323 settings include settings of the site number and H.232 ID for the three telepresence codecs. The settings are obtained from and saved to those telepresence codecs respectively. Issue 01 (2015-02-12) Huawei Proprietary and Confidential Copyright © Huawei Technologies Co., Ltd.
- Page 97 720p 50/60HZ Standard value for Huawei internal network H.239 video protocol H.264 Set this parameter as required. H.239 video resolution Auto Set this parameter as required. Issue 01 (2015-02-12) Huawei Proprietary and Confidential Copyright © Huawei Technologies Co., Ltd.
- Page 98 If the telepresence system does not have any PSTN interface card installed, the PSTN parameters will not be displayed. Skip sub-step 2. Figure 4-45 QoS and PSTN Issue 01 (2015-02-12) Huawei Proprietary and Confidential Copyright © Huawei Technologies Co., Ltd.
- Page 99 Figure 4-47 Network Address Book Table 4-31 Network Address Book Parameter Value Remarks Network address book Enable Fixed value. Server address Set this parameter as required. Issue 01 (2015-02-12) Huawei Proprietary and Confidential Copyright © Huawei Technologies Co., Ltd.
- Page 100 4-48. Figure 4-48 eSpace Server Step 8 Other peripherals. This function is specially designed for Medical Telepresence. For standard TP3106&TP3118S&TP3118, there is no computer in BOM, so please ignore this function and keep it forbidden, as shown in Figure 4-49.
-
Page 101: Configuring Video Matrix
Step 2 Right-click the Video Ports button, and select Control to display the Control Video Ports page, as shown in Figure 4-51. Click Restore Default. Figure 4-51 Control Video Ports page ----End Issue 01 (2015-02-12) Huawei Proprietary and Confidential Copyright © Huawei Technologies Co., Ltd. -
Page 102: Configuring Audio Matrix
Step 3 From the Input Control tab page, set the input control parameters according to the specifications provided in Table 4-32. Issue 01 (2015-02-12) Huawei Proprietary and Confidential Copyright © Huawei Technologies Co., Ltd. - Page 103 Speaker volume Recommended value. Alert tone volume Recommended value. The input/output connection is used for audio self-check, and does not require configuration, as shown in Figure 4-55. Issue 01 (2015-02-12) Huawei Proprietary and Confidential Copyright © Huawei Technologies Co., Ltd.
-
Page 104: Tabletop Displays
Step 1 Log in to the telepresence codec's web interface to access its home page, as shown in Figure 4-56. Right-click the Tabletop Display button and choose Control. Issue 01 (2015-02-12) Huawei Proprietary and Confidential Copyright © Huawei Technologies Co., Ltd. - Page 105 Step 2 On the Control Tabletop Displays page, click Adjust Video and set the parameters, as shown Figure 4-57 Table 4-34. Figure 4-57 Control Tabletop Displays page-Adjust Video Issue 01 (2015-02-12) Huawei Proprietary and Confidential Copyright © Huawei Technologies Co., Ltd.
-
Page 106: Setting The Address Book
1 hour, 2 hour, 4 hour, 8 hour, 16 hour, 1 day, 2 day or 3 day, as shown in Figure 4-58. Figure 4-58 Network Address Book ----End Issue 01 (2015-02-12) Huawei Proprietary and Confidential Copyright © Huawei Technologies Co., Ltd. -
Page 107: Importing And Exporting Contacts
Step 3 Select a save path for the contacts to be exported. A .vcf file is then saved to the selected path, as shown in Figure 4-61. Issue 01 (2015-02-12) Huawei Proprietary and Confidential Copyright © Huawei Technologies Co., Ltd. - Page 108 HUAWEI TP3106&TP3118&TP3118S Commissioning Guide 4 Parameter Configuration Figure 4-61 Export Contacts ----End Issue 01 (2015-02-12) Huawei Proprietary and Confidential Copyright © Huawei Technologies Co., Ltd.
-
Page 109: Video Device Configuration
Turn off the NANODRIFI saver Step 1 Press the setup key on the HD display's remote control to access the Set up menu, and scroll to Present time Setup. Issue 01 (2015-02-12) Huawei Proprietary and Confidential Copyright © Huawei Technologies Co., Ltd. - Page 110 –48 Vertical position Vertical size –60 Point by point scan l 720p video source Table 5-2 720p video source Parameter Value Remarks Horizontal position Horizontal size –47 Issue 01 (2015-02-12) Huawei Proprietary and Confidential Copyright © Huawei Technologies Co., Ltd.
- Page 111 Settings to display the HD display settings page. Access the Advanced Settings menu, and set the parameters according to the specifications, as shown in Table 5-4. Table 5-4 Advanced Settings Parameter Value Remarks Black Extension Input Level Gamma S curve ----End Issue 01 (2015-02-12) Huawei Proprietary and Confidential Copyright © Huawei Technologies Co., Ltd.
-
Page 112: Panasonic Th_65Pf20C Hd Displays
Step 2 Access the Picture Position/Size menu. Set the parameters according to the specifications, as shown in Table 5-5 Table 5-6. l 1080p video source Table 5-5 1080p video source Parameter Value Remarks Horizontal position Issue 01 (2015-02-12) Huawei Proprietary and Confidential Copyright © Huawei Technologies Co., Ltd. - Page 113 Step 2 Log in to the telepresence host's web interface. Right-click one of the HD displays, and choose Settings to display the HD display settings page. Access the Advanced Settings menu, and set the parameters according to the specifications, as shown in Table 5-8. Issue 01 (2015-02-12) Huawei Proprietary and Confidential Copyright © Huawei Technologies Co., Ltd.
-
Page 114: Panasonic Th_65Pf30C/ Th_65Pf30G Hd Displays
Step 3 Press and hold the key and select Yes in the prompt page, and select Off and Apply to current inputs. ----End Setting the Position and Size for the DVI Video Source The video signals of the TC300 tri-lens camera are input to the HD displays. Issue 01 (2015-02-12) Huawei Proprietary and Confidential Copyright © Huawei Technologies Co., Ltd. - Page 115 Settings to display the HD display settings page. Access the Picture menu, and set the parameters according to the specifications, as shown in Table 5-11. Table 5-11 Picture Parameter Value Remarks Picture mode Optimal Contrast Issue 01 (2015-02-12) Huawei Proprietary and Confidential Copyright © Huawei Technologies Co., Ltd.
-
Page 116: Panasonic Th_65Pf50C/ Th_65Pf50G Hd Displays
Step 2 Scroll to Day, and press the navigation keys to select the day. Step 3 Scroll to Present Time of Day, and press the navigation keys to select the time. ----End Issue 01 (2015-02-12) Huawei Proprietary and Confidential Copyright © Huawei Technologies Co., Ltd. - Page 117 Vertical size –52 Point by point scan BRIGHTNESS COLOR TINK SHARPNESS COLOR TEMP NORMAL GAMMA BLACK EXTENSION W/B HIGH R W/B HIGH G l 720p video source Issue 01 (2015-02-12) Huawei Proprietary and Confidential Copyright © Huawei Technologies Co., Ltd.
- Page 118 Settings to display the HD display settings page. Access the Advanced Settings menu, and set the parameters according to the specifications, as shown in Table 5-16. Table 5-16 Advanced Settings Parameter Value Remarks Black Extension Input Level Gamma S curve ----End Issue 01 (2015-02-12) Huawei Proprietary and Confidential Copyright © Huawei Technologies Co., Ltd.
-
Page 119: Tc310 Tri-Lens Camera
Settings page, as shown in Figure 5-2. Figure 5-2 Tri-Lens Camera Settings Step 2 Set the manual zoom value, as shown in Figure 5-3. Set Zoom to 5400. Then press Enter. Issue 01 (2015-02-12) Huawei Proprietary and Confidential Copyright © Huawei Technologies Co., Ltd. -
Page 120: Setting The Video Resolution
After the setting of the zoom value is completed, proceed to set the video resolution for the camera. 5.2.3 Setting the Video Resolution Choose Video resolution to 1080p 60Hz (720p 60Hz for Huawei internal network version), as shown in Figure 5-4. -
Page 121: Engineering Installation Diagrams
Figure 5-5. Figure 5-5 Common Settings Step 2 Log in to the telepresence host's web interface. Choose Import > Engineering Installation Diagram, as shown in Figure 5-6. Issue 01 (2015-02-12) Huawei Proprietary and Confidential Copyright © Huawei Technologies Co., Ltd. - Page 122 Step 3 Select the correct engineering installation diagram (if video resolution is 720p, select the 720P.dat file; if video resolution is 1080p, select the 1080P.dat file). See the Figure 5-8. Issue 01 (2015-02-12) Huawei Proprietary and Confidential Copyright © Huawei Technologies Co., Ltd.
- Page 123 HUAWEI TP3106&TP3118&TP3118S Commissioning Guide 5 Video Device Configuration Figure 5-8 Select File Step 4 Click Import to complete the import, as shown in the Figure 5-9. Issue 01 (2015-02-12) Huawei Proprietary and Confidential Copyright © Huawei Technologies Co., Ltd.
- Page 124 (one on each side), and a red cross (in the center). Use the engineering installation diagram with the craft tools for image stitching commissioning. See the Figure 5-11. Issue 01 (2015-02-12) Huawei Proprietary and Confidential Copyright © Huawei Technologies Co., Ltd.
- Page 125 See the Figure 5-12, Figure 5-13 Figure 5-14. Figure 5-12 Craft tool 1 Issue 01 (2015-02-12) Huawei Proprietary and Confidential Copyright © Huawei Technologies Co., Ltd.
-
Page 126: Lens Description
The lens screws of the TC310 can be classified into two types based on their functions: Fixing screw (1 PCS for each lens) Adjusting screws (4 PCS for each lens) See the Figure 5-15 Figure 5-16. Issue 01 (2015-02-12) Huawei Proprietary and Confidential Copyright © Huawei Technologies Co., Ltd. - Page 127 Figure 5-16 TC310 2 Functions The following table describes the functions of the screws used to adjust the lens during image stitching commissioning, as shown in Table 5-17. Issue 01 (2015-02-12) Huawei Proprietary and Confidential Copyright © Huawei Technologies Co., Ltd.
-
Page 128: Commissioning Image Stitching
(that is, the height of the table image), the left and right angles of the lens for the horizontal image stitching, and then the horizontal angle of the lens. Issue 01 (2015-02-12) Huawei Proprietary and Confidential Copyright © Huawei Technologies Co., Ltd. - Page 129 Telnet login (default debug user name, password is Change_Me) to the three terminals use the following command to remove Engineering Installation Diagram The delete command: BSP exe RM res/bootpic/1080P.dat Review delete results: the BSP exe ll view deleted res/bootpic Issue 01 (2015-02-12) Huawei Proprietary and Confidential Copyright © Huawei Technologies Co., Ltd.
-
Page 130: Commissioning Video Effects
Log in to the telepresence host's web interface with the superadmin account. Right-click the Tri-Lens Camera button, and choose Settings to display the Tri-Lens Camera Settings page, as shown in Figure 5-18 Figure 5-19. Issue 01 (2015-02-12) Huawei Proprietary and Confidential Copyright © Huawei Technologies Co., Ltd. - Page 131 Figure 5-18 Tri-Lens Camera Menu Figure 5-19 Tri-Lens Camera Settings Step 1 Set the manual focus value. Set Focus to 9000. Then press Enter, as shown in Figure 5-20. Issue 01 (2015-02-12) Huawei Proprietary and Confidential Copyright © Huawei Technologies Co., Ltd.
- Page 132 Shutter speed to 1/100). Step 3 Adjust video color. Notes: l When adjusting video color, it is recommended that you do the following in order: Issue 01 (2015-02-12) Huawei Proprietary and Confidential Copyright © Huawei Technologies Co., Ltd.
- Page 133 As there are still slight differences, adjust the Green gain tuning. Ensure that the HD display images colors are consistent, as shown in Figure 5-22. Issue 01 (2015-02-12) Huawei Proprietary and Confidential Copyright © Huawei Technologies Co., Ltd.
- Page 134 Table 5-18 Figure 5-23. Table 5-18 Set parameters Parameter Value Remarks Brightness Fixed value. Contrast Fixed value. Fixed value. sharpening Fixed value. Noise reduction Fixed value. Issue 01 (2015-02-12) Huawei Proprietary and Confidential Copyright © Huawei Technologies Co., Ltd.
-
Page 135: Disabling Telnet Login
You have configured the input and output ports on the telepresence host, and the camera can correctly communicate with the telepresence host. You have finished the calibration for the HD displays. Issue 01 (2015-02-12) Huawei Proprietary and Confidential Copyright © Huawei Technologies Co., Ltd. - Page 136 5-26, and turn the zoom value knob until the picture size matches the actual object size. (After the zoom value is adjusted, the picture becomes unclear, and you need to adjust the focal length knob to make the picture clear.) Issue 01 (2015-02-12) Huawei Proprietary and Confidential Copyright © Huawei Technologies Co., Ltd.
- Page 137 Step 3 There is no screw on the aperture knob. Directly turn the aperture knob to adjust the aperture, as shown in Figure 5-28, until the picture lightness meets the requirement. Issue 01 (2015-02-12) Huawei Proprietary and Confidential Copyright © Huawei Technologies Co., Ltd.
- Page 138 Step 2 Run the CTT. Choose Tool > Connection, and on the displayed dialog box, enter the internal IP address (172.16.21.25) of the camera, port 80, user name ctt, and password Change_Me. Step 3 Click Connect. Issue 01 (2015-06-17) Huawei Proprietary and Confidential Copyright © Huawei Technologies Co., Ltd.
- Page 139 Settings, and on the displayed dialog box, select Middle Camera for Camera and click Restore. Then restore the parameters to defaults for the center and right lenses Issue 01 (2015-06-17) Huawei Proprietary and Confidential Copyright © Huawei Technologies Co., Ltd.
- Page 140 HD display. Step 7 On the CTT, click OnePush and wait for about 3s. The white balance setting of the three lens automatically updates. Issue 01 (2015-06-17) Huawei Proprietary and Confidential Copyright © Huawei Technologies Co., Ltd.
- Page 141 Step 9 Orderly save the settings for the three lenses by clicking Save to Camera and Save Favorite. Figure 5-32 Lens settings dialog box ----End Issue 01 (2015-06-17) Huawei Proprietary and Confidential Copyright © Huawei Technologies Co., Ltd.
-
Page 142: System Verification
Check the HD display parameter settings. For details, see section "5.1 Displays." Telepresence Audio Log in to the codecs telepresence codecs' web interface, implement the audio loopback test. Issue 01 (2015-02-12) Huawei Proprietary and Confidential Copyright © Huawei Technologies Co., Ltd. - Page 143 During a audio play conference, ask a remote site to play a presentation, and check whether you can clearly hear the remote presentation audio at the local site. Issue 01 (2015-02-12) Huawei Proprietary and Confidential Copyright © Huawei Technologies Co., Ltd.
- Page 144 Audio input Connect an functional audio source sockets from a computer to one of the multi- functional sockets' audio port, and check whether the audio is output properly. Issue 01 (2015-02-12) Huawei Proprietary and Confidential Copyright © Huawei Technologies Co., Ltd.
- Page 145 Camera Parameter Telnet to the settings telepresence codecs to check the camera parameter settings. If parameter is inappropriat ely, change its settings. Issue 01 (2015-02-12) Huawei Proprietary and Confidential Copyright © Huawei Technologies Co., Ltd.
- Page 146 1. If the user cannot be pinged, the VLAN ports are grouped correctly. If the user can be pinged, re-group the VLAN ports as instructed in this guide. Issue 01 (2015-02-12) Huawei Proprietary and Confidential Copyright © Huawei Technologies Co., Ltd.
- Page 147 Telepresence Touch panel Check host whether the touch panel is properly connected to telepresence host, and can control the telepresence devices, including the tabletop displays. Issue 01 (2015-02-12) Huawei Proprietary and Confidential Copyright © Huawei Technologies Co., Ltd.
-
Page 148: Initiating A Conference
Step 1 After the touch panel is connected to the telepresence host, the following screen is displayed. to display the Contacts screen, as shown in Figure 6-1. Issue 01 (2015-02-12) Huawei Proprietary and Confidential Copyright © Huawei Technologies Co., Ltd. - Page 149 Call to display the conference information screen, as shown in Figure 6-2 Figure 6-2 Contacts Step 3 From the conference information screen, reselect the sites you want to call. To set conference parameters, tap Settings. Issue 01 (2015-02-12) Huawei Proprietary and Confidential Copyright © Huawei Technologies Co., Ltd.
-
Page 150: Controlling A Conference
Step 1 Customize the conference control options displayed on the conference control screen. Choose Settings > Advanced Settings > Conference Control Customization to display the Conference Control Customization screen, as shown in the following figure. Issue 01 (2015-02-12) Huawei Proprietary and Confidential Copyright © Huawei Technologies Co., Ltd. - Page 151 Commissioning Guide 6 System Verification For the Huawei internal network version, the Conference Control Customization is a bit different, as shown in the following figure. By default, Enable Rept Mode is not checked. The preceding figure shows the Conference Control Customization screen for the chair site.
- Page 152 HUAWEI TP3106&TP3118&TP3118S Commissioning Guide 6 System Verification ----End Issue 01 (2015-02-12) Huawei Proprietary and Confidential Copyright © Huawei Technologies Co., Ltd.
-
Page 153: Appendix
Command and Parameter Description Command syntax: Camera setc500CameraParam command field:value camport:5 Example: To set the exposure mode to manual exposure, run camera setc500CameraParam exposure:1 camport:5. Parameter description Issue 01 (2015-02-12) Huawei Proprietary and Confidential Copyright © Huawei Technologies Co., Ltd. - Page 154 Focusswitch l 0: auto focus l 1: manual focus ExposureComp MODE Turns on or off exposure Excompctl compensation. l 0: off l 1: on Default value: 0. Issue 01 (2015-02-12) Huawei Proprietary and Confidential Copyright © Huawei Technologies Co., Ltd.
- Page 155 Bright VAL Sets the brightness (0-23). Bright Aperture VAL Sets the aperture (0-15). Aperture Default value: 8. ExposureComp VAL Sets the exposure Excompval compensation (0-14). Default value: 7. Issue 01 (2015-02-12) Huawei Proprietary and Confidential Copyright © Huawei Technologies Co., Ltd.
- Page 156 Change_Me for the password. The window shown in the following figure is displayed. Step 2 Query the camera's current settings. Run camctrl camzoomsetting inquire on. Issue 01 (2015-02-12) Huawei Proprietary and Confidential Copyright © Huawei Technologies Co., Ltd.
- Page 157 Set the focus mode to manual focus by running the following command: camera setc500CameraParam focusswitch:1 camport:5 Set Focus VAL to the standard value 9000 by running the following command: Camera setc500CameraParam focusval:9000 camport:5 See the following figure. Issue 01 (2015-02-12) Huawei Proprietary and Confidential Copyright © Huawei Technologies Co., Ltd.
- Page 158 In most cases, it is recommended that you set the aperture (Iris VAL) to 16 or 17 and the brightness gain (Gain VAL) to 2 or 3. To adjust video brightness: Issue 01 (2015-02-12) Huawei Proprietary and Confidential Copyright © Huawei Technologies Co., Ltd.
- Page 159 To adjust video color: When the camera is capturing a static object, run camera setc500CameraParam whitebalance:3 camport:5 to set the white balance mode to automatic. After running the Issue 01 (2015-02-12) Huawei Proprietary and Confidential Copyright © Huawei Technologies Co., Ltd.
-
Page 160: Saving Camera Parameter Settings
Start > Run. In the Run dialog box, enter telnet 10.11.250.61, and press Enter. On the displayed window, enter the login name debug and password Change_Me. The window shown in the following figure is displayed. Issue 01 (2015-02-12) Huawei Proprietary and Confidential Copyright © Huawei Technologies Co., Ltd. - Page 161 Before running this command, check that the camera is properly connected to the telepresence codecs through serial cables. Step 4 Run mc camera saveconfig 1 to save the current camera settings. Issue 01 (2015-02-12) Huawei Proprietary and Confidential Copyright © Huawei Technologies Co., Ltd.
-
Page 162: Commissioning Video Effects
Command and Parameter Description Command syntax: Camera setc500CameraParam command field:value camport:5 Example: To set the exposure mode to manual exposure, run camera setc500CameraParam exposure:1 camport:5. Parameter description Issue 01 (2015-02-12) Huawei Proprietary and Confidential Copyright © Huawei Technologies Co., Ltd. - Page 163 0: off l 1: on Default value: 0. BackLight Turns on or off backlight Backlight compensation. l 0: off l 1: on Default value: 0. Issue 01 (2015-02-12) Huawei Proprietary and Confidential Copyright © Huawei Technologies Co., Ltd.
- Page 164 Shutter speed, Iris VAL, and Gain VAL are available to be set only when AE MODE is set to manual. Do not set Aperture VAL to a value smaller than 8, because this will decrease video clarity. Issue 01 (2015-02-12) Huawei Proprietary and Confidential Copyright © Huawei Technologies Co., Ltd.
- Page 165 Generally, you do not need to manually change the settings of the auxiliary parameters during deployment. If the settings displayed in the query result are different from the default (standard) settings, reset the parameters by running the relevant commands. Issue 01 (2015-02-12) Huawei Proprietary and Confidential Copyright © Huawei Technologies Co., Ltd.
- Page 166 See the following figure. Step 5 Set the aperture. Set Aperture VAL (value range: 0–15) to the standard value 8 by running the following command: camera setc500Cameraparm aperture:8 camport:5 Issue 01 (2015-02-12) Huawei Proprietary and Confidential Copyright © Huawei Technologies Co., Ltd.
- Page 167 To set the aperture (Iris VAL) to 17, run camera setc500CameraParam iris:17 camport:5. l To set the brightness gain (Gain VAL) to 2, run camera setc500CameraParam lightgain:2 camport:5. See the following figure. Issue 01 (2015-02-12) Huawei Proprietary and Confidential Copyright © Huawei Technologies Co., Ltd.
- Page 168 This alters the settings of the blue gain and red gain. Therefore, reset the blue gain and the red gain by running the relevant API commands based on the values recorded in sub-step Step 72. Issue 01 (2015-02-12) Huawei Proprietary and Confidential Copyright © Huawei Technologies Co., Ltd.
-
Page 169: Saving Camera Parameter Settings
Step 2 To enable the camera to be configured based on the settings saved on the telepresence codecs when they are started, run mc camera cfgsendswitch 1. Issue 01 (2015-02-12) Huawei Proprietary and Confidential Copyright © Huawei Technologies Co., Ltd. - Page 170 Before running this command, check that the camera is properly connected to the telepresence codecs through serial cables. Step 4 Run mc camera saveconfig 1 to save the current camera settings. ----End Issue 01 (2015-02-12) Huawei Proprietary and Confidential Copyright © Huawei Technologies Co., Ltd.
-
Page 171: Setting The Wireless Router Ip Address In Ims Integration
Reset button for at least 10 seconds. Figure 7-1 Network of the TP3106's wireless router Connect the wireless router's LAN port to the network switch (Switch port 15). Assign the LAN port an IP address (such as 172.16.21.64) that is in the same network segment with the... - Page 172 DNS server address and click Apply to save the settings. See the following figure. Parameter Value Remarks Internet IP Address Mode Use Static IP Fixed value. Address IP Address 10.11.250.63 External IP address. Issue 01 (2015-02-12) Huawei Proprietary and Confidential Copyright © Huawei Technologies Co., Ltd.
- Page 173 Step 2 On the Wireless Settings page, set Name (SSID), Region, Channel, Mode, Security Options, and Passphrase according to the specifications provided in the following table. Click Apply to save the settings. Issue 01 (2015-02-12) Huawei Proprietary and Confidential Copyright © Huawei Technologies Co., Ltd.
- Page 174 Enable SSID Broadcast and click Apply to save the settings. See the following figure. Step 4 Click WAN Setup under Advanced to display the WAN Setup page. Enable Respond to Ping on Internet Port, and click Apply. Issue 01 (2015-02-12) Huawei Proprietary and Confidential Copyright © Huawei Technologies Co., Ltd.
- Page 175 IP subnet mask)and deselect Use Router as DHCP Server. Click Apply to save the settings. See the following figure. Parameter Value Remarks Device Name WGR614V10 Use the default value. Issue 01 (2015-02-12) Huawei Proprietary and Confidential Copyright © Huawei Technologies Co., Ltd.
-
Page 176: Bose Host Switch Change
Step 2 The audio cables provided with the Bose are used to connect from Bose speaker host to the speakers. The blue one should be used to connect the Speakers R port of the Bose speaker host Issue 01 (2015-02-12) Huawei Proprietary and Confidential Copyright © Huawei Technologies Co., Ltd. -
Page 177: Presentation Image Offset
Through Cables The Huawei MediaPad can connect to Telepresence host through Telepresence base support TD100, users need to buy a USB to RJ45 cable (as shown in the following figure) in Huawei Internet shopping mall, the link is http://www.vmall.com/product/257.html#0,14. (This link may renew, please log in to the web to search it.) -
Page 178: Wired Link Illustration
//Configure GE15 to work in access mode. [Quidway-Ethernet0/0/15]port default vlan 2 //Configure GE15 in VLAN 2. [Quidway-Ethernet0/0/15]quit //Quit the network interface setting. Step 1 Click Save. ----End Issue 01 (2015-02-12) Huawei Proprietary and Confidential Copyright © Huawei Technologies Co., Ltd. -
Page 179: Configuring Touch Panel Ip With Wired Connected Way
Figure 7-2. Figure 7-2 Choose USB network adapter 1 Configure the parameters in the displayed box, show as Figure 7-3. Figure 7-3 Setting USB network adapter 2 Issue 01 (2015-02-12) Huawei Proprietary and Confidential Copyright © Huawei Technologies Co., Ltd. -
Page 180: Configuring Ims Convergent Conferences
Step 2 Log in to the WEB interface of the wireless router, click Basic Settings under Setup to display the WAN IP settings page. Set these parameters based on Table 7-2. Click Apply to save the settings. Issue 01 (2015-02-12) Huawei Proprietary and Confidential Copyright © Huawei Technologies Co., Ltd. - Page 181 DNS Primary address 10.72.55.101 DNS Secondary address 10.72.11.10 Step 3 Configure IMS-related settings on telepresence host. Log into telepresence host's WEB interface, click System Settings > H.323/SIP > SIP. Issue 01 (2015-02-12) Huawei Proprietary and Confidential Copyright © Huawei Technologies Co., Ltd.
- Page 182 Server address Huawei.com Conference service number +867554404 Proxy server Enable Proxy server address 10.53.9.11 Server type Standard Transmission type SRTP encryption Maximum interconnectivity Password Main Codec Issue 01 (2015-02-12) Huawei Proprietary and Confidential Copyright © Huawei Technologies Co., Ltd.
-
Page 183: Configuring Espace Conferences
Figure 7-7 eSpace Server Table 7-4 eSpace server Parameter Value Remarks eSpace server Enable Set these parameters as required. Server address 10.50.0.100 Port UC1.0: 8443 Fixed value. Issue 01 (2015-02-12) Huawei Proprietary and Confidential Copyright © Huawei Technologies Co., Ltd. -
Page 184: Importing The Sitecall Certificate
7.9 Abnormal Display on the Software of Huawei Telepresence If the font type of the Android system is set in large fonts, the Huawei telepresence software may display abnormally. To fix the problem, click Settings->Display->Font size->Normal. 7.10 PassCode Configuration for Anonymous Conferences NOTICE This function only works in Huawei internal telepresence network. - Page 185 Forbidden (default) Set these parameters as required. Enable PassCode Forbidden (default) Set these parameters as required. Conference schedule refresh 2 (default) Set these parameters as interval required. Issue 01 (2015-02-12) Huawei Proprietary and Confidential Copyright © Huawei Technologies Co., Ltd.
- Page 186 Figure 7-11 Conference settings Table 7-6 Conference settings Parameter Value Remarks Default call type H.323 Set the values based on the actual environment. Default presentation mode Disabled Answer mode Manual Issue 01 (2015-02-12) Huawei Proprietary and Confidential Copyright © Huawei Technologies Co., Ltd.
-
Page 187: With 720P/50 Hz Video Source, There Is A Black Edge On The Screen For Panasonic 50C Screen
7.11 With 720P/50 Hz Video Source, There Is a Black Edge on the Screen for Panasonic 50C Screen PhenomenalDescription With 720p/50 Hz video source, there is a black edge on the screen for Panasonic 50C screen. Issue 01 (2015-02-12) Huawei Proprietary and Confidential Copyright © Huawei Technologies Co., Ltd. -
Page 188: Red Line Under Chapter Of Hid
Horizontal size –44 Vertical position Vertical size –51 ----End 7.12 Red line Under Chapter of HID This is an error correction function for Android pad, which is normal. Issue 01 (2015-02-12) Huawei Proprietary and Confidential Copyright © Huawei Technologies Co., Ltd. -
Page 189: Optional) Local Recording Settings
This chapter only covers the recording settings related to the telepresence system. For details about the recording system, see the Commissioning Guide to the Recording Subsystem of Huawei Telepresence- V2.0. If no recording server is configured for the telepresence system, skip this chapter. -
Page 190: Obtaining The Ip Addresses Of Recording Devices
Step 1 Log in to the web interface of the recording encoders one by one using the obtained IP addresses. The default login user name and password are both admin. Issue 01 (2015-02-12) Huawei Proprietary and Confidential Copyright © Huawei Technologies Co., Ltd. - Page 191 Step 2 Click Configurate. Under IP Address Modification, set the IP address for the recording encoder by based on Table 8-1, as shown in Figure 8-3. Figure 8-3 Setting the IP address of the recording encoder Issue 01 (2015-02-12) Huawei Proprietary and Confidential Copyright © Huawei Technologies Co., Ltd.
-
Page 192: Setting Audio And Video Parameters
Figure 8-6. Use default values for parameters not listed. Click Save on each configuration page. Figure 8-4 Web interface of recording encoders Figure 8-5 Setting video parameters Issue 01 (2015-02-12) Huawei Proprietary and Confidential Copyright © Huawei Technologies Co., Ltd. -
Page 193: Configuring The Recording Server
Step 1 Log in to the web interface of the recording server using the obtained IP address. The default login user name and password are both admin. Figure 8-8 Logging in to the recording server Issue 01 (2015-02-12) Huawei Proprietary and Confidential Copyright © Huawei Technologies Co., Ltd. - Page 194 8 (Optional) Local Recording Settings Figure 8-9 Recording server web interface Step 2 Choose System Maintenance > System Set. Figure 8-10 System maintenance Step 3 Complete system settings. Issue 01 (2015-02-12) Huawei Proprietary and Confidential Copyright © Huawei Technologies Co., Ltd.
- Page 195 Set the parameter based on the site requirement. Record File Max-Length 500M Recommended value. Set the parameter based on the site requirement. Issue 01 (2015-02-12) Huawei Proprietary and Confidential Copyright © Huawei Technologies Co., Ltd.
-
Page 196: Associating The Recording Server With Recording Encoders
WAN are not configurable. Subnet Mask 255.255.255.0 Gateway 10.11.54.1 ----End 8.3.2 Associating the Recording Server with Recording Encoders Step 1 Click MeetingRoom and click New Meeting Room. Issue 01 (2015-02-12) Huawei Proprietary and Confidential Copyright © Huawei Technologies Co., Ltd. - Page 197 Encoder3 Addr:(Right) 172.16.21.113 Encoder4 Addr:(Auxiliary) 172.16.21.114 Reconnect Unlimited Step 3 Under Disconnected, click Connect in the Configuration column to associate the recording server with the recording encoders. Issue 01 (2015-02-12) Huawei Proprietary and Confidential Copyright © Huawei Technologies Co., Ltd.
-
Page 198: Setting Recording Parameters On The Telepresence Host
Step 1 If the password of the recording server is not szreach, change it to szreach.Telnet to the recording server using the current password. In this example, the current password is szreach. Issue 01 (2015-02-12) Huawei Proprietary and Confidential Copyright © Huawei Technologies Co., Ltd. -
Page 199: Associating The Telepresence Host With The Recording Server
Step 3 Log in to the web interface of the telepresence host as the superadmin user (password: Change_Me), right-click Recording System, and choose Settings. Figure 8-19 Right-clicking Recording System Step 4 Set recording parameters. Issue 01 (2015-02-12) Huawei Proprietary and Confidential Copyright © Huawei Technologies Co., Ltd. -
Page 200: Setting Audio And Video Port Parameters
8.4.3 Setting Audio and Video Port Parameters NOTE For details about the cable connections between the recording system and telepresence system, see the HUAWEI TP3106&TP3118S&TP3118 V100R001C01B012 Telepresence System Connection Diagrams. Step 1 Configure relevant ports, as shown in Figure 8-21. On the displayed page, right-click Video Ports and choose Settings from the shortcut menu. - Page 201 Step 3 Right-click Audio Ports and choose Settings. In the Audio Port Settings dialog box, click the Line Output Ports tab. Set parameters and click Save, as shown in Figure 8-23. Issue 01 (2015-02-12) Huawei Proprietary and Confidential Copyright © Huawei Technologies Co., Ltd.
- Page 202 Step 4 Right-click Power and choose Settings. Set power socket 3 to Recording system and click Save. Step 5 Restart the telepresence host to enable the settings. ----End Issue 01 (2015-02-12) Huawei Proprietary and Confidential Copyright © Huawei Technologies Co., Ltd.
Need help?
Do you have a question about the TP3106 and is the answer not in the manual?
Questions and answers