
Related Manuals for Taurus RB10.5 Smart


Summary of Contents for Taurus RB10.5 Smart
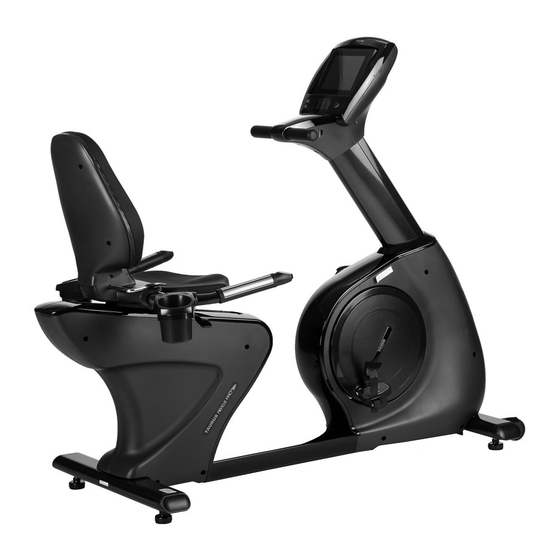
- Page 1 ® Assembly and operating instructions TFRB10.5SMART01.02 Ergometer RB10.5 Smart TF-RB10.5-SMART...
- Page 2 RB10.5 Smart...
- Page 3 Dear Customer, Thank you for deciding for a high-quality training equipment of the brand Taurus, the brand that makes athlete‘s hearts beat faster. Taurus offers a wide range of home fitness equipment like elliptical cross trainers, ergometers, treadmills and rowing machines.
-
Page 4: Table Of Contents
CONTENT GENERAL INFORMATION 1.1 Technical data 1.2 Personal safety 1.3 Electrical safety 1.4 Set-up place ASSEMBLY INSTRUCTIONS, MAINTENANCE AND CARE 2.1 General instructions 2.2 Errors and error diagnosis 2.3 Maintenance and service calendar ASSEMBLY 3.1 Package contents 3.2 Assembly instructions OPERATING INSTRUCTIONS 4.1 Console display 4.2 Language settings... - Page 5 WARRANTY INFORMATION DISPOSAL ORDERING ACCESSORIES ORDERING SPARE PARTS 9.1 Service hotline 9.2 Serial number and model name 9.3 Parts list 9.4 Exploded drawing...
-
Page 6: General Information
GENERAL INFORMATION Technical data TFT display of speed in km/h training time in min training distance in km cadence (rotations per minute) calories burnt in kcal heart rate (when using the hand sensors or a chest strap) heart rate trend + Watt resistance level METs... -
Page 7: Personal Safety
Personal safety Before you start using the equipment, you should consult your physician that this type of exercise is suitable for you from a health perspective. Particularly affected are persons who: have a hereditary disposition to high blood pressure or heart disease, are over the age of 45, smoke, have high cholesterol values, are overweight and/or have not exercised regularly in the past year. -
Page 8: Electrical Safety
Electrical safety (not valid for equipment with generator drive) The equipment should be connected directly to a grounded plug socket only by means of the power cable supplied. The use of multi-socket adapters or similar is not recommended. Extension leads must comply with local electrical safety guidelines. -
Page 9: Assembly Instructions, Maintenance And Care
No objects of any type should be inserted into the openings of the equipment. The equipment should be placed on a level and solid surface, any unevenness in the floor should be leveled out. A floor protective mat / equipment underlay can help to protect high-quality floor coverings (parquet, laminate, cork, carpets) from dents and sweat and can help to level out slight unevenness. - Page 10 You should therefore immediately replace damaged or worn components. Please contact your contract partner in such a case. The equipment should no longer be used until it has been repaired. When needed, only use original Taurus spare parts. Check the tightness of all screw connections once a month.
-
Page 11: Maintenance And Service Calendar
Maintenance and service calendar The following routine work must be done in the specified time intervals: Part Weekly Monthly Twice a year Annually Display console Tighten the pedals Plastic cover Seat rail Legends: C = cleaning; I = inspect... -
Page 12: Assembly
ASSEMBLY Package contents The package contains the parts represented in the illustration. If one of the illustrated parts is missing, please contact your contract partner. Handlebar Decoration Console Console Bracket Upright Post Assembly Cover Seat Handlebar Assembly & Accessory Tray Upper Handlebar Adjustment Handle Back Cushion Frame... - Page 13 Tools and screw sets Drawing Part no. and description Qty. 86) Spring washer (M8) 87) Washer (8x38x2.0t) 96) Screw (M4x10mm) 97) Screw (M4x20mm) 99) Bolt (M5xp0.8x15mm) 100) Bolt (M5xp0.8x30mm) 107) Bolt (M8xp1.25x55mm) 112) Bolt (M8xp1.25x65mm) 117) Bolt (M10xp1.5x50mm) Allen wrench (6mm) Combination wrench (6mm) Socket wrench (13mm) T-hand socket wrench (17mm)
- Page 14 Handlebar Back Console Cushion Quick Upright Post Access Key Base Seat Pulse Sensor Accessory Tray Pedal Main Frame Leveler Rear Stabilizer RB10.5 Smart...
-
Page 15: Assembly Instructions
Assembly instructions Before starting assembly, look carefully through the individual assembly steps shown and assemble the equipment in the order indicated. Step 1: Assemble base feet a) Mount four adjusting screws (28) each on the front base foot (2) and rear base foot (3). b) Make sure that the adjusting screws (28) are tightly attached to the base feet. - Page 16 Step 2: Cable connection a) Connect the middle connection cable (130) to the lower connection cable (131). Make sure that the cables are not stuck. b) Connect the pulse sensor cable 2 (134) to the pulse sensor cable 3 (135). Make sure that the cables are not stuck.
- Page 17 Step 5: Assemble upper handle a) Loosen the four pre-mounted screws (M8xp1.25x20mm) (104) and washers (86) from the upper handle (9). b) Insert the upper handle (9) in the console mast (8) and tighten this with four screws (M8xp1.25x20mm) (104) and four washers (86).
- Page 18 Step 8: Assemble seat frame a) Loosen the four pre-mounted spring washers (M8)(86) and four screws (M8xp1.25x20mm) (104) on both sides of the seat frame (6). b) Place the seat frame (6) in the backrest holder (5) and mount this with four spring washers (M8)(86) and four screws (M8xp1.25x20mm)(104).
- Page 19 Step 11: Assemble bottle holder Turn the seat handle (4) so that the hand pulse sensor handle points down. Mount the accessory holder (40) on the seat handle (4) with four screws (M4x10mm)(96). NOTE: Do not damage the pulse sensor cable 4 (136). Step 12: Assemble seat handle Place the seat handle (4) on the frame (1) and mount this with two spring washers (M8)(86)
- Page 20 Step 14: Assemble the seat a) Loosen the four pre-mounted screws (M8xp1.25x20mm)(141) under the seat (46). b) Mount the seat (46) on the seat frame (7) with four screws (M8xp1.25x20mm)(104). Step 15: Assemble the pedals a) Turn the right pedal (16) clockwise in the right pedal crank, which is located in the right crank cover.
- Page 21 Angle adjustment of the console Adjust the angle of the console by pressing slightly on the upper or lower end of the console. Transporting the equipment Lift the equipment on the rear base foot and pull the equipment to the desired place.
- Page 22 Adjusting the back upholstery a) In order to set the desired angle, pull up the adjusting lever from the backrest while you are sitting on the upholstery. b) Release the adjusting lever and listen for a “click” so that your desired angle is se- curely set.
-
Page 23: Operating Instructions
OPERATING INSTRUCTIONS Console display RB10.5 Pro Smart... -
Page 24: Language Settings
Language settings Step 1: Step 2: Method to enter the settings: a. First tap the right top corner 1 time. Choose and press the Language Button that b. Then tap the left bottom corner 3 times you want to use. to enter the settings. -
Page 25: Video & Musik Copy Settings
Step 3: Step 4: Fill in Password (if needed) and press “OK” Press “Return” button to the previous page. Note: Capital letters and small letters must be typed exactly. Video & Music copy settings Step 1: Step 2: a. First download your music or video to USB Connect USB memory stick into the Console’s memory stick. -
Page 26: Login Settings
Step 3: Step 4: Then keep tap “Return” button to return to the Main page. copy into the console. Login settings Step 1: Step 2: Tap “User” button to login. a. Fill out personal information – NAME, GENDER, BIRTHDAY, HEIGHT and WEIGHT. Note: Pressing the “Quick Start”... -
Page 27: Workout Programs Settings
Workout programs settings Step 1: Step 2: Tap “Programs” button to select the preference program to exercise. exercise program. There are 6 types of Tap “Quick Start” button to exercise. programs to choose from as shown below. 4 types of Workout Pro- 4 types of Mountain Roads Running Routes with Goog- grams... -
Page 28: Workout Programs
4.6.1 Workout programs Step 1: Step 2: There are 4 programs available to choose Choose the desired workout program and from (see the following figures). set up Distance, Time, Calories or Watt for proper workout. Manual Program Constant Power Program (30 ~ 300 Watt;... -
Page 29: Mountain Road Programs
4.6.2 Mountain Road Programs Step 1: If select Mountain Road Program, there are 4 types of Mountain Roads available to choose from, choose one of the desired mountain road program for proper workout. Note: The shorter the distance, the heavier resistance could get; on the contrary, the longer the distance, the lighter resistance could get. -
Page 30: H.r.c. Programs
4.6.3 H.R.C. Programs Step 1: Step 2: There are 4 H.R.C. programs available to Choose one of the desired workout program, choose from (see the following figures). and set up Distance, Time, Calories for proper Simple formula overview (maximum heart workout. -
Page 31: Racing Challenge Programs
4.6.4 Racing Challenge Programs Step 1: Step 2: There are 4 types (5, 10, 15 and 20 Laps) Choose one of the desired racing challenge available to choose from. program for proper workout. Once the workout is completed, you can review your workout results. -
Page 32: Running Routes With Google Maps
4.6.5 Running Routes with Google Maps Step 1: Step 2: To create a route, select and touch the “start” To start workout by pressing the “Start” and “destination”. button. “Green” means the start location. Once the workout is completed, you can “Yellow”... -
Page 33: Virtual Running
4.6.6 Virtual Running Step 1: There are 3 types of virtual running scenes available to choose from, choose one of the virtual running scene for proper workout. Multi-Media functions during Step 1: During workout, drag your finger on the ◀ or ▶, ▲ triangular icons on either side of the screen to reveal or hide the panels displaying the current workout values (Calories, RPM, Distance, Heart Rate, Speed, and Watt). - Page 34 The software comes with the following multi- media function apps for your enjoyment during exercise. Drag your finger down on the top triangular icon ▲ to reveal the panel of app icons and tap your desired app. Browser Button Browse websites on the Internet. YouTube Button Play videos from YouTube’s online collection.
-
Page 35: Workout Instructions
WORKOUT INSTRUCTIONS Heart rate measuring Pulse measuring through hand sensors The hand sensors integrated in the handles allow you to determine your heart rate. You can measure your heart rate by lightly grasping the sensors with both hands at the same time. - Page 36 Note: If you have not been active in doing sports for a longer period of time, you should first go to your physician in order to discuss your training with them. You should also contact your physician in advance in the event of heart problems, high/low blood pressure and obesity.
- Page 37 Example: For a 45-year-old man or woman, the maximum heart rate is 175 (220 - 45 = 175). • The fat burning target zone (55%) is at approximately 96 beats/min. = (220 - age) x 0.55. • The cardio target zone (75%) is at approximately 131 beats/min. = (220 - age) x 0.75.
-
Page 38: 10 Tips For Effective Ergometer Training
10 tips for effective ergometer training 1. Set goals What would you like to achieve with your training? Weight regulation, improved stamina, prevent risk of disease, more mobility, cardiovascular training, etc. In order to achieve your long-term training goal, set individual partial goals, e. g., weekly or monthly goals. -
Page 39: Designing A Workout
9. Workout journal Keep a record of your training sessions. Note the date, resting pulse, active pulse, recovery pulse, resistance level, time, distance, calories burnt and fitness level. 10. Reward yourself Do something good for you and your body after training or after achieving a partial goal. - Page 40 WEEK 5 + 6 Beginner Advanced Days Duration Intensity Duration Intensity 30 min. Moderate speed, keep 40 min. Vary speed, keep resistance resistance low 30 min. Moderate speed, keep 40 min. Vary speed, keep resistance resistance low 30 min. Moderate speed, keep 40 min.
-
Page 41: Stretching Exercises For Leg & Chest Muscles
Stretching exercises for leg & chest muscles 1. Exercise: Stretching of front thigh / leg extension (quadriceps) • Stable position, grab arches of feet • Pull heel towards buttocks, knee points downwards (no abduction) • Straight upper body, avoid tilting the pelvic forward (hollow back) by tensing the abdominal muscles •... - Page 42 3. Exercise: Stretching the calf muscles (gastrocnemius) • Place feet parallel to each other pointing forward, the heels touch the floor • Support yourself on a chair coming from a lunge • Move your body weight to the front leg, press your heel from the rear leg towards the floor and hold the contact •...
-
Page 43: Workout Journal
Workout journal Date Time (min.) Training weight Calories burnt Body weight Ø Pulse Distance Resistance level I feel ... RB10.5 Smart... -
Page 44: Warranty Information
WARRANTY INFORMATION Taurus training fitness equipment is subject to strict quality controls. However, if a fitness equipment purchased from us does not work perfectly, we take it very seriously and ask you to contact our customer service as indicated. We are happy to help you by phone via our service hotline. - Page 45 The terms of use are defined as follows: • Home use: solely for private use in private households up to 3 hours per day • Semi-professional use: up to 6 hours per day (e. g. rehabilitation centers, hotels, clubs, company gyms) •...
-
Page 46: Disposal
If you have trouble finding the serial number on your fitness equipment, our service team is at your disposal to offer further information. Service outside the warranty period We are also happy to issue an individual cost estimate if there is a problem with your fitness equipment after the warranty has expired, or in cases which do not fall under the terms of the warranty, e. -
Page 47: Ordering Accessories
ORDERING ACCESSORIES Sport-Tiedje floor mat size XXL Art. No. ST-FM-XXL Sport-Tiedje transmitter chest strap Art. No. ST1000 Sport-Tiedje Komfort chest strap Premium Art. No. ST1050 Chest strap contact gel 250ml Art. No. BK-250 Fitness equipment care set Art. No. HF-500 RB10.5 Smart... -
Page 48: Ordering Spare Parts
9:00 am - 6:00 pm Serial number and model name Before assembling your equipment, find the serial number on the white sticker and enter it in the appropriate space. Serial number: Brand / category: Model name: Taurus recumbent ergometer RB10.5-SMART... -
Page 49: Parts List
Parts list Description Qty. No. Description Qty. Main Frame Console Bracket Front Stabilizer Upper Handlebar Decoration Cover Rear Stabilizer Lower Handlebar Decoration Cover Seat Handlebar Foam Grip Back Cushion Adjustment Bracket Plastic Seat Support Cover (L) Back Cushion Frame Plastic Seat Support Cover (R) Seat Frame Back Cushion Hinge Upright Post... - Page 50 Description Qty. No. Description Qty. Idler Arm Screw (M4x10mm) Axle Cover Screw (M4x20mm) Idler Shaft Screw (M5x18mm) Idler Spring Bolt (M5×p0.8×15mm) Roller Plate Bolt (M5×p0.8×30mm) Roller Axle Bolt (M5×p0.8×75mm) Seat Adjustment Lever Bolt (M6×p1.0×20mm) Seat Torsion Spring Bolt (M5×p0.8×12mm) Back Cushion Adjustment Bracket Bolt (M8×p1.25×20mm) Cushion Linkage Axel Bolt (M10×p1.5×45mm)
- Page 51 Description Qty. No. Description Qty. Nut (M10xp1.25) Generator Wire Upper Connection Wire Bolt (M8xp1.25x20mm) Middle Connection Wire 20 Spacer (4.6mm) Lower Connection Wire 20 Spacer (36mm) Sensor Wire Adaptor Socket Pulse Sensor Wire 1 Ground Wire Pulse Sensor Wire 2 Adaptor Wire 2 Pulse Sensor Wire 3 Adaptor Wire 3...
-
Page 52: Exploded Drawing
Exploded drawing... - Page 53 DISCLAIMER ©2011 TAURUS is a registered brand of the company Sport-Tiedje GmbH. All rights reserved. Any use of this trademark without the explicit written permission of Sport-Tiedje is prohibited. Product and instructions are subject to change. Technical data can be changed without advance notice.
- Page 55 Ergometer RB10.5 Smart...
Need help?
Do you have a question about the RB10.5 Smart and is the answer not in the manual?
Questions and answers