Advertisement
Quick Links
Advertisement

Related Manuals for Xylem MJK Chatter E-MAIL


Summary of Contents for Xylem MJK Chatter E-MAIL
- Page 1 USERS MANUAL CHATTER™ DATA LOGGER Chatter™ data logger E-MAIL AND RTU MODELS...
- Page 2 USERS MANUAL CHATTER™ DATA LOGGER Your notes:...
-
Page 3: Table Of Contents
USERS MANUAL CHATTER™ DATA LOGGER Table of contents Introduction Initial setup Panel mount model ........................... 9 Package content ................................... 10 Open the Chatter Data logger ................................... 11 Insert cable glands ................................... 12 Connect the antenna ................................... 13 Insert a SIM-card ................................... - Page 4 USERS MANUAL CHATTER™ DATA LOGGER Alarm ................................79 Advanced ................................81 Analog inputs ................................... 83 Setup ................................84 High limit ................................87 Low limit ................................89 Advanced ................................91 InstrumentNet inputs ................................... 92 Setup ................................93 High limit ................................96 Low limit ................................
- Page 5 USERS MANUAL CHATTER™ DATA LOGGER InstrumentNet inputs ................................151 Alarm list ................................... 152 Stormflow ................................... 153 Stormflow status ................................154 Stormflow counters ................................155 Stormflow conditional log ................................156 Deviation detect ................................... 157 Modem status ................................... 158 Technical reference Signal names ...........................
-
Page 6: Introduction
USERS MANUAL CHATTER™ DATA LOGGER Introduction Thank you for choosing Chatter™ Data Logger. We have done our best to design and produce a quality data logger to meet your requirements. To ensure the best result MJK recommends that the user reads this manual to become familiar with all features, functions and details of the Chatter™... - Page 7 USERS MANUAL CHATTER™ DATA LOGGER Ordering Item number Description Revision Description Changes regarding e-mail capabilities Changed several topics in Configuration with Chatter Link RTU Changed names after lock-down of fields in user interface Finished some topics Finished some topics Added subtopics in Initial setup. Added subtopics in Configuration with Chatter Link RTU Restructured content sequence First release in this format...
-
Page 8: Initial Setup
USERS MANUAL CHATTER™ DATA LOGGER Initial setup The initial setup - or physical setup - of a Chatter™ Data Logger consists of some steps. Which steps depends on your model of Chatter™ Data Logger: Panel mount model Tube mount model Unpack the Chatter™... -
Page 9: Panel Mount Model
USERS MANUAL CHATTER™ DATA LOGGER Panel mount model... -
Page 10: Package Content
USERS MANUAL CHATTER™ DATA LOGGER Package content When you receive your Chatter™ Data Logger for wall mounting, the package contains: One Chatter™ Data Logger for mounting in a panel or on a wall. One plastic bag with cable glands Identification Your Chatter™... -
Page 12: Insert Cable Glands
USERS MANUAL CHATTER™ DATA LOGGER Insert cable glands Open the plastic bag with the cable glands, the content is shown here. Punch out the blanks in the housing where you want to insert cable glands Be careful when you knock out the blanks, don't damage the electronic components inside the housing. -
Page 18: Analog Sensors
USERS MANUAL CHATTER™ DATA LOGGER Analog sensors General Up to four analog sensors may be connected to the panel mount version of a Chatter™ Data Logger. Connect the power supply leads - the red and brown wires - from all four sensors to the terminals in this way: Red wire - positive supply lead - to the terminal marked +5 / 10 / 15V... -
Page 21: Mounting In The Field
USERS MANUAL CHATTER™ DATA LOGGER Mounting in the field Drill four holes, spacing as shown to the right. Use screws and other mounting material suited for the surface, on which the Chatter™ Data Logger will be mounted. Use some sort of strain relief for the sensor cable, the cable gland must NOT be the only support for the weight of the sensor and cable! Place the lid on top of the housing, tighten all four screws. -
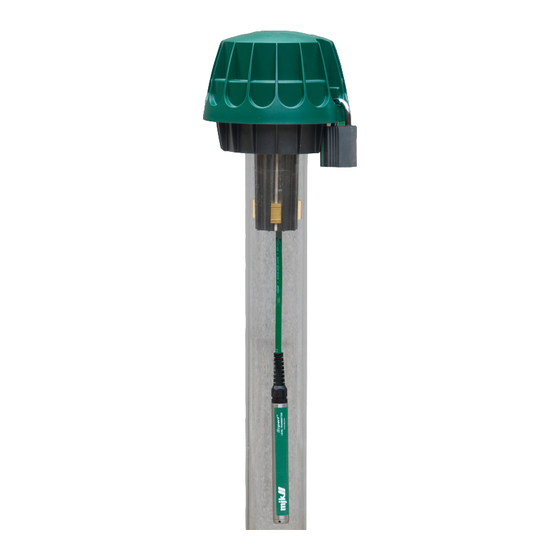
Page 22: Tube Mount Model
USERS MANUAL CHATTER™ DATA LOGGER Tube mount model... -
Page 25: Insert A Sim-Card
USERS MANUAL CHATTER™ DATA LOGGER Insert a SIM-card The holder for the SIM-card is on the right side of the printed circuit board. Push the SIM-card cover to the right to open it. Insert the SIM-card into the holder. Make sure it is positioned correctly, see the markings in the picture.. -
Page 26: Turn On The Chatter Data Logger
USERS MANUAL CHATTER™ DATA LOGGER Turn on the Chatter Data logger Locate the battery power jumper. When delivered, the battery power jumper connects the two rightmost pins - this is the OFF-position Move the battery power jumper so it connects the two leftmost pins - this is the ON-position. - Page 28 USERS MANUAL CHATTER™ DATA LOGGER Mount three wedges of the same size, use the rubber bands to keep them in position. A dditional inform ation: Accessories...
-
Page 29: Connect Sensor
USERS MANUAL CHATTER™ DATA LOGGER Connect sensor Mount the black aluminium base in the end of the tube using one set of wedges to fit the internal diameter of the tube. Tools Type Size Socket wrench 7 mm Attach the safety wire to the black aluminium base using a screw and washer. - Page 30 USERS MANUAL CHATTER™ DATA LOGGER Lower the sensor into the tube. Do not just drop the sensor into the tube, lower it gently.
-
Page 31: Re-Assemble The Chatter Data Logger
USERS MANUAL CHATTER™ DATA LOGGER Re-assemble the Chatter Data logger Make sure that the gasket is correctly placed in the green plastic housing, then put the base plate back in place. Ensure that none of the wires from the bas plate are trapped between the gasket and the baseplate. -
Page 32: Start With The Setup Wizard
USERS MANUAL CHATTER™ DATA LOGGER Start with the setup wizard General You can use a wizard to make the initial setup of your Chatter™ Data Logger. A wizard guides you through the necessary steps to ensure a simple, working configuration. Two different wizards are available, one for a Chatter™... -
Page 33: Rtu Wizard
USERS MANUAL CHATTER™ DATA LOGGER RTU wizard The first step is to connect with a Chatter™ Data Logger Click the button Start You may change the built-in firmware e-mail version Database version Select the firmware version you will change to. You may change the built-in firmware to a database version. - Page 34 USERS MANUAL CHATTER™ DATA LOGGER Select the method used to deliver the measured data. Select Not in use if you want no communication from the Chatter™ Data Logger Select SMS if the Chatter™ Data Logger will deliver measured data in an SMS message Select SCADA GSM if the Chatter™...
-
Page 35: Sms
USERS MANUAL CHATTER™ DATA LOGGER If you selected the SM S option, you must provide the telephone number for the telephone which will receive the SMS message. Click the button with the arrow to continue. Enter the pin-code for the SIM-card is a pin-code is used. Leave the field empty if you don't use a pin-code Click the button with the arrow to continue. - Page 36 USERS MANUAL CHATTER™ DATA LOGGER A standard Windows save file window, Use it to specify where you want to save the configuration file. The wizard is completed. Click the button to close the wizard.
-
Page 37: Scada Gprs
USERS MANUAL CHATTER™ DATA LOGGER SCADA GPRS If you selected the SC A D A G PRS option, you must provide the IP address and the IP port number used by the SCADA system. This must be in this form: <address>:<port>, an example: 10.0.0.20:1025 Click the button with the arrow to continue. - Page 38 USERS MANUAL CHATTER™ DATA LOGGER A standard Windows save file window, Use it to specify where you want to save the configuration file. The wizard is completed. Click the button to close the wizard.
-
Page 39: Scada Gsm
USERS MANUAL CHATTER™ DATA LOGGER SCADA GSM If you selected the SC A D A G SM option, you must provide telephone number used by the SCADA system. Click the button with the arrow to continue. Select which sign you want to use as the decimal delimiter. You can use either a comma or a decimal point. - Page 40 USERS MANUAL CHATTER™ DATA LOGGER The wizard is completed. Click the button to close the wizard.
-
Page 41: E-Mail Wizard
USERS MANUAL CHATTER™ DATA LOGGER e-mail wizard The first step is to connect with a Chatter™ Data Logger Click the button Start You may change the built-in firmware RTU version Database version Select the firmware version you will change to. You may change the built-in firmware to a database version. - Page 42 USERS MANUAL CHATTER™ DATA LOGGER Select how often you want to measure the level using the InstrumentNet sensor and how often you want the Chatter™ Data Logger to send an e-mail to deliver the measured data. Click the button with the arrow to continue. A dditional inform ation: Data log schedule Data call schedules...
- Page 43 USERS MANUAL CHATTER™ DATA LOGGER Select which sign you want to use as the decimal delimiter. You can use either a comma or a decimal point. A dditional inform ation: Locale settings Save the configuration created by this wizard. The configuration is saved as a file on your PC. Click the button Save configuration A default file name is provided, Change the file name and the description to suit your needs...
-
Page 44: Configuration With Chatter Link
USERS MANUAL CHATTER™ DATA LOGGER Configuration with Chatter Link MJK Automation ApS provides a PC-program, Chatter™ Link, as a part of the Chatter™ Data Logger package. You must use this program to do the initial setup and configuration of your Chatter™ Data Logger. You can create a configuration i two different ways: Use the start wizard, it guides you through some easy steps to make a basic configuration. -
Page 45: Open A Configuration
USERS MANUAL CHATTER™ DATA LOGGER Open a configuration From the menu strip: Click the button O pen a configuration From the Start-menu: Click the button O pen a saved configuration The standard option is to open a default configuration. Select one of the configurations in the list. -
Page 46: Advanced
USERS MANUAL CHATTER™ DATA LOGGER Advanced... -
Page 47: Read The Current Configuration
USERS MANUAL CHATTER™ DATA LOGGER Read the current configuration From the Start-menu: Click the button Connect to a Chatter Your PC must be connected to the Chatter™ Data Logger with a USB- cable. From the menu strip: Click the button Connect to a Chatter The connection is in progress If you get this warning, re-connect the USB cable and try once more. -
Page 48: Select Language
USERS MANUAL CHATTER™ DATA LOGGER Select language Use this window select langua ge you want Chatter ™ Link to use. below for a detaile descrip tion of each part in this pane. Select your language Select between the available languages. Chatter™... -
Page 49: Chatter Information Window
USERS MANUAL CHATTER™ DATA LOGGER Chatter information window Use this window to get some general information about your Chatter™ Data Logger The data shown are only accurate when your PC is connected to the Chatter™ Data Logger with a USB-cable, otherwise it will show the data from the last time, you were connected to the Chatter™... -
Page 50: Call Information Pane
USERS MANUAL CHATTER™ DATA LOGGER Call information pane This pane shows data related to calls made by the Chatter™ Data Logger. The data shown are only accurate when your PC is connected to the Chatter™ Data Logger with a USB-cable, otherwise it will show the data from the last time, you were connected to the Chatter™... - Page 51 USERS MANUAL CHATTER™ DATA LOGGER A dditional inform ation: Battery life expectancy Replacing the battery Location in register list Time since last reset Shows the time elapsed since last soft reset or power application to the Chatter™ Data Logger. This time is for your information only, you cannot change it.
-
Page 52: Product Details Pane
USERS MANUAL CHATTER™ DATA LOGGER Product details pane This pane shows data related to the Chatter™ Data Logger. The data shown are only accurate when your PC is connected to the Chatter™ Data Logger with a USB-cable, otherwise it will show the data from the last time, you were connected to the Chatter™... - Page 53 USERS MANUAL CHATTER™ DATA LOGGER This value is updated every time a configuration is written to the Chatter™ Data Logger even if no changes are made to the configuration A dditional inform ation: Location in register list...
-
Page 54: Function Setup
USERS MANUAL CHATTER™ DATA LOGGER Function setup... -
Page 55: Stormflow
USERS MANUAL CHATTER™ DATA LOGGER Stormflow General A stormflow is a condition where water is spilled over a crest with a known geometry. The Chatter™ Data Logger can detect stormflows and calculate the amount of water spilled over the crest. The Chatter™ Data Logger handles stormflow conditions in five different ways. - Page 56 USERS MANUAL CHATTER™ DATA LOGGER Total duration of detected stormflows today Total duration of detected stormflows yesterday Total volume in all stormflows, the green shaded area. Total volume in all stormflows today Total volume in all stormflows yesterday Conditional with start volume calculates how much water is spilled, but certain conditions must be met before it is accepted as a stormflow:...
-
Page 57: General
USERS MANUAL CHATTER™ DATA LOGGER General Use this window to set the way stormflow detection and recording will operate. Signal name Select an existing signal name or enter a new signal name. The signal name will act as an identifier for this input, inserted into any SMS messages and e-mails sent from this Chatter™... - Page 58 USERS MANUAL CHATTER™ DATA LOGGER Select between No and Yes. If you select Yes, the Chatter™ Data Logger will make an alarm call when the stormflow condition no longer exists. It will call all entries in the Alarm call list, starting with the first entry.
-
Page 59: Stormflow Calculation
USERS MANUAL CHATTER™ DATA LOGGER Stormflow calculation Use this window to set the way stormflow calculations will operate. Signal input Select the input which will supply the level measurement needed for the stormflow calculation You must select both an input type, InstrumentNet or Analog and the input number between one and four. - Page 60 USERS MANUAL CHATTER™ DATA LOGGER Select the number of decimals you need, you can select from zero to eight digits after the decimal point. The Chatter™ Data Logger stores the measured value internally with the maximum precision regardless of this setting. Volume convert factor The calculated volume will be multiplied with the number entered in this field.
-
Page 61: Q Points
USERS MANUAL CHATTER™ DATA LOGGER Q points Use this window to set the way stormflow calculations will operate. Weir type Select between the supported weir types A dditional inform ation: Supported weir types Select number of Q points Select the number of Q points you want to use. You can select up ro 16 Q points This setting is valid for custom Q ponts only Max head, h [m] Enter the maximum head, h, for the selected weir measured in meters... - Page 62 USERS MANUAL CHATTER™ DATA LOGGER The Depth below edge is only available if you select a rectangular weir. A dditional inform ation: Supported weir types Calculate Q points Use this button to calculate the actual Q points corresponding to the selected weir type Select number of Q points Select which input you want to use to detect stormflows.
-
Page 63: Stormflow Conditional
USERS MANUAL CHATTER™ DATA LOGGER Stormflow conditional Use this window to set the way stormflow detection and recording will operate. Start time Select how many minutes the first spill must be above the set limit before it is accepted as a stormflow. Stop timeout Select how many minutes the level must be below the set limit before it is accepted as a terminated stormflow. -
Page 64: Stormflow Always On
USERS MANUAL CHATTER™ DATA LOGGER Stormflow always on... -
Page 65: Supported Weir Types
USERS MANUAL CHATTER™ DATA LOGGER Supported weir types Rectangular full width weir, front elevation. The notch width, b, equals the total weir width, B, both measured in meters Rectangular full width weir, side elevation h is actual head, measured in meters p is the depth from the crest to the bottom of the weir measured in meters Rectangular notch weir, front elevation... - Page 66 USERS MANUAL CHATTER™ DATA LOGGER Rectangular full width weir, side elevation h is actual head, measured in meters p is the depth from the crest to the bottom of the weir measured in meters Triangular V-notch weir, front elevation α is the actual notch angle, measured in degrees Triangular V-notch weir, side elevation h is actual head, measured in meters...
-
Page 67: Deviation Detect
USERS MANUAL CHATTER™ DATA LOGGER Deviation detect... -
Page 68: General
USERS MANUAL CHATTER™ DATA LOGGER General... -
Page 69: Setup - Running Avarage
USERS MANUAL CHATTER™ DATA LOGGER Setup - Running avarage... -
Page 70: Setup - Periode Avarage
USERS MANUAL CHATTER™ DATA LOGGER Setup - Periode avarage... -
Page 71: Rising Rate Limit
USERS MANUAL CHATTER™ DATA LOGGER Rising rate limit In use? Select between No and Yes. Select if the rising rate limit is in use or not in use. Signal name Select an existing signal name or enter a new signal name. The signal name will act as an identifier for rising rate limit, inserted into any SMS messages and e-mails sent from this Chatter™... - Page 72 USERS MANUAL CHATTER™ DATA LOGGER log interval A dditional inform ation: Working in normal mode As you can specify a data log interval of 24 hours and a delay of 250 data log intervals, the result can be a very long delay!
-
Page 73: Falling Rate Limit
USERS MANUAL CHATTER™ DATA LOGGER Falling rate limit In use? Select between No and Yes. Select if the falling rate limit is in use or not in use. Signal name Select an existing signal name or enter a new signal name. The signal name will act as an identifier for this input, inserted into any SMS messages and e-mails sent from this analog input Additional information:... - Page 74 USERS MANUAL CHATTER™ DATA LOGGER normal mode, the sample time is the Data log interval A dditional inform ation: Working in normal mode Setting the data log interval As you can specify a data log interval of 24 hours and a delay of 250 data log intervals, the result can be a very long delay!
-
Page 75: I/O Signals Menu
USERS MANUAL CHATTER™ DATA LOGGER I/O signals menu... -
Page 76: Digital Inputs
USERS MANUAL CHATTER™ DATA LOGGER Digital inputs Use this window to set the way each of the four digital input will operate. The data shown are only accurate when your PC is connected to the Chatter™ Data Logger with a USB-cable, otherwise it will show the data from the last time, you were connected to the Chatter™... -
Page 77: Setup
USERS MANUAL CHATTER™ DATA LOGGER Setup Use this window to set the way each of the four digital input will operate. The data shown are only accurate when your PC is connected to the Chatter™ Data Logger with a USB-cable, otherwise it will show the data from the last time, you were connected to the Chatter™... - Page 78 USERS MANUAL CHATTER™ DATA LOGGER Active low, a voltage greater than 2 V relative to GND is the normal state, a voltage between 2 V and 5 V relative to GND generates an event or alarm. Active high, a voltage less than 2 V relative to GND is the normal state, a voltage between 2 V and 5 V relative...
-
Page 79: Alarm
USERS MANUAL CHATTER™ DATA LOGGER Alarm Use this window to set the way each of the four digital input will operate. The data shown are only accurate when your PC is connected to the Chatter™ Data Logger with a USB-cable, otherwise it will show the data from the last time, you were connected to the Chatter™... - Page 80 USERS MANUAL CHATTER™ DATA LOGGER Setting the alarm call list...
-
Page 81: Advanced
USERS MANUAL CHATTER™ DATA LOGGER Advanced Use this window to set the way each of the four digital input will operate. The data shown are only accurate when your PC is connected to the Chatter™ Data Logger with a USB-cable, otherwise it will show the data from the last time, you were connected to the Chatter™... - Page 82 USERS MANUAL CHATTER™ DATA LOGGER...
-
Page 83: Analog Inputs
USERS MANUAL CHATTER™ DATA LOGGER Analog inputs Use this window to set the way each of the four analog input will operate, A dditional inform ation: Setup pane High limit pane Low limit pane Advanced pane In use? Select between No and Yes. If you select Ye s , this input will either log a measurement according to the log interval, act as an alarm input or act as an event input... -
Page 84: Setup
USERS MANUAL CHATTER™ DATA LOGGER Setup Use this pane to set the way each of the four analog input will operate. See below for a detailed description of each part in this pane. Signal name Select an existing signal name or enter a new signal name. The signal name will act as an identifier for this input. - Page 85 USERS MANUAL CHATTER™ DATA LOGGER Select between No and Yes. If you select Yes, the Chatter™ Data Logger will make an alarm call using the Alarm call list when an alarm condition no longer exists. A dditional inform ation: Setting the alarm call list Use alarm retention interval Select between No and Yes.
- Page 86 USERS MANUAL CHATTER™ DATA LOGGER A dditional inform ation: Scaling and calibration Changing output values...
-
Page 87: High Limit
USERS MANUAL CHATTER™ DATA LOGGER High limit Use this pane to set the way each of the four analog input will react when the high limit is passed on either on a rising slope or on a falling slope. See below for a detailed description of each part in this pane. - Page 88 USERS MANUAL CHATTER™ DATA LOGGER normal mode, the sample time is the Data log interval A dditional inform ation: Working in normal mode As you can specify a data log interval of 24 hours and a delay of 250 data log intervals, the result can be a very long delay!
-
Page 89: Low Limit
USERS MANUAL CHATTER™ DATA LOGGER Low limit Use this pane to set the way each of the four analog input will react when the low limit is passed on either on a rising slope or on a falling slope. See below for a detailed description of each part in this pane. - Page 90 USERS MANUAL CHATTER™ DATA LOGGER If the Chatter™ Data Logger is working in normal mode, the sample time is the Data log interval A dditional inform ation: Working in normal mode Setting the data log interval As you can specify a data log interval of 24 hours and a delay of 250 data log intervals, the result can be a very long delay!
-
Page 91: Advanced
USERS MANUAL CHATTER™ DATA LOGGER Advanced... -
Page 92: Instrumentnet Inputs
USERS MANUAL CHATTER™ DATA LOGGER InstrumentNet inputs Use this window to set the way each of the four Instrument Net inputs will operate. See below for a detailed description of each part of this window. A dditional inform ation: Setup pane High limit pane Low limit pane InstrumentNet setup pane... -
Page 93: Setup
USERS MANUAL CHATTER™ DATA LOGGER Setup Use this pane to set the way each of the four Instrument Net inputs will operate. See below for a detailed description of each part in this pane. Signal name Select an existing signal name or enter a new signal name. The signal name will act as an identifier for this input. - Page 94 USERS MANUAL CHATTER™ DATA LOGGER Call on alarm OFF Select between No and Yes. If you select Yes, the Chatter™ Data Logger will make an alarm call using the Alarm call list when an alarm condition no longer exists Additional information: Setting the alarm call list Use alarm retention interval Select between No and Yes.
- Page 95 USERS MANUAL CHATTER™ DATA LOGGER The default value is 1, please read about Scaling and Calibration before you change this value. A dditional inform ation: Scaling and calibration Changing output values...
-
Page 96: High Limit
USERS MANUAL CHATTER™ DATA LOGGER High limit Use this pane to set the way each of the four Instrument Net inputs will react when the high limit is passed on either on a rising slope or on a falling slope. See below for a detailed description of each part in this pane. - Page 97 USERS MANUAL CHATTER™ DATA LOGGER Working in event mode If the Chatter™ Data Logger is working in normal mode, the sample time is the Data log interval A dditional inform ation: Working in normal mode As you can specify a data log interval of 24 hours and a delay of 250 data log intervals, the result can be a very long delay!
-
Page 98: Low Limit
USERS MANUAL CHATTER™ DATA LOGGER Low limit Use this pane to set the way each of the four Instrument Net inputs will react when the low limit is passed on either on a rising slope or on a falling slope. See below for a detailed description of each part in this pane. - Page 99 USERS MANUAL CHATTER™ DATA LOGGER Working in event mode Setting the event log interval If the Chatter™ Data Logger is working in normal mode, the sample time is the Data log interval A dditional inform ation: Working in normal mode Setting the data log interval As you can specify a data log interval of 24 hours and a delay of 250 data log intervals, the...
-
Page 100: Instrumentnet Setup
USERS MANUAL CHATTER™ DATA LOGGER InstrumentNet setup Use this pane to set the way each of the four Instrument Net sensors are configured. See below for a detailed description of each part in this pane. Instrument Net sensor ID Enter the Instrument Net device ID for the Instrument Net sensor connected to this input. If the sensor is an MJK Expert™... -
Page 101: Advanced
USERS MANUAL CHATTER™ DATA LOGGER Advanced... -
Page 102: Schedules
USERS MANUAL CHATTER™ DATA LOGGER Schedules... -
Page 103: Log Schedule
USERS MANUAL CHATTER™ DATA LOGGER Log schedule Data log interval Select how often you want the Chatter™ Data Logger to make measurements. You can select intervals from 1 minute to 24 hours. The actual log time is relative to midnight. If you select every 12 hours, the actual log times will be at 00:00 Unicersal Time Coordinated and 12:00 Unicersal Time Coordinated. -
Page 104: Data Call Schedule
USERS MANUAL CHATTER™ DATA LOGGER Data call schedule... -
Page 105: Schedule
USERS MANUAL CHATTER™ DATA LOGGER Schedule Use this pane to set the way you want this Chatter™ Data Logger to deliver its logged data to a recipient. See below for a detailed description of each part in this pane. Time selection Three identical schedules are provided. -
Page 106: Data Call List
USERS MANUAL CHATTER™ DATA LOGGER Data call list Data call type You must select one of the four call types: If the Chatter™ Data Logger is using the e-mail firmware: Call type Description Not in use This entry in the call list is not used SMS message This Chatter™... - Page 107 USERS MANUAL CHATTER™ DATA LOGGER telephone number. SCADA via GPRS One or two IPv4 addresses for the SCADA system. The address must be in the form like this: 192.168.1.100:5001, the :5001 identifies the TCP-port at the address 192.168.1.100 where the SCADA system listens for data. This IPv4 address can be either a public or a private address, depending on the network you want to access, If you are using two IPv4 addresses for SCADA via GPRS, you cannot use the SCADA via...
-
Page 108: Data Call Settings
USERS MANUAL CHATTER™ DATA LOGGER Data call settings Data call settings You can select a call time offset, ranging from nothing to 24 hours. The call time offset is applied to all three call intervals. The time for any call You want your Set up a call Set the call time... -
Page 109: Scada Log
USERS MANUAL CHATTER™ DATA LOGGER SCADA log 4 identical logs Filter by Select which input is logged in this SCADA system log Value type Help text goes here. Select log interval Help text goes here. Log interval [h:mm:ss] Help text goes here. -
Page 110: Alarm Calls
USERS MANUAL CHATTER™ DATA LOGGER Alarm calls... -
Page 111: Alarm Call List
USERS MANUAL CHATTER™ DATA LOGGER Alarm call list Use this window to set the way you want this Chatter™ Data Logger to deliver alarms to a recipient. See below for a detailed description of each part in this pane. Alarm call type You must select one of the four call types: Call type Description... -
Page 112: Alarm Settings
USERS MANUAL CHATTER™ DATA LOGGER Alarm settings Use this window to set the way you want this Chatter™ Data Logger to deliver alarms to a recipient. See below for a detailed description of each part in this pane. Alarm retention interval Select the time, which must run out, before the Chatter™... -
Page 113: System Setup Menu
USERS MANUAL CHATTER™ DATA LOGGER System setup menu... -
Page 114: Chatter Name
USERS MANUAL CHATTER™ DATA LOGGER Chatter name This pane shows data related to the Chatter™ Data Logger. The data is only available when your PC is connected to the Chatter™ Data Logger with a USB- cable See below for a detailed description of each part in this pane. -
Page 115: Locale Settings
USERS MANUAL CHATTER™ DATA LOGGER Locale settings This pane shows data related to the Chatter™ Data Logger. The data is only available when your PC is connected to the Chatter™ Data Logger with a USB- cable See below for a detailed description of each part in this pane. -
Page 116: Day Shift Moment
USERS MANUAL CHATTER™ DATA LOGGER Day shift moment Use this window to set when today becomes yesterday. Normally a day starts at midnight, but you can shift this to make your day start at any time you want. When today becomes yesterday, all day counter values are moved from the today-part to the yesterday part It affects log times as Data log interval and Event log interval is 'shifted' from midnight by this amount... -
Page 117: Communication
USERS MANUAL CHATTER™ DATA LOGGER Communication Use this window to set the parameters necessary for communicating via GSM or GPRS with the built-in modem. The Signal strength pane is only visible if the Chatter™ Data Logger is using the RTU firmware See below for a detailed description of each part in this pane. -
Page 118: Gsm/Gprs Setup
USERS MANUAL CHATTER™ DATA LOGGER GSM/GPRS setup Use this window to set the parameters necessary for communicating via GSM or GPRS with the built-in modem. See below for a detailed description of each part in this pane. Pin code for SIM-card If the SIM-card for this Chatter™... -
Page 119: Internet Settings
USERS MANUAL CHATTER™ DATA LOGGER Internet settings Use this window to set the parameters necessary for communicating via the internet with the built-in modem. See below for a detailed description of each part in this pane. Enter the Access Point Name needed for GPRS communication. The APN depends on which GPRS network you will use. -
Page 120: Usb Connection
USERS MANUAL CHATTER™ DATA LOGGER USB connection Use this window to set the parameters for when a low battery condition occurs for this Chatter™ Data Logger See below for a detailed description of each part in this pane. Auto detect USB connected Select between No and Yes. -
Page 121: Signal Strength
USERS MANUAL CHATTER™ DATA LOGGER Signal strength Use this window to set the parameters for when a low battery condition occurs for this Chatter™ Data Logger See below for a detailed description of each part in this pane. Low limit Help text goes here Signal name Select an existing signal name or enter a new signal name. -
Page 122: Rtu Settings
USERS MANUAL CHATTER™ DATA LOGGER RTU settings This pane shows data related to the Chatter™ Data Logger. The data is only available when your PC is connected to the Chatter™ Data Logger with a USB- cable See below for a detailed description of each part in this pane. -
Page 123: E-Mail Setup
USERS MANUAL CHATTER™ DATA LOGGER e-mail setup Use this window to set the parameters necessary for sending e-mails via the internet with the built-in modem. See below for a detailed description of each part in this pane. A dditional inform ation: Setup Settings Clear text filter... -
Page 124: Setup
USERS MANUAL CHATTER™ DATA LOGGER Setup Use this window to set the parameters for sending e- mails from this Chatter™ Data Logger See below for a detailed description of each part in this pane. Server for outgoing e-mail When the Chatter™ Data Logger sends mail, it must send it via an external mail server. Normally this mail server is a part of your mobile telephone package. -
Page 125: Settings
USERS MANUAL CHATTER™ DATA LOGGER Settings Use this window to set the parameters for sending e- mails from this Chatter™ Data Logger See below for a detailed description of each part in this pane. Add latest battery voltage Select between No and Yes. If you select Yes, the latest battery voltage measurement will be added to the e-mail sent from this Chatter™... -
Page 126: Clear Text Filter
USERS MANUAL CHATTER™ DATA LOGGER Clear text filter Use this window to set the parameters for sending e- mails from this Chatter™ Data Logger See below for a detailed description of each part in this pane. Only include alarms Select between No and Yes. Include total pulse count Select between No and Yes. -
Page 127: Clear Text E-Mail
USERS MANUAL CHATTER™ DATA LOGGER Clear text e-mail Use this window to set the parameters for sending e- mails from this Chatter™ Data Logger See below for a detailed description of each part in this pane. Max. number of logs in a clear text e-mail Select the maximum number of measurements or alarms, the Chatter™... -
Page 128: Csv File Filter
USERS MANUAL CHATTER™ DATA LOGGER CSV file filter Use this window to set the parameters for sending e- mails from this Chatter™ Data Logger See below for a detailed description of each part in this pane. Only include alarms Select between No and Yes. Include total pulse count Select between No and Yes. -
Page 129: Dat And Csv E-Mail
USERS MANUAL CHATTER™ DATA LOGGER DAT and CSV e-mail Use this window to set the parameters for sending e- mails from this Chatter™ Data Logger See below for a detailed description of each part in this pane. Max. number of logs in a CSV or DAT file Select the maximum number of measurements or alarms, the Chatter™... -
Page 130: Sms Setup
USERS MANUAL CHATTER™ DATA LOGGER SMS setup This pane shows data related to the Chatter™ Data Logger. The data is only available when your PC is connected to the Chatter™ Data Logger with a USB- cable See below for a detailed description of each part in this pane. -
Page 131: Power Management
USERS MANUAL CHATTER™ DATA LOGGER Power management This pane shows data related to the Chatter™ Data Logger. The data is only available when your PC is connected to the Chatter™ Data Logger with a USB-cable See below for a detailed description of each part in this pane. -
Page 132: Battery Pane
USERS MANUAL CHATTER™ DATA LOGGER Battery pane Use this window to set the parameters for when a low battery condition occurs for this Chatter™ Data Logger See below for a detailed description of each part in this pane. Low battery voltage limit [mV] Enter the minimum acceptable voltage for the internal battery. -
Page 133: Stabilisation Pane
USERS MANUAL CHATTER™ DATA LOGGER Stabilisation pane Use this window to set how long time before a measurement the sensor should be turned on. See below for a detailed description of each part in this pane. Click an arrow to expand a topic. Click here to expand all topics now. -
Page 134: Security
USERS MANUAL CHATTER™ DATA LOGGER Security This pane shows data related to the Chatter™ Data Logger. The data is only available when your PC is connected to the Chatter™ Data Logger with a USB- cable See below for a detailed description of each part in this pane. -
Page 135: Function Windows
USERS MANUAL CHATTER™ DATA LOGGER Function windows The Functions window provides a number of tools. The window content depends on whether you has connected to the Chatter™ Data Logger with a USB-cable or not. This window in displayed when there is no connection between the Chatter™... -
Page 136: Change Device Firmware
USERS MANUAL CHATTER™ DATA LOGGER Change device firmware General Firmware is the program built in to one of the chips in the Chatter™ Data Logger, Three different types of firmware exists: Chatter™ Data Logger RTU firmware for data loggers supplying data directly to some sort of SCADA system Chatter™... -
Page 137: Device Time
USERS MANUAL CHATTER™ DATA LOGGER Device time Set Chatter time Sets the internal clock in the Chatter™ Data Logger to the time from your PC A dditional inform ation: Setting your PC time Set Chatter time tablle Reads the time zone information from your PC and sends it to the Chatter™ Data Logger. The time table is then used for converting the UTC time in the Chatter™... -
Page 138: Log
USERS MANUAL CHATTER™ DATA LOGGER Run log sequence Help text here Run event log Help text here... -
Page 139: Device Factory Reset
USERS MANUAL CHATTER™ DATA LOGGER Device factory reset To factory defaults Click the button to reset the Chatter™ Data Logger to a factory default state. This operation can not be reverted. If you choose to reset the Chatter™ Data Logger to factory defaults, all stored configurations, measurements and alarms are erased permanently Clear log Click the button to remove all stored measurements and alarms from the internal memory in the Chatter™... -
Page 140: Communication
USERS MANUAL CHATTER™ DATA LOGGER Communication Force call 1 Click the button to command the Chatter™ Data Logger to execute the call specified in Data call schedule 1 now. A dditional inform ation: Data call schedule Force call 2 Click the button to command the Chatter™ Data Logger to execute the call specified in Data call schedule 2 now. -
Page 141: Device Function
USERS MANUAL CHATTER™ DATA LOGGER Device function Reset hardware Click the button to command the Chatter™ Data Logger to perform a software reset. The effect of a software reset is equal to powering off the Chatter™ Data Logger and powering it on again. Data in the Chatter™... -
Page 142: Logged Data
USERS MANUAL CHATTER™ DATA LOGGER Logged data From the menu strip: Click the button Read data logs From the Start-menu: Click the button Connect to a Chatter This section of the Chatter™ Link program lets you read, save and display the data logged by a Chatter™ Data Logger. -
Page 143: Import Data File
USERS MANUAL CHATTER™ DATA LOGGER Import data file Use this to import a previously saved data file containing log data from a Chatter™ Data Logger Click the button Select log data file Navigate to your saved log data file using the normal File O pen dialogue Return to Chatter™... -
Page 144: Read Log
USERS MANUAL CHATTER™ DATA LOGGER Read log Use this to read logged data from a Chatter™ Data Logger. The data is only available when your PC is connected to the Chatter™ Data Logger with a USB-cable. Select the amount of logs, you want to read from the Chatter™... -
Page 145: View Logs
USERS MANUAL CHATTER™ DATA LOGGER View logs Use this to display logged data from a Chatter™ Data Logger. The data is only available when your PC is connected to the Chatter™ Data Logger with a USB-cable. Select the interval from which you want to see the logged data. - Page 146 USERS MANUAL CHATTER™ DATA LOGGER When done, close the window with the C lose all menu. If measurements from different inputs are present in the log data file, a graph for each type of measurement is displayed. Return to Chatter™ Link main window using this button in the menu strip...
-
Page 147: Live Data
USERS MANUAL CHATTER™ DATA LOGGER Live data Start the live data view with the View newest values button in the menu strip. This section of the Chatter™ Link program lets you read the current data from a Chatter™ Data Logger. The data is only available when your PC is connected to the Chatter™... -
Page 148: I/O Values
USERS MANUAL CHATTER™ DATA LOGGER I/O values... -
Page 149: Digital Inputs
USERS MANUAL CHATTER™ DATA LOGGER Digital inputs Use this to display live data from a Chatter™ Data Logger. The data is only available when your PC is connected to the Chatter™ Data Logger with a USB-cable. The current data from the digital inputs are shown in this window Return to Chatter™... -
Page 150: Analog Inputs
USERS MANUAL CHATTER™ DATA LOGGER Analog inputs Use this to display live data from a Chatter™ Data Logger. The data is only available when your PC is connected to the Chatter™ Data Logger with a USB-cable. The current data from the analog inputs are shown in this window Return to Chatter™... -
Page 151: Instrumentnet Inputs
USERS MANUAL CHATTER™ DATA LOGGER InstrumentNet inputs Use this to display live data from a Chatter™ Data Logger. The data is only available when your PC is connected to the Chatter™ Data Logger with a USB-cable. The current data from the InstrumentNet inputs are shown in this window Return to Chatter™... -
Page 152: Alarm List
USERS MANUAL CHATTER™ DATA LOGGER Alarm list Use this to display live data from a Chatter™ Data Logger. The data is only available when your PC is connected to the Chatter™ Data Logger with a USB-cable. The current alarm list is shown in this window, one line for each active alarm Return to Chatter™... -
Page 153: Stormflow
USERS MANUAL CHATTER™ DATA LOGGER Stormflow... -
Page 154: Stormflow Status
USERS MANUAL CHATTER™ DATA LOGGER Stormflow status Use this to display live data from a Chatter™ Data Logger. The data is only available when your PC is connected to the Chatter™ Data Logger with a USB-cable. The current data for stormflow status are shown in this window Return to Chatter™... -
Page 155: Stormflow Counters
USERS MANUAL CHATTER™ DATA LOGGER Stormflow counters Use this to display live data from a Chatter™ Data Logger. The data is only available when your PC is connected to the Chatter™ Data Logger with a USB-cable. The current data for stormflow counters are shown in this window Return to Chatter™... -
Page 156: Stormflow Conditional Log
USERS MANUAL CHATTER™ DATA LOGGER Stormflow conditional log Use this to display live data from a Chatter™ Data Logger. The data is only available when your PC is connected to the Chatter™ Data Logger with a USB-cable. The current data for stormflow log are shown in this window Return to Chatter™... -
Page 157: Deviation Detect
USERS MANUAL CHATTER™ DATA LOGGER Deviation detect Use this to display live data from a Chatter™ Data Logger. The data is only available when your PC is connected to the Chatter™ Data Logger with a USB-cable. The current data for deviation detect are shown in this window Return to Chatter™... -
Page 158: Modem Status
USERS MANUAL CHATTER™ DATA LOGGER Modem status Use this to display live data from a Chatter™ Data Logger. The data is only available when your PC is connected to the Chatter™ Data Logger with a USB-cable. The current data for modem status are shown in this window Return to Chatter™... -
Page 159: Technical Reference
USERS MANUAL CHATTER™ DATA LOGGER Technical reference... -
Page 160: Signal Names
USERS MANUAL CHATTER™ DATA LOGGER Signal names Signal names are texts you can use to identify an input or a signal. You can create up to 40 signal names, each with a length of 32 characters. A signal name can be assigned to one or more inputs or signals according to your needs. -
Page 161: Time And Time Zones
USERS MANUAL CHATTER™ DATA LOGGER Time and time zones Internally, the Chatter™ Data Logger uses Unicersal Time Coordinated as its time zone. Unicersal Time Coordinated equals Greenwich Mean Time without Daylight Saving Time. Unicersal Time Coordinated is perfect for machines, but a bit impractical for humans, as the time in Unicersal Time Coordinated seldom matches the time in your local time zone... -
Page 162: Battery Life Expectancy
USERS MANUAL CHATTER™ DATA LOGGER Battery life expectancy Calculating the battery life is complicated, a lot of different factors are involved. The battery has an initial capacity of 19 Ah or 19.000 mAh. To make allowance for ageing, environment and variations between batteries, the capacity used for calculating battery life expectancy is set to 17 Ah or 17.000 mAh. -
Page 163: Replacing The Battery
USERS MANUAL CHATTER™ DATA LOGGER Replacing the battery Reporting battery voltage, change when approaching 3,1 V is recommended, Battery information MJK Item Description 550246 Battery for Chatter™ Data Logger, 3,6 V, 19 Ah A dditional inform ation: Battery life expectancy Remember to set the clock! It will start from January 1st, 2000 when the battery is removed! -
Page 164: Value Types And Layout
USERS MANUAL CHATTER™ DATA LOGGER Value types and layout Different Instrument Net sensors may supply their data in different formats. The Chatter™ Data Logger supports the following data types and data type layouts: Data type Possible values 16 bit unsigned integer 0 to 65.535 or 0 to 2 –1 16 bit signed integer... -
Page 165: Managing Calls
USERS MANUAL CHATTER™ DATA LOGGER Managing calls General All calls made by a Chatter™ Data Logger are managed via call lists. A call list is a combination of a call type and a recipient. Two different call list exists, one for scheduled data calls and another for alarm calls. Each of these call lists handles six calls. -
Page 166: Scheduling Calls
USERS MANUAL CHATTER™ DATA LOGGER Scheduling calls General You can preset three different call schedules for a Chatter™ Data Logger. The preset call schedules will be used in the Data call list. The call schedules governs how often the Chatter™ Data Logger will send data to a recipient. You can select intervals between 10 minutes and 24 hours. -
Page 167: Call Lists
USERS MANUAL CHATTER™ DATA LOGGER Call lists General The Chatter™ Data Logger uses two call list to deliver data or alarms to recipients: The data call list is used to deliver logged data from the Chatter™ Data Logger to one or more recipients. The alarm call list is used to deliver alarms from the Chatter™... -
Page 168: Recipients
USERS MANUAL CHATTER™ DATA LOGGER Recipients General The Chatter™ Data Logger can deliver logged data or alarms to three different recipient types: Mobile phones which will receive logged data or alarms as SMS messages. SCADA system which will receive logged data or alarms via a GPRS connection. SCADA system which will receive logged data or alarms via a dial up connection from the GSM modem in the Chatter™... -
Page 169: Modes Of Operation
USERS MANUAL CHATTER™ DATA LOGGER Modes of operation... -
Page 170: Normal Mode
USERS MANUAL CHATTER™ DATA LOGGER Normal mode General Normal mode is in operation when the Chatter™ Data Logger is not in event mode.. A dditional inform ation: Event mode Operation The normal mode of operation for a Chatter™ Data Logger is: Sleeping to conserve power Waking up with a set log interval and makes the specified measurements, then going back to sleep Waking up with a set log interval and makes a call, then going back to sleep... -
Page 171: Event Mode
USERS MANUAL CHATTER™ DATA LOGGER Event mode General Event mode is in operation if an event log interval is selected. When the Chatter™ Data Logger is in event mode, all inputs where event logging is enabled, will be logged when the event interval runs out. If event is enabled on a digital input, an analog input or a Instrument Net input, the Chatter™... -
Page 172: Scaling And Calibration
USERS MANUAL CHATTER™ DATA LOGGER Scaling and Calibration General Scaling and calibration is a way to change the sensor output from the measured value to another value. Scaling Scaling will multiply - or divide - any measured value by a fixed value. Use calibration if you want to change the output from one measuring unit to another, for example from bar to meter water column. -
Page 173: Inet And Analog
USERS MANUAL CHATTER™ DATA LOGGER INET and analog Examples Below are some examples, showing what happens to the output when different values for scaling and calibration are applied to an InstrumentNet sensor. Never use equal values in Scale Max or Scale Zero. It will result in an illegal mathematical operation, divide by zero! No scaling and no calibration Output value (1 0 Sensor value) (0 0) - Page 174 USERS MANUAL CHATTER™ DATA LOGGER Output is scaled and calibrated, the input value is multiplied by 0,7 and 1,5 is added Output value (0,7 0 Sensor value) (0 1,5) Output value Sensor value 0,7 1,5 This is an error, the output is always 1 Output value (0 0 Sensor value) (1 0) Output value 1 A dditional inform ation:...
-
Page 175: Changing Output Values
USERS MANUAL CHATTER™ DATA LOGGER Changing output values Examples Below are some examples, showing what happens to the output when different values for scaling and calibration are applied. Never use equal values in Scale Max or Scale Zero. It will result in an illegal mathematical operation, divide by zero! Change the output unit from bar to meter water column Output value (10,1971 1 Sensor value) (0 0) - Page 176 USERS MANUAL CHATTER™ DATA LOGGER Change the output unit from bar to inches of water column Output value (401,4742 1 Sensor value) (0 0) Output value Sensor value 401,4742 Change the output unit from °Celsius to °Fahrenheit Output value (1 1,8 Sensor value) (32 0) Output value Sensor value 1,8 32 Change the output from level above sensor to depth to water surface The standard setting for the Chatter™...
- Page 177 USERS MANUAL CHATTER™ DATA LOGGER Output value ( 1 1 Sensor value) ((3 5) 0) Output value ( 1) Sensor value 8 Output value unit is in meter water column Output value ( 10,1971 1 Sensor value) ((3 5) 0) Output value ( 10,1971) Sensor value 8...
-
Page 178: Accessories
USERS MANUAL CHATTER™ DATA LOGGER Accessories Accessories MJK Item Description 521751 Set of wedges for the Chatter™ Data Logger tube mount model. Contains wedges number 1, 2, 3 and 4. 512751 Set of wedges for the Chatter™ Data Logger tube mount model. Contains wedges number 4, 5 and 6. -
Page 179: Appendixes
USERS MANUAL CHATTER™ DATA LOGGER Appendixes Appendix A Installing Chatter™ Link on your PC A dditional inform ation: Appendix A Appendix B Updating Chatter™ Link to a new release A dditional inform ation: Appendix B Appendix C Setting the time on your PC A dditional inform ation: Appendix C Appendix D... - Page 180 USERS MANUAL CHATTER™ DATA LOGGER Appendix A Installing Chatter™ Link on your PC You must install the program on your PC before you can use it This guide shows ho to install Chatter™ Link The Chatter™ Link program is in a zip-file. Unzip it to a folder on your desktop.
- Page 181 USERS MANUAL CHATTER™ DATA LOGGER You will see a green progress-bar during the install procedure. It is for your information only. Installation done. Click the button Finish and the Chatter™ Link program starts You can also start the Chatter™ Link program using the shortcut in the Start-menu...
- Page 182 USERS MANUAL CHATTER™ DATA LOGGER Appendix B Updating Chatter™ Link to a new release Start the check for program updates with the button in the menu strip. Your PC must be connected to the internet for this to work. This window is displayed while the program checks for new, available updates.
- Page 183 USERS MANUAL CHATTER™ DATA LOGGER Appendix C Setting the time on your PC The time in your PC is used when you are setting the clock in your Chatter™ Data Logger. If you want the Chatter™ Data Logger to use the correct time when it is logging data, you must have the correct time settings in your PC.
- Page 184 USERS MANUAL CHATTER™ DATA LOGGER Appendix D MJK Automation ApS has compiled this list of known APNs from various telecom suppliers for your convenience, MJK Automation ApS holds no responsibility for the accuracy of the data in this table. Telecom supplier Optus internet Telestra...
- Page 185 USERS MANUAL CHATTER™ DATA LOGGER Appendix E Character sets used in e-mails Country Character set Text Latin1 ISO-8859-1 Latin1 covers most West European languages, such as French (fr), Spanish (es), Catalan (ca), Basque (eu), Portuguese (pt), Italian (it), Albanian (sq), Rhaeto-Romanic (rm), Dutch (nl), German (de), Danish (da), Swedish (sv), Norwegian (no), Finnish (fi), Faroese (fo), Icelandic (is), Irish (ga), Scottish (gd), and English (en), incidentally also Afrikaans (af) and Swahili (sw), thus in effect...
- Page 186 USERS MANUAL CHATTER™ DATA LOGGER Thai ISO-8859-11 The Thai TIS620 is likely to be published as ISO-8859-11 Latin/Thai (th). It contains some combining vowel and tone marks that have to be written above or below the consonants. Latin7 ISO-8859-13 Latin7 is going to cover the Baltic Rim and re-establish the Latvian (lv) support lost in Latin6 and may introduce the local quotation marks.
- Page 187 USERS MANUAL CHATTER™ DATA LOGGER Appendix F Definition of legends used in register descriptions Modbus R/W R = Read only R/W = Read/Write 3 = Read holding registers 16 = Write holding registers Data types U16 = unsigned 16 bit value U32 = unsigned 32 bit value S32 = signed 32 bit value STR20 = String with 20 chars...
-
Page 188: General Setup Parameters
USERS MANUAL CHATTER™ DATA LOGGER General setup parameters Name Modbus Description Station ID R/W 3/16 U16 Used for ID device in SCADA system (not used internally in device) Default is 0, not in use RTU Name/ID Tag R/W 3/16 STR RTU Name / Location Name Default = "Chatter1"... -
Page 189: Digital Input
USERS MANUAL CHATTER™ DATA LOGGER Digital input Name Modbus Description DI last updated 298 298 298 298 R 3/16 Last time that signal values was updated (UTC Time in seconds since 1970.1.1 and only signal that are enable) DI1 - 4 Status register 300: 300: 300:... -
Page 190: Analog Input
USERS MANUAL CHATTER™ DATA LOGGER Analog input Name Modbus Description AI last updated 398 398 398 398 R 3/16 Last time that signal values was updated (UTC Time in seconds since 1970.1.1 and only signal that are enable) AI1 - 4 Low limit status flag 400: 400: 400: 400:... -
Page 191: Inet Input
USERS MANUAL CHATTER™ DATA LOGGER INET input Name Modbus Description INET Com error status flag. 796: 796: 796: 796: R 3/16 Bit value 0 = off, 1 = active / on offs INET Com error status flag. 797: 797: 797: 797: R 3/16 Bit value 0 = off, 1 = active / on... -
Page 192: Deviation Detect
USERS MANUAL CHATTER™ DATA LOGGER Deviation detect Name Modbus Description Updated R 3/16 U32 85000 Last time that signal values was updated (UTC Time in seconds since 1970.1.1 and only signal that are enable) R 3/16 F32 85000 Last calculation in input signal unit AVG now R 3/16 F32 85000... -
Page 193: Stormflow Recording
USERS MANUAL CHATTER™ DATA LOGGER Stormflow recording Name Modbus Description Stormflow pulses total R/W 3/16 U32 Number of active pulses Stormflow pulses today R/W 3/16 U16 Number of active pulses Stormflow pulses R/W 3/16 U16 Number of active pulses yesterday Stormflow duration total R/W 3/16 U32 Duration in seconds... -
Page 194: Stormflow Measurement
USERS MANUAL CHATTER™ DATA LOGGER Stormflow measurement Name Modbus Description Flow last updated R 3/16 U32 85000 Last time that signal values was updated (UTC Time in seconds since 1970.1.1 and only signal that are enable) Flow R 3/16 F32 85000 Last measured flow [l/s] Flow input R 3/16... -
Page 195: Stormflow Log
USERS MANUAL CHATTER™ DATA LOGGER Stormflow log Name - Modbus Description Log 1 Start time 110 R 3/16 UTC Time in sec. since 1970.1.1 This value must always be read to sync log and to get newest value. If not, the rest of the values will never be updated. - Page 196 USERS MANUAL CHATTER™ DATA LOGGER Name - Log 1 as ydmhms Modbus Description R 3/16 Start time seconds (UTC / U16 85000 ex 59 = 59sec Local) This Value must always be read to sync log and get newest value. If not, the rest of the values will never be updated.
-
Page 197: Data Logger
USERS MANUAL CHATTER™ DATA LOGGER Data logger General Newest log-value * A Log Value must be read in an single Telegram. It is not possible to break up reading first part of the value in first telegram and Last part in the next * What signal that is read from signal A, B, C, D is configured with "840140 MJK Chatter Link"... - Page 198 USERS MANUAL CHATTER™ DATA LOGGER Name Modbus Type Description Signal A signal type R/W 3/16 Signal type to show log for : 0 = None, 1 = AI,2 = INET, 3 = Flow Signal A signal number R/W 3/16 Signal number selection: 0 = DI1,AI1,INET1, Flow[L/s] .., 3 = DI4,AI4,INET4 Signal A log interval R/W 3/16...
- Page 199 USERS MANUAL CHATTER™ DATA LOGGER...
-
Page 200: Alarm History
USERS MANUAL CHATTER™ DATA LOGGER Alarm history Name Modbus Description Info Text R 16 User for standard alarm texts like ex. 'DI1' or 'Stormflow limit'. This value must always be read to sync log and get newest value. Else the rest of the values will never be updated. -
Page 201: Letter Of Conformity
USERS MANUAL CHATTER™ DATA LOGGER Letter of conformity Konformitetserklæring Declaration of Conformity Konformitätserklärung Vi, MJK Automation A/S, We, MJK Automation A/S, Wir, MJK Automation A/S, DK-2850 Nærum, DK-2850 Nærum, DK-2850 Nærum, påtager os det fulde ansvar for at produktet declare under our sole responsibility that the erklären in alleiniger Verantwortung, dass som denne erklæring angår, er i product to which this declaration relates is in... - Page 202 USERS MANUAL CHATTER™ DATA LOGGER Your notes:...
- Page 203 USERS MANUAL CHATTER™ DATA LOGGER Index Hang up High limit 87, 96 Active high Active low In use? 87, 89, 96, 98 Analog inputs Initial setup Advanced Instrument Net reg. address Calibration 0V Instrument Net sensor ID Calibration 2,5V InstrumentNet inputs Call on alarm OFF Advanced Call on alarm ON...
- Page 204 USERS MANUAL CHATTER™ DATA LOGGER Panel mount model Insert cable glands Instrument Net sensors Mounting in the field Open the Chatter Data logger Package content Serial number Turn on the Chatter Data logger Parity Reset Reset hardware Reset modem online time Reset time in operation Reset to factory defaults Scale 0%...
- Page 205 150 countries, we have strong, long-standing relationships with customers who know us for our powerful combination of leading product brands and applications expertise, backed by a legacy of innovation. For more information on how Xylem can help you, go to www.xyleminc.com MJK Automation A/S Byageren 7 DK-2850 Nærum...
Need help?
Do you have a question about the MJK Chatter E-MAIL and is the answer not in the manual?
Questions and answers