Advertisement
Available languages
Available languages
Quick Links
Advertisement

Related Manuals for iwc AQUATIMER CHRONOGRAPH


Summary of Contents for iwc AQUATIMER CHRONOGRAPH
- Page 1 AQUATIMER CHRONOGRAPH REF. 3767 OPERATING INSTRUCTIONS ИНСТРУКЦИЯ ПО ЭКСПЛУАТАЦИИ...
- Page 3 Operating instructions English Инструкция по эксплуатации Русский...
- Page 5 You are now the owner of a beau- tiful new example of this IWC tradition. We would like to congratulate you on your choice and send you our best...
- Page 6 The technical refinements of the Aquatimer Chronograph Your IWC watch shows you the time in hours, minutes and seconds, together with the date and the day. You can use the integrated chronograph to measure any period of time up to 12 hours in seconds, minutes and hours. Stop times can be added together.
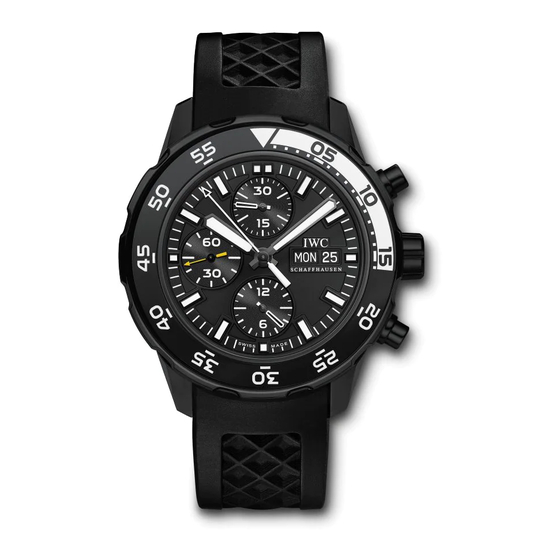
- Page 7 Key to the Aquatimer Chronograph 4 | 5 1 Hour hand 8 Minute counter 2 Minute hand 9 Hour counter 3 Small seconds hand 10 Start/stop button 4 Date display 11 Reset button 5 Day display 12 Rotating bezel with...
- Page 8 Functions of the crown X Normal position (screwed in) 0 Winding position 1 Date and day setting 2 Time setting Normal position This watch has a screw-in crown. Screwing the crown in to its normal position (X) prevents the inadvertent adjust- ment of the time or date and also acts as a double seal to prevent water from seeping into the case.
- Page 9 Winding position 6 | 7 With the crown in the winding position (0), you can also wind the automatic movement by hand. A few revolutions of the crown are enough to start the movement. However, it is better to wind the watch by turning the crown through approximately 20 revolutions as this will ensure max- imum accuracy.
- Page 10 Time setting Pull out the crown to position 2. This will stop the move- ment. To set the time accurately to the second, it is best to stop the movement as the seconds hand passes 60. Now move the minute hand a few minute strokes beyond the time to be set.
- Page 11 Setting your watch correctly 8 | 9 To set your watch correctly, proceed as follows: • Release the crown by turning it to the left. • Wind the movement (approximately 20 revolutions of the crown). • Pull out the crown to position 1. •...
- Page 12 • Push the crown back to position 0 to start the move- ment. • Now push the crown to position X and secure it by simultaneously turning it to the right. Important: Although the watch is water-resistant in pos- itions 0, 1 and 2, the crown should always be screwed in again for normal use (position X).
- Page 13 Reading the chronograph 10 | 11 Chronograph seconds hand: The scale for the central chronograph seconds hand runs around the edge of the dial. Minute counter: The 30-minute scale with a slow jump- ing hand is situated on the subdial at 12 o’clock. This hand makes two complete revolutions in one hour.
- Page 14 If you are planning to use the watch to time dives, you should be a certified open water diver and have the water-resistance of your watch checked regularly by an IWC service centre. Cleaning the watch after diving After diving – and especially after diving in seawater –...
- Page 15 Adjusting the metal bracelet 12 | 13 If you have chosen a metal bracelet, you can easily adjust it to the size of your wrist. You can make this adjustment yourself by removing or adding individual bracelet links. Taking the bracelet apart and removing individual links Remove the bracelet from the case as described and open the clasp by...
- Page 16 Determining bracelet length Place the watch with the bracelet open around your wrist and estimate the number of surplus bracelet links that you can now remove from the bracelet (as described above). If you need to shorten the bracelet by sev- eral links, you should remove the same number of links from each half of the bracelet, if possible, to ensure that the clasp can be worn more or less at the centre of the...
- Page 17 Attaching the bracelet 14 | 15 Attach the component parts of the bracelet link to the connection point and push the pivot pin into the brace- let from the side (1). Using the special tool provided, now press the securing pin downwards (2) and, at the same time, slide the pivot pin back into the bracelet until it lies flush (3).
- Page 18 Changing between different types of bracelet Your IWC watch has a bracelet quick-change system* that enables you to change the bracelet quickly and sim- ply, without the use of tools. To remove the bracelet, use your thumb to push down the retaining lever (1) on the underside of the horns.
- Page 19 To attach the bracelet, push down the 16 | 17 two sides of the horns vertically to- wards the lower side of the case and into the recesses (3) until you hear and feel the retaining lever engage. When attaching the bracelet, you must ensure that the horns are securely engaged to prevent the bracelet com- ing off your wrist unintentionally.
- Page 20 To ensure that your watch continues to function perfectly, you should have it checked by an IWC service centre at least once a year. Your watch should also be tested after exposure to unusually harsh conditions. If the tests are...
- Page 21 For this reason, we rec- ommend that you have your watch serviced approxi- mately every five years. Please contact an authorized IWC Official Agent or send your watch directly to the IWC Customer Service Department in Schaffhausen. Effective from April 2011.
- Page 23 20 | 21...
- Page 25 22 | 23...
- Page 27 24 | 25...
- Page 29 26 | 27...
- Page 31 28 | 29...
- Page 33 30 | 31...
- Page 35 32 | 33...
- Page 37 34 | 35...
- Page 39 36 | 37...
- Page 41 38 | 39...
- Page 43 40 | 41...
- Page 45 42 | 43...
- Page 47 44 | 45...
- Page 49 46 | 47...
- Page 51 48 | 49...
- Page 53 50 | 51...
- Page 55 52 | 53...
- Page 57 54 | 55...
- Page 59 56 | 57...
- Page 61 58 | 59...
- Page 63 60 | 61...
- Page 65 62 | 63 62 | 63...
- Page 67 64 | 65...
- Page 69 66 | 67...
- Page 71 68 | 69...
- Page 73 70 | 71...
- Page 75 72 | 73...
- Page 77 техники, материалов или дизайна, даже если они скрыты в мельчайших деталях, которые, возможно, даже не вид- ны.Теперь Вы являетесь владельцем прекрасного совре- менного примера этой традиции IWC. Мы хотели бы искренне поздравить Вас с этим выбором и пожелать всего наилучшего за то время, которое Вы проведете, наслаждаясь...
- Page 78 Технические характеристики Aquatimer Chronograph Ваши часы IWC показывают время в часах, минутах и секун- дах, а также дату и день недели. С помощью функции хроно- графа Вы можете измерять промежутки времени до 12 часов в секундах, минутах и часах. Ваш хронограф позволяет сум- мировать...
- Page 79 Описание Aquatimer Chronograph 76 | 77 1 Часовая стрелка 7 Секундная стрелка 2 Минутная стрелка хронографа 3 Маленькая секундная 8 Минутный счетчик стрелка 9 Часовой счетчик 4 Указатель даты 10 Кнопка пуска/остановки 5 Указатель дня недели 11 Кнопка сброса на ноль...
- Page 80 Функции заводной головки X Нормальное положение (завинчена) 0 Положение завода 1 Установка даты и дня недели 2 Установка времени Нормальное положение Эти часы имеют завинчивающуюся заводную головку. Завод- ная головка в нормальном положении (положение X) пре- дотвращает непреднамеренную регулировку времени или даты...
- Page 81 Положение завода 78 | 79 Когда заводная головка находится в положении завода (поло- жение 0), автоматический механизм можно завести вручную. Чтобы часы начали идти, достаточно нескольких вращений заводной головки. Однако для максимальной точности хода желательно завести механизм полностью, повернув головку примерно...
-
Page 82: Установка Времени
Установка времени Установите заводную головку в положение 2. При этом меха- низм остановится. Для установки времени с точностью до се- кунды рекомендуется остановить механизм, когда секундная стрелка дойдет до отметки 60. Теперь переведите минутную стрелку на несколько делений дальше требуемой отметки. После... - Page 83 Как правильно установить Ваши часы 80 | 81 Порядок установки показаний на часах: • Отвинтите заводную головку вращением влево. • Заведите часы (для этого поверните заводную головку примерно на 20 оборотов). • Установите заводную головку в положение 1. • Поверните заводную головку вправо для последователь- ной...
- Page 84 ствиям минутная стрелка придет в движение сразу же после запуска часового механизма. • Для запуска часового механизма верните головку в положе- ние 0. • Теперь переместите головку в положение X и одновременно зафиксируйте ее поворотом вправо. Важное примечание: Несмотря на то что часы сохраняют во- донепроницаемость...
- Page 85 Считывание показаний хронографа 82 | 83 Секундная стрелка хронографа: Шкала для показаний центральной секундной стрелки хронографа нанесена по краю циферблата. Минутный счетчик: Дополнительный циферблат 30-минут- ного счетчика с плавно «прыгающей» стрелкой размещен в положении 12 часов. Эта стрелка совершает два полных обо- рота...
- Page 86 Если Вы планируете использовать часы для измерения времени погружения,Вы должны иметь сертификат Оpen water diver и регулярно проверять водонепроницаемость часов в сервисном центре IWC. Чистка часов после погружения После погружения, особенно в морскую воду, необходимо спо- лоснуть часы под струей водопроводной воды. Это пре-...
- Page 87 Регулировка металлического браслета 84 | 85 Если Вы выбрали часы на металлическом браслете, Вы мо- жете легко отрегулировать его под размер своего запястья. Это можно сделать самостоятельно путем снятия или добав- ления отдельных звеньев браслета. Разборка браслета и снятие отдельных звеньев Отсоедините...
- Page 88 Определение длины браслета Наденьте часы с открытой застежкой на запястье и определите количество лишних звеньев, которые можно снять с браслета (как описано выше). Если не- обходимо укоротить браслет на неско- лько звеньев, то Вам нужно снять оди- наковое количество звеньев с каждой стороны браслета так, чтобы...
- Page 89 Сборка браслета 86 | 87 Соедините части браслета вместе, за- тем с боковой стороны вставьте штифт в браслет (1). При помощи специального инструмента нажмите на предохранительную кнопку вниз (2) и одновременно полностью вставьте штифт в браслет (3). Предо- хранительная кнопка при этом должна вернуться...
- Page 90 Для отсоединения браслета нажмите большим пальцем на предохранитель- ный рычажок (1), расположенный на внутренней стороне между ушками часов. Удерживая рычажок, вытащите соеди- нительное звено вертикально из кор- пуса часов (2). * Система быстрой замены браслета была разработана IWC по лицензии компании Cartier.
- Page 91 Для присоединения браслета вставьте 88 | 89 его вертикально вниз, направив высту- пами в пазы (3), до того, как услышите и почувствуете, что предохранитель- ный рычажок защелкнулся. Присоединяя браслет, убедитесь, что выступы браслета вста- влены в пазы корпуса правильно и предохранительный рычажок...
- Page 92 Официальные агенты IWC также готовы предоставить такую информацию. Для обеспечения безупречной работы часов Вы должны про- изводить их проверку в сервисном центре IWC не реже одного раза в год. Также необходимо проводить осмотр, если часы подвергались воздействию экстремальных нагрузок. Если...
- Page 93 грязненное в процессе трения. Поэтому рекомендуется про- водить сервисное обслуживание часов примерно один раз в пять лет. Для этого, пожалуйста, свяжитесь с официальным агентом IWC или же отправьте свои часы напрямую в отдел сервисного обслуживания IWC в Шаффхаузен. Документ действителен с апреля 2011 года.
- Page 94 IWC Schaffhausen Branch of Richemont International SA Baumgartenstrasse 15 CH-8201 Schaffhausen Switzerland Phone +41 (0)52 635 65 65 +41 (0)52 635 65 01 info@iwc.com www.iwc.com © Copyright 2011 IWC Schaffhausen, Branch of Richemont International SA Printed in Switzerland...
Need help?
Do you have a question about the AQUATIMER CHRONOGRAPH and is the answer not in the manual?
Questions and answers