Advertisement
Quick Links
1
2
7
6
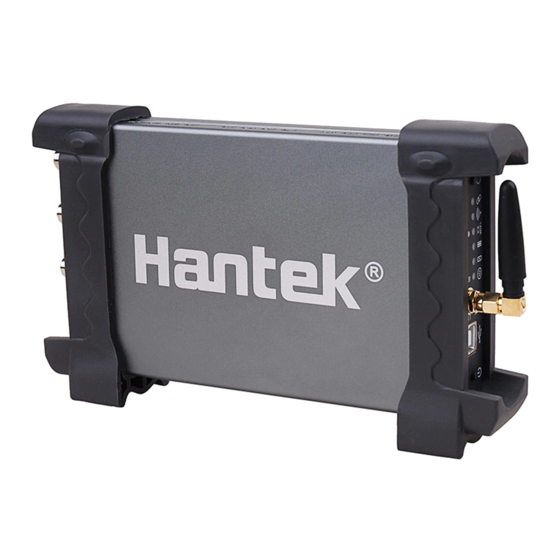
1.
CH 1: Input connector for waveform display.
2.
CH 2: Input connector for waveform display.
3.
EXT.: Input connector for an external trigger source. Use the Trigger menu to select the Ext. source.
4.
CAL.: Probe compensation output.
5.
GND.: Ground terminal.
6.
Power button: Power on/off button.
7.
USB PORT: Connect the B-Type Plug of USB cable to this port.
8.
ANT: Antenna
9.
Indications
Power on/off. When the battery is lower than 10%, the indicator is quick blinking.
When the battery is not less than 10%, the indicator is slow blinking.
Battery charging
Battery full
USB/WIFI indication, Hotspot, creates own wireless local area network (WLAN) in WiFi mode.
The indicator keeps lighting in USB mode and slow blinking in WiFi mode.
Send signals when the connection is successful with the tablet/PC.
App connection, In Wi-Fi mode, if there is communication link between IDSO device and
IDSO APP, the indicator keeps lighting normally.
10. Easylink: Press this button to restart the IDSO and set Wi-Fi connection mode.
4
5
3
8
9
10
There are two ways to charge the battery:
1. Connect B-Type Plug of USB cable to IDSO's USB port. Connect A-type Plug of USB cable to power adapter
(5V,1A).
2. Connect B-Type Plug of USB cable to IDSO's USB port. Connect A-type Plug of USB cable to PC's USB port.
Note:
It is recommended to charge the rechargeable battery completely before using the oscilloscope for the first time.
When the battery is out of power, please use power adapter to charge it for a period of time before using.
IDSO device work in direct mode
When in the direct mode, Apple/Andriod device is connect with the IDSO device via Wi-Fi hotspot which created
by IDSO device. IDSO device works in this mode in default.
1.
Power on the IDSO.
Keep pressing power button until the power on/off indication lights up.
2.
The indication of communication USB/WIFI is slow blinking. Hotspot, creates own wireless local area
network (WLAN).
Connect your Apple/Andriod device with Wi-Fi hotspot. Click "SettingWi-Fi/WLAN" options, then select
3.
Network Name of the IDSO device. The password is 1234567890. You can get Network Name from the
label of IDSO's shell.
4.
Connect the IDSO device to a signal source.
Tap the IDSO app to open it. Then click "RUN" button. The scope is ready to use.
5.
If you can't connect it successfully, please do as the followings:
1)
Close the IDSO APP.
Long press the Easylink button until the "USB/WIFI"LED is off, release the Easylink button. IDSO
2)
device will reboot automatically. If the IDSO device doesn't reboot automatically, press power button to
reboot it manually.
3)
After rebooted, the IDSO device will be in direct mode.
IDSO APP
Advertisement

Related Manuals for Hantek IDSO


Summary of Contents for Hantek IDSO
- Page 1 1. Connect B-Type Plug of USB cable to IDSO’s USB port. Connect A-type Plug of USB cable to power adapter (5V,1A). 2. Connect B-Type Plug of USB cable to IDSO’s USB port. Connect A-type Plug of USB cable to PC’s USB port. Note: It is recommended to charge the rechargeable battery completely before using the oscilloscope for the first time.
- Page 2 WiFi Connect While in Windows, insert the installation CD into the CD-ROM drive. Also you can download the software 5) If connect the IDSO with PC successfully, you can see “Connected” on bottom left corner on status column. from Hantek website.
Need help?
Do you have a question about the IDSO and is the answer not in the manual?
Questions and answers