
Related Manuals for Innovative Concepts in Entertainment MONOPOLY ROLL-N-GO


Summary of Contents for Innovative Concepts in Entertainment MONOPOLY ROLL-N-GO
- Page 1 Service Manual Innovative Concepts in Entertainment 10123 Main Street Clarence, New York 14031 (716) 759-0360 8:30am to 6:00pm EST WWW.ICEGAME.COM...
- Page 2 Table of Contents Safety and Warnings Game Play Parts Included Back Cabinet Hole Plug Install Game Assembly 7 - 10 Bonus Chart recommendations 11 - 12 Card Swipe Install Programming 14 - 19 Access to Game Electronics Access to Safety Sensors Monitor Replacement Instructions 21 - 23 Assembly Drawings...
- Page 3 SAFETY AND WARNINGS BEFORE YOU BEGIN WARNING: WHEN INSTALLING THIS GAME, A GROUNDED A.C. RECEPTACLE MUST BE USED. FAILURE TO DO SO COULD RESULT IN INJURY TO YOURSELF OR OTHERS. FAILURE TO USE A GROUNDED RECEPTACLE COULD ALSO CAUSE IMPROPER GAME OPERATION, OR DAMAGE TO THE ELECTRONICS.
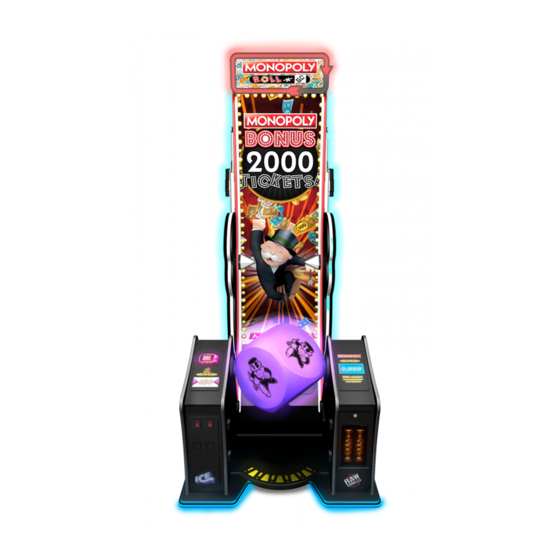
- Page 4 Game Play The object of the game is to WIN BIG! Players skillfully spin the LED-lit dice to land on spaces. The players goal is to hit the many bonus spaces and win lots of tickets! To win the “Monopoly Bonus” a player needs to land on two of the same color properties. They will win 10X the value of that property if they do so! There are eight different colored families to win.
- Page 5 Parts included with your game. If any you are missing any of the parts below please contact ICE service department. Monday through Friday 8:30am to 6pm Eastern standard time at (716) 759-0360. You can also visit our webpage at WWW.ICEGAME.COM X’s 2 X’s 2 In TV bag: Remote control and IR extender...
- Page 6 Back Cabinet Hole Plug Installation After removing the shipping bolts used to secure the back cabinet to the shipping pallet, insert four hole plugs into the holes the bolts were removed from. See below for location. The hole plugs are in the hardware kit.
- Page 7 Cabinet ASSEMBLY Step 1: Before sliding the cabinets together, pull the main harness up and center it in the groove to ensure it does not get pinched between cabinets. Make sure to clear any large debris out of the triangular floor pockets.
- Page 8 Step 4: Lift the hinged monitor up and lock into place using one AA6281 (1/4-20 x 1- 1/2") Allen bolt on each side shown below. DO NOT LIFT BY THE MONITOR OR MARQUEE! USE A FRIEND TO LIFT! KEEP HANDS AND FINGERS AWAY FROM MONTY’S HAT AS YOU LIFT THE MONITOR UP! Step 5:...
- Page 9 Step 6: A large oval hole on the sides of the cabinet is where the wire harness should be inserted through. Then insert the bolts you installed into the holes and then slide the cityscape down to lock them in. Secure by tightening the bolts with a 5/32 bit included in the parts kit from the inside of the cabinet.
- Page 10 Step 8: Attach the white trim to the inside of each side of the cabinet. Secure using AA6383 (8-32 x 1-1/2") bolts and AA6240 (#8) washers. 4 per each side. Step 9: Remove the six security screws holding the plaque in place on the right-side. Attach the correct bonus decal and re-secure the plaque back to the cabinet.
- Page 11 The bonus is determined by the wheel configuration. $1.00 $1.50 $2.00 $.50 Average Tickets Average Tickets Average Tickets Average Tickets (.01 ticket value) (.01 ticket value) (.01 ticket value) (.01 ticket value) RM7019 RM7020 RM7022 RM7021...
- Page 12 The bonus is determined by the wheel configuration. $4.00 $3.00 $5.00 Average Tickets Average Tickets Average Tickets (.01 ticket value) (.01 ticket value) (.01 ticket value) 146 - 154 Tickets 116 - 124 Tickets 96 - 104 Tickets RM7030 RM7029...
- Page 13 Optional Card reader Install On the left side podium and above the double down switch is where you should mount your card swipe reader. This area is designated for this and also it is where the UCL harness connector is located to electronically attach your swipe system. Remove the plaque by using a 5/32 security bit.
- Page 14 Operator Control Panel The operator control panel is used to set the game’s many options. This is located at the front of the game through a small access panel. You must first open this panel in order to gain access. Use these controls to configure your game.
- Page 15 Diagnostics...
- Page 16 Pricing & Payout Adjustments Currency Input Determines the verbiage used on screen. Currency Type Adjusts for currency being used and verbiage on screen.. Swipe/Coin/Token Value How much is each pulse worth? Coins To Play Sets how many pulses to start a game. It will not appear when currency type is set to card swipe.
- Page 17 Game Settings Attract Music Frequency Adjusts when it plays music while in attract mode. Play Again Max Time Determines how long a monopoly bonus can be won. Once a player has landed on a colored property, the game will begin to count down the minutes based on this setting. Once expired, the monopoly bonus is reset and the player would have to land on two of the same color properties again to win the monopoly bonus.
- Page 18 Audits...
- Page 19 Resets Menu Resets Menu Allows you to clear credits, owed tickets, etc... Utilities System Information...
- Page 20 Access to Game Electronics Located at the front of the game is an access panel where the varies electronics are located. This includes the computer, fuses, I/o board, power supply, and amplifier. To open the access door, remove the top molding by removing the two PC60622 1/4-20 Allen bolts.
- Page 21 Monitor Replacement Instructions Although it is possible to remove the lower monitor without removing the upper monitor we highly recommend removing the top monitor first to prevent serious damage to both monitors. The monitor panel mounted at the back of the monitors are designed with extra hole patterns to match the various VESA pattern standards and their power/video cable locations.
- Page 22 Remove the two clamps at the bottom of the mount. They are shown with the arrowed circles above. Unplug the AC cord to the monitor. Unplug the video cord to the monitor. The upper monitor uses HDMI and the lower monitor uses DVI. Unplug the IR extender if attached. FOR BOTH MONITORS Remove the side trim pieces on both sides at the front of the game.
- Page 23 FOR UPPER MONITOR ONLY Unplug the harness located at bottom left side. Remove the two screws at the back of the upper arrow marquee to remove the upper arrow marquee. FOR LOWER MONITOR ONLY Remove the bottom trim on both sides. The center arrow will also need to be removed. Unplug the harness when removing.
- Page 24 Assembly Drawings RM1050X Encoder RM3045X Podium RM3004X Monitor RM3096X LED RM3020X Marquee RM3030X AND RM3031X RM3036X RM3037X RM3074X...
- Page 25 Part 1 of RM1050X Part 2 of RM1050X...
- Page 27 RM3044X...
- Page 29 RM3096X - DICE LED Assembly...
- Page 32 Item no. Part No. Description Item no. Part No. Description RM3004 Monitor Back AA6053 1/4 Split lockwasher RM3005 Monitor Mount Spacer PC60631 Cabinet Insert RM3006 Monitor Mount Cleat AA6212 ¼ x¾ flat washer black RM3007 Monitor Mount Slider AA6261 ¼-20 x 2¼ BSHCS RM3008 Monitor Mount Washer AA6220...
- Page 35 NOTE: RM3036X = left RM3037X = right...
- Page 38 Universal Card link Connection See Wiring Insert for wire colors and which connections are used. Pin 1. +12v- Supply to Card System = Minimum of 2A available for the card systems and a Max of 3A. Pin 2. Coin 1 - input to the game PCB. Pin 3.
- Page 39 Electronic Parts RM2035X Encoder PCB NB3004RMX Safety Sensors CG2041X Safety Sensor main PCB HH5005 Ticket Dispenser WN2035X Resistor PCB WE2034X DJ2000RMX Computer (need software version when ordering). FE2006 Audio Amplifier E02111 Relay E02007 Speaker GF2010 12 volt DC supply AR2010 12 volt DC supply GF2011 5 volt DC supply...
- Page 42 I.C.E. Inc. We cannot be responsible for the quality, suitability or safety of any non-I.C.E. part or modification (including labor) that is performed by such a distributor. Innovative Concepts in Entertainment 10123 Main St.
Need help?
Do you have a question about the MONOPOLY ROLL-N-GO and is the answer not in the manual?
Questions and answers