Table of Contents

Subscribe to Our Youtube Channel
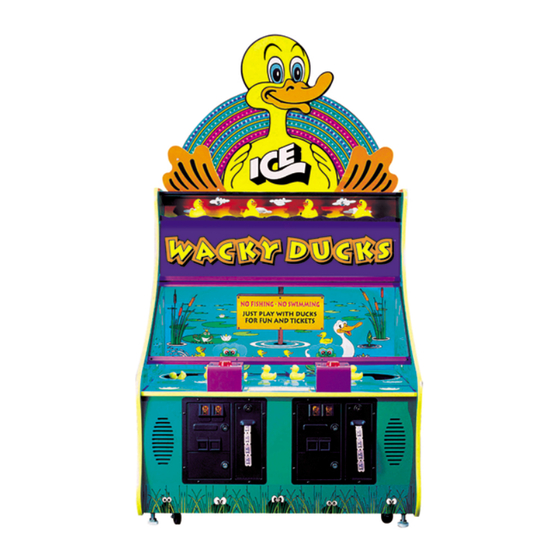
Related Manuals for Innovative Concepts in Entertainment Wacky Ducks


Summary of Contents for Innovative Concepts in Entertainment Wacky Ducks
- Page 1 OWNERS AND SERVICE MANUAL COPYRIGHT 2000, INNOVATIVE CONCEPTS IN ENTERTAINMENT INC. MANUFACTURED UNDER LICENSE FROM JUPITER GAMES 10123 MAIN STREET, CLARENCE, NY 14031 SERVICE 1-716-759-0360 FAX 1-716-759-0084 E-MAIL service@icegame.com...
-
Page 2: Table Of Contents
TABLE OF CONTENTS INTRODUCTION · GAME FEATURES · GAME PLAY ASSEMBLY · BEFORE YOU BEGIN · TOOLS NEEDED · INSTALLATION · SETTING A.C. LINE VOLTAGES · A.C. LINE VOLTAGE ADJUSTMENTS SET-UP / TESTING · SAFETY PRECAUTIONS · PROGRAMMING YOUR GAME ·... -
Page 3: Introduction
INTRODUCTION The ducks move along a belt that is powered by GAME FEATURES a heavy-duty 12-volt gear motor. This motor has been chosen for its long lasting and cool running Thank you for your purchase of the new WACKY capabilities. It has a full-length drive shaft for DUCKSÔ... - Page 4 INTRODUCTION ends once the player hits a duck. The player then wins the tickets that were displayed at the time of the hit. NOTE: This game is generally set up as a "One Hit" game. The operator can however set the game up for a different predetermined number of hits.
-
Page 5: Assembly
4. Find the location that the game will be placed in and move into rough position. 5. Remove the "Wacky DucksÔ" sign on the front of the game by rotating the two locks, and lifting up on them. -
Page 6: Setting A.c. Line Voltages
Notice a small window on the fuse holder location. When all testing is done, re-install the with an arrow that points to the voltage "Wacky DucksÔ" Sign, remove the keys, and roll the game is presently set at. the game into its final location. Lower the adjustable leg levelers to keep the game from ·... -
Page 7: Set-Up / Testing
SET-UP / TESTING SAFETY PRECAUTIONS PROGRAMMING BUTTON WARNING: WHEN INSTALLING THIS GAME, A Press this button to enter or exit the 3 PRONG GROUNDED A.C. RECEPTICLE PROGRAMMING mode. You will notice when MUST BE USED. FAILURE TO DO SO COULD you are in the Programming mode, as the RESULT IN INJURY TO YOURSELF OR displays in the Frogs will change. - Page 8 SET-UP / TESTING MODE 1 MODE 5 (GAME LENGTH) (VALUE OF XX) This mode determines how long the game lasts in SECONDS. The range for this value is 0-30. This option determines the number of tickets to The default value for this game is "10" dispense each time a dispense order is given by OPTION MODE 4.
- Page 9 SET-UP / TESTING MODE 9 (FACTORY RESET) This mode has the capability to reset all options to the factory default values. The range for this option is 0-1. Setting a "1" will reset all values. The default value for this option is "0" (no reset) NOTE: THE GAME CAN ALSO BE RESET TO FACTORY DEFAULT VALUES BY TURNING THE GAME OFF, REMOVING THE BATTERY...
- Page 10 SET-UP / TESTING ROPE LIGHTING If you have the type shown in the photo below, The rope light in the marquee is operated by a there are no adjustments. The fuse located at the rope light controller located behind the WACKY bottom of the printed board is the only user DUCKSÔ...
-
Page 11: Quick Troubleshooting
QUICK TROUBLESHOOTING GAME WILL NOT START NO A.C. POWER CHECK POWER AT A.C.RECEPTICLE POWER MODULE SET INCORRECTLY CHECK VOLTAGE SETTING FUSE BAD IN POWER MODULE CHECK OR REPLACE FUSE FUSE BAD ON MAIN P.C. BOARD CHECK OR REPLACE FUSE NO CREDITS INSERT PROPER AMOUNT OF COINS BAD COIN MICRO SWITCH CHECK OR REPLACE MICRO SWITCH... -
Page 12: Repair
OPERATIONAL MECHANICAL REPAIR BACKGROUND PUNCHING GLOVE ASSEMBLY The WACKY DUCKSÔ game has been designed OVERVIEW to be as easy as possible to repair. The punching glove system is designed for high The duck belt can be easily adjusted while in the reliability and safety. - Page 13 REPAIR If you see that the thermal switch is good, check to see that the coil and the diode on the coil are good. Disconnect the coil and unsolder 1 side of the diode. Do a resistance check to see that there is infinite resistance in one direction.
- Page 14 REPAIR 6. Remove the hex nuts that secure the 2 long shoulder bolts to the puncher mounting bracket. Unscrew the two shoulder bolts from the puncher mounting bracket. The puncher assembly should now be able to be removed. 7. Remove the 2 screws that hold the coil retaining bracket to the puncher bracket.
- Page 15 REPAIR 7. Loosen the 4 adjusting bolts on BOTH DOES NOT RUN BACKWARDS WHEN ends of the assembly to loosen up the THE GAME IS POWERED BACK ON. IF duck belt. THE BELT RUNS BACKWARDS THE BELT COULD BE SEVERELY DAMAGED.
- Page 16 REPAIR COULD CAUSE SHAFT MIS- ALIGNMENT AND / OR EXCESSIVE MOTOR NOISE. 16. FOLLOW THE DUCK BELT ADJUSTMENT PROCEDURES AT THE END OF THIS SECTION. DUCK BELT ADJUSTMENT 1. PRELIMINARY ADJUSTMENT - Loosen the 4 bolts that hold the duck belt assembly to the cabinet.
- Page 17 DAMAGE OR FRAYING OF THE BELT MATERIAL OR COULD DAMAGE THE SEWN BELT SEAM. BULB REPLACEMENT ROPE LIGHT 1. Remove the WACKY DUCKSÔ sign from the front of the game. ROPE LIGHT 2. Disconnect the rope light connector and the 2-wire speaker harness.
-
Page 18: Electrical / Electronic Repair
A.C. receptacle. · Clean dirt and grime from the punching mechanisms if they become sluggish. 2. Remove the WACKY DUCKSÔ sign from the front of the game. NOTE: DO NOT USE ANY LUBRICANT ON THE PUNCHING MECHANISMS, AS THIS WILL 3. - Page 19 INSTALLATION 1. TURN OFF A.C. POWER 2. Remove the WACKY DUCKS backlit sign by turning the two retaining locks, then lift and pull the sign from the game. This will access the Main P.C. Board. 3. Remove the E-Proms from the Main P.C. Board using a suitable chip puller, or carefully remove by gently prying with a small flat blade screwdriver.
- Page 20 To replace the EPROM(s) on the Main Printed Circuit Board, do the following: 1. Turn the power off 2. Remove the "Wacky Ducks™" sign on the front of the game by rotating the two locks, and lifting up on them.
-
Page 21: Parts Listings
PARTS LISTINGS MECHANICAL PARTS ELECTRICAL / ELECTRONIC PARTS FP1019 LEVELER FOOT HD1052 SWIVEL CASTER LOW TICKET SWITCH WA5001 TRIPLE COIN DOOR 2005 LIGHT BULB, #906 WK1001 CONTROL BOX 2026 THERMAL SWITCH WK1014 RAMP (DUCK LIFT) 2133CW ROPE LIGHT, CHASING 110 VOLT WK1020 PUNCH ASSEMBLY BRACKET 2364X... - Page 24 WARRANTY I.C.E warrants all components in the MESMERIZERÔ game to be free of defects in materials and workmanship for a period of ninety days from the date of purchase. This warranty does not cover items damaged due to normal wear and tear, subjected to abuse, improperly assembled by the end user, modified, repaired, or operated in a fashion other than that described in the service manual.
Need help?
Do you have a question about the Wacky Ducks and is the answer not in the manual?
Questions and answers