CARDIOSTRONG FX90 Assembly And Operating Instructions Manual
For more information, please visit cardiostrong.com, sport-tiedje.com

Related Manuals for CARDIOSTRONG FX90


Summary of Contents for CARDIOSTRONG FX90
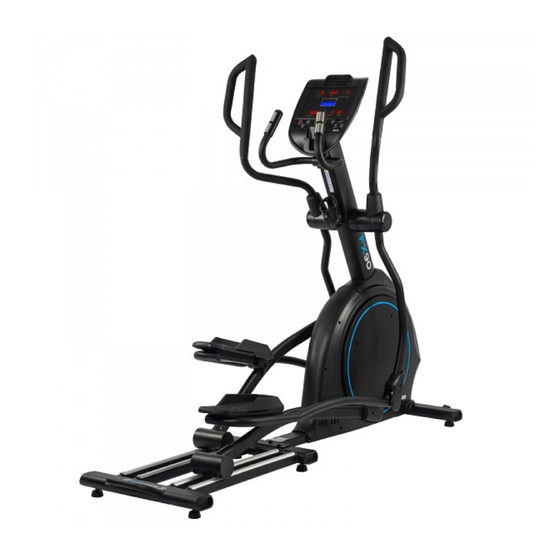
- Page 1 Assembly and Operating Instructions CSTFX90.01.01 Art. No.: CST-FX90 Elliptical cross trainer FX90...
- Page 2 FX90 ...
-
Page 3: Table Of Contents
Content GENERAL INFORMATION Technical Data Personal Safety Electrical Safety Set-Up Place ASSEMBLY General Instructions Scope of Delivery Assembly OPERATING INSTRUCTIONS Console Display Button Functions Switching on the Device Standby Mode Programmes 3.5.1 Quick Start Programme 3.5.2 Manual Programme (M) 3.5.3 Pre-Set Profile Programmes (P) 3.5.4 User-Defined Programmes (U) 3.5.5 Heart Rate Controlled Programmes (♥) 3.5.6 Watt Controlled Programme (W) - Page 4 ORDERING SPARE PARTS Serial Number and Model Name Parts List Exploded Drawing WARRANTY CONTACT FX90 ...
- Page 5 With cardiostrong® fitness equipment, the focus is on what sport is all about: maximum performance! Therefore, the equipment is developed in close consultation with athletes and sports scientists.
- Page 6 This notice indicates potentially hazardous situations which, if not avoided, will result in death or serious injuries! NOTICE This notice indicates further useful information. Retain these instructions in a safe place for future reference, maintenance or when ordering replacement parts. FX90 ...
-
Page 7: General Information
GENERAL INFORMATION Technical Data LED - Display of: Training time in min. Speed in km/h Training distance in km Calories in kcal Heart rate (when using hand pulse sensors or chest strap) User memory: Programmes in total: Quick-Start programmes: Manual programmes: Watt controlled programmes: Heart rate controlled programmes: User-defined programmes:... -
Page 8: Personal Safety
Make sure that nobody is within the range of motion of the equipment during training so as not to endanger you or other persons. ࣑ ATTENTION Do not insert any objects of any kind into the openings of the device. FX90 ... -
Page 9: Electrical Safety
Electrical Safety DANGER ⚠ In order to reduce the risk of an electric shock, always unplug the equipment from the mains socket immediately after your workout, before assembly or dismantling, and before maintenance or cleaning. Do not pull on the cable. ⚠... -
Page 10: Set-Up Place
(over 70%) like swimming pools. A floor protective mat/equipment underlay can help to protect high-quality floor coverings (parquet, laminate, cork, carpets) from dents and sweat and can help to level out slight unevenness. FX90 ... -
Page 11: Assembly
ASSEMBLY General Instructions ⚠ DANGER Do not leave any tools, packaging materials such as foils or small parts lying around, as otherwise there is a danger of suffocation for children. Keep children away from the equipment during assembly. ⚠ WARNING Pay attention to the instructions attached to the equipment in order to reduce the risk of injuries. -
Page 12: Scope Of Delivery
If parts of the scope of delivery are missing or damaged, the assembly must not be carried out. 58 M8-8 53 Φ8-6 49 Φ25*Φ8.2*t2.0-4 50 Φ8-12 83 M5×10-8 33 M8*50*20-2 35 M8*15-4 46 ST4×20-4 32 M8*55*20-2 45 ST4×16-5 30 M8*15-10 36 M8*45*20-6 FX90 ... - Page 13 (62) Handlebar down (86) Pulley limited sleeve (98) Handlebar middle (97) Handlebar outer (62) Connection case (86) Pulley limited sleeve (98) Middle cover (97) Outer cover connceting powder case cover cover (Handlebar) 2x (Handlebar) 2x (90) Down (102) Handlebar (91) Down (108) Body arm cover (102) Handlebar (90) Down handlebar...
- Page 14 Console Upper handlebar (R) Upper handlebar (L) Handlebar with hand pulse sensors Handlebar cover Lower handlebar Lower handlebar Swing arm (R) Pedal arm (R) Sliding rail cover Main frame Pedal arm (L) Sliding rail Swing arm (L) FX90 ...
-
Page 15: Assembly
Assembly Before assembly, take a close look at the individual assembly steps shown and carry out the assembly in the order given. NOTICE First loosely screw all parts together and check that they fit properly. Tighten the screws using the tool only when you are instructed to do so. Step 1: Assembly of the upright post Connect the main frame communication cable (61) with upright post communication cable (76),... - Page 16 Guide the hand pulse cables (59) through the openings on the upright post (2). Mount the handlebar (7) to the upright post (2) with four Allen screws (30) and four washers (50). Mount the handlebar cover (104) to the handlebar (7) with two screws (83). FX90 ...
- Page 17 Step 4: Assembly of the body arms NOTICE For better performance, apply some lubricant to the axle on the main frame. Mount the left body arm (8) to the axle on the main frame (1) with one Allen screw (35) and one washer (49).
- Page 18 Slide the cover (102) onto the upper handlebar (14) and connect the upper handlebar (14) with the lower handlebar (5) with three Allen screws (36) and three self-locking nuts (58). Repeat 1.–5. for the other side. Coated lubricate oil FX90 ...
- Page 19 Step 6: Attaching the covers Mount cover A (90) and cover B (91) to both sides of the lower handlebar (5) with each one screw (83) Repeat the previous step for the other side.
- Page 20 The equipment must not be connected to a multiple socket, otherwise it cannot be guaranteed that the equipment will be supplied with sufficient power. Technical errors can result. Plug the power plug into a wall outlet that complies with the instructions in the chapter on electrical safety. FX90 ...
-
Page 21: Operating Instructions
OPERATING INSTRUCTIONS NOTICE Familiarise yourself with all the functions and setting options of the device before starting training. Have the proper use of this product explained to you by a specialist. Console Display Display of rotations per minute Display range: 0–999 Display of training time in minutes TIME Display range: 0:00–99:59... -
Page 22: Button Functions
Start the program to calculate the body fat percentage (FAT% 5.0%-50%) and the BODY FAT BMI (0-50). Selecting a programme or function UP (+) Increase a value Selecting a program or function DOWN (-) Decrease a value START/ Starting or stopping/pausing a programme STOP FX90 ... -
Page 23: Switching On The Device
Switching on the Device As soon as the console is started, a beep sounds for one second and the display lights up, see Figure 1. The display will then show the device settings as shown in Figure 2. You can then select the user. NOTICE By default, U1 is displayed at the beginning, see Figure 3. -
Page 24: Standby Mode
You are in the ‘manual’ programme. To start the Quick Start programme, press the START/STOP button. All values will be counted up. To pause the programme, press the START/STOP button again. To end the programme, briefly press the RESET button in the paused programme. FX90 ... -
Page 25: Manual Programme (M)
3.5.2 Manual Programme (M) The manual programme can be used based on one or more target values. Use the UP/DOWN buttons to select the manual programme (M) and confirm with the MODE button. You can now set the values for time, distance, calories and/or pulse in this order. -
Page 26: Pre-Set Profile Programmes (P)
During the workout it is possible to adjust the resistance level for all segments with the UP/ DOWN buttons. To pause the programme, press the START/STOP button again. To end the programme, briefly press the RESET button in the paused programme. Programme sequences FX90 ... -
Page 28: User-Defined Programmes (U)
During the workout it is possible to adjust the resistance level for each segment with the UP/DOWN buttons. To pause the programme, press the START/STOP Figure 7 button again. To end the programme, briefly press the RESET button in the paused programme. FX90 ... -
Page 29: Heart Rate Controlled Programmes (♥)
3.5.5 Heart Rate Controlled Programmes ( ♥ ⚠ WARNING Your training equipment is not a medical device. The heart rate measurement of this equipment may be inaccurate. Various factors can affect the accuracy of the heart rate measurement. The heart rate measurement serves only as a training aid. Four heart rate programs are available. -
Page 30: Watt Controlled Programme (W)
MODE button. Figure 10 To start the programme, press the START/STOP button. To pause the programme, press the START/STOP button again. Figure 6 To end the programme, briefly press the RESET button in the paused programme. Figure 11 FX90 ... -
Page 31: Heart Rate Recovery Test (Recovery)
Heart Rate Recovery Test (RECOVERY) Use the recovery function after a workout to measure your recovery heart rate. To start the recovery programme, press the RECOVERY button and hold the hand pulse sensors. The display will show a countdown counting down from 00:60 to 00:00 (see Figure 12). NOTICE To exit the recovery function prematurely, press the RECOVERY button again. -
Page 32: Body Fat Test (Body Fat)
To exit the body fat test earlier and return to the previous program, press the BODY FAT button again. After completion, the values for the fat percentage (FAT%) and your BMI will be displayed. NOTICE If the value for the body fat percentage is not in the 5%–50% range, the display shows the error code E-4. FX90 ... -
Page 33: Storage And Transport
STORAGE AND TRANSPORT General Instructions ⚠ WARNING The storage location should be chosen so that improper use by third parties or children can be prevented. If your equipment does not have transportation wheels, the equipment must be disassembled before transportation. ࣑... -
Page 34: Troubleshooting, Care And Maintenance
Use a suitable chest strap (see Unsuitable chest strap recommended accessories). No pulse display Wrong position of chest Reposition chest strap and/or strap moisten electrodes Chest strap defective or Check if pulse display by hand pulse battery empty possible Changing batteries FX90 ... -
Page 35: Error Codes And Troubleshooting
Error Codes and Troubleshooting The electronics of the equipment continuously carries out tests. In case of deviations, an error code appears on the display and normal operation is stopped for your safety. E-1: Console does not receive hand pulse sensor signal during body fat programme Make sure that there is enough contact to the hand pulse sensors. -
Page 36: Maintenance And Inspection Calendar
The materials can be recycled as per their symbols. Through the reuse, recycling of materials or other forms of recovery of old equipment, you make an important contribution to the protection of the environment. FX90 ... -
Page 37: Recommended Accessories
RECOMMENDED ACCESSORIES To make your training experience even more efficient and pleasant, we recommend that you add suiting accessories to your fitness equipment. This could be a floor mat, for example, which makes your fitness equipment stand more securely and also protects the floor from falling sweat, but it could also be additional handrails on some treadmills or silicone spray to keep moving parts in good shape. - Page 38 The serial number of your equipment is unique. It's located on a white sticker. The exact position of this sticker is shown in the following illustration. Enter the serial number in the appropriate field. Serial number: Brand / Category: cardiostrong / elliptical cross-trainer Model Name: FX90 Article Number: CST-FX90 FX90 ...
- Page 39 Parts List Name Qty. Main frame Upright post Sliding rail Crank Right handlebar Left handlebar Pulse circular tube body arm Left body arm Right Swing arm right Swing arm Left Sliding rail Aluminum plate Cover decoration Left upper handlebar Right upper handlebar Bearing base Circlip for shaftΦ20 Upright post connection plate (1)
- Page 40 Spring washer Φ8 Spring washer Φ10 Flat key 8*10*18 Flat washer Φ8*Φ30*t3.0 Hex self-locking nut M10 Hex self-locking nut M8 Handle pulse connecting wire Magnet motor Main frame communication cable Bushing Brake tension spring Φ11.5×Φ1.2×13 EVA pad Spring washer Φ12 FX90 ...
- Page 41 bearings M12 Deep groove ball bearing 6201ZZ Deep groove ball bearing 6004ZZ Deep groove ball bearing 6005ZZ Hex nut M12×P1.75 Belt pulley axle Belt pulley Hex nut M12 Fly wheel Motor belt Upright post communication wiring Outer cover-left Outer cover-right Crank cover Pedal-left Pedal-right...
- Page 42 Crank clearance set two Power communication wire Magnetic sensor Power adapter Brake line Flywheel axis Deep groove ball bearing 6203ZZ Handle bar axle sleeve clearance set Switching bearing clearance set Crank bearing clearance set Swing arm bearing clearance set FX90 ...
- Page 43 Exploded Drawing...
- Page 44 Ownership of equipment or parts of equipment which have been replaced is transferred to us. The warranty period is not extended nor does a new warranty period begin following repair or replacement under the warranty. FX90 ...
- Page 45 Warranty Conditions For the warranty to be valid, the following steps must be taken: Please contact our customer service by email or phone. If the product under warranty has to be sent in for repair, the seller bears costs. After expiry of the warranty, the buyer bears the costs of transport and insurance.
- Page 46 �� Mo - Fr 08:00 - 18:00 09:00 - 18:00 09:00 - 18:00 Please find a detailed overview including address and opening hours for all stores of the Sport-Tiedje Group in Germany and abroad on the following website: www.sport-tiedje.com/en/stores FX90 ...
- Page 47 LIVE FITNESS WEBSHOP AND SOCIAL MEDIA Sport-Tiedje is Europe’s largest specialist store for www.sport-tiedje.co.uk home fitness equipment with currently 80 stores www.sport-tiedje.de/blog and one of the world’s most renowned online mail order companies for fitness equipment. Private customers order via the 25 web shops www.facebook.com/SportTiedje in the respective national language or have their desired equpiment assembled on site.
- Page 48 Notes FX90 ...
- Page 49 Notes...
- Page 50 Notes FX90 ...
- Page 52 Elliptical cross trainer FX90...
Need help?
Do you have a question about the FX90 and is the answer not in the manual?
Questions and answers