
Related Manuals for Kramer PT-871/2-KIT


Summary of Contents for Kramer PT-871/2-KIT
- Page 1 USER MANUAL MODEL: PT-871/2-KIT, PT-871/2xr-KIT, WP-871xr, PT-872xr HDMI Line Transmitters and Receivers over Long-Reach DGKat P/N: 2900-300716 Rev 1 www.kramerAV.com...
-
Page 2: Table Of Contents
Defining PT-871/2-KIT, PT-871/2xr-KIT, WP-871xr, PT-872xr Installing the Device Connecting to the Device Connecting PT-871/2-KIT, PT-871/2xr-KIT, PT-872xr Connecting WP-871xr and PT-872xr Setting the DIP-Switches PT-871/2xr-KIT and PT-872xr WP-871xr Technical Specifications PT-871/2-KIT PT-871/2xr-KIT and PT-872xr WP-871xr PT-871/2-KIT, PT-871/2xr-KIT, WP-871xr, PT-872xr – Contents... -
Page 3: Introduction
Kramer Electronics Ltd. Introduction Welcome to Kramer Electronics! Since 1981, Kramer Electronics has been providing a world of unique, creative, and affordable solutions to the vast range of problems that confront the video, audio, presentation, and broadcasting professional on a daily basis. In... -
Page 4: Overview
Safety Instructions Caution: There are no operator serviceable parts inside the unit Warning: Use only the Kramer Electronics power supply that is provided with the unit Warning: Disconnect the power and unplug the unit from the wall before installing Recycling Kramer Products... -
Page 5: Typical Applications
Typical Applications PT-871/2-KIT, PT-871/2xr-KIT, WP-871xr, PT-872xr are ideal for the following typical applications: • Long-distance AV signal extension for large room connectivity. • AV extension in meeting rooms, boardrooms, hotels and corporate facilities. PT-871/2-KIT, PT-871/2xr-KIT, WP-871xr, PT-872xr – Introduction... -
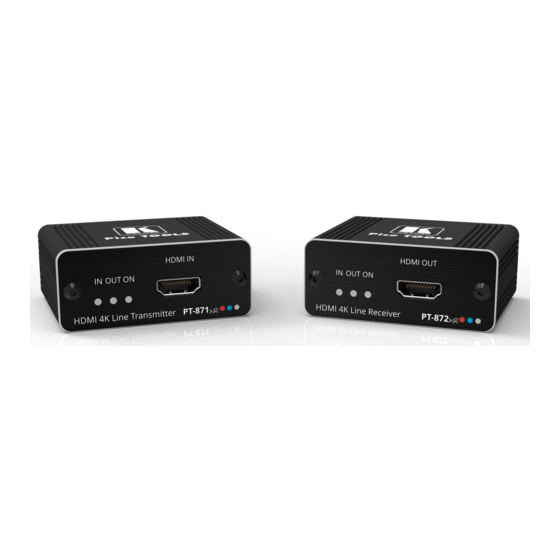
Page 6: Defining Pt-871/2-Kit, Pt-871/2Xr-Kit, Wp-871Xr, Pt-872Xr
Always set DIP-switch 1 identically on both devices. OFF (up) – Standard compression level (default). DIP-switch 1: ON (down) – High compression level for additional Compression Options range extension. DIP-switch 2: Must be set to OFF (up). PT-871/2-KIT, PT-871/2xr-KIT, WP-871xr, PT-872xr – Defining PT-871/2-KIT, PT-871/2xr-KIT, WP-871xr, PT-872xr... - Page 7 Connect to the power adapter (if required). Connect GND to GND, Block Connector +12V to +12V. DGKAT2 OUT RJ-45 Connector Connect to the DGKat-2.0 IN connector on the PT-872xr using CAT 6A cable. PT-871/2-KIT, PT-871/2xr-KIT, WP-871xr, PT-872xr – Defining PT-871/2-KIT, PT-871/2xr-KIT, WP-871xr, PT-872xr...
- Page 8 Do not change the default DIP-switch settings (located on the front panel, behind the frame) DIP-switch 1 Must be set to ON (right). DIP-switch 2 Must be set to OFF (up). PT-871/2-KIT, PT-871/2xr-KIT, WP-871xr, PT-872xr – Defining PT-871/2-KIT, PT-871/2xr-KIT, WP-871xr, PT-872xr...
-
Page 9: Installing The Device
RK-4PT-B rack adapter (for all models) or an optional RK-4PT rack adapter (for PT-871/2-KIT); see the Rack Adapters user manual for installation instructions available from our Web site www.kramerav.com/downloads/RK-4PT#Tab_Resources. • Fasten a bracket (included) on each side of the unit and attach it to a flat surface. - Page 10 (DIN 49073). • UK: 1 Gang in-wall junction box, 75x75mm (W, H), and depth that can fit in both the device and the connected cables (BS 4662). PT-871/2-KIT, PT-871/2xr-KIT, WP-871xr, PT-872xr – Installing the Device...
-
Page 11: Connecting To The Device
PT-872xr, connect its power and then switch on the power to each device. We highly recommend using only Kramer UNIKAT cables with these products. If using 3 party shielded CAT-6A cables, both ends of the shield must be soldered to the connectors for the products to function properly. -
Page 12: Connecting Wp-871Xr And Pt-872Xr
PT-872xr receiver. We recommend that you use only the power cord that is supplied with the PT-872xr receiver. Alternatively, you can connect the WP-871xr power adapter and PT-872xr powered by PoC. PT-871/2-KIT, PT-871/2xr-KIT, WP-871xr, PT-872xr – Connecting to the Device... -
Page 13: Setting The Dip-Switches
DIP-switch default settings (located on the front panel, behind the frame). When using PT-872xr as the receiver for WP-871xr, set the PT-872xr Compression Options DIP-switch to ON (down = high-compression) to match the WP-871xr which supports only high compression. PT-871/2-KIT, PT-871/2xr-KIT, WP-871xr, PT-872xr – Setting the DIP-Switches... -
Page 14: Technical Specifications
Max. Resolution 3840x2160@60Hz (4:4:4) 24bpp Compliance HDR10, HDMI 2.0, HDCP 2.2 Extension Line We recommend that you use Kramer shielded cables to achieve optimum extension ranges. Max. Range 40m (130ft) at 4K60 (4:4:4 or 4:2:0) or full HD (1080p @60Hz 36bpp) -
Page 15: Pt-871/2Xr-Kit And Pt-872Xr
4096x2160@60Hz (4:4:4) 24bpp at standard compression level Compliance HDMI 2.0, HDCP 2.2, HDR 10 Extension Line We recommend that you use Kramer shielded cables to achieve optimum extension ranges. Max Range at High 60m (200ft) at 4K@60Hz (4:4:4) Compression Level... - Page 16 Max. Resolution 3840x2160@60Hz (4:4:4) 24bpp Compliance HDMI 2.0, HDCP 2.2, HDR 10 Extension Line We recommend that you use Kramer shielded cables to achieve optimum extension ranges. Max. Range 60m (200ft) at 4K@60Hz (4:4:4) 70m (230ft) at 4K@60Hz (4:2:0) or full HD (1080p...
- Page 17 Electronics products, this product must be insured during shipment, with the insurance and shipping charges prepaid by you. If this product is returned uninsured, you assume all risks of loss or damage during shipment. Kramer Electronics will not be responsible for any costs related to the removal or re- installation of this product from or into any installation.
- Page 18 SAFETY WARNING Disconnect the unit from the power supply before opening and servicing For the latest information on our products and a list of Kramer distributors, visit our Web site where updates to this user manual may be found. We welcome your questions, comments, and feedback.
Need help?
Do you have a question about the PT-871/2-KIT and is the answer not in the manual?
Questions and answers