Advertisement
Quick Links
Scan for full manual
Step 1: Check what's in the box
SL-1N Master Room Controller
Kramer RC-IR3 Infrared Remote Control Transmitter with
batteries and user manual
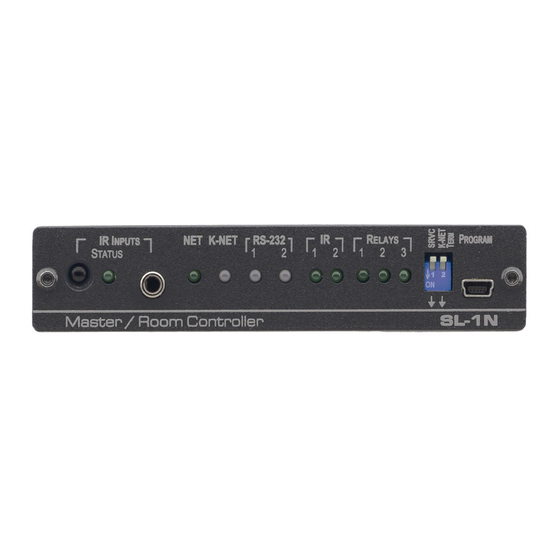
Step 2: Get to know your SL-1N
#
Feature
1
RELAYS Terminal Blocks
2
IR Output Terminal Blocks
3
RS-232 Terminal Blocks
4
ETHERNET RJ-45 Connector
5
DEFAULT Pushbutton
6
K-NET Terminal Block
7
12V DC Connector
8
IR IN Sensor and LED
9
IR INPUT 3.5mm Mini Jack
10
NET LED
11
K-NET LED
12
RS-232 Tx/Rx LEDs
13
IR LEDs
14
RELAYS LEDs
15
SRVC DIP-Switch
16
K-NET TERM DIP-Switch
17
PROGRAM USB Connector
SL-1N Quick Start
SL-1N Quick Start Guide
This guide helps you install and use your
Go to
www.kramerav.com/downloads/SL-1N
upgrades are available.
Function
Connect to low-voltage relay-driven devices (from 1 to 3)
Connect to IR emitter cables (from 1 to 2)
Connect to the RS-232 devices (from 1 to 2)
Connects to the PC or other serial controller through computer networking
LAN
Press to reset to factory default definitions:
IP number − 192.168.1.39, mask – 255.255.0.0, gateway – 0.0.0.0, also to
remove the current configuration
First disconnect the power cord and then connect it again while pressing the
ETH Factory Reset button. The unit powers up and loads its memory with the
factory default definitions and erases all stored presets
PIN GND is for the ground connection; PIN B (-) and PIN A (+) are for
RS-485, and PIN +12V is for powering the unit
The ground connection is sometimes connected to the shield of the RS-485
cable
For supplying power to the unit
Accepts IR remote commands
Connects to a remote infrared sensor
Illuminates while transmitting over Ethernet
Illuminates when the K-NET is active (red – transmit, green – receive, during
normal activity flashes red)
Illuminates while transmitting/receiving on an RS-232 port (1 to 2) (red –
transmit, green – receive)
Illuminates when an IR port is active
Illuminates when a relay is active (1 to 3)
Slides down for service use only, slides up for normal operation
Slides down for K-NET termination, slides up for not terminated
Connect to a computer for unit configuration and firmware upgrading
SL-1N
for the first time.
to download the latest user manual and check if firmware
1 Power supply (12V DC)
1 Quick start guide
P/N: 2 9 0 0 - 3 0 1 2 7 3 QS
4 Rubber feet
Rev: 2
Advertisement

Related Manuals for Kramer SL-1N


Summary of Contents for Kramer SL-1N
- Page 1 1 Power supply (12V DC) 4 Rubber feet Kramer RC-IR3 Infrared Remote Control Transmitter with 1 Quick start guide batteries and user manual Step 2: Get to know your SL-1N Feature Function RELAYS Terminal Blocks Connect to low-voltage relay-driven devices (from 1 to 3)
- Page 2 • Reliable earthing of rack-mounted equipment should be maintained. Step 4: Connect inputs and outputs Always switch OFF the power on each device before connecting it to your SL-1N. To achieve specified extension distances, use the recommended Kramer cables available at www.kramerav.com/product/SL-1N.
Need help?
Do you have a question about the SL-1N and is the answer not in the manual?
Questions and answers