Advertisement
SL-240C Quick Start Guide
This guide helps you install and use your SL-240C for the first time.
Go to
upgrades are available.
Scan for full manual
Step 1: Check what's in the box
SL-240C Master / Room Controller
5V DC Power Supply
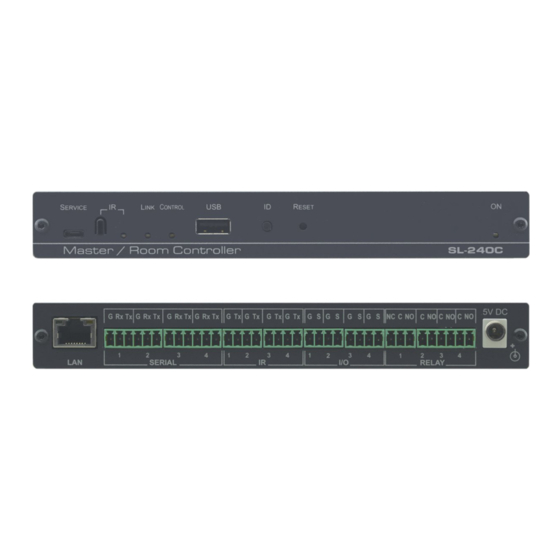
Step 2: Get to know your SL-240C
#
Feature
1
SERVICE Mini USB 2.0 Port
2
IR Learner and LED
3
LINK LED
4
CONTROL LED
5
USB Connector
6
ID Button
7
RESET Button
8
ON LED
9
LAN RJ-45 Connector
SL-240C Quick Start (P/N: 2900-300895QS REV 2)
www.kramerav.com/downloads/SL-240C
TOOL Mounting bracket kit
Function
Connect to a PC to perform a firmware upgrade.
Detects IR signals for IR learning and indicates an active signal by lighting blue.
Indicates Ethernet activity:
Blue LED on – good connection.
Blue LED flashing – no connection.
Blue LED off – not ready.
Indicates control states:
Green – the control application (brain) is ready and working.
Blue – the control application (brain) is synchronizing.
Red – indicates an error in the control application (brain).
N/A – For future use.
For self-identification over the network.
Press the button to send (broadcast) the Beacon P3K command.
Reply includes: IP address, UDP port number, TCP port number, MAC address, and
Model Name.
For performing a factory default reset.
Green – the device is powered.
Connects to a local area network via PoE-enabled Ethernet cable. Indications:
to download the latest user manual and check if firmware
P/N:
2 9 0 0 - 3 0 0 8 9 5 QS
1 Quick start guide
Rev: 2
Advertisement
Table of Contents

Related Manuals for Kramer SL-240C


Summary of Contents for Kramer SL-240C
- Page 1 SL-240C Quick Start Guide This guide helps you install and use your SL-240C for the first time. Go to www.kramerav.com/downloads/SL-240C to download the latest user manual and check if firmware upgrades are available. Scan for full manual Step 1: Check what’s in the box...
- Page 2 Kramer high-performance cables to connect AV equipment to the SL-240C. Step 5: Connect the power Connect to a local area network via PoE-enabled Ethernet cable or, optionally, connect the 5V DC power supply to the SL-240C and plug the power supply into the mains electricity.
Need help?
Do you have a question about the SL-240C and is the answer not in the manual?
Questions and answers