GCX VHM Series Installation Manual
Philips mp20/30/40/50 intellivue wall mount kit
Hide thumbs
Also See for VHM Series:
- Installation & operation manual (9 pages) ,
- Installation & operation manual (11 pages) ,
- Installation & operation manual (13 pages)
Table of Contents
Advertisement
Quick Links
The purpose of this guide is to:
1. Describe attachment of Table Top Mount to Mounting Adapter.
2. Describe attachment of Mounting Adapter to VHM Arm.
3. Describe mounting of VHM Arm in the Wall Channel.
4. Describe mounting the monitor on the Arm.
5. Describe Operation and Adjustment of VHM Arm.
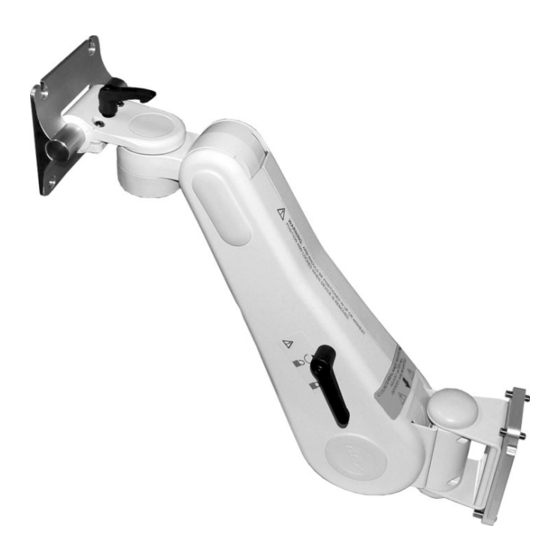
Parts Reference
The following parts and hardware are included with this installation kit (hardware not shown):
Item #
Description
1
VHM Arm with Mounting Adapter
2
Locking Lever, Height Adjustment
3
Cable Clip, VHM Arm
4
M6 x 8mm FHMS
5
M6 x 12mm FHMS
6
1/8'' Hex Wrench
7
5/32'' [4mm] Hex Wrench
8
Wall Channel Cover, 16''
9
1/2'' Socket Wrench
*10
Spacer, MP20/30
*11
M6 x 16mm Pan Head Machine Screw (PHMS)
*See "MP20/30 with non-Table Top Mount" (page 3) for use of these parts.
Tools Required
Phillips screwdriver (not provided), 1/8'' and 5/32'' [4mm] hex wrenches (provided), 1/2'' socket wrench (provided).
WARNING!
The VHM Arm contains a strong spring which is used to counterbalance the weight of the mounted
device. The Arm housing should never be disassembled by non-GCX personnel. Additionally, the
mounted device should only be removed with the Arm in its highest vertical position, with the Height
Locking Lever in the fully locked position. Failure to follow these guidelines could result in serious injury.
Before mounting the Arm:
1. Note that this arm has a wide range of motion both up/down and side to side. Please consider carefully the device
being mounted and the proximity of the assembly to other equipment, hospital personnel, and the patient. GCX
recommends that the hospital's risk management personnel verify the appropriateness of the application prior to
installation and use.
2. If assistance is needed regarding an application, please contact a GCX product specialist at (800) 228-2555.
Installation Guide
Philips MP20/30/40/50 IntelliVue VHM Wall Mount Kit
Qty
1
1
2
1
2
1
1
1
1
10
1
2
DU-AG-0021-25 Rev C 1/09/07 GCX Corp. Page 1 of 7
2
3
Advertisement
Table of Contents

Subscribe to Our Youtube Channel
Related Manuals for GCX VHM Series


Summary of Contents for GCX VHM Series
- Page 1 1. Note that this arm has a wide range of motion both up/down and side to side. Please consider carefully the device being mounted and the proximity of the assembly to other equipment, hospital personnel, and the patient. GCX recommends that the hospital’s risk management personnel verify the appropriateness of the application prior to installation and use.
- Page 2 Arm. The Lever operates by turning clockwise to tighten or counterclockwise to loosen. Ensure that the Locking Lever is in the locked position before mounting the Arm in the channel. Height Locking Lever DU-AG-0021-25 Rev C 1/09/07 GCX Corp. Page 2 of 7...
- Page 3 1. Fit Spacer into recessed area on top of Mounting Adapter (below). Ensure Spacer remains between Mounting Adapter and monitor. 2. Insert two (2) M6 x 16mm PHMS through bottom of Mounting Adapter and thread into mounting holes in bottom of monitor (right). Mounting Adapter Spacer DU-AG-0021-25 Rev C 1/09/07 GCX Corp. Page 3 of 7...
- Page 4 Arm. 1/2'' [13 mm] Socket Wrench Counterbalance Adjuster Bolt CW Decreases Force Adjuster Cover CCW Increases Force 4. Close the Adjuster Cover. DU-AG-0021-25 Rev C 1/09/07 GCX Corp. Page 4 of 7...
- Page 5 1/2'' [13mm] box or open-end wrench, tighten or loosen Pivot Bolt and Hex Nut to desired tension. Reinstall bolt caps back over each end of Pivot Bolt. 1/2" [13 mm] Socket Wrench DU-AG-0021-25 Rev C 1/09/07 GCX Corp. Page 5 of 7...
- Page 6 3. Relieve the weight of the mounted instrument by lifting against the underside of the Arm, near the instrument. Simultaneously, push up or pull down the opposite end of the Arm immediately in front of the Slide. 4. Tighten four (4) set screws. DU-AG-0021-25 Rev C 1/09/07 GCX Corp. Page 6 of 7...
- Page 7 Dry the arm thoroughly after cleaning. CAUTION: GCX makes no claims regarding the efficacy of the listed chemicals or processes as a means for controlling infection. Consult your hospital’s infection control officer or epidemiologist. To clean or sterilize mounted instruments or accessory equipment, refer to the specific instructions delivered with those products.
Need help?
Do you have a question about the VHM Series and is the answer not in the manual?
Questions and answers