GCX VHM Series Installation & Operation Manual
Arms with rear extension
Hide thumbs
Also See for VHM Series:
- Installation & operation manual (9 pages) ,
- Installation & operation manual (11 pages) ,
- Installation manual (8 pages)
Table of Contents
Advertisement
Quick Links
3875 Cypress Drive Petaluma, CA 94954 800.228.2555 707.773.1100 Fax 707.773.1180 www.gcx.com
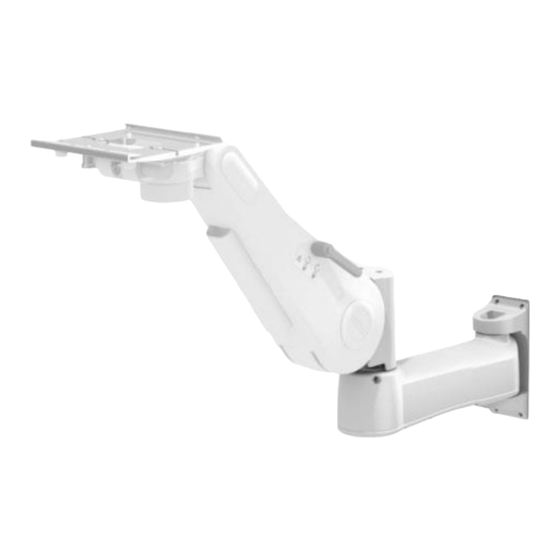
Installation & Operation Manual for VHM™ Series Arms with Rear Extension
VHM Arm
VHM with 14"/35.6cm Extension
Shown with VHM Arm below the Extension
The purpose of this manual is to describe general installation, operation, and adjustment procedures for VHM™ Series
Arms with rear extension. This manual should be used in conjunction with any instrument-specific installation guides.
Please read this manual and all instrument-specific installation material before installing or using this product. Refer to
qualified personnel.
THE FRONT END PIVOT OF THE EXTENSION CAN BE ORIENTED WITH THE VHM ARM ABOVE OR BELOW THE
EXTENSION (SEE PICTURES ABOVE). TO CHANGE THE ORIENTATION OF THE FRONT END PIVOT, REFER TO
DOCUMENT: DU-WS-0005-7X. THIS DOCUMENT CAN BE OBTAINED BY CONTACTING GCX TECHNICAL
SUPPORT 800-228-2555 OR +1 707-773-1100, OR VISIT OUR WEBSITE: WWW.GCX.COM/SUPPORT/SUPPORT
ARMS.
Table of Contents
1.0. Installation, Operation, and Maintenance Warnings ........................................................................................... 2
Parts Reference ............................................................................................................................................................... 3
Tools Required ................................................................................................................................................................ 3
2.0 Installing the VHM Arm in the Channel .................................................................................................................. 4
3.0 Mounting the Instrument on the VHM Arm............................................................................................................ 5
4.0 Adjusting Counterbalance ...................................................................................................................................... 6
5.0 Operating and Adjusting the VHM Arm ................................................................................................................. 7
6.0 Cable Management ............................................................................................................................................... 10
7.0 Routine Maintenance ............................................................................................................................................. 11
8.0 Cleaning the Mounting Assembly ........................................................................................................................ 12
9.0 Troubleshooting the VHM Arm ............................................................................................................................. 13
Extension
VHM with 8"/20.3cm Extension
Shown with VHM Arm above the Extension
DU-WS-0005 Rev C 3/15/17 GCX Corp. Page 1 of 13
Advertisement
Table of Contents

Subscribe to Our Youtube Channel
Related Manuals for GCX VHM Series


Summary of Contents for GCX VHM Series
-
Page 1: Table Of Contents
3875 Cypress Drive Petaluma, CA 94954 800.228.2555 707.773.1100 Fax 707.773.1180 www.gcx.com Installation & Operation Manual for VHM™ Series Arms with Rear Extension Extension VHM Arm VHM with 14”/35.6cm Extension VHM with 8”/20.3cm Extension Shown with VHM Arm below the Extension Shown with VHM Arm above the Extension The purpose of this manual is to describe general installation, operation, and adjustment procedures for VHM™... -
Page 2: Installation, Operation, And Maintenance Warnings
GCX recommends that the hospital’s risk management personnel verify that the application is appropriate prior to installation and use of the VHM Arm. -
Page 3: Parts Reference
If regularly inspected, the VHM Arm should function properly for 5 to 10 years. If you are unable to adjust the arm or require service, contact GCX technical support at 800-228-2555 or +1 707-773-1100. -
Page 4: Installing The Vhm Arm In The Channel
Installation Note: For proper function of the locking mechanism, the arm must be properly adjusted to counterbalance the weight of the mounted instrument (see section 4.0). PULL Note: Locking Knob operates by Locking Knob pulling and releasing Knob. DU-WS-0005 Rev C 3/15/17 GCX Corp. Page 4 of 13... -
Page 5: Mounting The Instrument On The Vhm Arm
3.0 Mounting the Instrument on the VHM Arm Most instruments will require the attachment of an instrument-specific Mounting Adapter provided by GCX or by the instrument supplier. Install the Mounting Adapter in accordance with the installation guide included with the Adapter. -
Page 6: Adjusting Counterbalance
4.2 Open the Adjuster Cover by inserting a flat blade screwdriver in the slot at the rear of the Cover and prying upward. If necessary carefully unlock and readjust the Arm until the Counterbalance Adjuster Bolt is accessible through the Adjuster Cover (below center). Re-lock Arm when Counterbalance Adjuster is accessible. DU-WS-0005 Rev C 3/15/17 GCX Corp. Page 6 of 13... -
Page 7: Operating And Adjusting The Vhm Arm
(other than primary instrument) while the Height Locking Lever was engaged. A change in the total load can cause a sudden downward or upward movement of the Arm when the Height Locking Lever is disengaged. DU-WS-0005 Rev C 3/15/17 GCX Corp. Page 7 of 13... - Page 8 Arm near the instrument. Simultaneously, push up or pull down the opposite end of the Arm immediately in front of the Slide. Set Screws 5.3.5 Tighten four (4) set screws. Adjustable Stop DU-WS-0005 Rev C 3/15/17 GCX Corp. Page 8 of 13...
- Page 9 Swivel Tension Nut. Warning: Swivel tension nut must be torqued to a minimum of 20 in-lbs [2.3 N-m]. Swivel Tension Nut Swivel Point DU-WS-0005 Rev C 3/15/17 GCX Corp. Page 9 of 13...
-
Page 10: Cable Management
Leave some extra cable loose at the front and rear of the arm to prevent cable binding, connector damage, or Cable Guide damage. Cable Guide DU-WS-0005 Rev C 3/15/17 GCX Corp. Page 10 of 13... -
Page 11: Routine Maintenance
If regularly inspected, the VHM Arm should function properly for 5 to 10 years. If you are unable to adjust the arm or require service, contact GCX technical support at 1-800-288-2555 or +1 707-773-1100. DU-WS-0005 Rev C 3/15/17 GCX Corp. Page 11 of 13... -
Page 12: Cleaning The Mounting Assembly
8.0 Cleaning the Mounting Assembly CAUTION: GCX makes no claims regarding the efficacy of the listed chemicals or processes as a means for controlling infection. Consult your hospital’s infection control officer or epidemiologist. To clean or sterilize mounted instruments or accessory equipment, refer to the specific instructions delivered with those products. -
Page 13: Troubleshooting The Vhm Arm
Check Arm load rating (section 2.1). compatible with Load Rating of Arm. Counterbalance Adjustement Reposition Arm and lock in horizontal Arm not locked in a horizontal position. Bolt difficult to adjust. position (section 4.0). DU-WS-0005 Rev C 3/15/17 GCX Corp. Page 13 of 13...
Need help?
Do you have a question about the VHM Series and is the answer not in the manual?
Questions and answers