GCX VHM Series Installation & Operation Manual
Arms with fixed angle front end
Hide thumbs
Also See for VHM Series:
- Installation & operation manual (11 pages) ,
- Installation & operation manual (13 pages) ,
- Installation manual (8 pages)
Advertisement
Quick Links
3875 Cypress Drive Petaluma, CA 94954 800.228.2555 707.773.1100 Fax 707.773.1180 www.gcx.com
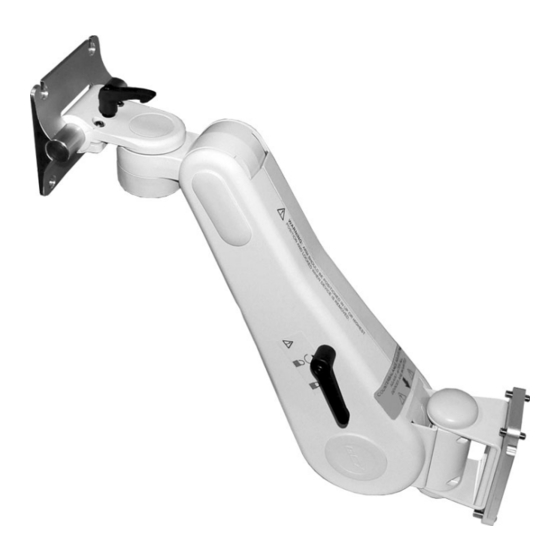
WS-0004-59 (40 lb/18.1 kg Max. Weight) & WS-0004-61 (30 lb/13.6 kg Max. Weight)
in Combination with Folding "L" Flat Panel/Keyboard Bracket FLP-0008-41
The purpose of thi s guide i s to:
•
Describe parts contained within this k it (page 2).
•
Describe installing Adjustable Stop (page 3).
•
Describe installing VHM A rm (page 3).
•
Describe attaching Folding L-Brack et and Keyboard Tray (page 4).
•
Describe attaching Display Mount to Display (page 5).
•
Describe attaching Display Mount to L-Brack et (page 5).
•
Describe Mouse House installation (page 6).
•
Describe Cautions, Warnings, Adjustments, and Cleaning (page 6-10).
Tool s Required:
•
Phillips Screwdriver (not provided).
•
Hex Wrenches – 3mm, 1/8", 5/32" (provided).
•
1/2" Socket Wrench (provided).
•
3/4" Socket Wrench (not provided).
Installation & Operation Manual
VHM™ Series Arms with Fixed Angle Front End
DU-WS-0004-59 Rev A 6/15/11 GCX Corp. Page 1 of 9
Advertisement

Subscribe to Our Youtube Channel
Related Manuals for GCX VHM Series


Summary of Contents for GCX VHM Series
- Page 1 3875 Cypress Drive Petaluma, CA 94954 800.228.2555 707.773.1100 Fax 707.773.1180 www.gcx.com Installation & Operation Manual VHM™ Series Arms with Fixed Angle Front End WS-0004-59 (40 lb/18.1 kg Max. Weight) & WS-0004-61 (30 lb/13.6 kg Max. Weight) in Combination with Folding “L” Flat Panel/Keyboard Bracket FLP-0008-41 The purpose of thi s guide i s to: •...
- Page 2 Installation Note: Assembly and Installation of this VHM wall mount kit should be followed in the sequence listed in this Installation Guide. Please read this Installation Guide prior to installing or using this product. DU-WS-0004-59 Rev A 6/15/11 GCX Corp. Page 2 of 9...
- Page 3 1. Guide the Slide (rear of Arm) into top of the Channel and lower Arm to desired height. Tighten the (4) Set Screws with 1/8" hex wrench to secure position. Slide Tighten the (4) Set Screws with 1/8” Hex Wrench DU-WS-0004-59 Rev A 6/15/11 GCX Corp. Page 3 of 9...
- Page 4 VHM Arm (2) 1/4-28 x 3/4" FHSCS Attaching Keyboard Tray (not supplied) to Folding L-Bracket 1. Install Keyboard Tray in accordance with separate Installation Guide supplied with Key board tray. DU-WS-0004-59 Rev A 6/15/11 GCX Corp. Page 4 of 9...
- Page 5 Tighten Adjustment Knob until Display Mount does not move. Press protective cover onto the 5/16” locknut. Nylon Washer Flat Washer 5/16” Locknut 1/2"-13mm Socket Wrench (supplied) Display Mount Adjustment Knob Flat Washer Nylon Washer Protective Cap DU-WS-0004-59 Rev A 6/15/11 GCX Corp. Page 5 of 9...
- Page 6 Arm. Counterbalance Adjuster Bolt 1/2” [13mm] Socket Wrench Adjuster Cover CW Decreases Force 4. Close the Adjuster Cover DU-WS-0004-59 Rev A 6/15/11 GCX Corp. Page 6 of 9...
- Page 7 1. To adjust the height of the display, support the display and loosen the adjustment knob. Move the display to desired location and tighten adjustment knob to secure position. Adjustment Knob DU-WS-0004-59 Rev A 6/15/11 GCX Corp. Page 7 of 9...
- Page 8 • Cable Retainers (2) are provided behind the Folding Keyboard Bracket (below center) for routing keyboard and mouse cables. • Nylon Cable Ties (2) (below right ) are provided for bundling cables together if desired. Cable Ties (2) Cable Guides (2) Cable Clips (2) DU-WS-0004-59 Rev A 6/15/11 GCX Corp. Page 8 of 9...
- Page 9 Cleaning the Mounting Assembly CAUTION: GCX makes no claims regarding the efficacy of the listed chemicals or processes as a means for controlling infection. Consult your hospital’s infection control officer or epidemiologist. To clean or sterilize mounted instrument s or accessory equipment, refer to the specific instructions delivered with those products.
Need help?
Do you have a question about the VHM Series and is the answer not in the manual?
Questions and answers