Advertisement
Quick Links
3875 Cypress Drive Petaluma, CA 94954 • 800.228.2555 • +1.707.773.1100 • Fax 707.773.1180 • www.gcx.com
8.26lbs
3.75 kg
Max Weight
Warning: This mounting kit provides the appropriate hardware for its intended mounting application. It is the
responsibility of the installer of this product to ensure that all screws used to secure the ambulance mount have a
minimum thread engagement of three (3) 360˚ turns past the polyamide insert in the lock nuts, this will prevent the screws
from backing off or loosening from any vibration.
Failure to adhere to this warning could result in damage to equipment or injury to patients/personnel.
Parts Reference
The following parts and hardware are included in this installation kit:
Item #
Description
1
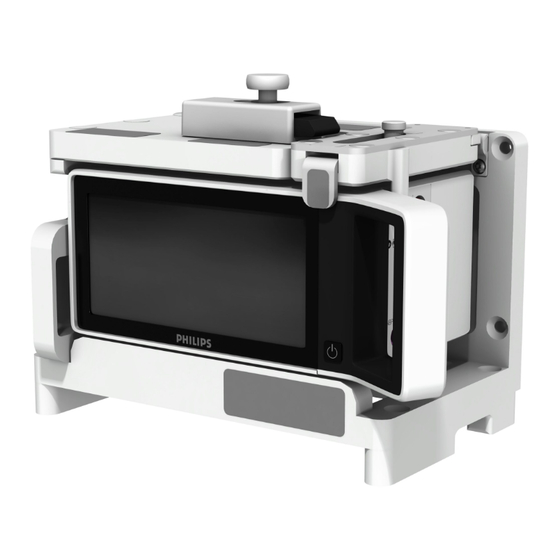
IntelliVue X3 Ambulance Mount
2
Power Cord Bracket
3
10-32 X 1/2" Flat Head Machine Screw (FHMS)
4
M6 X 40 Flat Head Machine Screw (Not Shown)
5
M6 X 70 Flat Head Machine Screw (Not Shown)
6
M6 X 1 Nylon Lock Nut (Not Shown)
7
3/4" X 1/4 X .90" Thick Washer (Not Shown)
8
M4 X 20mm Flat Head Machine Screw (Not Shown)
Tools Required:
Phillips Screwdriver (Not provided)
Power Drill (Not provided)
8mm Drill Bit (Not provided)
Installation Guide
IntelliVue X3 Ambulance Mount
Qty.
1
1
1
4
4
4
4
2
2
DU-PH-0062-87 Rev A 7/14/2020 GCX Corp Page 1 of 8
1
3
Advertisement

Related Manuals for GCX IntelliVue X3


Summary of Contents for GCX IntelliVue X3
- Page 1 3875 Cypress Drive Petaluma, CA 94954 • 800.228.2555 • +1.707.773.1100 • Fax 707.773.1180 • www.gcx.com Installation Guide IntelliVue X3 Ambulance Mount 8.26lbs 3.75 kg Max Weight Warning: This mounting kit provides the appropriate hardware for its intended mounting application. It is the responsibility of the installer of this product to ensure that all screws used to secure the ambulance mount have a minimum thread engagement of three (3) 360˚...
- Page 2 Metric Fasteners mounting surface on the 3/4 X 1/4 X .090” Flat Washer (4) ambulance that the out- M6 X 1 Nylon Lock Nut (4) of-hospital mount will be fastened to. DU-PH-0062-87 Rev A 7/14/2020 GCX Corp Page 2 of 8...
- Page 3 8.941” / 277.1mm Wall/ Ambulance support 4” / 101.6mm plate/ Adapter plate. DU-PH-0062-87 Rev A 7/14/2020 GCX Corp Page 3 of 8...
- Page 4 GCX To begin the installation, make sure the latch is in the Slide the IntelliVue X3 Dock by sliding from right to upward position as shown above. Failure to correctly left. Make sure the Dock slides smoothly and sits position the latch will result in in-proper installation.
- Page 5 No need to open the release button, while closing the latch. DU-PH-0062-87 Rev A 7/14/2020 GCX Corp Page 5 of 8...
- Page 6 GCX its handle across to release the connection To release the Philips IntelliVue X3, Monitor from the To install the Philips IntelliVue X3 to an extension, Dock, press the release button on the top of the please follow the X3 / MX100 instruction for use ambulance mount while simultaneously pulling the (provided with the device).
- Page 7 “Click” To increase the length of the latch, pull back the knob To install the IntelliVue X3 with the extension to the dock on the ambulance mount, slide the monitor from and move the slider from point A to point B. To...
- Page 8 Dry the assembly thoroughly after cleaning. CAUTION: GCX makes no claims regarding the efficacy of the listed chemicals or processes as a means for controlling infection. Consult your hospital’s infection control officer or epidemiologist. To clean or sterilize mounted devices or accessory equipment, refer to the specific instructions delivered with those products.
Need help?
Do you have a question about the IntelliVue X3 and is the answer not in the manual?
Questions and answers