GCX M Series Assembly Installation Manual
Wall mount kit for welch allyn connex vsm 6000 series and vsm 300 series monitors
Hide thumbs
Also See for M Series:
- Installation manual (4 pages) ,
- Mounting assembly installation manual (3 pages) ,
- Installation & operating manual (3 pages)
Advertisement
Available languages
Available languages
Quick Links
3875 Cypress Drive, Petaluma, CA 94954 800.228.2555 707.773.1100 Fax 707.773.1180 www.gcx.com
GCX Mounting Assembly Installation Guide
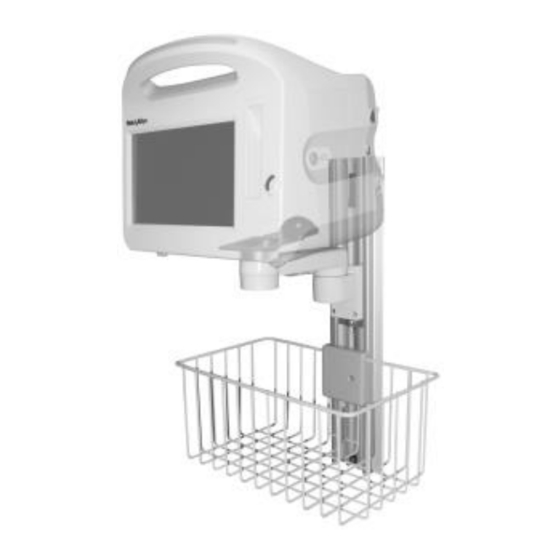
M-Series Wall Mount Kit for Welch Allyn® Connex® VSM 6000 Series
and VSM 300 Series Monitors
The purpose of this guide is to describe installation of the Wall Mount Kit.
Parts Reference
The parts list below includes parts and hardware that will be used in this installation procedure (hardware not shown).
Item # Description
Wall Channel Kit, 19" (includes instructions – not shown)
1
M-Series Arm with Mounting Adapter, 8"
2
3
Utility Basket
4
Adjustable Stop
18" Strap, Hook and Loop (not shown)
5
1/8" Hex Wrench (not shown)
6
Wall Channel Cover, 16" (includes instructions – not shown)
7
Tools Required: Phillips screwdriver (not provided), 1/2 in. socket wrench (not provided), 1/8 in. hex wrench (provided).
Installing the Wall Mount Kit
1. Install the Wall Channel in accordance with the GCX Wall Channel Kit Installation Instructions (DU-WC-0002).
2. Insert one (1) Adjustable Stop in the top of Channel and let it slide to rest against the Fixed Stop at bottom of the
Channel (left photo below).
3. Install the Utility Basket by inserting the Slide (on the back of the Basket) into the top of the Channel and sliding the
Basket to the desired mounting position (center photo below). Using the 1/8 in. hex wrench, tighten the Set Screw to
secure the Basket in position. Slide the Adjustable Stop up the Channel to the bottom of Basket Slide and tighten the
center screw in the Adjustable Stop.
4. Insert the remaining Adjustable Stop in the Channel and let it slide to the top of the Basket Slide (right photo below).
80021997 Ver. B, 2017-04
Adjustable Stop
Tighten Set Screw
Adjustable Stop #1
Quantity
VSM300
VSM6000
Series
Series
1
1
1
2
2
0
1
1
Adjustable Stop #2
Tighten Knob
DU-WA-0016-01 Rev B 4/18/17 GCX Corp Page 1 of 4
2
VSM 300
VSM 6000
3
4
Advertisement

Related Manuals for GCX M Series


Summary of Contents for GCX M Series
- Page 1 Installing the Wall Mount Kit 1. Install the Wall Channel in accordance with the GCX Wall Channel Kit Installation Instructions (DU-WC-0002). 2. Insert one (1) Adjustable Stop in the top of Channel and let it slide to rest against the Fixed Stop at bottom of the Channel (left photo below).
- Page 2 (2) Hook and Loop Straps. one (1) Hook and Loop Strap. 8. Install the Wall Channel Cover in accordance with the Channel Cover Installation Guide (DU-UT-0001-20). 80021997 Ver. B, 2017-04 DU-WA-0016-01 Rev B 4/18/17 GCX Corp Page 2 of 4...
- Page 3 Dry the arm thoroughly after cleaning. CAUTION: GCX makes no claims regarding the efficacy of the listed chemicals or processes as a means for controlling infection. Consult your hospital’s infection control officer or epidemiologist. To clean or sterilize mounted instruments or accessory equipment, refer to the specific instructions delivered with those products.
- Page 4 CAUTION Position the wall mount so that the screen, controls, and connectors are accessible and support optimal and ergonomic use of the device. Periodic maintenance: Visually inspect the mounting screws on the wall mount monthly for looseness and wear. 80021997 Ver. B, 2017-04 DU-WA-0016-01 Rev B 4/18/17 GCX Corp Page 4 of 4...
- Page 5 1/8"-Sechskantstiftschlüssel (mitgeliefert). Installieren des Kits für die Wandmontage 1. Installieren Sie die GCX-Profilschiene gemäß der Installationsanleitung des GCX-Wandhalterungssets (DU-WC-0002). 2. Führen Sie einen (1) verstellbaren Anschlag an der Oberseite des Kanals ein und schieben Sie ihn bis zum festen Anschlag an der Unterseite des Kanals (Foto links unten).
- Page 6 Montage des großen Netzteils mit Montage des kleinen Netzteils mit zwei (2) Klettverschlussgurten. einem (1) Klettverschlussgurt. 8. Installieren Sie die Wandkanalabdeckung gemäß Installationsanleitung (Channel Cover Installation Guide, DU-UT-0001-20). 80021997 Ver. B, 2017-04 DU-WA-0016-01 Rev B 18.04.17 GCX Corp Seite 2 von 4...
- Page 7 Reinigungsmittel umgehend mit einem mit Wasser angefeuchteten Tuch ab. Trocknen Sie den Arm nach der Reinigung gründlich ab. VORSICHT: GCX erhebt keine Ansprüche in Bezug auf die Wirksamkeit der aufgeführten chemischen Stoffe oder Verfahren zur Kontrolle von Infektionen. Für Informationen dazu wenden Sie sich bitte an den für Infektionskontrolle verantwortlichen Mitarbeiter oder Epidemiologen in Ihrem Krankenhaus.
- Page 8 ACHTUNG Bringen Sie die Wandhalterung so an, dass der Bildschirm, Bedienelemente und Anschlüsse zugänglich sind und die optimale und ergonomische Nutzung des Geräts unterstützen. Regelmäßige Wartung: Monatliche Sichtprüfung der Befestigungsschrauben der Wandhalterung auf festen Sitz und Abnutzung. 80021997 Ver. B, 2017-04 DU-WA-0016-01 Rev B 18.04.17 GCX Corp Seite 4 von 4...
- Page 9 1/8 pulg. (incluida). Instalación del kit de soporte de pared 1. Instale la canaleta de pared de acuerdo con las Instrucciones de instalación del kit de canaleta de pared GCX (DU-WC-0002). 2. Introduzca un (1) tope ajustable en la parte superior del canal y deslícelo para que descanse sobre el tope fijo en la parte inferior del canal (se muestra en la imagen de la izquierda).
- Page 10 (1) correa con cierre. cierre. 8. Instale la tapa del canal de pared de acuerdo con la guía de instalación de la tapa del canal (DU-UT-0001-20). 80021997 Ver. B, 2017-04 DU-WA-0016-01 Rev. B 4/18/17 GCX Corp Página 2 de 4...
- Page 11 Seque el brazo completamente después de la limpieza. PRECAUCIÓN: GCX no asegura la eficacia de los productos químicos o los métodos enumerados como medio de control de infecciones. Consulte con el especialista en control de infecciones del hospital o con el epidemiólogo. Para limpiar o esterilizar los dispositivos montados o accesorios, consulte las instrucciones específicas de cada producto.
- Page 12 óptima y ergonómica. Mantenimiento periódico: inspeccione visualmente los tornillos de montaje del soporte de pared una vez al mes por si estuvieran sueltos o desgastados. 80021997 Ver. B, 2017-04 DU-WA-0016-01 Rev. B 4/18/17 GCX Corp Página 4 de 4...
-
Page 13: Référence Des Pièces
Installation du kit de montage mural 1. Poser le rail mural conformément aux Instructions de pose du rail mural GCX (DU-WC-0002). 2. Insérez une (1) butée réglable en haut du canal et laissez-la glisser afin qu'elle repose sur la butée fixe en bas du canal (photo de gauche ci-dessous). - Page 14 (2) sangles de type boucle et une (1) sangle de type boucle et crochet. crochet. 8. Installez le couvercle du canal mural conformément au Manuel d'installation du couvercle du canal (DU-UT-0001-20). 80021997 Ver. B, 2017-04 DU-WA-0016-01 Rév B 4/18/17 GCX Corp Page 2 \ 4...
- Page 15 Séchez le bras soigneusement après le nettoyage. ATTENTION : GCX n'affirme aucunement que les produits ou procédés indiqués soient des moyens de prévention des infections. Consulter le responsable de la prévention des infections ou l'épidémiologiste de l'hôpital. Pour nettoyer ou stériliser les appareils ou le matériel accessoire montés, consulter les instructions fournies avec ces produits particuliers.
- Page 16 Maintenance périodique : inspectez visuellement les vis de montage sur le montage mural une fois par mois, pour détecter des problèmes de serrage et des signes d'usure. 80021997 Ver. B, 2017-04 DU-WA-0016-01 Rév B 4/18/17 GCX Corp Page 4 \ 4...
- Page 17 Installazione del kit per il montaggio a parete 1. Installare la guida a parete secondo le istruzioni di installazione del kit della guida a parete GCX (DU-WC-0002). 2. Inserire un (1) fermo regolabile nella parte superiore del canale e farlo scorrere fino al fermo fisso presente alla fine del canale (foto a sinistra riportata di seguito).
- Page 18 8. Installare la copertura del canale a parete come da istruzioni riportate nella Channel Cover Installation Guide (DU-UT-0001-20) (Guida all'installazione della copertura del canale). 80021997 Ver. B, 2017-04 DU-WA-0016-01 Rev B 4/18/17 GCX Corp Pagina 2 di 4...
- Page 19 Dopo la pulizia, asciugare con cura il braccio. ATTENZIONE: la GCX non entra nel merito dell'efficacia delle sostanze chimiche o dei procedimenti indicati come mezzi di controllo delle infezioni. Per questo, rivolgersi all'epidemiologo o al responsabile del controllo delle infezioni ospedaliere.
- Page 20 Manutenzione periodica: ispezionare visivamente le viti di montaggio del supporto a parete ogni mese per verificarne il serraggio e l'usura. 80021997 Ver. B, 2017-04 DU-WA-0016-01 Rev B 4/18/17 GCX Corp Pagina 4 di 4...
Need help?
Do you have a question about the M Series and is the answer not in the manual?
Questions and answers