Advertisement
4. Adjustment
Push or pull from the top or bottom of the screen to obtain the desired angle.
5. Install curved TV
VESA HOLE
400*400VESA
NOTE:To install curved TV,please use "M8*30 screw+big spacer(15mm) or big&small(20mm) Spacer together"
NOTE:To install curved TV,please use "M8*50 screw+big&big spacer(30mm) or big&big&small spacer(35mm)
or big&big&small&small(40mm) Spacer together"
M8x30MM Screw+ M8x15MM Spacer or M8x20MM Spacer
M8x50MM Screw+ M8x30MM Spacer or M8x35MM Spacer or M8x40MM Spacer
M-D
or
M-D
or
M-F
M-F
M-G
M-H
M-H
Maintenance
• Check that the bracket is secure and safe to use at regular intervals(at least every three months).
• Please contact your dealer if you have any questions.
7
5°
-15°
WALL
VESA Horizontal LINE
Curved TV
The curved deepth is aroud 10~15mm from VESA horizontal line.
M-E
or
M-E
or
M-F
M-F
M-G
M-G
M-H
M-H
M-E
M-F
M-H
200x200/300x300
400x200/400x400
INSTALLATION MANUAL
Tilting Wall Mount
CAUTION:
LISTED WEIGHT CAPACITY. SERIOUS
INJURY OR PROPERTY DAMAGE MAY
OCCUR!
55"
MAX
DO NOT EXCEED RATED
50kg
50kg
(110lbs)
(110lbs)
RATED
RATED
Advertisement
Table of Contents

Related Manuals for Displays2go LM3255TLT


Summary of Contents for Displays2go LM3255TLT
- Page 1 INSTALLATION MANUAL 4. Adjustment Tilting Wall Mount 5° -15° Push or pull from the top or bottom of the screen to obtain the desired angle. 5. Install curved TV WALL VESA HOLE VESA Horizontal LINE 400*400VESA Curved TV The curved deepth is aroud 10~15mm from VESA horizontal line. NOTE:To install curved TV,please use "M8*30 screw+big spacer(15mm) or big&small(20mm) Spacer together”...
- Page 2 Component Checklist NOTE: Read the entire instruction manual before you start installation and assembly. IMPORTANT: Ensure that you have received all parts according to the component checklist prior to installation. If any parts are missing or faulty, telephone your local distributor for a replacement. WARNING •...
- Page 3 1a. Wood Stud Wall Mounting 1b. Solid Brick and Concrete Mounting 55mm 55mm 60mm 60mm (2.2") (2.2" ) (2.4") (2.4") ø 4.5mm ø 10mm (ø 3/16") (ø 3/8" ) Find and mark the exact Mark the exact location of mounting holes location of mounting holes Drill pilot holes...
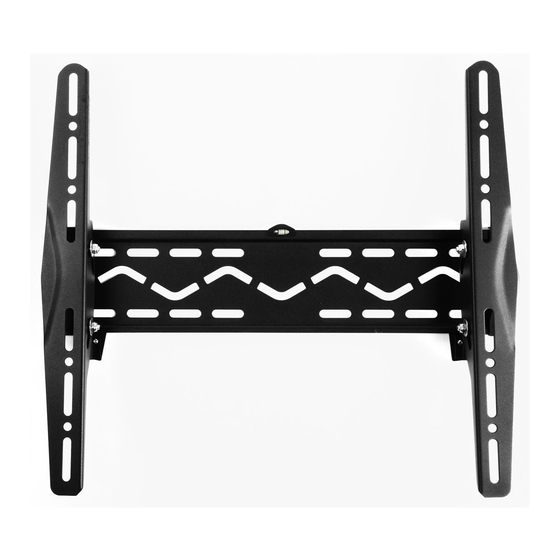
- Page 4 2. Installing the Adapter Brackets 2-2 For Recessed Back Screen or to Access A/V Inputs Top of theTV 2-1 For Flat Back Screen Note: Choose appropriate screws, washers and spacers (if necessary) according to the type of screen. · Position the adapter brackets as close as possible to the center of the TV. ·...
Need help?
Do you have a question about the LM3255TLT and is the answer not in the manual?
Questions and answers