Advertisement
Quick Links
Aspire
®
Replacement of Gears in Folding
Table Center Mechanism
Tools Required
Flat Head Screwdriver
Rubber Mallet
Electric Screwdriver
with #4 Hex Drive
Package Contents
2 Gear (Left and Right)
2 Location Pin
Installation
Note: These instructions provide basic information for
installing replacement gears in the folding table center
mechanism. For safety purposes and to avoid damage and/or
injury, it is recommended that two or more persons be used
to move the wood tops, and that the wood tops be removed/
installed with the base in the upright position.
Note: If a gear is being replaced at the end of the table, it will
not be necessary to remove the center heart mechanism as
outlined in steps 3, 4, 5, and 6. Follow steps 1 and 2, but
modify to remove the top only from the side that is being
replaced. Table will still need to be in folded position as per
step 2, but you will only be required to remove leg on one side
to replace gear. Continue with steps 7 through 17 as they apply
to this situation.
Note: For ease of replacement and re-assembly, gears should
only be replaced one side at a time. Determine which gear(s)
is/are damaged before starting repairs.
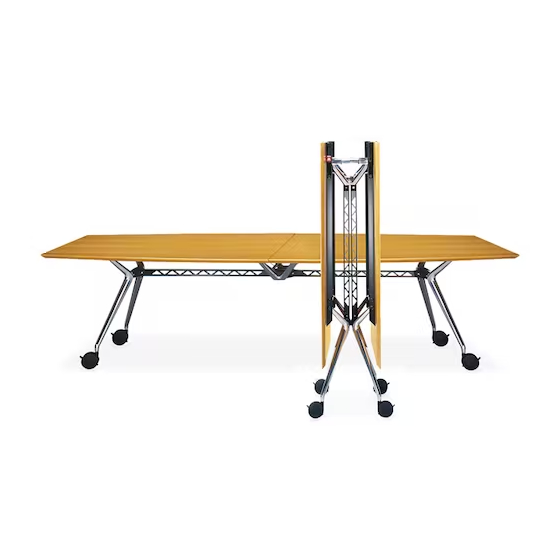
1. Make sure table is fully open and locked. Use the electric
screwgun with #4 hex bit to remove screws holding
worksurfaces to table frame. Save all removed screws.
(Reference Aspire Assembly Instruction: "Mount Wood
Top to Table Base Understructure"). Carefully remove
worksurfaces from frame and set aside. Unlock frame and
move to fully folded position. (Figure A).
Proper product installation, in accordance with these instructions, is the responsibility of the installing agent.
If you have any questions concerning these instructions, please call Kimball Office Customer Care.
Part No. 1741509 Revision A-05
Long-Nose Pliers
Set of metric Allen Wrenches
Lubriplate, Vaseline, or
other similar lubricant
2 Pivot Ring
1 Male/Female Fastener
Tables Assembly Instructions
2. Use the long-nose pliers to remove the clevis pin from one
of the turnbuckles attached to the "H" bracket at the
bottom of the frame. Remove one of the springs from the
"H" bracket. Loosening these items removes tension from
the cables that pass through the center mechanism.
(Figure B).
Figure A
Remove worksurfaces
Figure B
Loosen retention
cable by removing
clevis pin
"H" Bracket
Unhook
spring
Page 1 of 5
Fold frame
Advertisement

Related Manuals for Kimball Office Aspire Table


Summary of Contents for Kimball Office Aspire Table
- Page 1 (Figure A). Proper product installation, in accordance with these instructions, is the responsibility of the installing agent. If you have any questions concerning these instructions, please call Kimball Office Customer Care. Part No. 1741509 Revision A-05...
- Page 2 Proper product installation, in accordance with these instructions, is the responsibility of the installing agent. If you have any questions concerning these instructions, please call Kimball Office Customer Care. Part No. 1741509 Revision A-05...
- Page 3 Insert new pivot ring into new gear Proper product installation, in accordance with these instructions, is the responsibility of the installing agent. If you have any questions concerning these instructions, please call Kimball Office Customer Care. Part No. 1741509 Revision A-05...
- Page 4 Re-install set screws Proper product installation, in accordance with these instructions, is the responsibility of the installing agent. If you have any questions concerning these instructions, please call Kimball Office Customer Care. Part No. 1741509 Revision A-05...
- Page 5 Re-attach rails and all fasteners Proper product installation, in accordance with these instructions, is the responsibility of the installing agent. If you have any questions concerning these instructions, please call Kimball Office Customer Care. Part No. 1741509 Revision A-05...
Need help?
Do you have a question about the Aspire Table and is the answer not in the manual?
Questions and answers