Table of Contents
Advertisement
TABLE OF CONTENTS
TABLE OF CONTENTS.........................................................................................................1
IMPORTANT SAFETY WARNINGS......................................................................................3
LETTER OF INTRODUCTION...............................................................................................4
SPA RECORD KEEPING INFORMATION............................................................................5
IMPORTANT SAFETY INSTRUCTIONS...............................................................................6
DOS AND DON'TS............................................................................................................8
HYPERTHERMIA..............................................................................................................8
SWIM SPA INSTALLATION..................................................................................................9
SITE AND POSITIONING..................................................................................................9
OUTDOOR INSTALLATION.............................................................................................10
INDOOR INSTALLATION.................................................................................................10
SWIM SPA SYSTEM COMPONENTS.................................................................................12
SWIM SPA COMPONENTS.................................................................................................13
JETS AND AIR CONTROLS...............................................................................................14
JETS.............................................................................................................................14
CLEANING AND REPLACING JETS............................................................................14
ELECTRICAL INFORMATION............................................................................................15
ELECTRICAL CONNECTIONS....................................................................................16
START UP PROCEDURES.................................................................................................19
PRIMING YOUR SWIM SPA...........................................................................................19
OPERATING INSTRUCTIONS............................................................................................20
CONTROL PANEL TYPES AND MODELS (in.k1000)....................................................20
CONTROL PANEL OPERATION....................................................................................20
Power...........................................................................................................................20
Main Screen.................................................................................................................20
Start or Stop Accessories.............................................................................................21
Notifications..................................................................................................................21
Water Temperature.......................................................................................................22
In-Fit Exercise Pools
1
Advertisement
Table of Contents

Related Manuals for L.A. Spas In-Fit 13 SL

Summary of Contents for L.A. Spas In-Fit 13 SL
-
Page 1: Table Of Contents
TABLE OF CONTENTS TABLE OF CONTENTS......................1 IMPORTANT SAFETY WARNINGS..................3 LETTER OF INTRODUCTION....................4 SPA RECORD KEEPING INFORMATION................5 IMPORTANT SAFETY INSTRUCTIONS................6 DOS AND DON'TS......................8 HYPERTHERMIA......................8 SWIM SPA INSTALLATION....................9 SITE AND POSITIONING....................9 OUTDOOR INSTALLATION.....................10 INDOOR INSTALLATION....................10 SWIM SPA SYSTEM COMPONENTS.................12 SWIM SPA COMPONENTS....................13 JETS AND AIR CONTROLS....................14 JETS..........................14 CLEANING AND REPLACING JETS................14... - Page 2 Home Page........................22 Settings........................22 Water Care........................23 Water Care Modes.......................23 Modifying Schedules....................24 Maintenance........................24 Error Log........................25 Set Date & Time......................25 Keypad Settings......................26 Electrical Configuration....................26 About..........................26 WiFi..........................27 FEATURE OPERATIONS....................28 JET SELECTOR VALVES....................28 AIR CONTROL VALVES....................28 WATER FEATURE/WATERFALL CONTROL VALVES..........28 in.stream2 AUDIO SYSTEM..................28 in.touch SYSTEM......................28 in.touch BASIC SET-UP INSTRUCTIONS.................29 MAINTENANCE........................31 WATER CHEMISTRY.....................31...
-
Page 3: Important Safety Warnings
IMPORTANT SAFETY WARNINGS SAVE THESE INSTRUCTIONS NOTE: When installing and using this equipment, basic safety precautions should always be taken to reduce the risk of electrical shock, to ensure safe usage, and to safeguard the user’s health. Failure to follow instructions and warnings contained in this Owner’s Manual, in the Swim Spa Installation Guide, and on the swim spa itself may result in severe personal injury, including death, as well as property damage. -
Page 4: Letter Of Introduction
LETTER OF INTRODUCTION Dear Valued Customer: Congratulations! On behalf of the entire L.A. Spas family, thank you for your decision to purchase one of our products. The following pages contain valuable and helpful information for the care and safe opera- tion of your new spa. -
Page 5: Spa Record Keeping Information
SPA RECORD KEEPING INFORMATION Serial Number Location The serial number is located in the lower right corner of the equipment access panel on the front of the swim spa. PLEASE FILL IN THE INFORMATION BELOW Spa Information: Model _________________ Color __________________ Serial No. __________________________ Owner Information: Name __________________________________ Date of Purchase __________________________ Address __________________________________________________________________________... -
Page 6: Important Safety Instructions
IMPORTANT SAFETY INSTRUCTIONS READ AND FOLLOW ALL INSTRUCTIONS 1. WARNING - To reduce the risk of inju replace a suction fitting with one rated ry, do not permit children to use this less than the flow rate marked on the product unless they are closely super original suction fitting. - Page 7 c. Before entering a spa the user should 2. At least two lugs marked “BONDING measure the water temperature since LUGS” are provided on the external the tolerance of water temperature surface or on the inside of the supply regulating devices varies. terminal box or compartment.
-
Page 8: Dos And Don'ts
Dos and Don’ts of Spa Care: Don’t: • Use the spa at 104°F (40°C) for long periods of time (more than 30 • Save these instructions! minutes). See Hyperthermia. • Replace the cover immediately after • Use an extension cord to power your use. -
Page 9: Swim Spa Installation
SWIM SPA INSTALLATION wrap all the way around the bottom frame Danger: Electrical shock risk. Install at of the Swim spa. least 1.5m from all metal surfaces. Locate the Swim spa on a solid, level The electrical supply for this product must foundation keeping in mind the weight of include a suitably rated switch or circuit the filled Swim spa (in excess of 18,000 lb. -
Page 10: Outdoor Installation
WARNING: ACCESS TO THE Swim may cause falls and /or water spa SHOULD BE CONTROLLED IN damage. Water will splash out of the ACCORDANCE WITH ALL APPLICABLE Swim spa during normal use when NATIONAL AND LOCAL CODES. IN swimming and when exiting the SOME LOCATIONS THIS MAY INCLUDE Swim spa. - Page 11 NOTE: Reference separate swim spa installation manual during installation. Thermal Creep Your spa is manufactured with energy-effi- cient components and systems that capture heat generated by the equipment, then transfer that heat back to the spa water. In warmer weather or in situations with ex- tended run times, “Thermal Creep”...
-
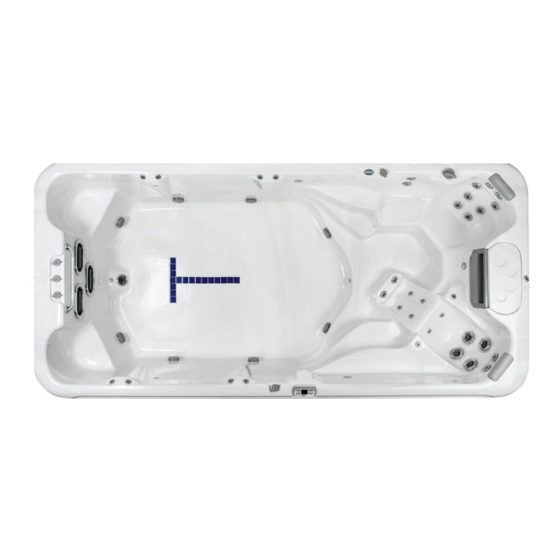
Page 12: Swim Spa System Components
SWIM SPA SYSTEM COMPONENTS A. Filter Skimmer/Weir: Removes E. Drain Access (Adjacent to the equipment service panel): Drain floating debris from the water surface, provides a water return path to faucets are located immediately behind equipment, and houses water filter the front door panel. -
Page 13: Swim Spa Components
SWIM SPA COMPONENTS Reference only. Equipment is not always as shown Note: No consumer serviceable parts. Warning and Installation Label: Contains We recommend that only an authorized important safety information, hazard service technician perform swim spa warnings and installation instructions. repair or service. -
Page 14: Jets And Air Controls
JETS AND AIR CONTROLS Swim Area Jets Note: Ozone production is stopped Swim spa jets are designed to produce a when functions are activated on control smooth flow of water with high output to panel. create a consistent swim stream. Whether you want to swim or walk/jog against the Cleaning or Replacing Jets force of the jets, you will find the flow of... -
Page 15: Electrical Information
Typical 240V GFCI (North America Only) and RCD Connections The appliance should be supplied through a residual current device (RCD) or Ground Fault Interrupter (GFCI) with a rated tripping current not exceeding 30mA. Means for disconnection must be incorporated in the fixed wiring in accordance with the wiring rules. Parts containing live voltage, except parts supplied with safety extra-low voltage not exceeding 12V, must be inaccessible to a person in the hot tub. -
Page 16: Electrical Connections
IMPORTANT INFORMATION REGARDING ELECTRICAL INSTALLATION NORTH AMERICA Equipment Type Electrical Rating Branch Circuit Circuit Break 2 pumps 240V 40A 3 wires + ground 4 pumps 240V 48A 3 wires + ground 5 pumps 240V 48A 3 wires + ground EXPORT Equipment Type Electrical Rating Branch Circuit... - Page 17 in.yj-2 connections 240V Connection (3 wires + ground) in.ye-5 connections (Export only) 230V Single-phase 230V Dual-phase* (1x32A) (2x16A) Connect jumpers Connect jumpers (brown wires) (brown wires) P7 ---> P13 P7 ---> P10 P10 ---> P74 P13 ---> P74 230V Three-Phase* 230V Three-phase* (3x16A) Delta...
- Page 18 For Dual and Three phase connections: Change to proper phase setting in the control panel. For In-Fit 13 SL, press and hold the Program Key until b32 is shown on the display. Change to the proper breaker and phase settings. For all others, see Operation Instruc- tions on how to enter the Electrical Configuration section.
-
Page 19: Start Up Procedures
START UP PROCEDURES Follow recommendations for site location 4. Add chemicals. See Chemical Treatment and electrical connection. and Water Maintenance section. Follow Operating Instructions for your particular 1. Use standard “tap water” to fill the model to set heat to the desired swim spa by draping a garden hose temperature. -
Page 20: Operating Instructions
OPERATING INSTRUCTIONS CONTROL PANEL TYPES AND MODELS in.k1000 Control Panel This easy to use control has been programmed to be “plug and play”. Turn the power on, adjust the desired temperature and the system is ready to go. If there are situations that require additional filtering time, the filter settings can be customized to any special require- ments. -
Page 21: Start Or Stop Accessories
Start or Stop Accessories To start or stop an accessory, touch the as- sociated icon. Icons will become animated when their accessory is use, animation will stop when turned off. Icons on the screen will reflect the speed or state of the devices running on your spa. -
Page 22: Water Temperature
Water Temperature The temperature shows at the bottom of the screen gives the actual water tempera- ture. Use the Up and Down icon to set the desired temperature. The set point will ap- pear in blue. After 3 seconds without any change to the set temperature value, the current water temperature will reappear. -
Page 23: Water Care
Water Care The Water Care section will help you set up your ideal filtration and heating set- tings. Choose between Away from Home, Beginner, Energy Savings, Super Energy and Weekender, depending on your need. Touch the Water care name to choose your setting. -
Page 24: Modifying Schedules
Modifying Schedules To modify a Water Care category, touch the pen at the right end of the desired watercare to open the selected Water Care menu. You can add schedules by touching the « + » symbol. To delete a schedule, touch the garbage can icon at the right end of the desired line Touch the Economy tab to change the economy setting and filter cycle tab for the... -
Page 25: Error Log
Error Log In this section you can see errors that have been archived by the system. Drag the list Up and Down to move through the list. Er- rors are archived chronologically, from the most recent to the oldest (top to bottom). The Error Log page shows the error code, the date of the error, and the time. -
Page 26: Keypad Settings
Keypad Settings Here you can adjust the Temperature Units, Day/Night contrast, and Display orientation and language. Simply touch the option you want to change. Electrical Configuration Please do not make changes in this section unless you are a qualified electrician. In this section you can change the low-level configuration, as well as modify the number of phases and the input current. -
Page 27: Wifi
Wi-Fi This menu allows you to connect your in.touch module to a Wi-Fi network or to change its network. To connect your in.touch module to a wire- less network, slide the left wheel until the desired menu icon is shown in the middle screen or press on the menu name. -
Page 28: Feature Operations
FEATURE OPERATIONS JET SELECTOR VALVES (DIVERTER VALVES) Your spa may be equipped with a jet selector valve (diverter valve). This valve can be used to divert jet power from one area in the spa to another area. This valve is fully adjustable and can be used to suit the user’s desired effect. -
Page 29: In.touch Basic Set-Up Instructions
in.touch BASIC SET-UP INSTRUCTIONS The in.touch module has a built in WiFi transceiver that allows you to communicate with your favorite devices. The following steps will show you how to connect with your spa. Set Up Download Application: in.touch world allows you in.touch home allows to use the Internet anywhere you to control your spa... - Page 30 The following instructions are for iOS users only: Configuration (iOS Users Only) 1. Go to Settings in the in.touch app and select WiFi Connection. 2. Choose the network that you want your spa to connect to (i.e. your home WiFi). If the network has a passcode, enter it when prompted.
-
Page 31: Maintenance
MAINTENANCE Water Chemistry pH Level Water chemistry is critical in a swim spa pH is the balance of acidity and alkalinity in system. Chemicals are used to sanitize the water. Maintaining proper pH is import- the water an control the pH balance. The ant for the effectiveness of your sanitizer, for combination of high water temperature and user comfort and to prevent corrosion of the... -
Page 32: Sanitizing With Ozone
cals provides you with cleaner, healthier swim spa water. water, reduced chemical usage, and Draining your Swim Spa protects your skin from chemically induced irritation. NOTE: Always turn the circuit breaker off when you drain your swim spa. Do Sanitizing with Ozone not turn the spa heater back on until you have full flow coming from the jets Swim spas vary in size, and frequency and... -
Page 33: Filter Maintenance
NOTE: Do NOT attempt to use the swim time, it is best to operate the heater at spa pump to drain the spa. the maximum high temperature to 104ºF NOTE: Close and replace caps on all (40ºC), especially if there is a power drains prior to refilling the swim spa. -
Page 34: Swim Spa Cabinet Care
7. For further information on blowing out the Protect Swim spa finish - plumbing lines and winterizing always keep cover on the swim spa procedures, contact your local dealer. when not in use. Swim Spa Cabinet Care The cabinets are made of a high quality Underwater LED Lights alternative to wood that is virtually The underwater LED light assemblies are... -
Page 35: Keeping Your Water Clean & Safe
WARRANTY SERVICE INFORMATION Your L.A. Spas warranty gives you specific coverage. Be sure you read your warranty carefully and return your completed warranty card to your L.A. Spas dealer upon comple- tion of installation. -
Page 36: Troubleshooting
TROUBLESHOOTING HEATING SYSTEM Symptom Problem Corrective Action Spa water cold / spa not 1. Temperature setting is 1. Increase temperature heating not at user select. Power reset caused default setting 2. Reset to standard mode. 2. Spa in economy mode 3. - Page 37 WATER SYSTEM Symptom Problem Corrective Action Pulsating jets 1. Water level low 1. Fill with water to 5” (13cm) below the top of spa 2. Dirty filters 2. Clean filters 3. Filter intake / pump 3. Remove obstruction intake restricted 4.
- Page 38 ERROR MESSAGES Message Corrective Action Hardware error was detected (Ther- Reset power to spa. Check for operations of all mal fuse) pumps and accessories. If error code remains, call for service. High Limit circuit has tripped! DO NOT ENTER WATER. Add cold water to spa and let the heater cool down, reset power to spa.
- Page 39 ERROR CODES Error Code Description Corrective Action A hardware error was detected in Reset power to spa. Check for the control pack. operations of all pumps and accessories. If error code remains, call for service. The high limit circuit has tripped. DO NOT ENTER WATER.
-
Page 40: Wiring Diagrams
WIRING DIAGRAMS In.ye-3 control pack: Electrician: To determine which control pack is used, review white sticker containing bar code on control system inside of spa cabinet. No user serviceable parts. All connections must be made by a qualified, licensed electrician. In-Fit Exercise Pools... - Page 41 In.ye-3 CE control pack: Electrician: To determine which control pack is used, review white sticker containing bar code on control system inside of spa cabinet. No user serviceable parts. All connections must be made by a qualified, licensed electrician. In-Fit Exercise Pools...
- Page 42 In.ye-5 control pack: Electrician: To determine which control pack is used, review white sticker containing bar code on control system inside of spa cabinet. No user serviceable parts. All connections must be made by a qualified, licensed electrician. In-Fit Exercise Pools...
- Page 43 In.ye-5 CE control pack: Electrician: To determine which control pack is used, review white sticker containing bar code on control system inside of spa cabinet. No user serviceable parts. All connections must be made by a qualified, licensed electrician. In-Fit Exercise Pools...
- Page 44 In.yt-7 control pack: Electrician: To determine which control pack is used, review white sticker containing bar code on control system inside of spa cabinet. No user serviceable parts. All connections must be made by a qualified, licensed electrician. In-Fit Exercise Pools...
- Page 45 In.yt-7 CE control pack: Electrician: To determine which control pack is used, review white sticker containing bar code on control system inside of spa cabinet. No user serviceable parts. All connections must be made by a qualified, licensed electrician. In-Fit Exercise Pools...
- Page 46 In.yt-12 control pack: Electrician: To determine which control pack is used, review white sticker containing bar code on control system inside of spa cabinet. No user serviceable parts. All connections must be made by a qualified, licensed electrician. In-Fit Exercise Pools...
Need help?
Do you have a question about the In-Fit 13 SL and is the answer not in the manual?
Questions and answers