Bosch D1260 Owner's Manual
Bosch owners manual security systems d1260, d1260b
Hide thumbs
Also See for D1260:
- Owner's manual (154 pages) ,
- User manual (76 pages) ,
- Installation manual (20 pages)
Table of Contents
Advertisement
Quick Links
Advertisement
Table of Contents

Related Manuals for Bosch D1260


Summary of Contents for Bosch D1260
- Page 1 D1260/D1260B Owner's Manual Keypad National Security Systems Inc (800)457-1999...
-
Page 2: Table Of Contents
D1260/D1260B | Owner's Manual This system includes a telephone line seizure feature. The system may be programmed to communicate with a central monitoring station to report system events. You will not be able to use your phone while the system is communicating with the central monitoring station. In the unlikely event that the central station is not able to receive the report, your phone may be unavailable for up to 20 minutes while the panel makes additional communication attempts. - Page 3 Using Print Log ...65 Using Display Rev ...65 Using Service Walk Test ...65 Bosch Security Systems | 9/04 | 50410D D1260/D1260B | Owner's Manual | Contents Using Default Text ... 66 Using Setup ... 66 Part IV: Multi-Area Use... 68...
- Page 4 D1260/D1260B | Owner's Manual Contents User (Token) Worksheet (User 227 to 249) (101-249 = D9412G only) ...91 User (Passcode) Worksheet (Blank) ...92 User (Token) Worksheet (Blank)...93 Security System Limitations...93 Fire Safety and Evacuation ...94 Standard Displays ...95 System Trouble Displays...96 Security System Glossary ...98...
-
Page 5: Introduction
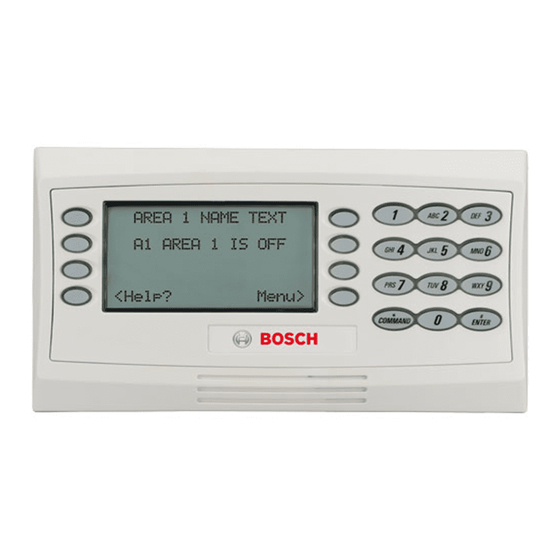
“soft keys”). Figure 1: D1260/D1260B front panels 1 - LCD Display 2 - Digital Keypad Bosch Security Systems | 9/04 | 50410D D1260B Soft Keys 4 - Keypad Function Keys D1260/D1260B | Owner's Manual | Contents D1260... -
Page 6: About This Owner's Manual
D1260/D1260B | Owner's Manual | Introduction - About This Owner’s Manual The numeric keypad section is a standard 3x4-keypad matrix that should be very familiar to you. It has been designed to closely resemble that of a standard telephone with the numeric keys of 1-0; and * and # keys. -
Page 7: Part I: Security System Basics
EXIT Previous Next Bosch Security Systems | 9/04 | 50410D D1260/D1260B | Owner's Manual | Part I: Security system basics Pressing the soft key adjacent to the function being displayed initiates the function. To exit the Command Menu, press the Use the Command Menu to locate functions you don’t... -
Page 8: Points
D1260/D1260B | Owner's Manual | Part I: Security system basics - Points Points What is a Point? A “point” is a detection device, or group of devices connected to your security system. Points display individually at the keypad with custom text. The text can describe a single door, motion sensor, smoke detector, or an area such as UPSTAIRS or GARAGE. -
Page 9: View Faulted Or Bypassed Points
D1260/D1260B | Owner's Manual | Part I: Security system basics - View Faulted or Bypassed Points This manual uses the default idle state displays for examples of these idle states. Your security company may have programmed custom text for the idle displays in your system. The custom text and the default text for the three system idle displays follow. -
Page 10: Warning Displays And Tones
D1260/D1260B | Owner's Manual | Part I: Security system basics - Warning Displays and Tones 4. The display returns to idle text after scrolling through the faulted and bypassed point information. The View Points> soft key will be shown when there are faulted points. -
Page 11: Fire Alarms
3 seconds Bosch Security Systems | 9/04 | 50410D D1260/D1260B | Owner's Manual | Part I: Security system basics - Fire Alarms Your system may be programmed so that you cannot silence some fire alarms until the fire event clears. -
Page 12: Burglary Alarms
D1260/D1260B | Owner's Manual | Part I: Security system basics - Burglary Alarms Burglary Alarms Burglary alarms are the second priority. When a burglary point activates while your system is armed, your keypad emits a steady high-pitched burglary tone. The tone sounds for the time set by your security company. -
Page 13: Fire Trouble And Fire Supervisory Events
D1260/D1260B | Owner's Manual | Part I: Security system basics - Fire Trouble and Fire Supervisory Events Fire Trouble and Fire Supervisory Events When a fire trouble or fire supervisory condition occurs, your keypad emits three warble tones, then a pause (repeatedly). -
Page 14: Entry Delay Tone And Display
D1260/D1260B | Owner's Manual | Part I: Security system basics - Silencing an Alarm Entry Delay Tone and Display When you enter an armed system through a point programmed for entry delay, the keypad emits a repeating warble tone and displays the following to remind you to turn off your security system. -
Page 15: Part Ii: System Commands
D1260/D1260B | Owner's Manual | Part II: System Commands - Entering a Passcode Part II: System Commands Below is a summary of the commands covered in this section. Some of these functions may not be available in your system. Please consult... -
Page 16: Turning On The System (Arming)
D1260/D1260B | Owner's Manual | Part II: System Commands - Turning On the System (Arming) Turning On the System (Arming) Your security system can be turned on (armed) in many different ways, depending on the arming command used. Arming Commands are those commands used to turn on the system. -
Page 17: Turning On The System (Arming) With Doors Or Windows Open
D1260/D1260B | Owner's Manual | Part II: System Commands - Turning On the System (Arming) With Doors or Turning On the System (Arming) With Doors or Windows Open If a protected door or window is open, you may have the option of “force arming” with that point faulted. - Page 18 D1260/D1260B | Owner's Manual | Part II: System Commands - Turning On the System (Arming) With Doors or Windows Open 12. Once the last faulted point is displayed, pressing Next> soft key will start displaying a summary and then specifics of any bypassed points.
-
Page 19: Master Arm ? (Command + 1)
D1260/D1260B | Owner's Manual | Part II: System Commands - MASTER ARM ? (COMMAND + 1) MASTER ARM ? (COMMAND + 1) Description Use this function to turn on the entire system, both perimeter and interior. When you turn on the system, the display shows how many seconds of exit delay time you have to exit the protected area. -
Page 20: Master Arming All Areas
D1260/D1260B | Owner's Manual | Part II: System Commands - MASTER ARM ? (COMMAND + 1) Master Arming all Areas If you prefer, you may use the Master Arm ?> command in the Command Menu to initiate this function which will arm all available areas according to your authority level. -
Page 21: Master Arm Inst ? (Command + 1 + 1)
D1260/D1260B | Owner's Manual | Part II: System Commands - MASTER ARM INST ? (COMMAND + 1 + 1) 13. To disarm your security system, enter your personal passcode and press ENTER. 14. The display changes to show that all the areas are disarmed. -
Page 22: Perimetr Inst (Command + 2)
D1260/D1260B | Owner's Manual | Part II: System Commands - PERIMETR INST (COMMAND + 2) PERIMETR INST (COMMAND + 2) Turn On the Perimeter With No Delays Description Use this function to turn on only the perimeter of your building, leaving the interior of the building disarmed. -
Page 23: Perimetr Delay ? (Command + 3)
D1260/D1260B | Owner's Manual | Part II: System Commands - PERIMETR DELAY ? (COMMAND + 3) PERIMETR DELAY ? (COMMAND + 3) Turn On the Perimeter With Delays Description In residential systems this function allows you to only arm the perimeter and exit through a door programmed for exit delay. -
Page 24: Silence The Trouble Sounder & Clear Trouble Display (Command + 4)
D1260/D1260B | Owner's Manual | Part II: System Commands - Silence the Trouble Sounder & Clear Trouble Display (COMMAND + 4) Silence the Trouble Sounder & Clear Trouble Display (COMMAND + 4) Description Use COMMAND 4 to silence the trouble sounder during system events. -
Page 25: Walk Test ? (Command + 4 + 4)
D1260/D1260B | Owner's Manual | Part II: System Commands - WALK TEST ? (COMMAND + 4 + 4) 4. Your system displays event summary lines and point text in this order: fire alarm summary line b. point text for each fire alarm event alarm summary line d. - Page 26 D1260/D1260B | Owner's Manual | Part II: System Commands - WALK TEST ? (COMMAND + 4 + 4) If you prefer, you may use the Command Menu in place of steps 2 and 3 to initiate this function. Press the MENU> soft key to enter the Command Menu.
-
Page 27: Reset Sensors ? (Command + 4 + 7)
D1260/D1260B | Owner's Manual | Part II: System Commands - RESET SENSORS ? (COMMAND + 4 + 7) RESET SENSORS ? (COMMAND + 4 + 7) Reset Sensors Description Detection devices, such as smoke detectors and shock sensors, must be reset after being activated. This function momentarily removes power from these sensors to reset them. -
Page 28: Watch Mode ? (Command + 6)
D1260/D1260B | Owner's Manual | Part II: System Commands - WATCH MODE ? (COMMAND + 6) WATCH MODE ? (COMMAND + 6) Watch Mode Description With your security system disarmed, you can use watch mode to monitor some points. Each time some points are faulted (door or window is opened) the keypad chimes once and displays the point text for 60 seconds. -
Page 29: Perimetr Part ? (Command + 8)
D1260/D1260B | Owner's Manual | Part II: System Commands - PERIMETR PART ? (COMMAND + 8) If you prefer, you may use the Command Menu in place of steps 2 and 3 to initiate this function. Press the MENU> soft key to enter the Command Menu. -
Page 30: Using Command 7
D1260/D1260B | Owner's Manual | Part II: System Commands - Special Alerts (COMMAND + 7 and COMMAND + 4. When exit delay time expires and the system turns on, the display shows: 5. When performing a COMMAND 8 and no points... -
Page 31: Using Command 9
D1260/D1260B | Owner's Manual | Part II: System Commands - Special Alerts (COMMAND + 7 and COMMAND 3. Your COMMAND 7 special alert has been programmed to: notify your alarm company ring a bell on your premises display at your keypad... -
Page 32: Part Iii: Advanced Commands
D1260/D1260B | Owner's Manual | Part III: Advanced Commands - Advanced Commands Part III: Advanced Commands Use this section of the manual to perform advanced system functions like add and delete user passcodes, reassign authority levels to user passcodes and operate or change programmed scheduled events (Skeds) from the keypads. -
Page 33: Bypass A Point? (Command + 0)
D1260/D1260B | Owner's Manual | Part III: Advanced Commands - BYPASS A POINT? (COMMAND + 0) times. User Passcodes A three to six digit number entered at a keypad to access the system. BYPASS A POINT? (COMMAND + 0) Description This command allows you to bypass points that you do not want included in the system. - Page 34 D1260/D1260B | Owner's Manual | Part III: Advanced Commands - BYPASS A POINT? (COMMAND + 0) 5. If a digit is pressed, the display shows number: # . As soon as a digit key is pressed, the Entering point number:...
-
Page 35: Unbypass A Point? (Command + 0 + 0)
D1260/D1260B | Owner's Manual | Part III: Advanced Commands - UNBYPASS A POINT? (COMMAND + 0 + 0) UNBYPASS A POINT? (COMMAND + 0 + 0) Description Unbypassing a point is a way to return a bypassed point to the security system so that it can once again respond to trouble and alarm conditions. -
Page 36: Send Report ? (Command + 4+1 Or 4+2)
D1260/D1260B | Owner's Manual | Part III: Advanced Commands - SEND REPORT ? (COMMAND + 4+1 or 4+2) FRONT DOOR is already bypassed. indicates that the point has already been bypassed. FRONT DOOR cannot by bypassed. indicates the system is programmed not to allow that point to be bypassed. - Page 37 D1260/D1260B | Owner's Manual | Part III: Advanced Commands - SEND REPORT ? (COMMAND + 4+1 or 4+2) If you prefer, you may use the Command Menu in place of steps 2 and 3 to initiate this function. Press the MENU> soft key to enter the Command Menu.
-
Page 38: Remote Program ? (Command + 4 + 3)
D1260/D1260B | Owner's Manual | Part III: Advanced Commands - REMOTE PROGRAM ? (COMMAND + 4 + 3) REMOTE PROGRAM ? (COMMAND + 4 + 3) Description This function allows the user to initiate Remote Account Manager sessions. When the phone is ringing at the panel, the user initiates this function to have the panel seize the line. -
Page 39: For Systems With A Phone Number Or Network Connection
D1260/D1260B | Owner's Manual | Part III: Advanced Commands - REMOTE PROGRAM ? (COMMAND + 4 + 3) 11. At the conclusion of the programming session your system sends a report to the security company and then returns your telephone to normal service and your display to idle text. -
Page 40: Change Time/Date (Command + 4 + 5)
D1260/D1260B | Owner's Manual | Part III: Advanced Commands - CHANGE TIME/DATE (COMMAND + 4 + 5) CHANGE TIME/DATE (COMMAND + 4 + 5) The time and date in your system must be correct for scheduled events to occur at the correct times. Check the time at least once a month to ensure accuracy. -
Page 41: Door Control (Command + 4 + 6)
D1260/D1260B | Owner's Manual | Part III: Advanced Commands - DOOR CONTROL (COMMAND + 4 + 6) Enter the new date using a MM/DD/YY format. Ex: If the desired time is January 1, 2002, press 0 + 1 + 0 + 1 + 0 + 2 Enter>... -
Page 42: Table 3: Door Status
D1260/D1260B | Owner's Manual | Part III: Advanced Commands - DOOR CONTROL (COMMAND + 4 + 6) Cycle Door 1. If you wish to momentarily unlock an access door to allow a person into an area, press the Door> soft key. -
Page 43: Access Level
Exit> soft key to leave this function. Bosch Security Systems | 9/04 | 50410D D1260/D1260B | Owner's Manual | Part III: Advanced Commands - Access Level Access Level This function is used to manually enable/disable access authority levels assigned to users. It can also be used to temporarily disable a user’s access level instead of... -
Page 44: Change Display (Command + 4 + 9)
D1260/D1260B | Owner's Manual | Part III: Advanced Commands - CHANGE DISPLAY (COMMAND + 4 + 9) 8. After selecting whether to disable or enable the level, the display prompts you again to enter an Authority Level to modify. <Exit 9. -
Page 45: Extend Closing (Command + 5 + 1)
D1260/D1260B | Owner's Manual | Part III: Advanced Commands - EXTEND CLOSING (COMMAND + 5 + 1) If you prefer, you may use the Command Menu in place of steps 2 and 3 to initiate this function. Press the MENU> soft key to enter the Command Menu. - Page 46 D1260/D1260B | Owner's Manual | Part III: Advanced Commands - EXTEND CLOSING (COMMAND + 5 + 1) If you have not armed or extended closing, the Close Now message and beep will reappear after 10 minutes. Your alarm company sets the length of time for the closing window.
-
Page 47: Chg Skeds ? (Command + 5 + 2)
D1260/D1260B | Owner's Manual | Part III: Advanced Commands - CHG SKEDS ? (COMMAND + 5 + 2) CHG SKEDS ? (COMMAND + 5 + 2) Description A Sked is a function programmed to be performed automatically at a scheduled time by your security system. - Page 48 D1260/D1260B | Owner's Manual | Part III: Advanced Commands - CHG SKEDS ? (COMMAND + 5 + 2) Only on holiday> Pressing this soft key will enable the sked only on holidays and change the first line of the Skd 1 X 08:00AM display to Except on holiday>...
-
Page 49: Table 4: Sked Table
D1260/D1260B | Owner's Manual | Part III: Advanced Commands - CHG SKEDS ? (COMMAND + 5 + 2) Table 4: Sked Table SKED # Except on Time Holiday SKED 1 Yes / No SKED 2 Yes / No SKED 3... -
Page 50: Del User ? (Command + 5 + 3)
D1260/D1260B | Owner's Manual | Part III: Advanced Commands - DEL USER ? (COMMAND + 5 + 3) DEL USER ? (COMMAND + 5 + 3) This function allows a user to be deleted. This function will delete the passcode, Master User, and all sub-users associated with the user number. -
Page 51: Chg Relays ? (Command + 5 + 4)
D1260/D1260B | Owner's Manual | Part III: Advanced Commands - CHG RELAYS ? (COMMAND + 5 + 4) CHG RELAYS ? (COMMAND + 5 + 4) Your security company may program relays for automatic control and/or control from your keypad of devices such as premises lighting or entry gates. -
Page 52: Using Chg Passcodes
D1260/D1260B | Owner's Manual | Part III: Advanced Commands - CHG PASSCODES ? (COMMAND + 5 + 5) To avoid conflicting with other passcodes and duress codes, your system does not let you change passcodes to an existing passcode or to within plus or minus 2 of an existing passcode. -
Page 53: Add/Change User (Command + 5 + 6)
D1260/D1260B | Owner's Manual | Part III: Advanced Commands - ADD/CHANGE USER (COMMAND + 5 + 6) If the passcode does not match, the command center will emit a error tone and display not changed. 9. The display automatically returns to idle text after three seconds. - Page 54 D1260/D1260B | Owner's Manual | Part III: Advanced Commands - ADD/CHANGE USER (COMMAND + 5 + 6) 5. Enter the user number and press either the soft key or the ENTER button. 6. The display changes to show the user number entered and the user’s name (if any).
- Page 55 D1260/D1260B | Owner's Manual | Part III: Advanced Commands - ADD/CHANGE USER (COMMAND + 5 + 6) Enter new passcode: 3. The display changes to Enter the new passcode. As soon as a number is pressed, on the third line next to the asterisks.
- Page 56 D1260/D1260B | Owner's Manual | Part III: Advanced Commands - ADD/CHANGE USER (COMMAND + 5 + 6) If the passcode does not match, the command center will emit an error tone and display Passcode not changed <Exit 5. Press the...
- Page 57 D1260/D1260B | Owner's Manual | Part III: Advanced Commands - ADD/CHANGE USER (COMMAND + 5 + 6) <Exit Press the soft key to exit out of this menu Level changed. and return to the 6. Repeat Step 5 for each area through Area 8.
- Page 58 D1260/D1260B | Owner's Manual | Part III: Advanced Commands - ADD/CHANGE USER (COMMAND + 5 + 6) D9412/D7412: D9112/D7212: <No Press the soft key to reject the name and return to Step 1. Add/Change Card Card> 1. Pressing the soft key will allow you to add/change a user’s access card or credential.
- Page 59 D1260/D1260B | Owner's Manual | Part III: Advanced Commands - ADD/CHANGE USER (COMMAND + 5 + 6) 5. If the card is accepted, the display changes to Card added. Card changed either already exists in your system. <Exit Pressing the soft key exits out of this function and returns the display to idle text.
-
Page 60: Default Text ? (Command + 5 + 7)
D1260/D1260B | Owner's Manual | Part III: Advanced Commands - DEFAULT TEXT ? (COMMAND + 5 + 7) 5. If the card you are trying to add to the system already exists, an error tone sounds and the display changes to Card already exists. -
Page 61: Fire Test ? (Command + 5 + 8)
D1260/D1260B | Owner's Manual | Part III: Advanced Commands - FIRE TEST ? (COMMAND + 5 + 8) 4. The current state of the area is displayed for 3 seconds before returning to idle text. FIRE TEST ? (COMMAND + 5 + 8) Use this function to test fire points and other 24-hour points to be certain they function properly. -
Page 62: Display Rev ? (Command + 5 + 9)
D1260/D1260B | Owner's Manual | Part III: Advanced Commands - DISPLAY REV ? (COMMAND + 5 + 9) 5. As you fault each point, your command center will display the point text for 60 seconds and ring the fire sounders for 2 seconds. This verifies that the detection device is working properly. -
Page 63: Service Menu ? (9 + 9 + Enter)
5. The display will return to idle text after 5 seconds. Bosch Security Systems | 9/04 | 50410D D1260/D1260B | Owner's Manual | Part III: Advanced Commands - SERVICE MENU ? (9 + 9 + Enter) The service menu is used to access the following... -
Page 64: Using View Log
D1260/D1260B | Owner's Manual | Part III: Advanced Commands - SERVICE MENU ? (9 + 9 + Enter) Using View Log 1. Press the View Log ?> soft key. 2. The display changes to Enter start date: Go to last event>... -
Page 65: Using Print Log
D1260/D1260B | Owner's Manual | Part III: Advanced Commands - SERVICE MENU ? (9 + 9 + Enter) Using Print Log Print Log ?> 1. Press the soft key. Enter start date: 2. The display changes to Print all events>... -
Page 66: Using Default Text
D1260/D1260B | Owner's Manual | Part III: Advanced Commands - SERVICE MENU ? (9 + 9 + Enter) If you know the point number, you can enter it by pressing its number key and then the ENTER key. The display will change to show the point that was entered. - Page 67 D1260/D1260B | Owner's Manual | Part III: Advanced Commands - SERVICE MENU ? (9 + 9 + Enter) Low Brightness, Contrast. <- Level +> Each of these selections have either side of the display that allows you to increase (+) or decrease (-) the setting being displayed.
-
Page 68: Working With Multiple Areas From A Single Command Center
D1260/D1260B | Owner's Manual | Part IV: Multi-Area Use - Working with Multiple Areas from a Single Command Center Part IV: Multi-Area Use Working with Multiple Areas from a Single Command Center Each of the functions described in the preceding section on Advanced Commands is presented as though your system includes only one area. -
Page 69: View Point Status
Bosch Security Systems | 9/04 | 50410D D1260/D1260B | Owner's Manual | Part IV: Multi-Area Use - View Point Status 5. The top line indicates that you are still in View Point Status mode. The second line will display the point text. -
Page 70: Move To Area ? (Command + 5 + 0)
D1260/D1260B | Owner's Manual | Part IV: Multi-Area Use - MOVE TO AREA ? (COMMAND + 5 + 0) MOVE TO AREA ? (COMMAND + 5 + 0) With this function you can perform tasks in an area other than the one you’re in without having to physically go to that area. -
Page 71: Turning On The System
D1260/D1260B | Owner's Manual | Part IV: Multi-Area Use - Turning On the System 7. You are now able to perform tasks in this area. The number of areas to which you can move will be limited by the scope of the command center. -
Page 72: Faulted Points In Other Areas
D1260/D1260B | Owner's Manual | Part IV: Multi-Area Use - Turn On the Entire System Without Delays 1. Enter your passcode and press ENTER. 2. The command center will display the following: Command center scope and/or your authority level limit the actual number of areas you may turn on. -
Page 73: Turning Off The System
WAREHOUSE All On Instant all areas are armed. Bosch Security Systems | 9/04 | 50410D D1260/D1260B | Owner's Manual | Part IV: Multi-Area Use - Turning Off the System Turning Off Multiple Areas with a Passcode This function is useful for turning off multiple areas with a few keystrokes. -
Page 74: Turning Off Selected Areas
D1260/D1260B | Owner's Manual | Part IV: Multi-Area Use - Turning Off the System Menu> 2. Press the key to enter the Command Menu. Next> 3. Press the soft key repeatedly until you DISARM ?> reach the prompt then press the adjacent soft key. - Page 75 D1260/D1260B | Owner's Manual | Part IV: Multi-Area Use - Turning Off the System 5. Enter your passcode and press ENTER. The passcode is shown as asterisks (*) when entered and advance from the right side of the display to the left until all the passcode digits are entered.
-
Page 76: Appendix
D1260/D1260B | Owner's Manual | Appendix - Supplementary Information for Adding Passcodes Appendix Supplementary Information for Adding Passcodes Use the information contained in this Supplement to help you add user passcodes. User Authority Levels Your security company uses the information contained on this page to establish authority levels for system users. -
Page 77: User Interface
M = Any Armed State, P = Perimeter Armed, D = Disarmed, Blank = No Access Security Level? I = Disarm to Perimeter Instant, D = Disarm All, Blank = No Disarm Rights Disarm Level? Bosch Security Systems | 9/04 | 50410D D1260/D1260B | Owner's Manual | Appendix - Passcode Worksheet Authority Levels Authority Levels... -
Page 78: User (Passcode) Worksheet (User 000 To 038)
D1260/D1260B | Owner's Manual | Appendix - Passcode Worksheet User (Passcode) Worksheet (User 000 to 038) User User Passcode Group 1 2 3 __ __ __ ____ 123456 ________ __ __ __ __ __ __ ____ __ __ __ __ __ __... -
Page 79: User (Token) Worksheet (User 000 To
User (Token) Worksheet (User 000 to 038) D9412G/D7412G Only Master ID ###-0 Sub-User ###-1 Site Card Data Site Not Available Bosch Security Systems | 9/04 | 50410D D1260/D1260B | Owner's Manual | Appendix - Passcode Worksheet Sub-User ###-2 Card Data Site Card Data Sub-User ###-3 Site Card Data... -
Page 80: User (Passcode) Worksheet (User 039 To 075)
D1260/D1260B | Owner's Manual | Appendix - Passcode Worksheet User (Passcode) Worksheet (User 039 to 075) User User Passcode Group __ __ __ __ __ __ ____ __ __ __ __ __ __ ____ __ __ __ __ __ __... -
Page 81: User (Token) Worksheet (User 039 To 075) D9412G/D7412G Only
D1260/D1260B | Owner's Manual | Appendix - Passcode Worksheet User (Token) Worksheet (User 039 to 075) D9412G/D7412G Only User Master ID ###-0 Sub-User ###-1 Sub-User ###-2 Sub-User ###-3 Site Card Data Site Card Data Site Card Data Site Card Data... -
Page 82: User (Passcode) Worksheet (User 076 To 114) (101-249 = D9412G Only)
D1260/D1260B | Owner's Manual | Appendix - Passcode Worksheet User (Passcode) Worksheet (User 076 to 114) (101-249 = D9412G only) User User Passcode Group __ __ __ __ __ __ ____ ____ __ __ __ __ __ __ ____ __ __ __ __ __ __... -
Page 83: User (Token) Worksheet (User 076 To 114) D9412G/D7412G Only (101-249 = D9412G Only)
D1260/D1260B | Owner's Manual | Appendix - Passcode Worksheet User (Token) Worksheet (User 076 to 114) D9412G/D7412G Only (101-249 = D9412G only) User Master ID ###-0 Sub-User ###-1 Sub-User ###-2 Sub-User ###-3 Site Card Data Site Card Data Site Card Data... -
Page 84: User (Passcode) Worksheet (User 115 To 150) (101-249 = D9412G Only)
D1260/D1260B | Owner's Manual | Appendix - Passcode Worksheet User (Passcode) Worksheet (User 115 to 150) (101-249 = D9412G only) User User Passcode Group __ __ __ __ __ __ __ __ __ __ __ __ __ __ __ __ __ __ __ __... -
Page 85: User (Token) Worksheet (User 115 To 150) (101-249 = D9412G Only)
User (Token) Worksheet (User 115 to 150) (101-249 = D9412G only) User Master ID ###-0 Site Card Data Site Bosch Security Systems | 9/04 | 50410D D1260/D1260B | Owner's Manual | Appendix - Passcode Worksheet Sub-User ###-1 Sub-User ###-2 Card Data Site Card Data End RADXUSR1 Handler... -
Page 86: User (Passcode) Worksheet (User 151 To 189) (101-249 = D9412G Only)
D1260/D1260B | Owner's Manual | Appendix - Passcode Worksheet User (Passcode) Worksheet (User 151 to 189) (101-249 = D9412G only) User User Passcode Group __ __ __ __ __ __ ____ __ __ __ __ __ __ ____ __ __ __ __ __ __... -
Page 87: User (Token) Worksheet (User 151 To 189) (101-249 = D9412G Only)
User (Token) Worksheet (User 151 to 189) (101-249 = D9412G only) User Master ID ###-0 Sub-User ###-1 Site Card Data Site Bosch Security Systems | 9/04 | 50410D D1260/D1260B | Owner's Manual | Appendix - Passcode Worksheet Sub-User ###-2 Card Data Site Card Data Sub-User ###-3 Site Card Data... -
Page 88: User (Passcode) Worksheet (User 190 To 226) (101-249 = D9412G Only)
D1260/D1260B | Owner's Manual | Appendix - Passcode Worksheet User (Passcode) Worksheet (User 190 to 226) (101-249 = D9412G only) User User Passcode Group __ __ __ __ __ __ ____ __ __ __ __ __ __ ____ __ __ __ __ __ __... -
Page 89: User (Token) Worksheet (User 190 To 226) D9412G/D7412G Only (101-249 = D9412G Only)
D1260/D1260B | Owner's Manual | Appendix - Passcode Worksheet User (Token) Worksheet (User 190 to 226) D9412G/D7412G Only (101-249 = D9412G only) User Master ID ###-0 Sub-User ###-1 Sub-User ###-2 Sub-User ###-3 Site Card Data Site Card Data Site Card Data... -
Page 90: User (Passcode) Worksheet (User 227 To 249) (101-249 = D9412G Only)
D1260/D1260B | Owner's Manual | Appendix - Passcode Worksheet User (Passcode) Worksheet (User 227 to 249) (101-249 = D9412G only) User User Passcode Group __ __ __ __ __ __ ____ __ __ __ __ __ __ ____ __ __ __ __ __ __... -
Page 91: User (Token) Worksheet (User 227 To 249) (101-249 = D9412G Only)
User (Token) Worksheet (User 227 to 249) (101-249 = D9412G only) User Master ID ###-0 Site Card Data Bosch Security Systems | 9/04 | 50410D D1260/D1260B | Owner's Manual | Appendix - Passcode Worksheet Sub-User ###-1 Sub-User ###-2 Site Card Data Site... -
Page 92: User (Passcode) Worksheet (Blank)
D1260/D1260B | Owner's Manual | Appendix - Passcode Worksheet User (Passcode) Worksheet (Blank) User User Passcode Group __ __ __ __ __ __ ____ __ __ __ __ __ __ ____ __ __ __ __ __ __ ____ __ __ __ __ __ __... -
Page 93: User (Token) Worksheet (Blank)
If the AC power supply is OFF and the back-up battery is either missing or dead, sensors will not detect intrusion. Bosch Security Systems | 9/04 | 50410D D1260/D1260B | Owner's Manual | Appendix - Security System Limitations Sub-User ###-1 Sub-User ###-2 Site... -
Page 94: Figure 4: Smoke Detector Locations (Plan View)
D1260/D1260B | Owner's Manual | Appendix - Fire Safety and Evacuation Although having a security system may make you eligible for reduced insurance premiums, the system is no substitute for insurance. Warning devices cannot compensate you for loss of life or property. -
Page 95: Standard Displays
You must turn off the system before entry delay time expires to avoid creating an alarm event. Bosch Security Systems | 9/04 | 50410D D1260/D1260B | Owner's Manual | Appendix - Standard Displays Exit Now Arming your system starts exit delay time. The... -
Page 96: System Trouble Displays
D1260/D1260B | Owner's Manual | Appendix - System Trouble Displays System Trouble Displays If you see any of the system trouble displays shown below, contact your security company to determine whether repairs are needed. The Silence> soft key is only displayed if a trouble tone is present. - Page 97 Fire Point Bypass This display indicates that fire points have been bypassed. Bosch Security Systems | 9/04 | 50410D D1260/D1260B | Owner's Manual | Appendix - System Trouble Displays 24 Hour Point Bypass This display indicates that 24-hour points have been bypassed.
-
Page 98: Security System Glossary
D1260/D1260B | Owner's Manual | Appendix - Security System Glossary Security System Glossary Area A group of detection devices connected to your security system. To turn on your controlled points (burglar detection devices). When an area is armed and a controlled point trips, an alarm occurs or entry delay begins. -
Page 99: Maintenance And Service
Do not spray any liquid directly onto the command center. It could run inside the case and damage electrical circuits. Your Alarm Company Name: Call This Number Before Testing Bosch Security Systems | 9/04 | 50410D D1260/D1260B | Owner's Manual | Appendix - Maintenance and Service... - Page 100 Bosch Security Systems 130 Perinton Parkway Fairport, NY 14450-9199 Customer Service: (800) 289-0096 Technical Support: (888) 886-6189 © 2004 Bosch Security Systems 50410D...
Need help?
Do you have a question about the D1260 and is the answer not in the manual?
Questions and answers