
Related Manuals for Stealth Products TWB480-17FDM


Summary of Contents for Stealth Products TWB480-17FDM
- Page 1 Flip-Down Mount Hardware OWNERS MANUAL Flip-Down (FDM) Hardware Stealth’s User and Installation Manual for the TWB Flip-Down (FDM) Hardware...
-
Page 2: Customer Satisfaction
Customer Satisfaction Stealth Products strives for 100% customer satisfaction. Your complete satisfaction is important. Please contact us with feedback or suggested changes that will help improve the quality and usability of our products. You may reach us at: Stealth Products, LLC... -
Page 3: Important Information
Important Information Important Information! All persons responsible for fitting, adjustment, and daily use of the devices discussed in these instructions must be familiar with and understand all safety aspects of the devices mentioned. In order for our products to be used successfully, you must: ... -
Page 4: Introduction
For further assistance, or more advanced applications, please contact your supplier or Stealth Products at (512) 715-9995 or toll free at 1-800-965-9229. Always keep the operating instructions in a safe place so they may be referenced as necessary. -
Page 5: Warranty
Warranty Our products are designed, manufactured, and produced to the highest of standards. If any defect in material or workmanship is found, Stealth Products will repair or replace the product at our discretion. Any implied warranty, including the implied warranties of merchantability and fitness for a particular purpose, shall not extend beyond the duration of this warranty. -
Page 6: Table Of Contents
Table of Contents 1.0 Customer Satisfaction.................. i 2.0 Important Information ................ii 3.0 Introduction ....................iii 4.0 Warranty ......................iv 5.0 Table of Contents ..................v 6.0 Warning Labels ..................... vi 6.1 Warning Labels ......................vi 6.2 Limited Liability ......................vi 6.3 Testing .......................... - Page 7 Table of Contents 11.0 TWB480-17FDM & TWB480-1FDM Flip-Down Headrest Hardware .. 11 11.1 Features of the TWB480-17FDM & TWB480-1FDM ......... 12 11.2 Mounting ........................12 11.3 Parts Included with TWB480-17FDM & TWB480-1FDM ......13 11.4 Link Addition/Replacement ................14 11.5 Link Adjustment....................... 15 11.6 TWB480-17FDM &...
-
Page 8: Warning Labels
SAFETY necessary. Limited Liability Stealth Products, LLC accepts no liability for personal injury or damage to property that may arise from the failure of the user or other persons to follow the recommendations, warnings, and instructions in this manual. Stealth Products does not hold responsibility for final integration of final assembly of product to end user. -
Page 9: Product Warnings
Product Warnings The following safety precautions should be taken when adjusting the flip-down mount hardware: CAUTION Ensure the red flip-down sleeve freely rotates. If the flip-down sleeve does not rotate, the hardware will not work properly. CAUTION When tightening screws, turn loosely until the screws stop, then tighten one quarter turn more. -
Page 10: Intended Use
Intended Use Intended Use The Flip-Down hardware offers a sleek design, strong resistance and an easy flip-down mechanism which allows the headrest to flip down while staying attached to the chair, eliminating misplacement. This has the added benefit of helping to improve mobility related issues and transfers. The ‘link’... -
Page 11: Parts And Accessories
Parts and Accessories Replacement Parts Part Number Description 3” Replacement Metric Link TWBM-LINK 6” Replacement Metric Link TWBM-LIL-6 Seat Back Mount for TWB480 Hardware SBM400 3 Piece 17mm Ball TWB-17MMBK 1” Headrest Ball TWB1”-B 3 Piece 1” Ball Kit TWB-1”BK... - Page 12 Parts and Accessories Tools Hardware Needed Description 2.5mm T-Handle Stop Collar & set screws on links 4mm T-Handle All screws on triangle & links 5mm T-Handle Screw Package for Seat Back Mount Tools, anti-seize, and Blue Medium Strength Liquid Loctite Series 242 are not provided. Torque Specs Tightening screws to torque specifications is recommended but not required.
-
Page 13: Tools & Hardware
FDM380 & TWB480-QFDM Flip-Down Headrest Hardware... -
Page 14: Twb380 & Twb480-Qfdm Flip-Down Headrest Hardware
TWB380 & TWB480-QFDM 10.0 Features of the FDM380 & TWB480-QFDM 10.1 8 inches of height adjustment Easy flip-down mechanism Compatible with assemblies: -TWB480-17FDM -TWB480-1FDM -TWB480-TAB Short versions available (6 inch rod): -FDM380-S -TWB480-17FDMS -TWB480-1FDMS Part Number Description... -
Page 15: Parts Included With Fdm380 & Fdm480-Qfdm
TWB380 & TWB480-QFDM 10.0 Parts Included with the FDM380 & FDM480-QFDM 10.2 Item Description Vertical Bar* 3/4” Diameter Flip Down Rod Flip Down Sleeve* FDM Sleeve Locknut* M5 Locknut (1) Shoulder Screw* M5 x .8 x 18mm SHS (1) Stop Collar Stop Collar Mount SBM Clamp Seatback Mount Clamp... -
Page 16: Replacing The Fdm380 & Fdm480-Qfdm
TWB380 & TWB480-QFDM 10.0 Replacing the FDM380 & FDM480-QFDM 10.3 Step 1: Loosen the set screws on the triangle mount with a 4mm T-Handle, but do not remove. Loosen the socket screws from the triangle allowing the thru triangle to be released from the mount. Step 2: Place the headrest hardware links in line with the thru and threaded triangles. -
Page 17: Stop Collar Adjustment
TWB380 & TWB480-QFDM 10.0 Stop Collar Adjustment 10.4 Step 1: Position the stop collar along the vertical bar at the required height for the client. Step 2: When the height of the stop collar has been determined, tighten the set screw using a 2.5mm T-Handle. -
Page 18: Seat Back Mount Installation
TWB380 & TWB480-QFDM 10.0 Seat Back Mount Installation 10.5 Step 1: Align the seat back mount to the back at the necessary height. With the necessary Socket Head Screws, secure the seat back mount to the back frame (See Option 1 or Option 2 below). Tighten with a 5mm T-Handle. -
Page 19: Flip-Down Mount
TWB380 & TWB480-QFDM 10.0 Flip–Down Mount 10.6 Step 1: To flip the hardware down and away, slide the red flip-down sleeve up. Step 2: Swing away the hardware in conjunction with the flip-down sleeve being pushed up. Step 3: To bring hardware back to the upright position, move links back to the vertical position. An audible ‘click’... -
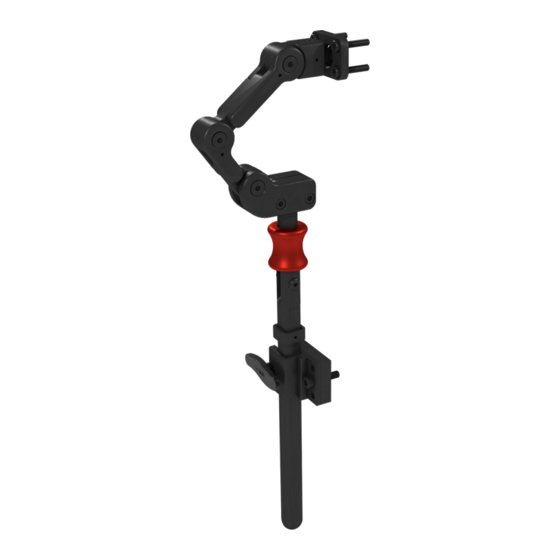
Page 20: Twb480-17Fdm & Twb480-1Fdm Flip-Down Headrest Hardware
TWB480-17FDM & TWB480-1FDM Flip-Down Headrest Hardware... -
Page 21: Features Of The Twb480-17Fdm & Twb480-1Fdm
TWB480-17FDM & TWB480-1FDM 11.0 Features 11.1 8 inches of height adjustment Easy flip-down mechanism 1 standard 3” link assembled with FDM Short versions available (6 inch rod): -FDM380-S -TWB480-17FDMS -TWB480-1FDMS Mounting 11.2 17mm hardware compatible with: 1”... -
Page 22: Parts Included With Twb480-17Fdm & Twb480-1Fdm
Parts Included with the TWB480-17FDM & TWB480-1FDM 11.3 Item 3/4” Diameter Flip Down Rod* SBM Clamp* Flip Down Sleeve* 2” Offset Link* TWB480 Inline Link* 17mm Ball Mount Kit Stop Collar* 1” Ball Mount *The TWB480-1FDM includes the same components as the TWB480-17FDM... -
Page 23: Link Addition/Replacement
TWB480-17FDM & TWB480-1FDM 11.0 Link Addition/Replacement 11.4 Step 1: Loosen the set screw on the offset link with a 4mm T-Handle, but do not remove. Remove the flat head screw from the offset link with a 4mm T-Handle, separating the offset link from the inline link and creating a gap for the new link to be installed. -
Page 24: Link Adjustment
TWB480-17FDM & TWB480-1FDM 11.0 Link Adjustment 11.5 Step 1: Loosen the set screw on the offset link with a 4mm T-Handle, but do not remove. Loosen the flat head screw from the offset link with a 4mm T-Handle. Step 2: Make any desired adjustments to the links necessary. Tighten all flat head screws and ensure all the links are in the desired position. -
Page 25: Twb480-17Fdm & Twb480-1Fdm Ball Kit Replacement
TWB480-17FDM & TWB480-1FDM 11.0 Ball Replacement for TWB480-17FDM & TWB480-1FDM 11.6 Step 1: Loosen and remove the M6 Flat Head Screw from the link, creating a gap in between the offset link and offset link nut. Step 2: Replace the 1” or 17mm ball kit by aligning the ring of the ball kit in between the predrilled holes of the offset link and offset link nut. -
Page 26: Twb486-17Fdm & Twb486-1Fdm Flip-Down Headrest Hardware
TWB486-17FDM & TWB486-1FDM Flip-Down Headrest Hardware... -
Page 27: Features Of Twb486-17Fdm & Twb486-1Fdm
TWB486-17FDM & TWB486-1FDM 12.0 Features 12.1 8 inches of height adjustment Easy flip-down mechanism Seat Back Mount provided with order 1 standard 3” link assembled with FDM Mounting 12.2 17mm hardware compatible with: 1” hardware compatible with: ... -
Page 28: Parts Included With Twb486-17Fdm & Twb486-1Fdm
TWB486-17FDM & TWB486-1FDM 12.0 Parts Included with the TWB486-17FDM & TWB486-1FDM 12.3 Item 15mm Flip Down Rod* SBM Clamp* Flip Down Sleeve* Offset Link* 2” Offset Link* Inline Link* Stop Collar* 17mm Ball Mount 1” Ball Mount *The TWB486-1FDM includes the same components as the TWB486-17FDM... -
Page 29: Link Addition/Replacement
TWB486-17FDM & TWB486-1FDM 12.0 Link Addition/Replacement 12.4 Step 1: Loosen the set screw on the link, and remove the flat head screw from the offset link. Step 2: After removing the flat head screw from the offset link, separate the offset and inline link, creating a gap for the new link to be installed. -
Page 30: Link Adjustment
TWB480-17FDM & TWB480-1FDM 11.0 Link Adjustment 12.5 Step 1: Loosen the set screw on the offset link with a 4mm T-Handle, but do not remove. Loosen the flat head screw from the offset link with a 4mm T-Handle. Step 2: Make any adjustments to the links necessary. Tighten all flat head screws and ensure all the links are in the desired position. -
Page 31: First Time Use
First Time Use 13.0 Dealer Assistance 13.1 During first time use by the client, it is advised that the dealer or service technician assists and explains to the customer (the user and/or the attendant) how the hardware functions. User Testing 13.2 It is important that the customer is fully aware of the installation of the Flip Down Hardware, how it functions, and if anything can be adjusted. -
Page 32: Maintenance
Maintenance 14.0 Maintenance 14.1 All parts should be checked on a regular basis and repaired, if necessary, by a service technician. Discontinue use after identifying loose or broken components. Periodically check the flip-down sleeve. Test that it engages properly and makes an audible “click”... - Page 33 NOTES 15.0...
- Page 34 NOTES 15.0...
- Page 35 NOTES 15.0...
- Page 36 Stealth Products, LLC. • info@stealthproducts.com • www.stealthproducts.com +1(800) 965-9229 | +1(512) 715-9995 | 104 John Kelly Drive, Burnet TX 78611 P139D507 Revision Date 2019-12-17...
Need help?
Do you have a question about the TWB480-17FDM and is the answer not in the manual?
Questions and answers