Table of Contents
Advertisement
Quick Links
TM
Smart Cloud-Based Video-Intercom
- PRELIMINARY -
Installation & Configuration Manual
Alpha Communications® and Alpha Media®, Inc.
NOTE: SINCE ALPHATOUCH™ IS AN EVER-CHANGING PLATFORM, PRINTED
DOCUMENTATION, SUCH AS THIS MANUAL, MAY NOT BE 100% UP-TO-DATE.
FOR THE MOST UP-TO-DATE DOCUMENTATION, PLEASE VISIT:
http://www.alphatouch.info/help
42 Central Drive
Farmingdale, NY 11735-1202
Phone: 631-777-5500
Fax: 631-777-5599
http://www.alphacommunications.com
Copyright© 2018-2019
AWD272 – Rev 1.0
Alpha Communications® All Rights Reserved
April 2019
1
Advertisement
Table of Contents

Related Manuals for Alpha Communications AlphaTouch


Summary of Contents for Alpha Communications AlphaTouch
- Page 1 Smart Cloud-Based Video-Intercom - PRELIMINARY - Installation & Configuration Manual Alpha Communications® and Alpha Media®, Inc. NOTE: SINCE ALPHATOUCH™ IS AN EVER-CHANGING PLATFORM, PRINTED DOCUMENTATION, SUCH AS THIS MANUAL, MAY NOT BE 100% UP-TO-DATE. FOR THE MOST UP-TO-DATE DOCUMENTATION, PLEASE VISIT: http://www.alphatouch.info/help...
-
Page 2: Table Of Contents
TABLE OF CONTENTS License Agreement ..............................6 Getting Started ..............................7 AlphaTouch™ Application Types ......................... 7 Selecting System Components..........................7 The Data Schema ............................... 7 Single Unit Structure ................................ 8 Multi-Unit, 1 Building ..............................9 Multi-Unit, Multi-Building ............................... 10 Help for Residents ..............................11 Before Signing In .............................. - Page 3 TABLE OF CONTENTS Viewing an Apartment’s Residents ........................23 Adding a New Resident ............................. 23 Edit Resident Information ..........................24 Deleting a Resident ............................24 Moving a Resident to Another Apartment ......................24 Sending a Resident a Password-Reset Link ....................... 25 Monitors ..................................
- Page 4 TABLE OF CONTENTS Installation Addons ................................. 32 Event Logs ..................................32 Installation Maintenance ..............................32 AT700AS Door Panel ............................... 33 Package Contents ............................... 34 Universal Panel Hardware ............................... 34 Surface-Mounting Hardware ............................34 Flush-Mounting Hardware ............................... 34 Mounting Hole Pattern / Dimensions ..........................35 Surface-Mounting ................................
-
Page 5: License Agreement
LICENSE AGREEMENT ALPHA MEDIA, INC. AlphaTouch™ 200 Series, ALL VERSIONS, AND SOFTWARE RELATED COMPONENTS. END-USER LICENSE AGREEMENT FOR ALPHA MEDIA, INC. SOFTWARE IMPORTANT-READ CAREFULLY: This Alpha Media, Inc. End-User License Agreement (“EULA”) is a legal agreement between you (either an individual or a single entity) and Alpha Media, Inc. -
Page 6: Getting Started
Once the AlphaTouch™ devices are connected to an Internet-Enabled PoE (Power Over Ethernet) network they will come to life, connecting to the AlphaTouch™ cloud services and they will download all of the program- ming data that is required. -
Page 7: Single Unit Structure
» Single Unit Structure NOTE: The following illustration is NOT a wiring diagram! It is designed to visualize the system data structure! -
Page 8: Multi-Unit, 1 Building
» Multi-Unit, 1 Building NOTE: The following illustration is NOT a wiring diagram! It is designed to visualize the system data structure! -
Page 9: Multi-Unit, Multi-Building
» Multi-Unit, Multi-Building NOTE: The following illustration is NOT a wiring diagram! It is designed to visualize the system data structure! -
Page 10: Help For Residents
When a call is placed to you, you will receive a push-notification on your phone. To see who is calling you, click on the notification. The AlphaTouch app will open and present you a live audio and video of your visitor. You can either Accept or Decline the call at that... -
Page 11: Ios App Help
» AlphaTouch Website For now, logging into the AlphaTouch™ website is the easiest way to access your more advanced functions. We hope to incorporate most of these functions into the mobile platofrms as well in the near future. Such functionalities include: •... -
Page 12: Managing My Resident Listing(S)
Please note: Management has the abilitiy to disable some of these features. You can sign in to the AlphaTouch™ website by clicking the “Sign-In” button at the top of this page. Managing My Resident Listing(s) » When you first sign in to the AlphaTouch™ website, you will be brought to the... -
Page 13: Sharing A Visitor Access Code
• Each guest receives their own unique QR Code Image. It is important that your guests do not share their QR Codes with one another. If they do, AlphaTouch™ will not be able to properly alert you to who is arriving. -
Page 14: Revoking Visitor Access
coolguy74@hotmail.com o E xample Input, Phone/Email with Names o 631-555-1212, Bob Smith o 631-555-2121, Leon Billows o mifflin_1275@gmail.com, Roberto Perez o coolguy74@hotmail.com, Greg Miller o E xample Input, Mixed o 631-555-1212 o 631-555-2121, Leon Billows o mifflin_1275@gmail.com o coolguy74@hotmail.com, Greg Miller Upon completion, click “Share QR Access Code”. -
Page 15: Help For Installers
The only real prerequisite for AlphaTouch™ is that all locations where devices will be located must have access to an Internet-Enabled PoE (Power Over Ethernet) network. They do not even need to all be connected to the same network, as long as all of the networks involved can reach the AlphaTouch™ cloud services via the Internet. -
Page 16: System Layout: Single-Unit
Internet-Connected PoE Network. This provides the Entrance Call Panel with power as well as a communication path to the AlphaTouch™ cloud. Once that has been established, the Entrance Call Panel can place telephone and app calls to your existing smart mobile devices and telephones. -
Page 17: System Layout: Multi-Unit
Internet-Connected PoE Network. This provides the Entrance Call Panel with power as well a communication path to the AlphaTouch™ cloud. Once that has been established, the Door Camera Panel can place telephone and app calls to your existing smart mobile devices and telephones. -
Page 18: Help For Administrators
HELP FOR ADMINISTRATORS Managing your AlphaTouch™ system is as easy as logging into the Cloud and making your changes. All connected devices will be updated virtually instantly when a change is made that impacts them. » Initial Programming Your initial system programming can be done by our factory professionals at no additional cost. That’s right - every device on your system will be pre-programmed according to your custom specifications. -
Page 19: Managing Your Installation(S)
» Managing Your Installation(s) Once you sign-in, you will be able to make system changes on your own. First, you may need to select which installation you wish to modify. • If you only manage one installation, you will be brought to the management area for that installation. •... -
Page 20: Edit Building Information
o Y ou can type a full address like: 1515 Broadway New York, NY 10003 o Y ou can also type popular location names like: Flatiron Building Google will return the full address: 175 5th Ave, New York, NY 10010, USA •... -
Page 21: Adding New Apartments
Adding New Apartments » • When viewing the list of building apartments, Click the add icon ( ) in the top toolbar. • You will be presented the option to Add One Apartment at a Time or to Bulk-Add Apartments o A dding Single Apartments: You will be asked for an apartment label for each apartment you wish to add, one at a time. -
Page 22: Resident(S)
Residents are entities which live in your apartments. If you wish for each resident to be able to use the AlphaTouch™ mobile apps, or to be contacted individually (apart from the general apartment contact), you must add each resident to their appropriate apartment. If any resident lives in more than one apartment, simply add them to both apartments, but use the same email address to link both apartments to that resi- dent’s mobile app. -
Page 23: Edit Resident Information
AlphaTouch™ installation. This email will include their personal access code (if enabled). o I f the email is brand new to the AlphaTouch™ cloud, and initial password will be generated for that email address and the email will also include their new login credentials. -
Page 24: Sending A Resident A Password-Reset Link
• The resident will be relocated to the new apartment, leaving their phone, email and access code settings in tact. Sending a Resident a Password-Reset Link » • Click the button next to the resident you wish to send a reset link to. •... -
Page 25: Edit An Existing Monitor
Edit an Existing Monitor » • Click the name of the monitor you wish to modify. • Modify the monitor nam or MAC Address. All other settings are specified on the monitor itself. • Once you are finished, click Save Monitor. Deleting a Monitor »... -
Page 26: Deleteing A Door/Entry Panel
Editing a Door/Entry Panel • Click the label of the door/entry panel you wish to modify. • Modify the door/entry panel name and other settings in accordance with the requirements listed in that device’s help section. • Once you are finished, click Save Panel. For detailed help with the specific settings for your door panel device(s), please see device-specific help sections: AT700AS Door Panel Deleteing a Door/Entry Panel... -
Page 27: Administrators
Please Note: Adding a new administrator will cause an email to be sent to them letting them know they’ve been added as an administrator to an AlphaTouch™ installation. • If the administrator’s email address is brand new to the AlphaTouch™ cloud, and initial password will be... -
Page 28: Editing An Administrator's Permissions
• If the administrator’s email address is recognized from another AlphaTouch™ installation, the email will let the administrator know that their new installation/property is available under their existing account. -
Page 29: Access Settings
» • Enable Resident Access Codes o I f enabled, AlphaTouch™ will assign a random access code to your residents that they can use to let themselves into the building. This code can be changed by management or the resident themselves. -
Page 30: Viewing Subscription & Billing Information
You can keep any number of credit cards on file for your installation. This is where they will be listed. You must have at least one valid card on file at all times to ensure there is no interruption in your AlphaTouch™ services. -
Page 31: Transaction History
Card”. Doing so will not cause any other payment to become flagged as the default Monthly Service Card. You must manually set a new card to take its place. Failure to do so may result in service interruptions. • Once you have verified that you wish to delete the Payment Method, confirm that by clicking Delete Payment Method. -
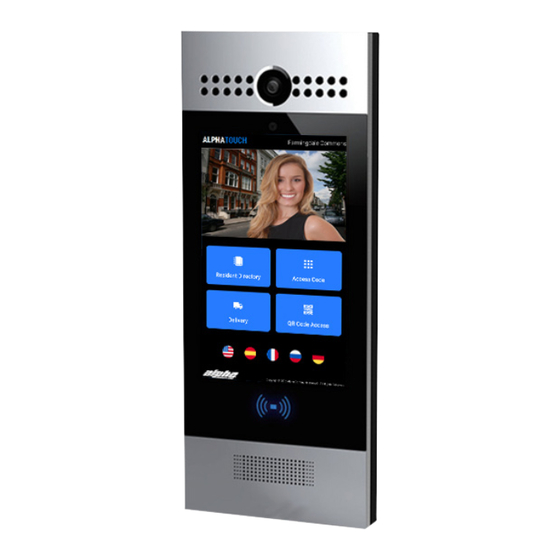
Page 32: At700As Door Panel
AT700AS DOOR PANEL The AT700AS is a touchscreen door panel that is bursting with cutting-edge technology! -
Page 33: Package Contents
» PACKAGE CONTENTS Please make sure the package contains the following installation and mounting hardware. » Universal Panel Hardware » Surface-Mounting Hardware » Flush-Mounting Hardware... -
Page 34: Mounting Hole Pattern / Dimensions
» Mounting Hole Pattern / Dimensions... -
Page 35: Surface-Mounting
» Surface-Mounting » Surface-Mounting with 86 Box... -
Page 36: Flush-Mounting
» Flush-Mounting... -
Page 37: Back Cover Installation
» Back Cover Installation » Device Mounting » Settings & Configuration General Settings » • Panel Name: This is the name of the door station. It typically reflects it’s location (ie, Front Door or Side Entrance). • Panel MAC Address: The unique MAC Address associated with this item. It can be found on the back of the station. -
Page 38: Directory Settings
• Play Voice Prompts? When set to ‘Yes’ the panel will audibly tell the visitor what to do in order to call a resident. • Visitor Language Options: Select which language options will be available on this door station. • Default Language for Text & Audio: Select the language you want to be used by default on this door/ entry panel. -
Page 39: Assistive Led Activation
• Pin this Action Button to the Resident Home Screen? If this button is pinned to the resident home screen, residents will be able to easily access this action button without bringing up the camera or receiving a call. This might be useful for a door-release button to allows resident to let themselves into the building if they forgot their key, proximity tag or access code. -
Page 40: Atrc100 Relay Controller
The Alpha Communications® model ATRC100 AlphaTouch™ relay controller is designed to provide the analog relay gateway interface for the AlphaTouch™ system. The ATRC100 is built into a rugged high impact ABS plastic case, and is powered by a separate model PS-ATRC100POE (PoE type) or RASP-PI-3-PS (5vdc type) plug-in power supply. -
Page 41: Relay Boards
• Connect the larger serial end of the CT032AE6 interface cable to the CA-USBSERV10 Serial to USB Converter, and connect that to one of the USB Ports on the ATRC100 AlphaTouch Relay Controller. • Connect the smaller pin connector to Relay Board #1. Do not force the plug onto the connector, and make sure it is oriented and aligned correctly. - Page 42 • If more than one (1) Relay Board is used, you must connect a model# CT032AEJ jumper cable from the Serial Out connector from the 1st Relay Board to the Serial IN connector on the next Relay Board, continuing to add jumpers as additional relay boards are required. Each CT032AEJ jumper cable is only 12 inches long, so make sure the multiple relay boards are as close together as feasible for proper wiring connections, while still allowing room for wiring the appropriate number of output relay terminals.
-
Page 43: Dip' Switch Settings For Numbering Relay Boards
1. Associating the Realy Controller with a Door Panel In order to use the AlphaTouch Relay Controller to interface with an existing analog intercom system, you must first specify, within the settings for your door panel that your relay controller is paired to that panel for analog integration. - Page 44 building, click the dropdown menu and select Apartments, Residents and Devices.Then, select the apartment you wish to modify. In the General tab, please specify the Relay Board # as well as the Relay Position #. NOTE: If you do not see the relay board and relay position options, it is because you have not yet associated the relay controller with the door panel as described in step 1.
Need help?
Do you have a question about the AlphaTouch and is the answer not in the manual?
Questions and answers